Page 182 of 317

180
C4-cactus_en_Chap07_info-pratiques_ed01-2016
Recommendations on storage
Never store bottles of AdBlue® in your
vehicle.
Procedure
F Switch off the ignition and remove the key.
F
F
or access to the AdBlue
® tank, raise the b
oot
carpet
then,
depending on equipment,
l
ift
out
the
spare
wheel
and/or the
s
torage box. F
W
ithout pressing, turn the black cap a
q
uarter turn anti-clockwise and lift it off.
AdBlue
® freezes at about -11°C and d
eteriorates above 25°C. It is recommended
t
hat bottles be stored in a cool area and
protected
from direct sunlight.
Under these conditions, the additive can be
kept
for
at least a year.
If the additive has frozen, it can be used once it
has
completely thawed out. Before
topping-up, ensure that the vehicle is p
arked on a flat and level sur face.
In wintry conditions, ensure that the
temperature
of the vehicle is above -11°C.
O
therwise the AdBlue
® may be frozen and s
o
cannot
be
poured
into its tank. Park your
v
ehicle
in
a
warmer
area for a few hours to
a
llow
the
top-up
to
be
carried out.
F
T
urn the blue cap a 6
th of a turn anti-
clockwise.
F
L
ift
off
the
cap.
Practical information
Page 183 of 317

181
C4-cactus_en_Chap07_info-pratiques_ed01-2016
F Obtain a bottle of AdBlue®. After first c
hecking
the
use-by
date,
read carefully
t
he instructions on use on the label before
pouring
the
contents
of
the bottle into your
v
ehicle's
Ad
Blue
® tank.
I
mportant :
if
your vehicle's AdBlue
®
tank
is
completely
empty
-
which
is
c
onfirmed
by
the
alert
messages
and
t
he
impossibility
of
starting
the
engine,
y
ou
must
add
at
least
3.8
litres
(so
t
wo 1.89
litre
bottles). If any additive is split or splashed, wash
immediately
w
ith
c
old
w
ater
o
r
w
ipe
w
ith
a
damp cloth.
If the additive has crystallised, clean it
off using a sponge and hot water.Important:
i
n the event of a top-up
after a breakdown because of a lack
of additive , signalled by the message
"
Top up emissions additive: Starting
p
revented", you must wait around
5
minutes
before
switching
on
the
ignition,
w
ithout opening the driver's door,
locking the vehicle or introducing the
key into the ignition switch .
Switch on the ignition, then, after
1
0 seconds, start the engine.
Never dispose of AdBlue
® additive
bottles
in
the
household
waste. Place
t
hem
in
a
special
container provided
t
his
p
urpose
o
r
t
ake
t
hem
t
o
y
our
d
ealer.
F
A
fter
emptying
the
bottle,
wipe
away
any
s
pillage
around
the
tank
filler
using
a
damp
c
loth.
F
R
efit
the
blue
cap
to
the
tank
and
turn
it
a
6th of a turn clockwise, to its stop.
F
R
efit the black cap and turn it a quarter of
a
turn clockwise without pressing. Ensure
t
hat the indicator on the cap lines up with
the
indicator on the support.
F
D
epending on equipment, return the spare
w
heel and/or the storage box to the bottom
o
f
the boot.
F
R
efit the boot carpet and close the tailgate.
7
Practical information
Page 201 of 317
199
C4-cactus_en_Chap08_En-cas-de-panne_ed01-2016
Main beam headlamps
F Remove the protective cover by pulling the t
ab.
F
D
isconnect the bulb connector (do not
remove
t
he
e
arth
c
onnector
lo
cated
belo
w).
F
P
ush on the spring, then move it towards
t
he middle of the vehicle to release
t
he bulb.
F
R
emove the bulb and change it.
Direction indicators
Amber coloured bulbs, such as the direction indicators, must be replaced
w
ith bulbs of identical specifications
and
colour.
Rapid
flashing
of
the
direction
indicator
w
arning
lamp
(right
or
left)
indicates
the
f
ailure
of
a
bulb
on
that
side.
F
T
urn
the
bulb
holder
an
eighth
of
a
turn
a
nti-clockwise
and
extract
it.
F
R
emove
the
bulb
and
change
it.
To
reassemble,
carry
out
these
operations
in
r
everse
o
rder. To
reassemble,
carry
out
these
operations
in
r
everse
o
rder.
8
In the event of a breakdown
Page 316 of 317

10
In the event of a breakdown
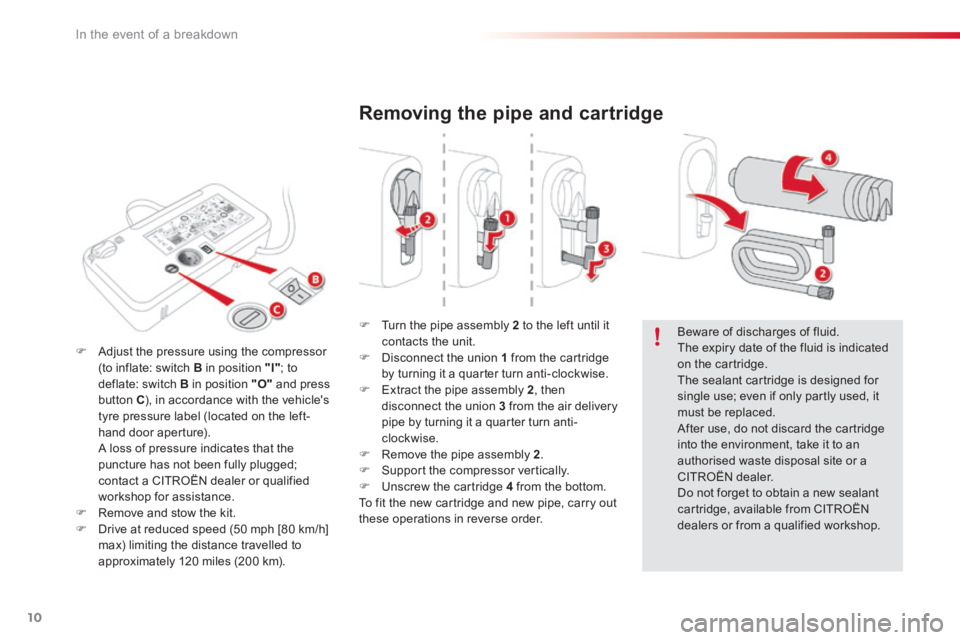
Removing the pipe and cartridge
Turn the pipe assembly 2 to the left until it contacts the unit. Disconnect the union 1 from the cartridge by turning it a quarter turn anti-clockwise. Extract the pipe assembly 2 , then disconnect the union 3 from the air delivery pipe by turning it a quarter turn anti-clockwise. Remove the pipe assembly 2 . Support the compressor vertically. Unscrew the cartridge 4 from the bottom. To fit the new cartridge and new pipe, carry out these operations in reverse order.
Beware of discharges of fluid. The expiry date of the fluid is indicated on the cartridge. The sealant cartridge is designed for single use; even if only partly used, it must be replaced. After use, do not discard the cartridge into the environment, take it to an authorised waste disposal site or a CITROËN dealer. Do not forget to obtain a new sealant cartridge, available from CITROËN dealers or from a qualified workshop.
Adjust the pressure using the compressor (to inflate: switch B in position "I" ; to deflate: switch B in position "O" and press button C ), in accordance with the vehicle's tyre pressure label (located on the left-hand door aperture). A loss of pressure indicates that the puncture has not been fully plugged; contact a CITROËN dealer or qualified workshop for assistance. Remove and stow the kit. Drive at reduced speed (50 mph [80 km/h]
max) limiting the distance travelled to approximately 120 miles (200 km).