2018 CITROEN C4 lock
[x] Cancel search: lockPage 182 of 317

180
C4-cactus_en_Chap07_info-pratiques_ed01-2016
Recommendations on storage
Never store bottles of AdBlue® in your
vehicle.
Procedure
F Switch off the ignition and remove the key.
F
F
or access to the AdBlue
® tank, raise the b
oot
carpet
then,
depending on equipment,
l
ift
out
the
spare
wheel
and/or the
s
torage box. F
W
ithout pressing, turn the black cap a
q
uarter turn anti-clockwise and lift it off.
AdBlue
® freezes at about -11°C and d
eteriorates above 25°C. It is recommended
t
hat bottles be stored in a cool area and
protected
from direct sunlight.
Under these conditions, the additive can be
kept
for
at least a year.
If the additive has frozen, it can be used once it
has
completely thawed out. Before
topping-up, ensure that the vehicle is p
arked on a flat and level sur face.
In wintry conditions, ensure that the
temperature
of the vehicle is above -11°C.
O
therwise the AdBlue
® may be frozen and s
o
cannot
be
poured
into its tank. Park your
v
ehicle
in
a
warmer
area for a few hours to
a
llow
the
top-up
to
be
carried out.
F
T
urn the blue cap a 6
th of a turn anti-
clockwise.
F
L
ift
off
the
cap.
Practical information
Page 183 of 317

181
C4-cactus_en_Chap07_info-pratiques_ed01-2016
F Obtain a bottle of AdBlue®. After first c
hecking
the
use-by
date,
read carefully
t
he instructions on use on the label before
pouring
the
contents
of
the bottle into your
v
ehicle's
Ad
Blue
® tank.
I
mportant :
if
your vehicle's AdBlue
®
tank
is
completely
empty
-
which
is
c
onfirmed
by
the
alert
messages
and
t
he
impossibility
of
starting
the
engine,
y
ou
must
add
at
least
3.8
litres
(so
t
wo 1.89
litre
bottles). If any additive is split or splashed, wash
immediately
w
ith
c
old
w
ater
o
r
w
ipe
w
ith
a
damp cloth.
If the additive has crystallised, clean it
off using a sponge and hot water.Important:
i
n the event of a top-up
after a breakdown because of a lack
of additive , signalled by the message
"
Top up emissions additive: Starting
p
revented", you must wait around
5
minutes
before
switching
on
the
ignition,
w
ithout opening the driver's door,
locking the vehicle or introducing the
key into the ignition switch .
Switch on the ignition, then, after
1
0 seconds, start the engine.
Never dispose of AdBlue
® additive
bottles
in
the
household
waste. Place
t
hem
in
a
special
container provided
t
his
p
urpose
o
r
t
ake
t
hem
t
o
y
our
d
ealer.
F
A
fter
emptying
the
bottle,
wipe
away
any
s
pillage
around
the
tank
filler
using
a
damp
c
loth.
F
R
efit
the
blue
cap
to
the
tank
and
turn
it
a
6th of a turn clockwise, to its stop.
F
R
efit the black cap and turn it a quarter of
a
turn clockwise without pressing. Ensure
t
hat the indicator on the cap lines up with
the
indicator on the support.
F
D
epending on equipment, return the spare
w
heel and/or the storage box to the bottom
o
f
the boot.
F
R
efit the boot carpet and close the tailgate.
7
Practical information
Page 195 of 317

193
C4-cactus_en_Chap08_En-cas-de-panne_ed01-2016
Removing a wheel
Parking the vehicle
Immobilise the vehicle where it does not block traffic: the ground must be level,
s
table and not slippery.
Apply
the parking brake, switch off the
i
gnition and engage first gear to block
t
he wheels.
Check
that the parking brake warning
l
amps in the instrument panel come on.
The
occupants must get out of the
v
ehicle and wait where they are safe.
Ensure
that the jack is correctly
p
ositioned at one of the vehicle's
j
acking points.
Incorrect
use of the jack could cause
t
he vehicle to drop.
Never
go underneath a vehicle raised
u
sing a jack; use an axle stand.
List of operations
F Remove the wheel bolt cover(s) using the t
ool 3 (depending on version).
F
S
lacken the bolts using the
w
heelbrace
1 o n l y.
Do
not use:
-
t
he jack for any other purpose than
l
ifting the vehicle,
-
a
jack other than the one supplied
b
y the manufacturer. The
jack must only be used to change a
w
heel with a damaged tyre.
The jack does not require any m
aintenance.
The
jack conforms to European
l
egislation, such as defined in the
M
achinery Directive 2006/42/CE.
8
In the event of a breakdown
Page 201 of 317

199
C4-cactus_en_Chap08_En-cas-de-panne_ed01-2016
Main beam headlamps
F Remove the protective cover by pulling the t
ab.
F
D
isconnect the bulb connector (do not
remove
t
he
e
arth
c
onnector
lo
cated
belo
w).
F
P
ush on the spring, then move it towards
t
he middle of the vehicle to release
t
he bulb.
F
R
emove the bulb and change it.
Direction indicators
Amber coloured bulbs, such as the direction indicators, must be replaced
w
ith bulbs of identical specifications
and
colour.
Rapid
flashing
of
the
direction
indicator
w
arning
lamp
(right
or
left)
indicates
the
f
ailure
of
a
bulb
on
that
side.
F
T
urn
the
bulb
holder
an
eighth
of
a
turn
a
nti-clockwise
and
extract
it.
F
R
emove
the
bulb
and
change
it.
To
reassemble,
carry
out
these
operations
in
r
everse
o
rder. To
reassemble,
carry
out
these
operations
in
r
everse
o
rder.
8
In the event of a breakdown
Page 204 of 317

202
C4-cactus_en_Chap08_En-cas-de-panne_ed01-2016
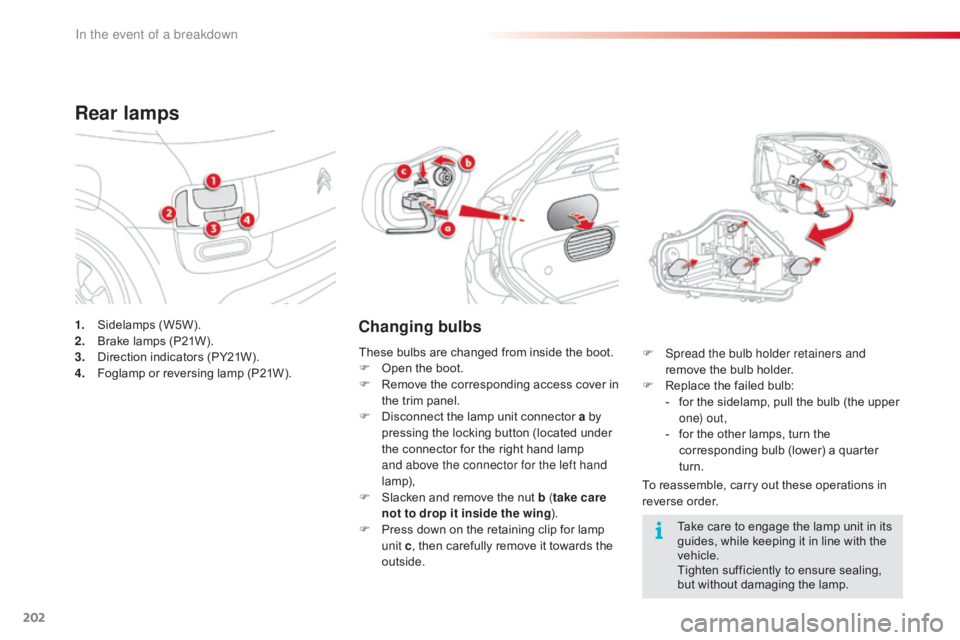
1. Sidelamps (W5W).
2. B rake lamps (P21W).
3.
D
irection indicators (PY21W).
4.
F
oglamp or reversing lamp (P21W).
Rear lamps
Changing bulbs
To reassemble, carry out these operations in reverse o rder.
F
S
pread the bulb holder retainers and
remove the bulb holder.
F
R
eplace the failed bulb:
-
f
or the sidelamp, pull the bulb (the upper
o
n e) o u t ,
-
f
or the other lamps, turn the
c
orresponding bulb (lower) a quarter
t
urn.
These
bulbs
are
changed
from
inside
the
boot.
F
O
pen
the
boot.
F
R
emove
the
corresponding
access
cover
in
t
he
trim
panel.
F
D
isconnect
the
lamp
unit
connector
a by
pressing
the
locking
button
(located
under
t
he
connector
for
the
right
hand
lamp
a
nd above the connector for the left hand
lamp),
F
S
lacken
and
remove
the
nut
b ( take care
not to drop it inside the wing ).
F
P
ress
down
on
the
retaining
clip
for
lamp
u
nit c,
then
carefully
remove
it
towards
the
o
utside. Take
care to engage the lamp unit in its
g
uides, while keeping it in line with the
v
ehicle.
Tighten
sufficiently to ensure sealing,
b
ut without damaging the lamp.
In the event of a breakdown
Page 210 of 317

208
C4-cactus_en_Chap08_En-cas-de-panne_ed01-2016
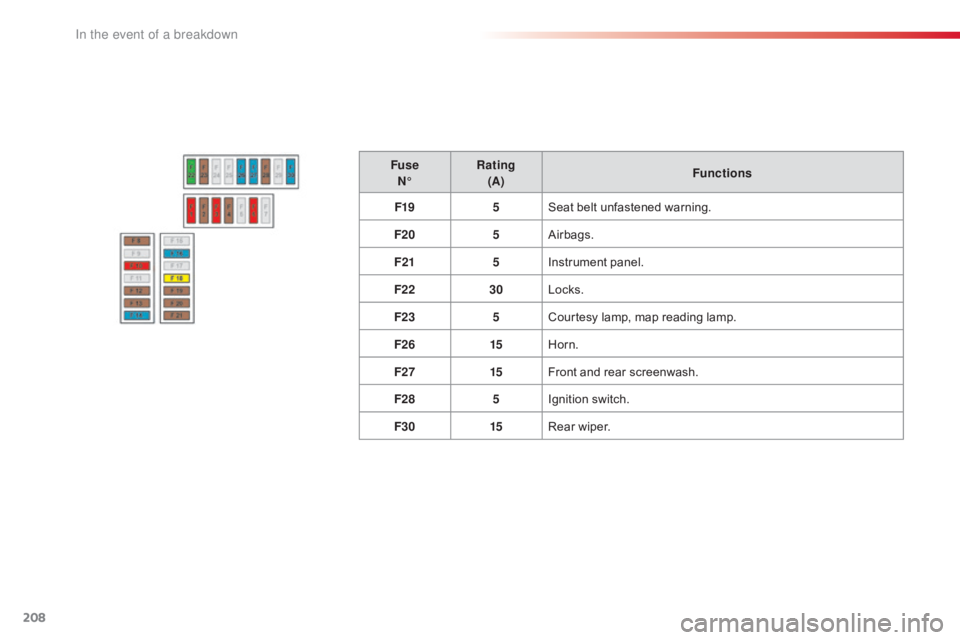
FuseN° Rating
(A) Functions
F19 5Seat
belt unfastened warning.
F20 5Airbags.
F21 5Instrument
panel.
F22 30Locks.
F23 5Courtesy
lamp, map reading lamp.
F26 15Horn.
F27 15Front
and rear screenwash.
F28 5Ignition
s
witch.
F30 15Rear
wiper.
In the event of a breakdown
Page 217 of 317

215
C4-cactus_en_Chap08_En-cas-de-panne_ed01-2016
Do not force the lever as locking will not be possible if the clamp is not
p
ositioned correctly; start the procedure
ag
ain.
Quick release terminal
Disconnecting the (+) terminal
F Raise the lever A fully to release the clamp B.
The
Stop & Start system may not be
o
perational during the trip following the
f
irst engine start.
In
this case, the system will only be
a
vailable again after a continuous
p
eriod of immobilisation of the vehicle,
a
period which depends on the ambient
t
emperature and the state of charge of
t
he battery (up to about 8 hours).
It
is
recommended
that
the
battery
be
d
isconnected if the vehicle is not to be used
for
a
very
long
period,
so
as
to
maintain
an
a
dequate
state
of
charge
for
starting
the
e
ngine.
Before
disconnecting
the
battery:
F
c
lose
all
openings
(doors,
boot,
windows,
r
oof),
F
s
witch
off
all
electrical
consumers
(audio
s
ystem,
wipers,
lighting...),
F
s
witch
off
the
ignition
and
then
wait
f
our minutes.
At
the
battery,
simply
detach
the
(+)
terminal.
Disconnecting the battery
Following reconnection of the battery, switch on t
he ignition and wait 1 minute before starting to
p
ermit initialisation of the electronic systems.
H
owever, if problems remain following this
o
peration, contact a CITROËN dealer or a
qualified
w
orkshop.
Referring
to the corresponding section, you
m
ust
y
ourself
r
einitialise
(
depending
o
n
ve
rsion):
-
t
he remote control key,
-
...
Following reconnection of the battery
Reconnecting the (+) terminal
F Position the open clamp B of the cable on
the positive post (+) of the battery.
F
P
ress down on the clamp to position it
c
orrectly on the battery post.
F
L
ock the clamp by lowering the lever A.
8
In the event of a breakdown
Page 218 of 317

216
C4-cactus_en_Chap08_En-cas-de-panne_ed01-2016
To w i n g
General recommendations
Observe the legislation in force in your country.
E nsure that the weight of the towing vehicle is higher than that of the towed vehicle.
The
driver must remain at the wheel of the towed vehicle and must have a valid driving licence.
When
towing a vehicle with all four wheels on the ground, always use an approved towing arm;
r
ope and straps are prohibited.
The
towing vehicle must move off gently.
When
towing a vehicle with the engine off, there is no longer any power assistance for braking
o
r steering.
In
the following cases, you must always call on a professional recovery service:
-
v
ehicle broken down on a motor way or fast road,
-
f
our-wheel drive vehicle,
-
w
hen it is not possible to put the gearbox into neutral, unlock the steering, or release the
par
king
b
rake,
-
t
owing with only two wheels on the ground,
-
w
here there is no approved towing arm available...
Procedure
for
having
your
vehicle
towed
or
for
towing
another vehicle using a removable towing eye.
The towing eye is stowed under the boot floor,
or
may
be
located
under
the
front
passenger
sea
t, d
epending o
n v
ersion.
In the event of a breakdown