Page 49 of 696

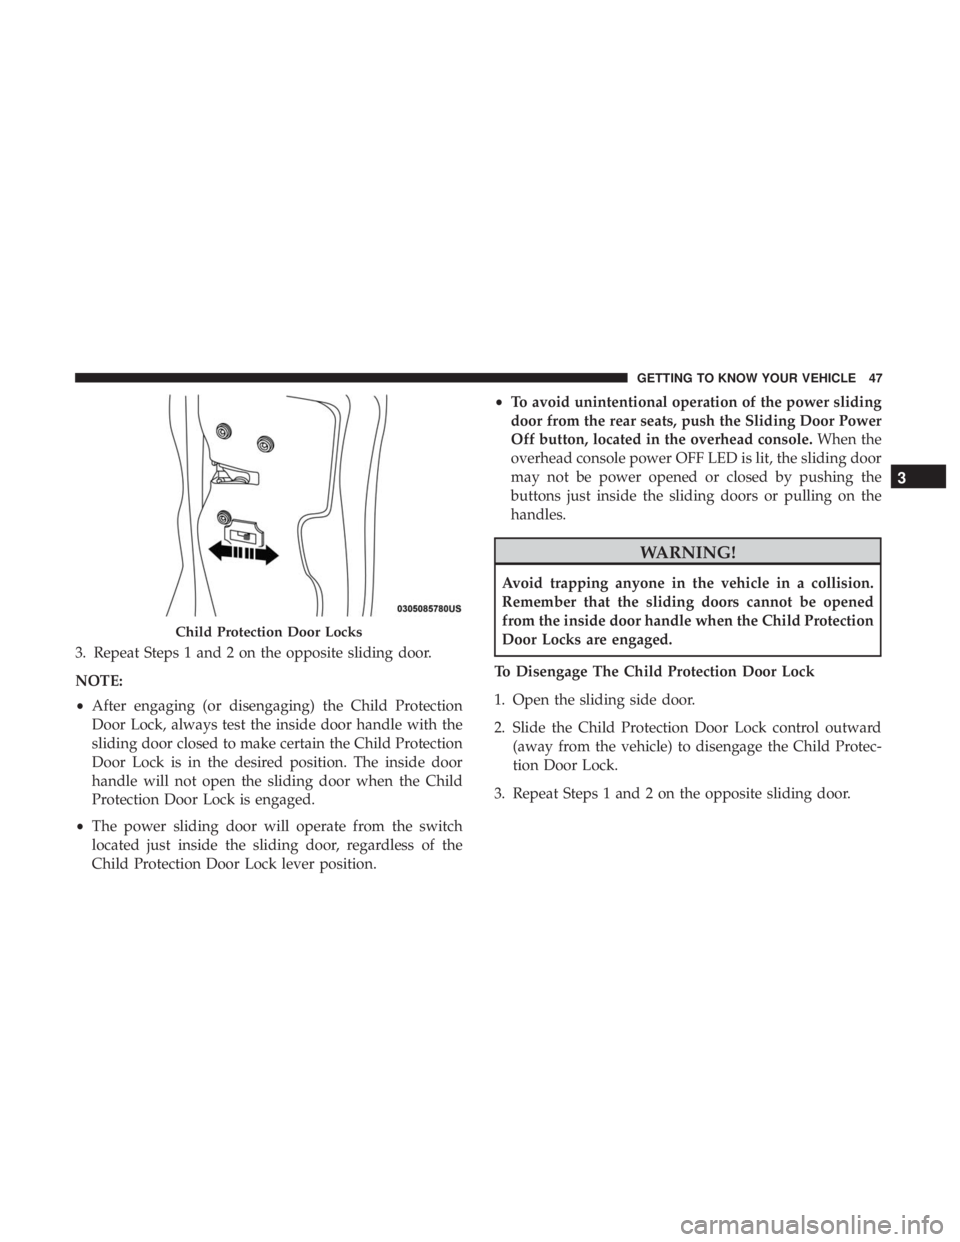
3. Repeat Steps 1 and 2 on the opposite sliding door.
NOTE:
•After engaging (or disengaging) the Child Protection
Door Lock, always test the inside door handle with the
sliding door closed to make certain the Child Protection
Door Lock is in the desired position. The inside door
handle will not open the sliding door when the Child
Protection Door Lock is engaged.
• The power sliding door will operate from the switch
located just inside the sliding door, regardless of the
Child Protection Door Lock lever position. •
To avoid unintentional operation of the power sliding
door from the rear seats, push the Sliding Door Power
Off button, located in the overhead console. When the
overhead console power OFF LED is lit, the sliding door
may not be power opened or closed by pushing the
buttons just inside the sliding doors or pulling on the
handles.
WARNING!
Avoid trapping anyone in the vehicle in a collision.
Remember that the sliding doors cannot be opened
from the inside door handle when the Child Protection
Door Locks are engaged.
To Disengage The Child Protection Door Lock
1. Open the sliding side door.
2. Slide the Child Protection Door Lock control outward (away from the vehicle) to disengage the Child Protec-
tion Door Lock.
3. Repeat Steps 1 and 2 on the opposite sliding door.
Child Protection Door Locks
3
GETTING TO KNOW YOUR VEHICLE 47
Page 57 of 696

NOTE:
•The outer head restraints will lower automatically as
necessary when the power seat begins to move.
• The center head restraint raises and lowers manually but
will not lower automatically.
• The head restraint can also be lowered manually using
the pull strap located at the back of the seat. Refer to
�Head Restraints - Third Row� in�Head Restraints� for
further information.
The switch is only functional when the liftgate is open and
the vehicle is in PARK.
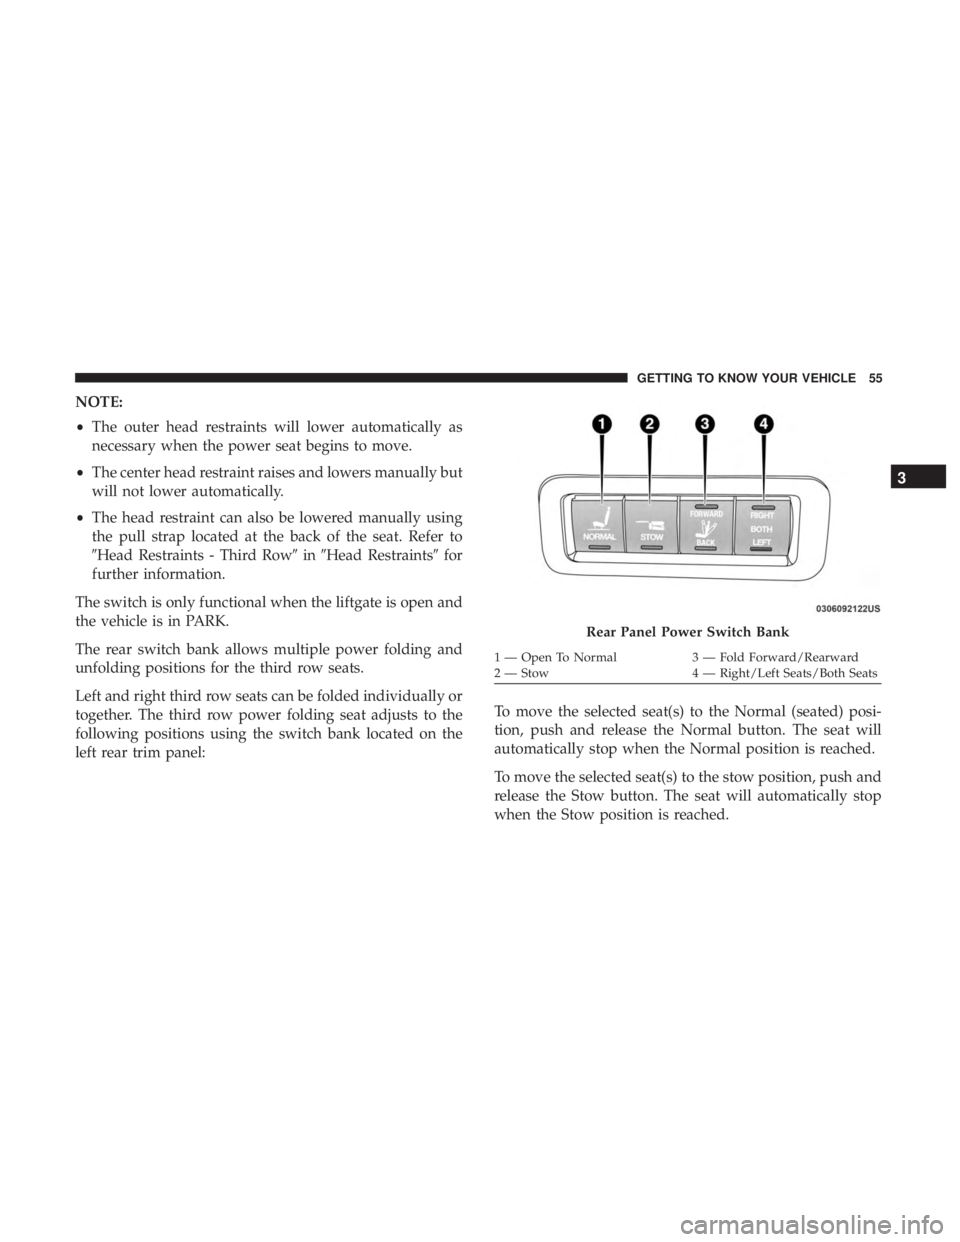
The rear switch bank allows multiple power folding and
unfolding positions for the third row seats.
Left and right third row seats can be folded individually or
together. The third row power folding seat adjusts to the
following positions using the switch bank located on the
left rear trim panel: To move the selected seat(s) to the Normal (seated) posi-
tion, push and release the Normal button. The seat will
automatically stop when the Normal position is reached.
To move the selected seat(s) to the stow position, push and
release the Stow button. The seat will automatically stop
when the Stow position is reached.
Rear Panel Power Switch Bank
1 — Open To Normal
3 — Fold Forward/Rearward
2 — Stow 4 — Right/Left Seats/Both Seats
3
GETTING TO KNOW YOUR VEHICLE 55
Page 72 of 696
4. Pull the strap located on the seat and pull the seat out ofthe storage bin. Push the seat rearward making sure that
it locks into the floor. Fold the seatback into the upright
position and pull the headrest up.
NOTE: The seatback may be locked, if it is, it will be
necessary to use the recliner handle to unlock the back
before folding into the upright position. 5. To position the floor panel back into its original state,
grab the bottom corner and extend it outward.
Pull Strap
Extend Panel
70 GETTING TO KNOW YOUR VEHICLE
Page 73 of 696
6. Lay the floor panel flat and push down until it clicksinto position. Replace the floor mat as needed.
7. Readjust the front seat as needed.WARNING!
• In a collision, you or others in your vehicle could be
injured if seats are not properly latched to their floor
attachments. Always be sure the seats are fully
latched.
• Sitting in a seat with the head restraint in its lowered
position could result in serious injury or death in a
collision. Always make sure the head restraints are in
their upright positions when the seat is to be occu-
pied.
Push Down To Lock
3
GETTING TO KNOW YOUR VEHICLE 71
Page 77 of 696
NOTE:
•The seatback may lock into the fold flat position. Use the
recline lever to unlock the seatback.
• When returning the seat to the original position, the
headrest must be folded back to the original position.Second Row Removable 8th Seat — If Equipped
While the 8th seat does not stow in the floor, it is foldable
and removable for added cargo space.
The release strap is located on the front of the seat, near the
floor. To remove the seat, pull the release strap to release
the rear latches. The seat assembly can now be removed
from the vehicle by moving it in a rearward direction from
the detent positions in the floor.
Fold Headrest To Upward Position
Second Row 8th Seat Fold Flat Strap
3
GETTING TO KNOW YOUR VEHICLE 75
Page 81 of 696
Reinstalling The Bench Seat
1. To reinstall the bench seat, align the seats front attach-ments into the detent positions on the floor.
2. Tilt seat rearward to lock the seat back into its original position.
NOTE: Push downward to ensure the rear latches are in
the locked position.
3. Lift the recline handle and return the seat back to the seating position.
WARNING!
If not properly latched, the seat could become loose.
Personal injuries could result.
Manually Folding Third Row Seats — If Equipped
1. Lower the center head restraint down to the seatback bypushing the button on the guide and pushing the head
restraint down.
2. Pull release strap marked “1” to release the anchors.
Release Strap “1”
3
GETTING TO KNOW YOUR VEHICLE 79
Page 83 of 696
To Unfold Third Row Seats
1. Pull up on the assist strap to lift the seat out of thestorage bin and push the seat forward until the anchors
latch.
2. Pulling strap “2” releases the seatback to return to its full upright position. 3. Raise the head restraint to its upright position.
WARNING!
•In a collision, you or others in your vehicle could be
injured if seats are not properly latched to their floor
attachments. Always be sure the seats are fully latched.
•Sitting in a seat with the head restraint in its lowered
position could result in serious injury or death in a
collision. Always make sure the head restraints are in
their upright positions when the seat is to be occupied.
Assist Straps
Strap “2”
3
GETTING TO KNOW YOUR VEHICLE 81
Page 84 of 696

Plastic Grocery Bag Retainer Hooks
Retainer hooks which will hold plastic grocery bag handles
are built into the seatbacks of the first and third row rear
seats. The floor supports the partial weight of the bagged
goods.
HEAD RESTRAINTS
Head restraints are designed to reduce the risk of injury by
restricting head movement in the event of a rear impact.
Head restraints should be adjusted so that the top of the
head restraint is located above the top of your ear.
WARNING!
•All occupants, including the driver, should not oper-
ate a vehicle or sit in a vehicle’s seat until the head
restraints are placed in their proper positions in
order to minimize the risk of neck injury in the event
of a crash.
• Head restraints should never be adjusted while the
vehicle is in motion. Driving a vehicle with the head
restraints improperly adjusted or removed could
cause serious injury or death in the event of a
collision.
Head Restraints — Front Seats
The front driver and passenger seats are equipped with
four-way head restraints.
To raise the head restraint, pull upward on the head
restraint. To lower the head restraint, push the adjustment
button, located at the base of the head restraint, and push
downward. The front head restraints are also adjustable
forward and rearward. To adjust forward, pull the head
restraint toward the front of the vehicle to desired position.
To adjust the head restraint rearward, pull forward on the
head restraint to furthest forward position and head re-
straint will reset to furthest rearward position.
NOTE: To remove the head restraint, raise it as far as it can
go. Then, push the release button and the adjustment
button at the base of each post while pulling the head
restraint up. Seatback angle may need to be adjusted to
fully remove the head restraint. To reinstall the head
restraint, put the head restraint posts into the holes and
push downward. Then, adjust the head restraint to the
appropriate height.
82 GETTING TO KNOW YOUR VEHICLE