2018 CHRYSLER PACIFICA HYBRID ESP
[x] Cancel search: ESPPage 397 of 614
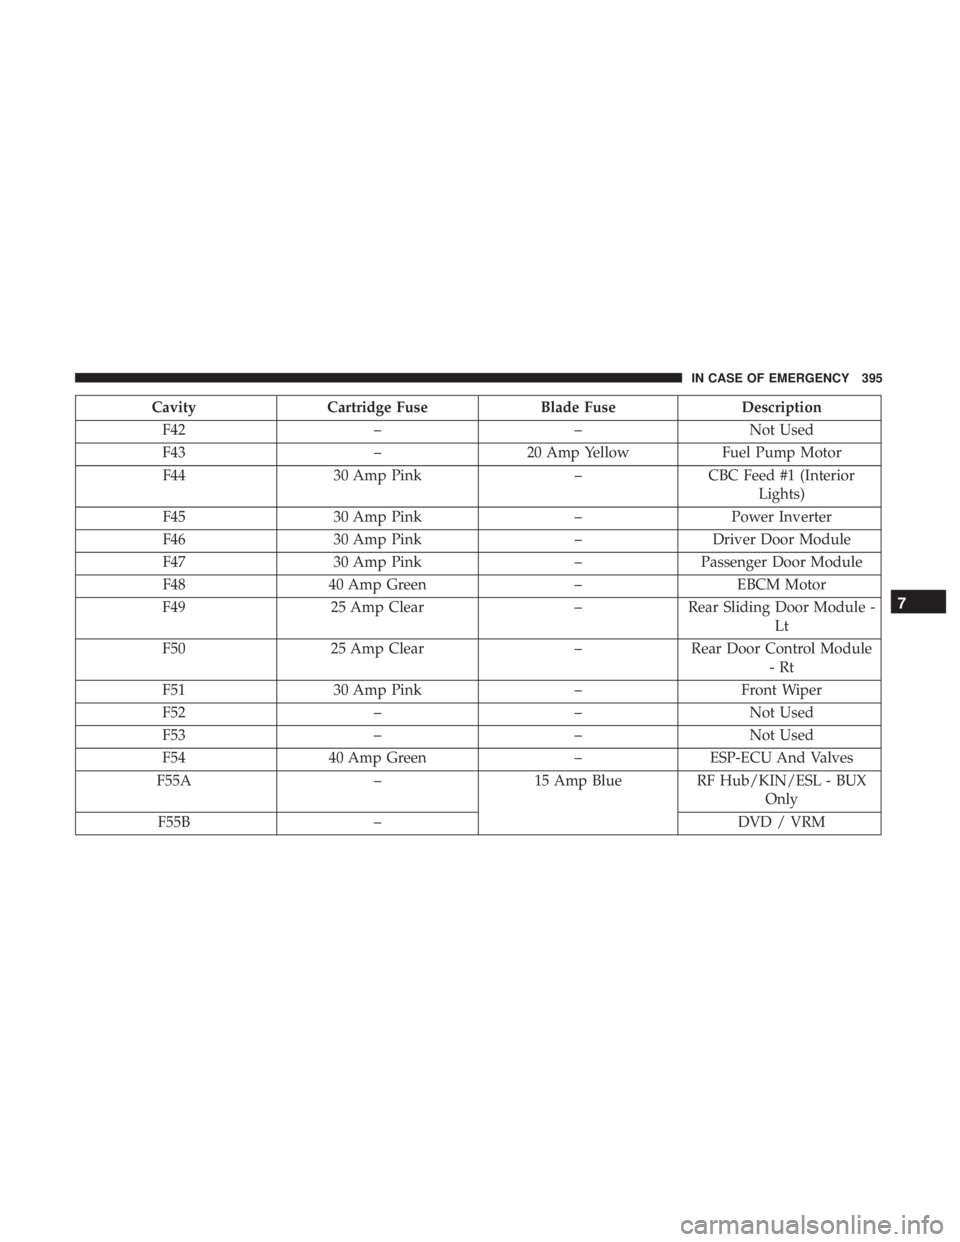
CavityCartridge Fuse Blade FuseDescription
F42 ––Not Used
F43 –20 Amp Yellow Fuel Pump Motor
F44 30 Amp Pink –CBC Feed #1 (Interior
Lights)
F45 30 Amp Pink –Power Inverter
F46 30 Amp Pink –Driver Door Module
F47 30 Amp Pink –Passenger Door Module
F48 40 Amp Green –EBCM Motor
F49 25 Amp Clear –Rear Sliding Door Module -
Lt
F50 25 Amp Clear –Rear Door Control Module
-Rt
F51 30 Amp Pink –Front Wiper
F52 ––Not Used
F53 ––Not Used
F54 40 Amp Green –ESP-ECU And Valves
F55A –15 Amp Blue RF Hub/KIN/ESL - BUX
Only
F55B – DVD / VRM
7
IN CASE OF EMERGENCY 395
Page 413 of 614
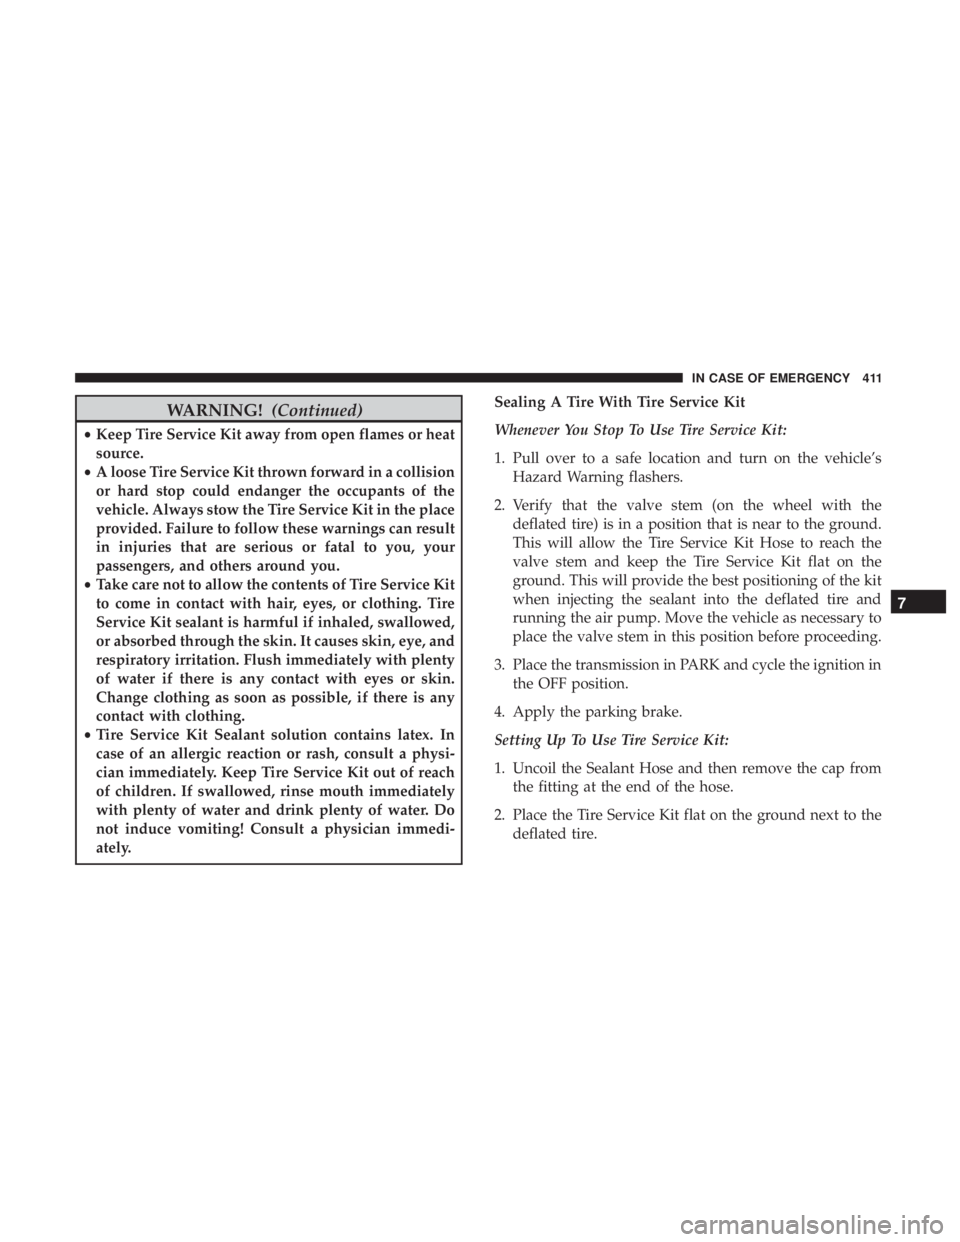
WARNING!(Continued)
•Keep Tire Service Kit away from open flames or heat
source.
• A loose Tire Service Kit thrown forward in a collision
or hard stop could endanger the occupants of the
vehicle. Always stow the Tire Service Kit in the place
provided. Failure to follow these warnings can result
in injuries that are serious or fatal to you, your
passengers, and others around you.
• Take care not to allow the contents of Tire Service Kit
to come in contact with hair, eyes, or clothing. Tire
Service Kit sealant is harmful if inhaled, swallowed,
or absorbed through the skin. It causes skin, eye, and
respiratory irritation. Flush immediately with plenty
of water if there is any contact with eyes or skin.
Change clothing as soon as possible, if there is any
contact with clothing.
• Tire Service Kit Sealant solution contains latex. In
case of an allergic reaction or rash, consult a physi-
cian immediately. Keep Tire Service Kit out of reach
of children. If swallowed, rinse mouth immediately
with plenty of water and drink plenty of water. Do
not induce vomiting! Consult a physician immedi-
ately. Sealing A Tire With Tire Service Kit
Whenever You Stop To Use Tire Service Kit:
1. Pull over to a safe location and turn on the vehicle’s
Hazard Warning flashers.
2. Verify that the valve stem (on the wheel with the deflated tire) is in a position that is near to the ground.
This will allow the Tire Service Kit Hose to reach the
valve stem and keep the Tire Service Kit flat on the
ground. This will provide the best positioning of the kit
when injecting the sealant into the deflated tire and
running the air pump. Move the vehicle as necessary to
place the valve stem in this position before proceeding.
3. Place the transmission in PARK and cycle the ignition in the OFF position.
4. Apply the parking brake.
Setting Up To Use Tire Service Kit:
1. Uncoil the Sealant Hose and then remove the cap from the fitting at the end of the hose.
2. Place the Tire Service Kit flat on the ground next to the deflated tire.
7
IN CASE OF EMERGENCY 411
Page 430 of 614
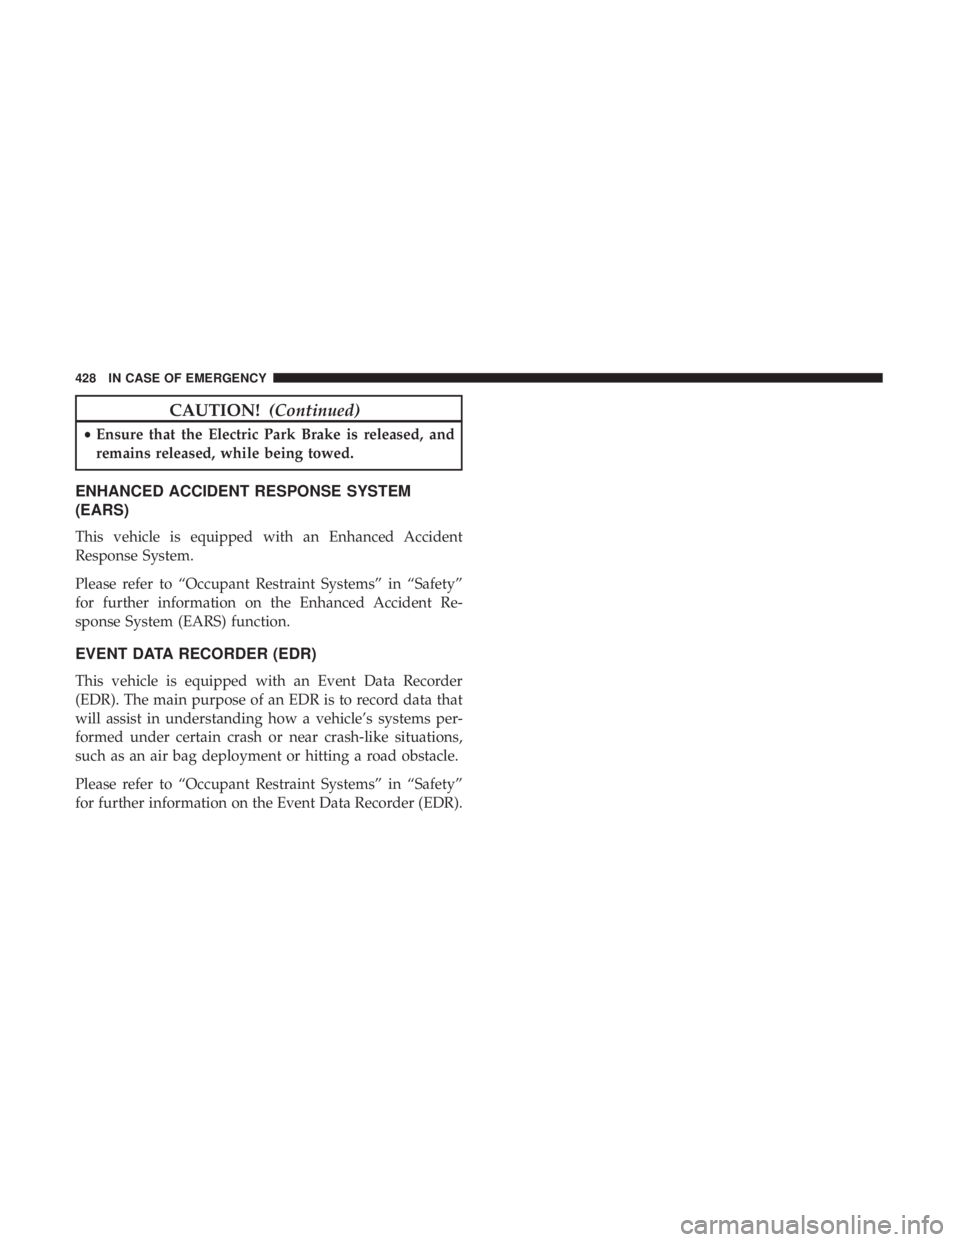
CAUTION!(Continued)
•Ensure that the Electric Park Brake is released, and
remains released, while being towed.
ENHANCED ACCIDENT RESPONSE SYSTEM
(EARS)
This vehicle is equipped with an Enhanced Accident
Response System.
Please refer to “Occupant Restraint Systems” in “Safety”
for further information on the Enhanced Accident Re-
sponse System (EARS) function.
EVENT DATA RECORDER (EDR)
This vehicle is equipped with an Event Data Recorder
(EDR). The main purpose of an EDR is to record data that
will assist in understanding how a vehicle’s systems per-
formed under certain crash or near crash-like situations,
such as an air bag deployment or hitting a road obstacle.
Please refer to “Occupant Restraint Systems” in “Safety”
for further information on the Event Data Recorder (EDR).
428 IN CASE OF EMERGENCY
Page 458 of 614
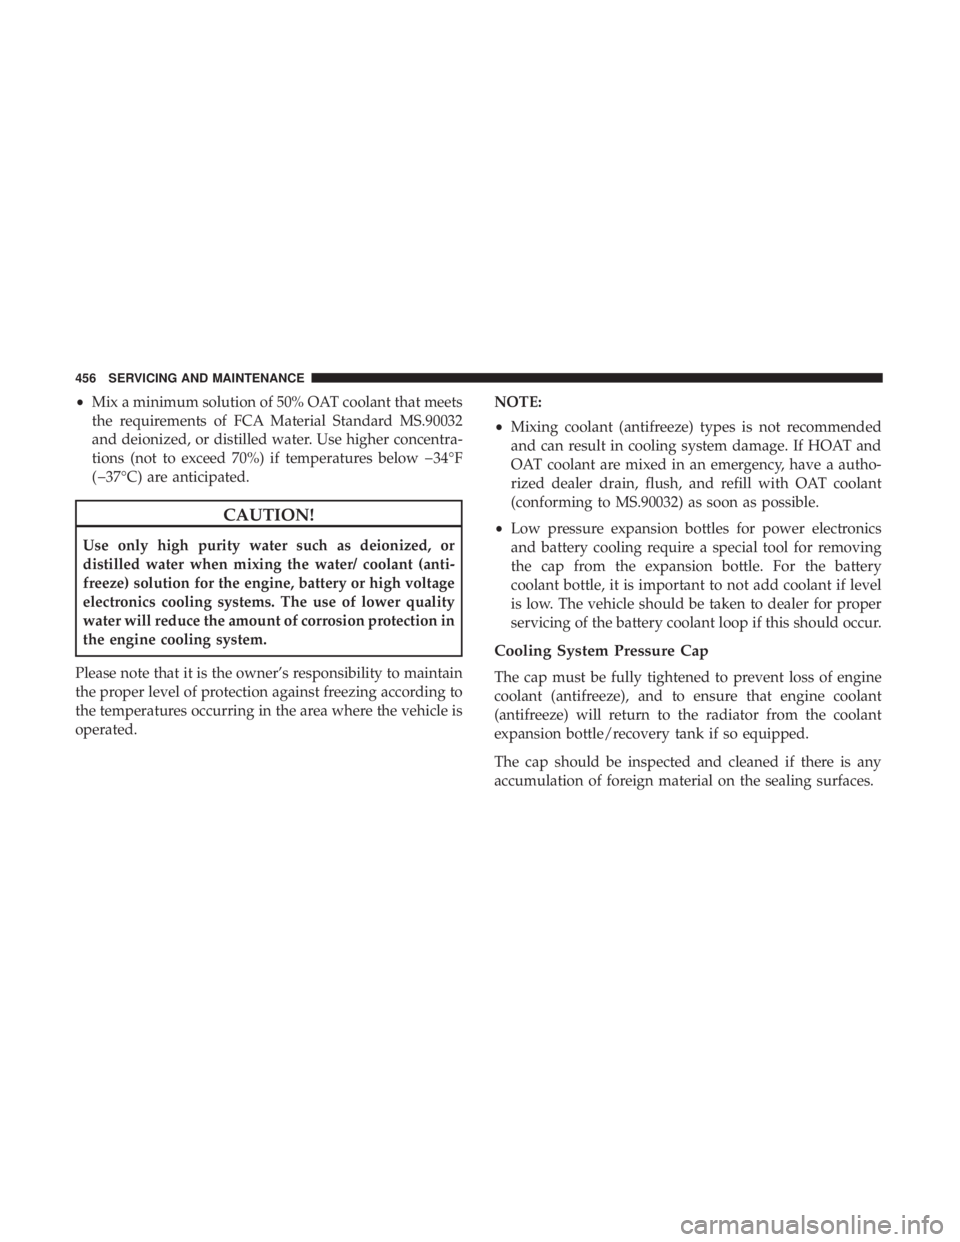
•Mix a minimum solution of 50% OAT coolant that meets
the requirements of FCA Material Standard MS.90032
and deionized, or distilled water. Use higher concentra-
tions (not to exceed 70%) if temperatures below �34°F
(�37°C) are anticipated.
CAUTION!
Use only high purity water such as deionized, or
distilled water when mixing the water/ coolant (anti-
freeze) solution for the engine, battery or high voltage
electronics cooling systems. The use of lower quality
water will reduce the amount of corrosion protection in
the engine cooling system.
Please note that it is the owner’s responsibility to maintain
the proper level of protection against freezing according to
the temperatures occurring in the area where the vehicle is
operated. NOTE:
•
Mixing coolant (antifreeze) types is not recommended
and can result in cooling system damage. If HOAT and
OAT coolant are mixed in an emergency, have a autho-
rized dealer drain, flush, and refill with OAT coolant
(conforming to MS.90032) as soon as possible.
• Low pressure expansion bottles for power electronics
and battery cooling require a special tool for removing
the cap from the expansion bottle. For the battery
coolant bottle, it is important to not add coolant if level
is low. The vehicle should be taken to dealer for proper
servicing of the battery coolant loop if this should occur.
Cooling System Pressure Cap
The cap must be fully tightened to prevent loss of engine
coolant (antifreeze), and to ensure that engine coolant
(antifreeze) will return to the radiator from the coolant
expansion bottle/recovery tank if so equipped.
The cap should be inspected and cleaned if there is any
accumulation of foreign material on the sealing surfaces.
456 SERVICING AND MAINTENANCE
Page 466 of 614
EXAMPLE:
Service Description:
95 = Load Index
–A numerical code associated with the maximum load a tire can carry
H = Speed Symbol
–A symbol indicating the range of speeds at which a tire can carry a load corresponding to its load index under cer-
tain operating conditions
–The maximum speed corresponding to the speed symbol should only be achieved under specified operating condi-
tions (i.e., tire pressure, vehicle loading, road conditions, and posted speed limits)
Load Identification:
Absence of the following load identification symbols on the sidewall of the tire indicates a Standard Load (SL) tire:
• XL = Extra load (or reinforced) tire, or
• LL = Light load tire or
• C, D, E, F, G = Load range associated with the maximum load a tire can carry at a specified pressure
Maximum Load – Maximum load indicates the maximum load this tire is designed to carry
Maximum Pressure – Maximum pressure indicates the maximum permissible cold tire inflation pressure for this tire
464 SERVICING AND MAINTENANCE
Page 473 of 614
Tires — General Information
Tire Pressure
Proper tire inflation pressure is essential to the safe and
satisfactory operation of your vehicle. Four primary areas
are affected by improper tire pressure:
•Safety and Vehicle Stability
• Economy
• Tread Wear
• Ride Comfort
Safety
WARNING!
• Improperly inflated tires are dangerous and can
cause collisions.
• Underinflation increases tire flexing and can result
in overheating and tire failure.
• Overinflation reduces a tire’s ability to cushion
shock. Objects on the road and chuckholes can cause
damage that result in tire failure.
(Continued)
WARNING! (Continued)
•Overinflated or underinflated tires can affect vehicle
handling and can fail suddenly, resulting in loss of
vehicle control.
• Unequal tire pressures can cause steering problems.
You could lose control of your vehicle.
• Unequal tire pressures from one side of the vehicle
to the other can cause the vehicle to drift to the right
or left.
• Always drive with each tire inflated to the recom-
mended cold tire inflation pressure.
Both under-inflation and over-inflation affect the stability
of the vehicle and can produce a feeling of sluggish
response or over responsiveness in the steering.
NOTE:
• Unequal tire pressures from side to side may cause
erratic and unpredictable steering response.
• Unequal tire pressure from side to side may cause the
vehicle to drift left or right.
8
SERVICING AND MAINTENANCE 471
Page 474 of 614
Fuel Economy
Underinflated tires will increase tire rolling resistance
resulting in higher fuel consumption.
Tread Wear
Improper cold tire inflation pressures can cause abnormal
wear patterns and reduced tread life, resulting in the need
for earlier tire replacement.
Ride Comfort And Vehicle Stability
Proper tire inflation contributes to a comfortable ride.
Over-inflation produces a jarring and uncomfortable ride.
Tire Inflation Pressures
The proper cold tire inflation pressure is listed on the
driver’s side B-Pillar or rear edge of the driver’s side door.
At least once a month:
•Check and adjust tire pressure with a good quality
pocket-type pressure gauge. Do not make a visual
judgement when determining proper inflation. Tires
may look properly inflated even when they are under-
inflated.
• Inspect tires for signs of tire wear or visible damage.
CAUTION!
After inspecting or adjusting the tire pressure, always
reinstall the valve stem cap. This will prevent moisture
and dirt from entering the valve stem, which could
damage the valve stem.
Inflation pressures specified on the placard are always
“cold tire inflation pressure”. Cold tire inflation pressure is
defined as the tire pressure after the vehicle has not been
driven for at least three hours, or driven less than 1 mile
(1.6 km) after sitting for a minimum of three hours. The
cold tire inflation pressure must not exceed the maximum
inflation pressure molded into the tire sidewall.
Check tire pressures more often if subject to a wide range
of outdoor temperatures, as tire pressures vary with tem-
perature changes.
Tire pressures change by approximately 1 psi (7 kPa) per
12°F (7°C) of air temperature change. Keep this in mind
when checking tire pressure inside a garage, especially in
the Winter.
Example: If garage temperature = 68°F (20°C) and the
outside temperature = 32°F (0°C) then the cold tire inflation
472 SERVICING AND MAINTENANCE
Page 482 of 614
WARNING!
Compact and Collapsible spares are for temporary
emergency use only. With these spares, do not drive
more than 50 mph (80 km/h). Temporary use spares
have limited tread life. When the tread is worn to the
tread wear indicators, the temporary use spare tire
needs to be replaced. Be sure to follow the warnings,
which apply to your spare. Failure to do so could result
in spare tire failure and loss of vehicle control.
Full Size Spare — If Equipped
The full size spare is for temporary emergency use only.
This tire may look like the originally equipped tire on the
front or rear axle of your vehicle, but it is not. This spare
tire may have limited tread life. When the tread is worn to
the tread wear indicators, the temporary use full size spare
tire needs to be replaced. Since it is not the same as your
original equipment tire, replace (or repair) the original
equipment tire and reinstall on the vehicle at the first
opportunity.
Limited Use Spare — If Equipped
The limited use spare tire is for temporary emergency use
only. This tire is identified by a label located on the limiteduse spare wheel. This label contains the driving limitations
for this spare. This tire may look like the original equipped
tire on the front or rear axle of your vehicle, but it is not.
Installation of this limited use spare tire affects vehicle
handling. Since it is not the same as your original equip-
ment tire, replace (or repair) the original equipment tire
and reinstall on the vehicle at the first opportunity.
WARNING!
Limited use spares are for emergency use only. Instal-
lation of this limited use spare tire affects vehicle
handling. With this tire, do not drive more than the
speed listed on the limited use spare wheel. Keep
inflated to the cold tire inflation pressures listed on
your Tire and Loading Information Placard located on
the driver ’s side B-Pillar or the rear edge of the driver ’s
side door. Replace (or repair) the original equipment
tire at the first opportunity and reinstall it on your
vehicle. Failure to do so could result in loss of vehicle
control.
Wheel And Wheel Trim Care
All wheels and wheel trim, especially aluminum and
chrome plated wheels, should be cleaned regularly using
mild (neutral Ph) soap and water to maintain their luster
480 SERVICING AND MAINTENANCE