Page 336 of 492

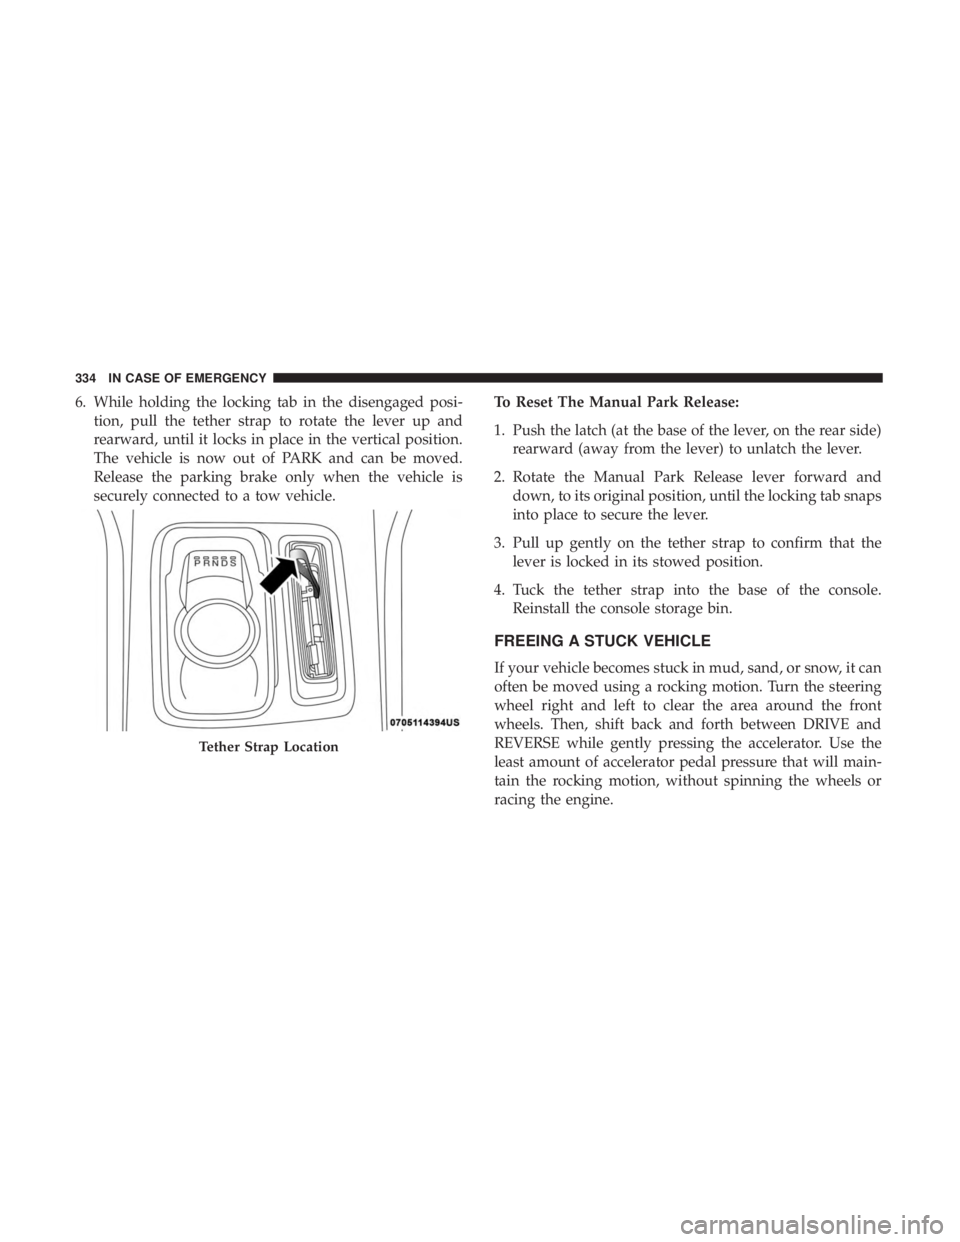
6. While holding the locking tab in the disengaged posi-tion, pull the tether strap to rotate the lever up and
rearward, until it locks in place in the vertical position.
The vehicle is now out of PARK and can be moved.
Release the parking brake only when the vehicle is
securely connected to a tow vehicle. To Reset The Manual Park Release:
1. Push the latch (at the base of the lever, on the rear side)
rearward (away from the lever) to unlatch the lever.
2. Rotate the Manual Park Release lever forward and down, to its original position, until the locking tab snaps
into place to secure the lever.
3. Pull up gently on the tether strap to confirm that the lever is locked in its stowed position.
4. Tuck the tether strap into the base of the console. Reinstall the console storage bin.
FREEING A STUCK VEHICLE
If your vehicle becomes stuck in mud, sand, or snow, it can
often be moved using a rocking motion. Turn the steering
wheel right and left to clear the area around the front
wheels. Then, shift back and forth between DRIVE and
REVERSE while gently pressing the accelerator. Use the
least amount of accelerator pedal pressure that will main-
tain the rocking motion, without spinning the wheels or
racing the engine.
Tether Strap Location
334 IN CASE OF EMERGENCY
Page 388 of 492

WARNING!
Tires and the spare tire should be replaced after six
years, regardless of the remaining tread. Failure to
follow this warning can result in sudden tire failure.
You could lose control and have a collision resulting in
serious injury or death.
Keep dismounted tires in a cool, dry place with as little
exposure to light as possible. Protect tires from contact with
oil, grease, and gasoline.
Replacement Tires
The tires on your new vehicle provide a balance of many
characteristics. They should be inspected regularly for
wear and correct cold tire inflation pressures. The manu-
facturer strongly recommends that you use tires equivalent
to the originals in size, quality and performance when
replacement is needed. Refer to the paragraph on “Tread
Wear Indicators” in this section. Refer to the Tire and
Loading Information placard or the Vehicle Certification
Label for the size designation of your tire. The Load Index
and Speed Symbol for your tire will be found on the
original equipment tire sidewall. See the Tire Sizing Chart example found in the “Tire Safety
Information” section of this manual for more information
relating to the Load Index and Speed Symbol of a tire.
It is recommended to replace the two front tires or two rear
tires as a pair. Replacing just one tire can seriously affect
your vehicle’s handling. If you ever replace a wheel, make
sure that the wheel’s specifications match those of the
original wheels.
It is recommended you contact an authorized tire dealer or
original equipment dealer with any questions you may
have on tire specifications or capability. Failure to use
equivalent replacement tires may adversely affect the
safety, handling, and ride of your vehicle.
WARNING!
•
Do not use a tire, wheel size, load rating, or speed
rating other than that specified for your vehicle.
Some combinations of unapproved tires and wheels
may change suspension dimensions and perfor-
mance characteristics, resulting in changes to steer-
ing, handling, and braking of your vehicle. This can
cause unpredictable handling and stress to steering
(Continued)
386 SERVICING AND MAINTENANCE
Page 419 of 492

MULTIMEDIA
CONTENTS
�UCONNECT SYSTEMS ...................419
� DRAG & DROP MENU BAR ................419
� CYBERSECURITY ...................... .420
� UCONNECT SETTINGS ...................421
▫ Customer Programmable Features — Uconnect
4C/4C NAV Settings ....................422
� STEERING WHEEL AUDIO CONTROLS .......445
▫ Radio Operation ....................... .446
▫ Media Mode ......................... .446
� AUX/USB/MP3 CONTROL ................447
� RADIO OPERATION AND MOBILE PHONES . . .447
▫ Regulatory And Safety Information ..........448
� UCONNECT VOICE RECOGNITION
QUICK TIPS .......................... .449
▫ Introducing Uconnect ....................449 ▫
Get Started .......................... .450
▫ Basic Voice Commands ...................451
▫ Radio .............................. .451
▫ Media .............................. .452
▫ Phone .............................. .453
▫ Voice Text Reply ...................... .453
▫ Climate ............................. .455
▫ Navigation (4C NAV) ....................456
▫ SiriusXM Guardian (4C/4C NAV)— If Equipped.457
▫ Register (4C/4C NAV) ...................457
▫ Vehicle Health Report/Alert (4C/4C NAV) .....458
▫ Mobile App (4C/4C NAV) ................458
▫ SiriusXM Travel Link (4C NAV) .............459
▫ Siri
Eyes Free — If Equipped ..............459
10
Page 430 of 492

Setting NameSelectable Options
Active ParkView Backup Camera Guidelines On
Off
NOTE:
The “Active ParkView Backup Camera Guidelines” feature overlays the Rear Backup Camera image with active, or
dynamic, grid lines to help illustrate the width of the vehicle and its project back up path, based on the steering
wheel position when the option is checked. A dashed center line overlay indicates the center of the vehicle to assist
with parking or aligning to a hitch/receiver.
Safety & Driving Assistance
After pressing the “Safety & Driving Assistance” button on
the touchscreen, the following settings will be available:
Setting Name Selectable Options
Forward Collision Warn-
ing On/Off— If Equipped On
Off
NOTE:
Changing the FCW status to “Off” prevents the system from warning you of a possible collision with the vehicle in
front of you.
The FCW system state is kept in memory from one ignition cycle to the next. If the system is turned OFF, it will re-
main off when the vehicle is restarted.
428 MULTIMEDIA
Page 432 of 492
Setting NameSelectable Options
LaneSense Warning — If Equipped Early
Medium Late
NOTE:
When the “LaneSense Warning” feature is selected, it sets the distance at which the steering wheel will provide feed-
back for potential lane departures. LaneSense Strength — If Equipped Low
Medium High
NOTE:
When the “LaneSense Strength” feature is selected, it sets the strength of the steering wheel feedback for potential
lane departures. ParkSense — If Equipped Sound Only Sound & Display
NOTE:
The ParkSense system will scan for objects behind the vehicle when the gear selector is in REVERSE and the vehicle
speed is less than 11 mph (18 km/h). It will provide an alert (audible and/or visual) to indicate the proximity to
other objects. The system can be enabled with Sound Only, or Sound and Display. To change the ParkSense status,
press and release the “Sound Only” or “Sound and Display” button.
430 MULTIMEDIA
Page 440 of 492
Auto Comfort Systems — If Equipped
After pressing the “Auto-On Comfort” button on the
touchscreen, the following settings will be available:
Setting NameSelectable Options
Auto-on Dr Heat Seat OffRemote Start All Starts
NOTE:
When this feature is selected the driver’s heated seat and heated steering wheel will automatically turn on when tem-
peratures are below 40° F (4.4° C). When temperatures are above 80° F (26.7° C) the driver vented seat will turn on.
Engine Off Options
After pressing the “Engine Off Options” button on the
touchscreen, the following settings will be available:
Setting Name Selectable Options
Easy Exit Seat — If Equipped OnOff
NOTE:
When the “Easy Exit Seat” feature is selected, the driver ’s seat will automatically move rearward once the engine is
shut off.
438 MULTIMEDIA
Page 447 of 492
System Information
After pressing the “System Information” button on the
touchscreen, the following settings will be available:
Setting NameSelectable Options
Software License System Software Information Screen
NOTE:
When the “System Information” feature is selected, a “System Software Information” screen will appear, displaying
the system software version.
STEERING WHEEL AUDIO CONTROLS
The remote sound system controls are located on the rear
surface of the steering wheel at the three and nine o’clock
positions.
Steering Wheel Audio Controls (Back View Of Steering Wheel)
10
MULTIMEDIA 445
Page 452 of 492

NOTE:If you see the NAV icon on the bottom bar, or in the
Apps menus, of your touchscreen, you have the Uconnect
4C NAV system. If not, you have a Uconnect 4C system.
Get Started
All you need to control your Uconnect system with your
voice are the buttons on your steering wheel.
Helpful hints for using Voice Recognition:
1. Visit UconnectPhone.com to check mobile device and feature compatibility and to find phone pairing instruc-
tions.
2. Reduce background noise. Wind and passenger conver- sations are examples of noise that may impact recogni-
tion.
3. Speak clearly at a normal pace and volume while facing straight ahead. The microphone is positioned on the
rearview mirror and aimed at the driver.
4. Each time you give a Voice Command, you must first push either the Voice Recognition (VR) or Phone button,
wait until afterthe beep, then say your Voice Command. 5. You can interrupt the help message or system prompts
by pushing the VR or Phone button and saying a Voice
Command from current category.
Uconnect Voice Command Buttons
1 — Push To Initiate Or To Answer A Phone Call, Send Or Receive
A Text
2 — For All Radios: Push To Begin Radio, Media, or Climate Func-
tions. For 8.4–inch System Only: Push To Begin Navigation Function
3 — Push To End Call
450 MULTIMEDIA