2018 CHEVROLET SILVERADO ECU
[x] Cancel search: ECUPage 245 of 501

Chevrolet Silverado Owner Manual (GMNA-Localizing-U.S./Canada/Mexico-
11349200) - 2018 - CRC - 2/27/18
244 Driving and Operating
There is also important loading
information for off-road driving in
this manual. See“Loading the
Vehicle for Off-Road Driving“
under Off-Road Driving 0231.
Two-Tiered Loading
Depending on the model of the
pickup, an upper load platform
can be created by positioning
three or four 5 cm (2 in) by
15 cm (6 in) wooden planks
across the width of the pickup
box. The planks must be
inserted in the pickup box
depressions.
When using this upper load
platform, be sure the load is
securely tied down to prevent it
from shifting. The load's center
of gravity should be positioned
in a zone over the rear axle. The
zone is located in the area
between the front of each wheel
well and the rear of each wheel well. The center of gravity height
must not extend above the top
of the pickup box flareboard.
Any load that extends beyond
the vehicle's taillamp area must
be properly marked according to
local laws and regulations.
Remember not to exceed the
Gross Axle Weight
Rating (GAWR) of the front or
rear axle.
Add-On Equipment
When carrying removable items,
a limit on how many people
carried inside the vehicle may
be necessary. Be sure to weigh
the vehicle before buying and
installing the new equipment.
Caution
Overloading the vehicle may
cause damage. Repairs would not
be covered by the vehicle
warranty. Do not overload the
vehicle.
Remember not to exceed the
Gross Axle Weight
Rating (GAWR) of the front or
rear axle.
* Equipment Maximum
Weight
Ladder Rack
and Cargo 340 kg (750 lb)
Cross Toolbox
and Cargo 181 kg (400 lb)
Side Boxes
and Cargo 113 kg per
side (250 lb
per side)
* The combined weight for all
rail-mounted equipment should
not exceed 454 kg (1,000 lb).
Page 247 of 501
Chevrolet Silverado Owner Manual (GMNA-Localizing-U.S./Canada/Mexico-
11349200) - 2018 - CRC - 2/27/18
246 Driving and Operating
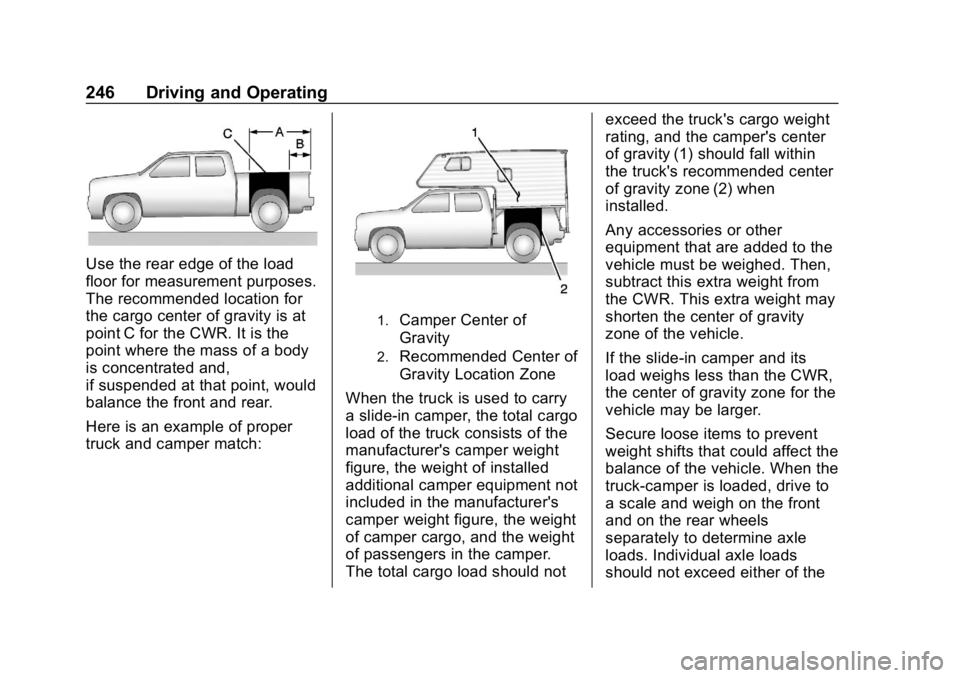
Use the rear edge of the load
floor for measurement purposes.
The recommended location for
the cargo center of gravity is at
point C for the CWR. It is the
point where the mass of a body
is concentrated and,
if suspended at that point, would
balance the front and rear.
Here is an example of proper
truck and camper match:
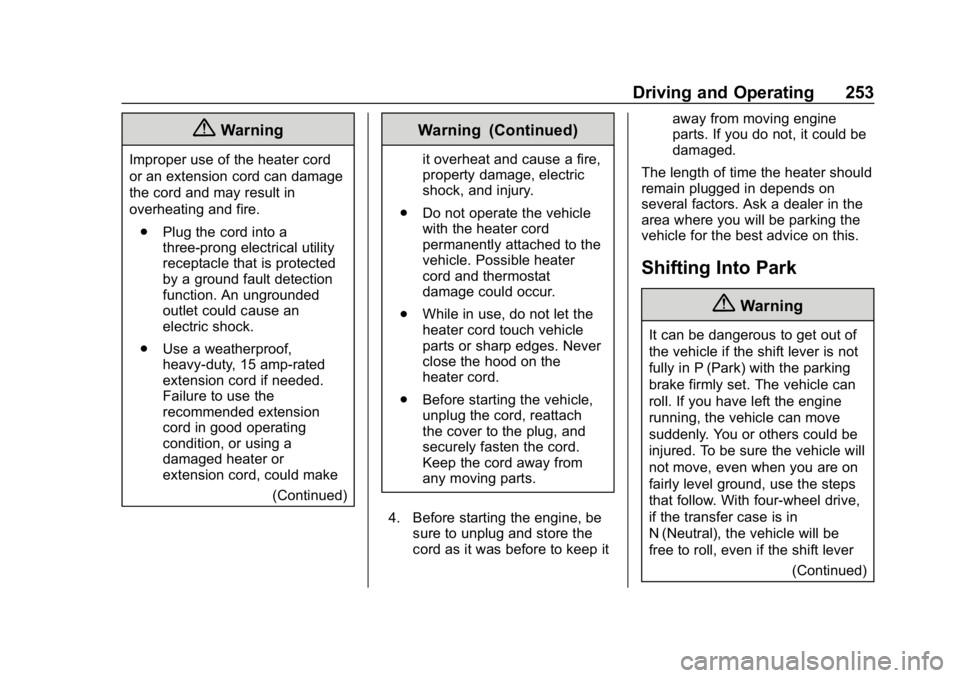
1.Camper Center of
Gravity
2.Recommended Center of
Gravity Location Zone
When the truck is used to carry
a slide-in camper, the total cargo
load of the truck consists of the
manufacturer's camper weight
figure, the weight of installed
additional camper equipment not
included in the manufacturer's
camper weight figure, the weight
of camper cargo, and the weight
of passengers in the camper.
The total cargo load should not exceed the truck's cargo weight
rating, and the camper's center
of gravity (1) should fall within
the truck's recommended center
of gravity zone (2) when
installed.
Any accessories or other
equipment that are added to the
vehicle must be weighed. Then,
subtract this extra weight from
the CWR. This extra weight may
shorten the center of gravity
zone of the vehicle.
If the slide-in camper and its
load weighs less than the CWR,
the center of gravity zone for the
vehicle may be larger.
Secure loose items to prevent
weight shifts that could affect the
balance of the vehicle. When the
truck-camper is loaded, drive to
a scale and weigh on the front
and on the rear wheels
separately to determine axle
loads. Individual axle loads
should not exceed either of the
Page 253 of 501

Chevrolet Silverado Owner Manual (GMNA-Localizing-U.S./Canada/Mexico-
11349200) - 2018 - CRC - 2/27/18
252 Driving and Operating
turned from ON/RUN to LOCK/OFF,
the windows and sunroof continue
to work up to 10 minutes or until any
door is opened. The radio continues
to work for up to 10 minutes or until
the driver door is opened.
Accessory Power Outlets (APOs)
The vehicle may have Accessory
Power Outlets (APOs) in several
locations. SeePower Outlets0132.
The APOs in the console or center
seat position are powered by
Retained Accessory Power (RAP).
They will continue to work for up to
10 minutes after the key is turned
from ON/RUN to LOCK/OFF, or until
the driver door is opened.
The APOs on the center stack come
from the factory powered directly
from the vehicle battery, and supply
accessory power at all times,
regardless of ignition key position.
If electronic items are left plugged
into these APOs for long periods of
time with the vehicle off, the vehicle
battery could be drained. The vehicle may not start if the battery is
allowed to drain for an extended
period of time.
Engine Coolant Heater
The engine heater can provide
easier starting and better fuel
economy during engine warm-up in
cold weather conditions at or below
−18 °C (0 °F). Vehicles with an
engine heater should be plugged in
at least four hours before starting.
An internal thermostat in the
plug-end of the cord may exist,
which will prevent engine coolant
heater operation at temperatures
above
−18 °C (0 °F).
If the vehicle has a diesel engine,
see the Duramax diesel
supplement.
{Warning
Do not plug in the engine block
heater while the vehicle is parked
in a garage or under a carport.
Property damage or personal (Continued)
Warning (Continued)
injury may result. Always park the
vehicle in a clear open area away
from buildings or structures.
To Use the Engine Coolant
Heater
1. Turn off the engine.
2. Open the hood and unwrap theelectrical cord. The cord is
secured to the driver side
fender with a clip, next to the
engine compartment fuse
block. Carefully remove the
wire tie that bundles the
electrical plug. Do not cut the
electrical cord.
Check the heater cord for
damage. If it is damaged, do
not use it. See your dealer for
a replacement. Inspect the
cord for damage yearly.
3. Plug the cord into a normal, grounded 110-volt AC outlet.
Page 254 of 501
Chevrolet Silverado Owner Manual (GMNA-Localizing-U.S./Canada/Mexico-
11349200) - 2018 - CRC - 2/27/18
Driving and Operating 253
{Warning
Improper use of the heater cord
or an extension cord can damage
the cord and may result in
overheating and fire.. Plug the cord into a
three-prong electrical utility
receptacle that is protected
by a ground fault detection
function. An ungrounded
outlet could cause an
electric shock.
. Use a weatherproof,
heavy-duty, 15 amp-rated
extension cord if needed.
Failure to use the
recommended extension
cord in good operating
condition, or using a
damaged heater or
extension cord, could make
(Continued)
Warning (Continued)
it overheat and cause a fire,
property damage, electric
shock, and injury.
. Do not operate the vehicle
with the heater cord
permanently attached to the
vehicle. Possible heater
cord and thermostat
damage could occur.
. While in use, do not let the
heater cord touch vehicle
parts or sharp edges. Never
close the hood on the
heater cord.
. Before starting the vehicle,
unplug the cord, reattach
the cover to the plug, and
securely fasten the cord.
Keep the cord away from
any moving parts.
4. Before starting the engine, be sure to unplug and store the
cord as it was before to keep it away from moving engine
parts. If you do not, it could be
damaged.
The length of time the heater should
remain plugged in depends on
several factors. Ask a dealer in the
area where you will be parking the
vehicle for the best advice on this.
Shifting Into Park
{Warning
It can be dangerous to get out of
the vehicle if the shift lever is not
fully in P (Park) with the parking
brake firmly set. The vehicle can
roll. If you have left the engine
running, the vehicle can move
suddenly. You or others could be
injured. To be sure the vehicle will
not move, even when you are on
fairly level ground, use the steps
that follow. With four-wheel drive,
if the transfer case is in
N (Neutral), the vehicle will be
free to roll, even if the shift lever (Continued)
Page 299 of 501
Chevrolet Silverado Owner Manual (GMNA-Localizing-U.S./Canada/Mexico-
11349200) - 2018 - CRC - 2/27/18
298 Driving and Operating
The structure, tires, and brakes of
the trailer must be rated to carry the
load. Inadequate trailer equipment
can cause the combination to
operate in an unexpected or unsafe
manner.
Before starting, check all trailer hitch
parts and attachments, safety
chains, electrical connectors, lamps,
tires, and mirrors. Get familiar with
the handling and braking of the rig.
If the trailer has electric brakes, start
the combination moving and then
apply the trailer brake controller by
hand to be sure the brakes work.
During the trip, check occasionally
to be sure that the load is secure
and the lamps and any trailer
brakes still work.
Following Distance
Stay at least twice as far behind the
vehicle ahead as you would when
driving the vehicle without a trailer.
This can help to avoid heavy
braking and sudden turns.
Passing
More passing distance is needed
when towing a trailer. The
combination will not accelerate as
quickly and is longer so it is
necessary to go much farther
beyond the passed vehicle before
returning to the lane.
Backing Up
Hold the bottom of the steering
wheel with one hand. To move the
trailer to the left, move that hand to
the left. To move the trailer to the
right, move your hand to the right.
Always back up slowly and,
if possible, have someone
guide you.
Making TurnsCaution
Making very sharp turns while
trailering could cause the trailer to
come in contact with the vehicle.
The vehicle could be damaged.
Avoid making very sharp turns
while trailering. When turning with a trailer, make
wider turns than normal. Do this so
the trailer will not strike soft
shoulders, curbs, road signs, trees,
or other objects. Avoid jerky or
sudden maneuvers. Signal well in
advance.
If the trailer turn signal bulbs burn
out, the arrows on the instrument
cluster will still flash for turns. It is
important to check occasionally to
be sure the trailer bulbs are still
working.
Turn Signals When Towing a
Trailer
The turn signal indicators on the
instrument cluster flash whenever
signaling a turn or lane change.
Properly hooked up, the trailer
lamps also flash, telling other
drivers the vehicle is turning,
changing lanes, or stopping. When
towing a trailer, the arrows on the
instrument cluster flash for turns
even if the bulbs on the trailer are
burned out.
Page 322 of 501
Chevrolet Silverado Owner Manual (GMNA-Localizing-U.S./Canada/Mexico-
11349200) - 2018 - CRC - 2/27/18
Driving and Operating 321
Trailer Wiring Harness
The vehicle is equipped with one of
the following wiring harnesses for
towing a trailer or hauling a slide-in
camper.
Basic Trailer Wiring
All regular, double cab, and crew
cab pickups have a seven-wire
trailer towing harness.
For vehicles not equipped with
heavy-duty trailering, the harness is
secured to the vehicle's frame
behind the spare tire mount. The
harness requires the installation of a
trailer connector, which is available
through your dealer.
Use only a round, seven-wire
connector with flat blade terminals
meeting SAE J2863 specifications
for proper electrical connectivity.
The seven-wire harness contains
the following trailer circuits:
.Green/Violet: Right Stop/Turn
Signal
. Yellow/Gray: Left Stop/Turn
Signal .
Gray/Brown: Taillamps/Parking
Lamps
. White/Green: Back-up Lamps
. Red/Green: Battery Feed
. White: Ground
. Blue: Electric Trailer Brake
The fuse for the electric trailer brake
circuit is installed in the underhood
electrical center, but the wires may
not be connected. They should be
connected by your dealer or a
qualified service center. To control
electric trailer brakes, a trailer brake
controller needs to be installed on
the vehicle by your dealer or a
qualified service center, see
“Electric Brake Control Wiring
Provisions” later in this section. Heavy-Duty Trailer Wiring Harness
Package
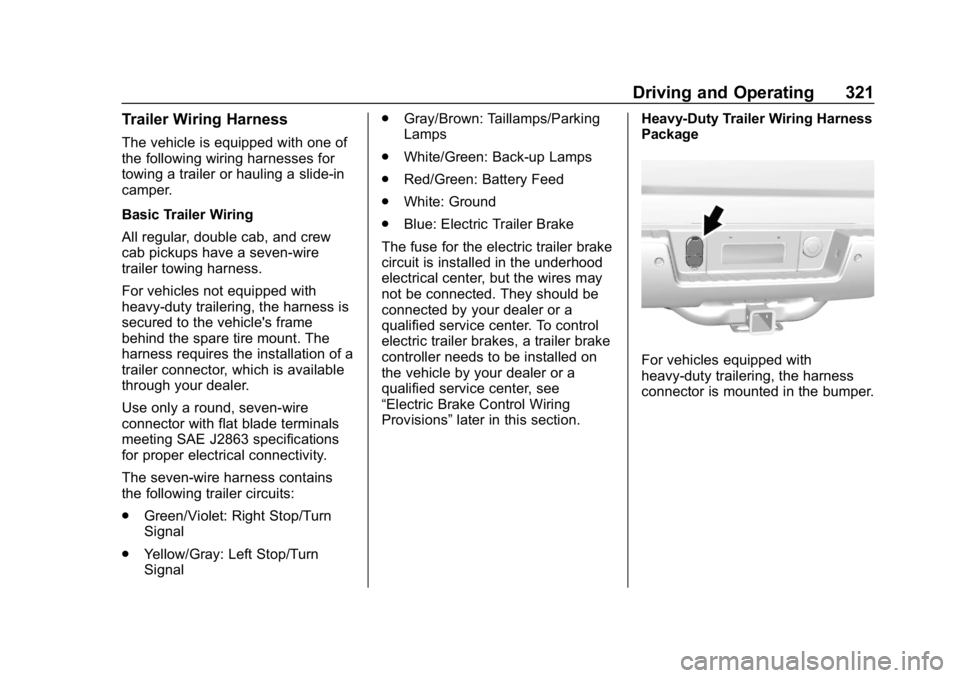
For vehicles equipped with
heavy-duty trailering, the harness
connector is mounted in the bumper.
Page 332 of 501
Chevrolet Silverado Owner Manual (GMNA-Localizing-U.S./Canada/Mexico-
11349200) - 2018 - CRC - 2/27/18
Driving and Operating 331
.Make sure the weight on the
front and rear axles does not
exceed the axle rating for each.
. For the front axle, if more cargo
or passengers must be carried,
appropriate counter ballast must
be installed rear of the rear axle.
Counter ballast must be properly
secured so it will not move
during driving.
. Rear ballast may be required to
ensure a proper front and rear
weight distribution ratio, even
though the actual weight at the
front axle may be less than the
front axle rating.
. The snow plow manufacturer or
installer can assist in
determining the amount of rear
ballast required, to help make
sure the snow plow/vehicle
combination does not exceed
the GVW rating, the front and
rear axle ratings, and the front
and rear weight distribution ratio.
. The total vehicle must not
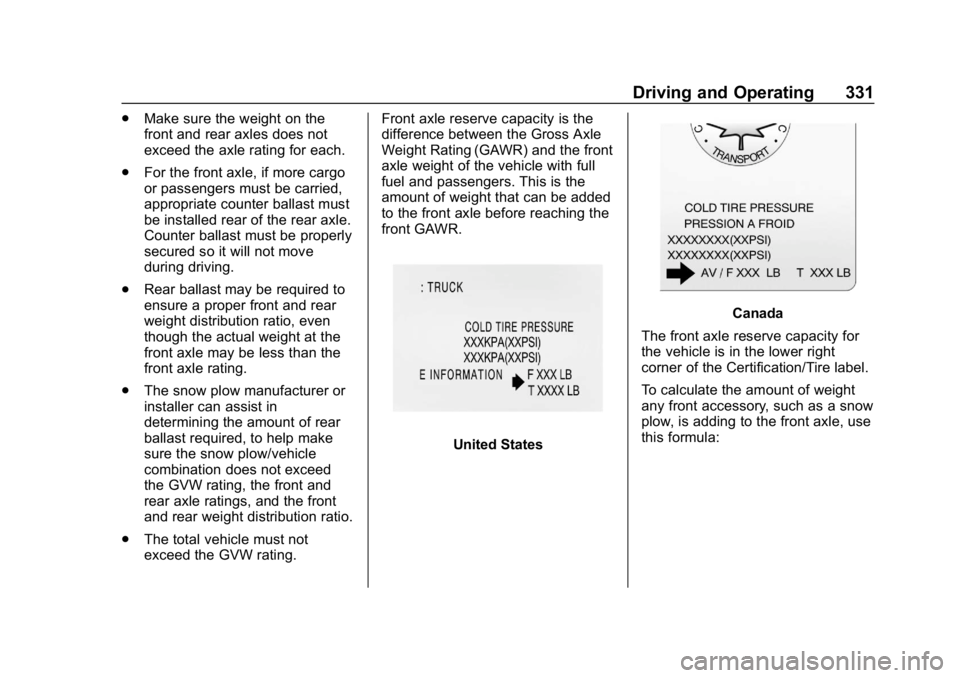
exceed the GVW rating. Front axle reserve capacity is the
difference between the Gross Axle
Weight Rating (GAWR) and the front
axle weight of the vehicle with full
fuel and passengers. This is the
amount of weight that can be added
to the front axle before reaching the
front GAWR.
United States
Canada
The front axle reserve capacity for
the vehicle is in the lower right
corner of the Certification/Tire label.
To calculate the amount of weight
any front accessory, such as a snow
plow, is adding to the front axle, use
this formula:
Page 357 of 501
Chevrolet Silverado Owner Manual (GMNA-Localizing-U.S./Canada/Mexico-
11349200) - 2018 - CRC - 2/27/18
356 Vehicle Care
Turn the pressure cap slowly
counterclockwise about one full
turn. If a hiss is heard, wait for
that to stop. A hiss means
there is still some pressure left.
2. Keep turning the pressure cap slowly, and remove it.
3. Fill the coolant surge tank with the proper mixture to the full
cold mark.
4. With the coolant surge tank pressure cap off, start the
engine and let it run until the
engine coolant temperature
gauge indicates approximately
90 °C (195 °F).
By this time, the coolant level
inside the coolant surge tank
may be lower. If the level is
lower, add more of the proper
mixture to the coolant surge
tank until the level reaches the
full cold mark.
5. Replace the pressure cap tightly. 6. Verify coolant level after the
engine is shut off and the
coolant is cold. If necessary,
repeat coolant fill procedure
Steps 1–6.
Caution
If the pressure cap is not tightly
installed, coolant loss and engine
damage may occur. Be sure the
cap is properly and tightly
secured.
Engine Overheating
If the vehicle has the Duramax
diesel engine, see the Duramax
diesel supplement.
Caution
Do not run the engine if there is a
leak in the engine cooling system.
This can cause a loss of all
coolant and can damage the
system and vehicle. Have any
leaks fixed right away. The vehicle has several indicators
to warn of engine overheating.
There is a coolant temperature
gauge in the vehicle's instrument
cluster. See
Engine Coolant
Temperature Gauge 0142.
In addition, there are ENGINE
OVERHEATED STOP ENGINE,
ENGINE OVERHEATED IDLE
ENGINE, and ENGINE POWER IS
REDUCED messages in the Driver
Information Center (DIC).
If the decision is made not to lift the
hood when this warning appears,
get service help right away. See
Roadside Assistance Program
0 465.
If the decision is made to lift the
hood, make sure the vehicle is
parked on a level surface.
4.3L V6, 5.3L V8, and 6.2L
V8 Engines
Check to see if the engine cooling
fans are running. If the engine is
overheating, the fans should be