2018 CHEVROLET SILVERADO ECU
[x] Cancel search: ECUPage 120 of 501
Chevrolet Silverado Owner Manual (GMNA-Localizing-U.S./Canada/Mexico-
11349200) - 2018 - CRC - 2/27/18
Seats and Restraints 119
If the vehicle does not have a rear
seat that will accommodate a
rear-facing child restraint, a
rear-facing child restraint should not
be installed in the vehicle, even if
the airbag is off.
If a child restraint uses a top tether,
seeLower Anchors and Tethers for
Children (LATCH System) 099 for
top tether anchor locations.
Do not secure a child restraint in a
position without a top tether anchor
if a national or local law requires
that the top tether be anchored, or if
the instructions that come with the
child restraint say that the top strap
must be anchored.
In Canada, the law requires that
forward-facing child restraints have
a top tether, and that the tether be
attached.
When using the lap-shoulder belt to
secure the child restraint in this
position, follow the instructions that
came with the child restraint and the
following instructions: 1. Move the seat as far back as it
will go before securing the
forward-facing child restraint.
Move the seat upward or the
seatback to an upright position,
if needed, to get a tight
installation of the child
restraint.
When the airbag off switch (if
equipped) has turned off the
front outboard passenger
frontal airbag, the off indicator
in the airbag off light should
light and stay lit when you start
the vehicle. See Airbag On-Off
Light 0144.
2. Put the child restraint on the seat.
3. Pick up the latch plate, and run the lap and shoulder portions
of the vehicle's seat belt
through or around the restraint.
The child restraint instructions
will show you how.
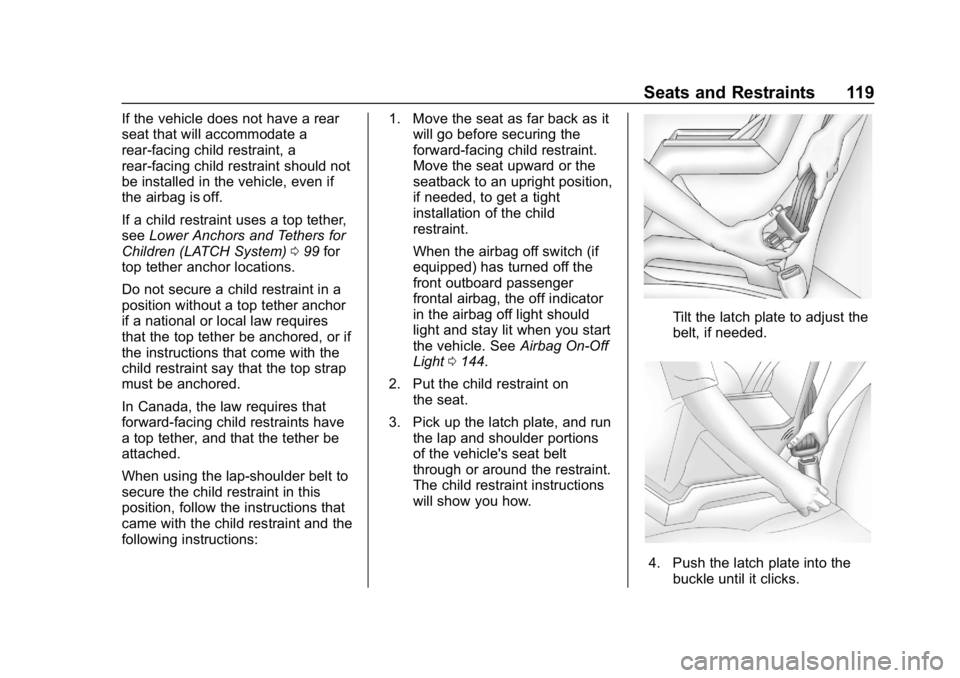
Tilt the latch plate to adjust the
belt, if needed.
4. Push the latch plate into the
buckle until it clicks.
Page 121 of 501
Chevrolet Silverado Owner Manual (GMNA-Localizing-U.S./Canada/Mexico-
11349200) - 2018 - CRC - 2/27/18
120 Seats and Restraints
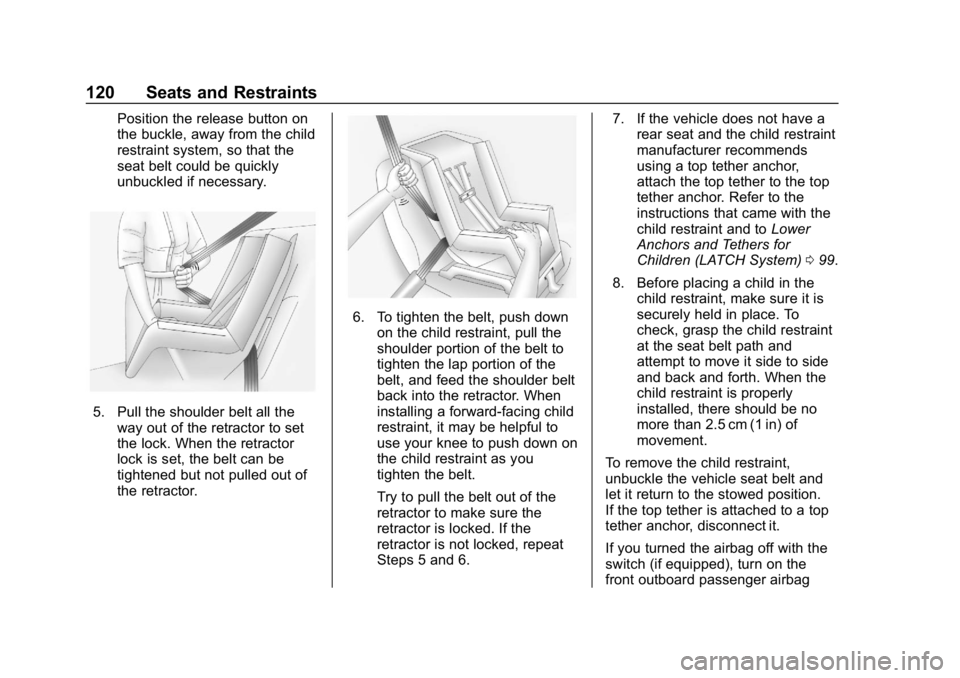
Position the release button on
the buckle, away from the child
restraint system, so that the
seat belt could be quickly
unbuckled if necessary.
5. Pull the shoulder belt all theway out of the retractor to set
the lock. When the retractor
lock is set, the belt can be
tightened but not pulled out of
the retractor.
6. To tighten the belt, push downon the child restraint, pull the
shoulder portion of the belt to
tighten the lap portion of the
belt, and feed the shoulder belt
back into the retractor. When
installing a forward-facing child
restraint, it may be helpful to
use your knee to push down on
the child restraint as you
tighten the belt.
Try to pull the belt out of the
retractor to make sure the
retractor is locked. If the
retractor is not locked, repeat
Steps 5 and 6. 7. If the vehicle does not have a
rear seat and the child restraint
manufacturer recommends
using a top tether anchor,
attach the top tether to the top
tether anchor. Refer to the
instructions that came with the
child restraint and to Lower
Anchors and Tethers for
Children (LATCH System) 099.
8. Before placing a child in the child restraint, make sure it is
securely held in place. To
check, grasp the child restraint
at the seat belt path and
attempt to move it side to side
and back and forth. When the
child restraint is properly
installed, there should be no
more than 2.5 cm (1 in) of
movement.
To remove the child restraint,
unbuckle the vehicle seat belt and
let it return to the stowed position.
If the top tether is attached to a top
tether anchor, disconnect it.
If you turned the airbag off with the
switch (if equipped), turn on the
front outboard passenger airbag
Page 122 of 501
Chevrolet Silverado Owner Manual (GMNA-Localizing-U.S./Canada/Mexico-
11349200) - 2018 - CRC - 2/27/18
Seats and Restraints 121
when you remove the child restraint
from the vehicle unless the person
who will be sitting there is a member
of a passenger airbag risk group.
SeeAirbag On-Off Switch 084 for
more information, including
important safety information.
Heavy-Duty Crew Cab Only
This vehicle has airbags. A rear
seat is a safer place to secure a
forward-facing child restraint. See
Where to Put the Restraint 098.
Never put a rear-facing child
restraint in the front. This is because
the risk to the rear-facing child is so
great if the airbag deploys.
{Warning
A child in a rear-facing child
restraint can be seriously injured
or killed if the passenger airbag
inflates. This is because the back
of the rear-facing child restraint
would be very close to the (Continued)
Warning (Continued)
inflating airbag. Secure
rear-facing child restraints in a
rear seat.
A child in a forward-facing child
restraint can be seriously injured
or killed if the front outboard
passenger airbag inflates and the
passenger seat is in a forward
position. If you secure a
forward-facing child restraint in
the front outboard passenger
seat, always move the seat as far
back as it will go. It is better to
secure the child restraint in a
rear seat.
If a child restraint uses a top tether,
see Lower Anchors and Tethers for
Children (LATCH System) 099 for
top tether anchor locations.
Do not secure a child restraint in a
position without a top tether anchor
if a national or local law requires
that the top tether be anchored, or if the instructions that come with the
child restraint say that the top strap
must be anchored.
In Canada, the law requires that
forward-facing child restraints have
a top tether, and that the tether be
attached.
When using the lap-shoulder belt to
secure the child restraint in this
position, follow the instructions that
came with the child restraint and the
following instructions:
1. Move the seat as far back as it will go before securing the
forward-facing child restraint.
Move the seat upward or the
seatback to an upright position,
if needed, to get a tight
installation of the child
restraint.
2. Put the child restraint on the seat.
3. Pick up the latch plate, and run the lap and shoulder portions
of the vehicle's seat belt
through or around the restraint.
The child restraint instructions
will show you how.
Page 124 of 501
Chevrolet Silverado Owner Manual (GMNA-Localizing-U.S./Canada/Mexico-
11349200) - 2018 - CRC - 2/27/18
Seats and Restraints 123
7. If your child restraint has a toptether, follow the child restraint
manufacturer's instructions
regarding the use of the top
tether. See Lower Anchors and
Tethers for Children (LATCH
System) 099 for more
information on using the top
tether anchors.
8. Before placing a child in the child restraint, make sure it is
securely held in place. To
check, grasp the child restraint
at the seat belt path and
attempt to move it side to side
and back and forth. When the
child restraint is properly
installed, there should be no
more than 2.5 cm (1 in) of
movement.
To remove the child restraint,
unbuckle the vehicle seat belt and
let it return to the stowed position.
If the top tether is attached to a top
tether anchor, disconnect it.
Page 129 of 501

Chevrolet Silverado Owner Manual (GMNA-Localizing-U.S./Canada/Mexico-
11349200) - 2018 - CRC - 2/27/18
128 Instruments and Controls
Instruments and
Controls
Controls
Steering Wheel Adjustment . . . 129
Steering Wheel Controls . . . . . . 129
Heated Steering Wheel . . . . . . . 130
Horn . . . . . . . . . . . . . . . . . . . . . . . . . . 130
Windshield Wiper/Washer . . . . 130
Compass . . . . . . . . . . . . . . . . . . . . . 131
Clock . . . . . . . . . . . . . . . . . . . . . . . . . 131
Power Outlets . . . . . . . . . . . . . . . . 132
Wireless Charging . . . . . . . . . . . . 134
Warning Lights, Gauges, and
Indicators
Warning Lights, Gauges, andIndicators . . . . . . . . . . . . . . . . . . . 136
Instrument Cluster . . . . . . . . . . . . 137
Speedometer . . . . . . . . . . . . . . . . . 140
Odometer . . . . . . . . . . . . . . . . . . . . . 140
Trip Odometer . . . . . . . . . . . . . . . . 140
Tachometer . . . . . . . . . . . . . . . . . . . 140
Fuel Gauge . . . . . . . . . . . . . . . . . . . 140
Engine Oil Pressure Gauge . . . . . . . . . . . . . . . . . . . . . . 141
Engine Coolant Temperature Gauge . . . . . . . . . . . . . . . . . . . . . . 142 Voltmeter Gauge . . . . . . . . . . . . . 143
Seat Belt Reminders . . . . . . . . . 143
Airbag Readiness Light . . . . . . . 144
Airbag On-Off Light . . . . . . . . . . . 144
Passenger Airbag Status
Indicator . . . . . . . . . . . . . . . . . . . . 146
Charging System Light . . . . . . . 147
Malfunction Indicator Lamp (Check Engine Light) . . . . . . . . 147
Brake System Warning Light . . . . . . . . . . . . . . . . . . . . . . . . 149
Antilock Brake System (ABS) Warning Light . . . . . . . . . . . . . . . 150
Four-Wheel-Drive Light . . . . . . . 150
Tow/Haul Mode Light . . . . . . . . . 150
Hill Descent Control Light . . . . 151
Lane Departure Warning (LDW) Light (2500/3500
Series) . . . . . . . . . . . . . . . . . . . . . . 151
Lane Keep Assist (LKA) Light (1500 Series) . . . . . . . . . . . . . . . 151
Vehicle Ahead Indicator . . . . . . 152
Traction Off Light . . . . . . . . . . . . . 152
StabiliTrak OFF Light . . . . . . . . . 152
Traction Control System (TCS)/ StabiliTrak Light . . . . . . . . . . . . . 152
Tire Pressure Light . . . . . . . . . . . 153
Low Fuel Warning Light . . . . . . 153
Security Light . . . . . . . . . . . . . . . . . 153
High-Beam On Light . . . . . . . . . . 154 Front Fog Lamp Light . . . . . . . . . 154
Lamps On Reminder . . . . . . . . . 154
Cruise Control Light . . . . . . . . . . 154
Information Displays
Driver Information Center (DIC)
(Base Level) . . . . . . . . . . . . . . . . 155
Driver Information Center (DIC) (Uplevel) . . . . . . . . . . . . . . . . . . . . 156
Vehicle Messages
Vehicle Messages . . . . . . . . . . . . 159
Engine Power Messages . . . . . 160
Vehicle Speed Messages . . . . . 160
Vehicle Personalization
Vehicle Personalization . . . . . . . 160
Universal Remote System
Universal Remote System . . . . 168
Universal Remote SystemProgramming . . . . . . . . . . . . . . . 168
Universal Remote System Operation . . . . . . . . . . . . . . . . . . . 170
Page 154 of 501

Chevrolet Silverado Owner Manual (GMNA-Localizing-U.S./Canada/Mexico-
11349200) - 2018 - CRC - 2/27/18
Instruments and Controls 153
If the light is on and not flashing, the
TCS and potentially the StabiliTrak
system have been disabled.
A Driver Information Center (DIC)
message may display. Check the
DIC messages to determine which
feature(s) is no longer functioning
and whether the vehicle requires
service.
If the light is on and flashing, the
TCS and/or the StabiliTrak system
is actively working.
SeeTraction Control/Electronic
Stability Control 0276.
Tire Pressure Light
For vehicles with the Tire Pressure
Monitor System (TPMS), this light
comes on briefly when the engine is
started. It provides information
about tire pressures and the TPMS. When the Light Is On Steady
This indicates that one or more of
the tires are significantly
underinflated.
A Driver Information Center (DIC)
tire pressure message may also
display. Stop as soon as possible,
and inflate the tires to the pressure
value shown on the Tire and
Loading Information label. See
Tire
Pressure 0392.
When the Light Flashes First and
Then Is On Steady
If the light flashes for about a minute
and then stays on, there may be a
problem with the TPMS. If the
problem is not corrected, the light
will come on at every ignition cycle.
See Tire Pressure Monitor
Operation 0395.
Low Fuel Warning Light
This light is near the fuel gauge and
comes on briefly when the ignition is
turned on as a check to show it is
working.
It also comes on when the fuel tank
is low on fuel. The light turns off
when fuel is added. If it does not,
have the vehicle serviced.
Security Light
The security light should come on
briefly as the engine is started. If it
does not come on, have the vehicle
Page 160 of 501

Chevrolet Silverado Owner Manual (GMNA-Localizing-U.S./Canada/Mexico-
11349200) - 2018 - CRC - 2/27/18
Instruments and Controls 159
and the timer is running. To reset
the timer to zero, press and hold
V
while this display is active, or
press
pand select reset.
Speed Limit (If Equipped) : Shows
sign information, which comes from
a roadway database in the onboard
navigation.
Engine Hours : Shows the total
number of hours the engine has run.
Transmission Fluid
Temperature : Shows the
temperature of the automatic
transmission fluid in either degrees
Celsius (°C) or degrees
Fahrenheit (°F).
Trailer Brake (If Equipped) : On
vehicles with the Integrated Trailer
Brake Control (ITBC) system, the
trailer brake display appears in
the DIC. TRAILER GAIN shows the trailer
gain setting. This setting can be
adjusted from 0.0 to 10.0 with either
a trailer connected or disconnected.
TRAILER OUTPUT shows the
power output to the trailer anytime a
trailer with electric brakes is
connected. Output is displayed as a
bar graph. Dashes may appear in
the OUTPUT display if a trailer is
not connected.
Off Road :
Displays vehicle pitch
and roll information, road wheel
angle, and four-wheel drive (4WD)
status.
Blank Page : Shows no
information.
Vehicle Messages
Messages displayed on the DIC
indicate the status of the vehicle or
some action that may be needed to
correct a condition. Multiple
messages may appear one after
another.
The messages that do not require
immediate action can be
acknowledged and cleared by
pressing
V. The messages that
require immediate action cannot be
cleared until that action is
performed.
All messages should be taken
seriously; clearing the message
does not correct the problem.
If a SERVICE message appears,
see your dealer.
Follow the instructions given in the
messages. The system displays
messages regarding the following
topics:
. Service Messages
. Fluid Levels
. Vehicle Security
Page 169 of 501
Chevrolet Silverado Owner Manual (GMNA-Localizing-U.S./Canada/Mexico-
11349200) - 2018 - CRC - 2/27/18
168 Instruments and Controls
Universal Remote
System
SeeRadio Frequency Statement
0 471.
Universal Remote System
Programming
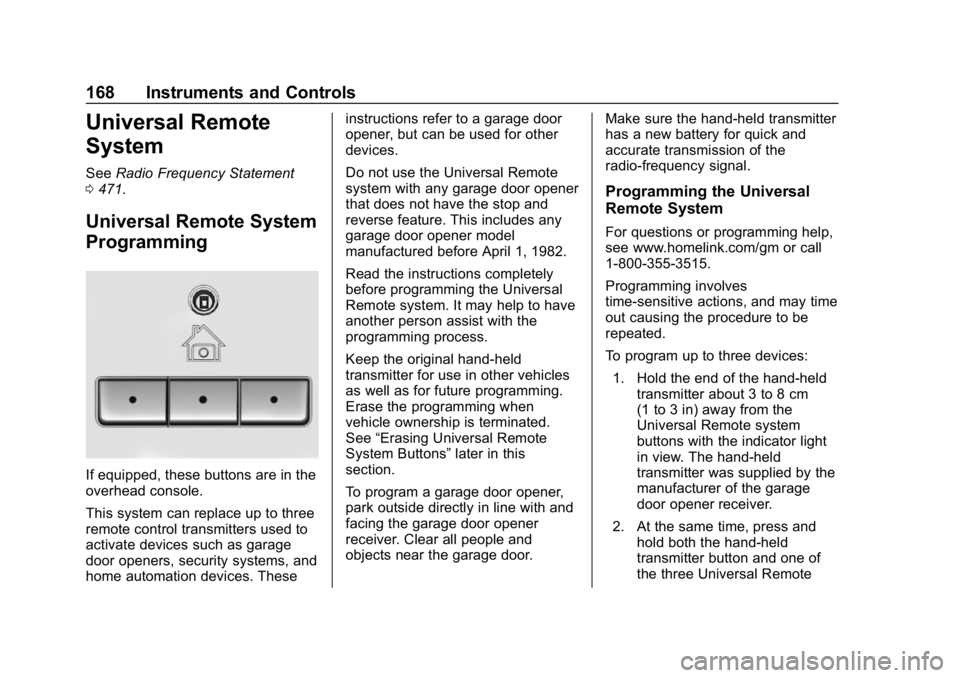
If equipped, these buttons are in the
overhead console.
This system can replace up to three
remote control transmitters used to
activate devices such as garage
door openers, security systems, and
home automation devices. These instructions refer to a garage door
opener, but can be used for other
devices.
Do not use the Universal Remote
system with any garage door opener
that does not have the stop and
reverse feature. This includes any
garage door opener model
manufactured before April 1, 1982.
Read the instructions completely
before programming the Universal
Remote system. It may help to have
another person assist with the
programming process.
Keep the original hand-held
transmitter for use in other vehicles
as well as for future programming.
Erase the programming when
vehicle ownership is terminated.
See
“Erasing Universal Remote
System Buttons” later in this
section.
To program a garage door opener,
park outside directly in line with and
facing the garage door opener
receiver. Clear all people and
objects near the garage door. Make sure the hand-held transmitter
has a new battery for quick and
accurate transmission of the
radio-frequency signal.
Programming the Universal
Remote System
For questions or programming help,
see www.homelink.com/gm or call
1-800-355-3515.
Programming involves
time-sensitive actions, and may time
out causing the procedure to be
repeated.
To program up to three devices:
1. Hold the end of the hand-held transmitter about 3 to 8 cm
(1 to 3 in) away from the
Universal Remote system
buttons with the indicator light
in view. The hand-held
transmitter was supplied by the
manufacturer of the garage
door opener receiver.
2. At the same time, press and hold both the hand-held
transmitter button and one of
the three Universal Remote