2018 CHEVROLET SILVERADO AUX
[x] Cancel search: AUXPage 185 of 501
Chevrolet Silverado Owner Manual (GMNA-Localizing-U.S./Canada/Mexico-
11349200) - 2018 - CRC - 2/27/18
184 Infotainment System
4.6
.Radio: Press and release to
go to the next station or
channel. Press and hold to
fast seek the next strongest
station or channel.
. USB/Bluetooth Music/
Pictures: Press and hold to
go to the next content.
Press and hold to fast
forward.
5.
#
. Press and release to
access the phone screen,
answer an incoming call,
or access the device home
screen. Press and hold to
access Press to Talk.
Home Page
Touchscreen Buttons
Touchscreen buttons show on the
screen when available. When a
function is unavailable, the button
may gray out. When a function is
selected, the button may highlight.
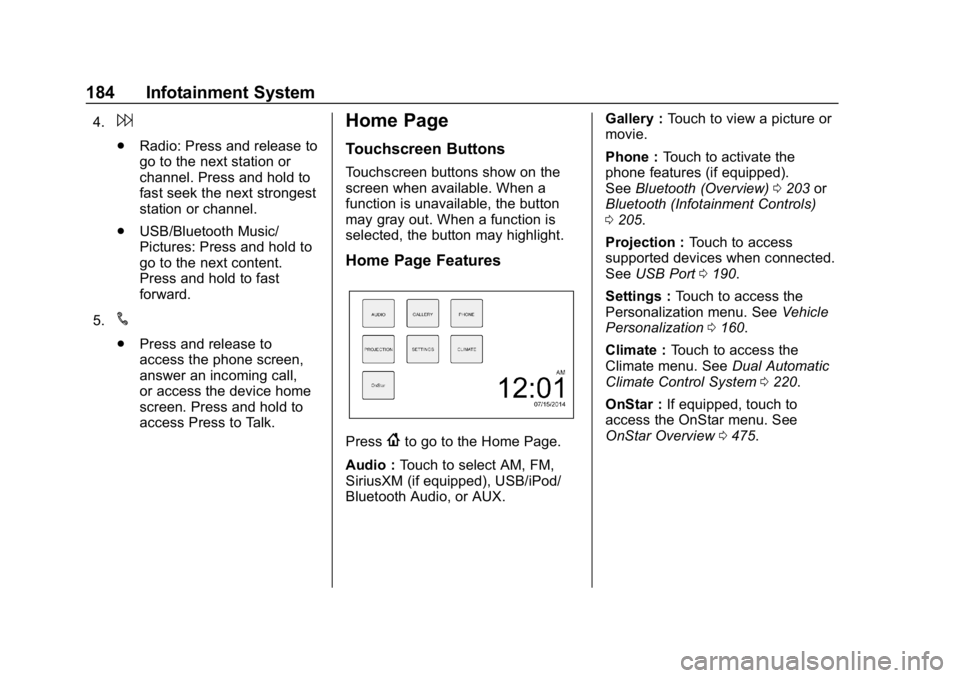
Home Page Features
Press{to go to the Home Page.
Audio : Touch to select AM, FM,
SiriusXM (if equipped), USB/iPod/
Bluetooth Audio, or AUX. Gallery :
Touch to view a picture or
movie.
Phone : Touch to activate the
phone features (if equipped).
See Bluetooth (Overview) 0203 or
Bluetooth (Infotainment Controls)
0 205.
Projection : Touch to access
supported devices when connected.
See USB Port 0190.
Settings : Touch to access the
Personalization menu. See Vehicle
Personalization 0160.
Climate : Touch to access the
Climate menu. See Dual Automatic
Climate Control System 0220.
OnStar : If equipped, touch to
access the OnStar menu. See
OnStar Overview 0475.
Page 187 of 501

Chevrolet Silverado Owner Manual (GMNA-Localizing-U.S./Canada/Mexico-
11349200) - 2018 - CRC - 2/27/18
186 Infotainment System
1. Touch MENU from a sourcescreen.
2. Select Auto Volume.
3. Select the desired setting.
4. Touch
3to go back to the
source screen.
Tone Settings
The tone settings can be set for
each radio band and each audio
player source.
Preset Tone Settings
. Touch MENU.
. Touch Tone Settings.
. Select a preset tone setting.
. Bass, Midrange, or Treble:
Touch −or +.
. Fader or Balance: Adjust the
front/rear or left/right speakers
by dragging the dot in the
vehicle image on the screen.
Custom Tone Settings
. Touch MENU.
. Touch Tone Settings. .
Touch Custom.
. Bass, Midrange, or Treble:
Touch −or +.
. Fader or Balance: Adjust the
front/rear or left/right speakers
by dragging the dot in the
vehicle image on the screen.
Touch
3to go back to the source
screen.
Selecting an Auxiliary Device
Connect the auxiliary device to the
AUX input terminal. Play will begin
when the system has finished
reading the information on the
device.
If the AUX device is already
connected, press
{, AUDIO,
Source, then select the device.
Selecting a Station
Seek Tuning
If the radio station is not known:
Press
7or6to automatically
search for available radio stations. Manual Tuning
Continue touching
toruto
manually change the radio station.
Direct Tune
From the AM or FM menu:
. Touch Tune.
. Enter the station number.
. Touch Go or
toruto go to
the previous or next station.
Favorite
. Touch
SorTto scroll through
the favorites.
. Touch on the station to select it.
Station List
. From the AM or FM menu,
touch MENU.
. Select Station List.
. Touch
QorRto scroll through
the list. Touch the station to
select it.
Page 191 of 501
Chevrolet Silverado Owner Manual (GMNA-Localizing-U.S./Canada/Mexico-
11349200) - 2018 - CRC - 2/27/18
190 Infotainment System
Audio Players
Avoiding Untrusted Media
Devices
When using media devices such as
CDs, DVDs, Blu-ray Discs, SD
cards, USB devices, and mobile
devices, consider the source.
Untrusted media devices could
contain files that affect system
operation or performance. Avoid use
if the content or origin cannot be
trusted.
USB Port
Using the USB Port
The infotainment system can play
music by connecting an auxiliary
device to the USB port.
USB Support
If equipped, there are USB ports is
in the center stack below the climate
controls, in the glove box, in the
center console under the armrest,and at the rear of the center
console. All ports use the USB 2.0
standard.
USB Supported Devices
.
USB Flash Drives
. Portable USB Hard Drives
Not all iPods and USB drives are
compatible with the USB port.
Make sure the iPod has the latest
firmware from Apple for proper
operation. iPod firmware can be
updated using the latest iTunes
application. See www.apple.com/
itunes.
For help with identifying your iPod,
go to www.apple.com/support.
The USB port can play both lower
and upper case .mp3, .wma, .ogg,
and .wav files stored on a USB
storage device.
Supported Apple Devices
To view supported devices in U.S.,
see www.my.chevrolet.com\learn. To view supported devices in
Canada, see
www.chevroletowner.ca.
To view supported devices in
Mexico, see your dealer.
USB Supported File and Folder
Structure
The infotainment system supports:
.
FAT16.
. FAT32.
. exFAT.
Connecting a USB Storage
Device or iPod/iPhone
To connect a USB storage device,
connect the device to the USB port.
To connect an iPod/iPhone, connect
one end of the device’ s cable to the
iPod/iPhone and the other end to
the USB port.
The iPod/iPhone charges while it is
connected to the vehicle if the
ignition is on or in ACC/
ACCESSORY. See Ignition
Positions 0248. When the vehicle is
turned off, the iPod/iPhone
Page 196 of 501

Chevrolet Silverado Owner Manual (GMNA-Localizing-U.S./Canada/Mexico-
11349200) - 2018 - CRC - 2/27/18
Infotainment System 195
2. Touch the desired music.
Tone Settings
. Touch Tone Settings. The Tone
Settings menu is displayed. See
“Tone Settings” inAM-FM Radio
0 185.
Auto Volume
. Touch Auto Volume. The Auto
Volume menu is displayed. See
“Auto Volume” inAM-FM Radio
0 185.
Picture System Information
The infotainment system can view
picture files stored on a USB
storage device and devices that
support Media Transfer
Protocol (MTP).
.
Supported file extensions: .jpg,
.bmp, .png, .gif.
. Animated GIF files are not
supported.
. Some files may not operate due
to a different recording format or
the condition of the file. Viewing Pictures
1. Connect the USB device to the USB port.
2. Touch the screen to open to full screen. Touch the screen again
to return to the previous
screen.
If the USB device is already
connected:
1. Press
{.
2. Touch GALLERY.
Some features are disabled while
the vehicle is in motion.
Viewing a Slide Show
1. Touch
zfrom the picture
screen.
2. Touch the screen to cancel the slide show during the slide
show playback.
Viewing a Previous or Next
Picture
Touch
SorTfrom the picture
screen. Rotating a Picture
Touch
wfrom the picture screen.
Enlarging a Picture
Touch
xfrom the picture screen.
Using the USB Picture Menu 1. Touch MENU from the picture screen.
2. Touch the appropriate menu: .Slide Show Time: Allows
selection of the slide show
interval.
. Clock, Temp. Display:
Allows selection of On or
Off to show the clock and
temperature on the full
screen.
. Display Settings: Adjusts
for Brightness and Contrast.
3. Touch
0to exit.
Auxiliary Jack
This vehicle may have an AUX jack
in the center console or armrest.
See Center Console Storage 0125.
Page 197 of 501
Chevrolet Silverado Owner Manual (GMNA-Localizing-U.S./Canada/Mexico-
11349200) - 2018 - CRC - 2/27/18
196 Infotainment System
Possible auxiliary audio sources
include:
.Laptop computer
. Audio music player
This jack is not an audio output. Do
not plug headphones into the
auxiliary input jack. Auxiliary
devices should be set up while the
vehicle is in P (Park).
Connect a 3.5 mm (1/8 in) cable
from the auxiliary device to the
auxiliary input jack.
If an auxiliary device has already
been connected, but a different
source is currently active, touch
Source repeatedly to scroll through
all of the available audio source
screens, until the AUX source
screen is shown.
Playing from the AUX Jack
An auxiliary device is played
through the audio system and
controlled through the device itself.
Play will begin when the system has
finished reading the information on
the device. Playing Music
To play the music from the device,
if the device is already connected:
1. Press
{.
2. Touch AUDIO.
3. Touch Source.
4. Touch AUX.
To adjust the tone settings. See
“Audio Settings” in“System
Settings” underAM-FM Radio
0 185.
Bluetooth Audio
If equipped, music may be played
from a paired Bluetooth device. See
“Pairing” underBluetooth
(Overview) 0203 orBluetooth
(Infotainment Controls) 0205 for
help pairing a device.
Volume and song selection may be
controlled by using the infotainment
controls or the phone/device. If Bluetooth Audio is selected and
nothing is heard, check the volume
setting on both the phone/device
and the infotainment system.
Launch music by touching MEDIA
on the Home Page.
To play music via Bluetooth:
1. Power on the device, and pair to connect the device.
2. Once paired, go into the audio application from the Home
Page or via the application tray.
Select MEDIA until Bluetooth
displays.
Bluetooth Audio Menu
Touch MENU to display the
Bluetooth Audio menu. The
following may be available:
Tone: Use the infotainment controls
to adjust the tone settings.
Press
oBACK to go back to the
previous menu.
Page 321 of 501
Chevrolet Silverado Owner Manual (GMNA-Localizing-U.S./Canada/Mexico-
11349200) - 2018 - CRC - 2/27/18
320 Driving and Operating
especially important for short box
pickups. Trailer pin box extensions
and sliding fifth-wheel hitch
assemblies can help this condition.
There should be at least 15 cm (6 in)
of clearance between the top of the
pickup box and the bottom of the
trailer shelf that extends over
the box.
Safety Chains
Always attach chains between the
vehicle and the trailer. Cross the
safety chains under the tongue of
the trailer to help prevent the tongue
from contacting the road if it
becomes separated from the hitch.
Instructions about safety chains
may be provided by the hitch
manufacturer or by the trailer
manufacturer. If the trailer is being
towed with a factory-installed step
bumper, safety chains may be
attached to the attaching points on
the bumper; otherwise, safety
chains should be attached to holes
on the trailer hitch platform. Always
leave just enough slack so thecombination can turn. Never allow
safety chains to drag on the ground.
Trailer Brakes
A loaded trailer that weighs more
than 900 kg (2,000 lb) must be
equipped with its own brake system,
with brakes working on all axles.
Trailer braking equipment
conforming to Canadian Standards
Association (CSA) requirement
CAN3-D313, or its equivalent, is
recommended.
State and local regulations may also
require the trailer to have its own
braking system if loaded above a
certain threshold. These
requirements vary from state to
state.
Read and follow the instructions for
the trailer brakes so they are
installed, adjusted, and maintained
properly.
Do not tap into the vehicle's
hydraulic brake system.
Auxiliary Battery
The auxiliary battery provision can
be used to supply electrical power
to additional equipment that may be
added, such as a slide-in camper.
If equipped, this relay will be on the
driver side of the vehicle, next to the
underhood electrical center.
Be sure to follow the proper
installation instructions included with
any electrical equipment that is
installed.
Caution
Leaving electrical equipment on
for extended periods will drain the
battery. Always turn off electrical
equipment when not in use and
do not use equipment that
exceeds the maximum amperage
rating of 30 amps for the auxiliary
battery provision.
Page 330 of 501
Chevrolet Silverado Owner Manual (GMNA-Localizing-U.S./Canada/Mexico-
11349200) - 2018 - CRC - 2/27/18
Driving and Operating 329
Warning (Continued)
(20-25 mph) and fully apply
the manual trailer brake
apply lever. Also check that
the trailer brake lamps and
other lamps are functioning
correctly.
. If the trailer brakes are not
operating properly at any
time, or if a DIC message
indicates problems with the
trailer connections or trailer
brakes, carefully pull the
vehicle over to the side of
the road when traffic
conditions allow.
Conversions and
Add-Ons
Add-On Electrical
Equipment
{Warning
The Data Link Connector (DLC) is
used for vehicle service
and Emission Inspection/
Maintenance testing. See
Malfunction Indicator Lamp
(Check Engine Light) 0147.
A device connected to the DLC —
such as an aftermarket fleet or
driver-behavior tracking device —
may interfere with vehicle
systems. This could affect vehicle
operation and cause a crash.
Such devices may also access
information stored in the vehicle’s
systems.
Caution
Some electrical equipment can
damage the vehicle or cause
components to not work and
would not be covered by the
vehicle warranty. Always check
with your dealer before adding
electrical equipment.
Add-on equipment can drain the
vehicle's 12-volt battery, even if the
vehicle is not operating.
The vehicle has an airbag system.
Before attempting to add anything
electrical to the vehicle, see
Servicing the Airbag-Equipped
Vehicle 090 and Adding Equipment
to the Airbag-Equipped Vehicle
0 90.
For information on wiring auxiliary
switches, see www.gmupfitter.com
or contact your dealer.
Page 334 of 501
Chevrolet Silverado Owner Manual (GMNA-Localizing-U.S./Canada/Mexico-
11349200) - 2018 - CRC - 2/27/18
Driving and Operating 333
go to a weigh station and weigh the
vehicle. Your dealer can also help
with this.
The total vehicle reserve capacity
for the vehicle is in the lower right
corner of the Certification/Tire label
as shown previously.
See your dealer for additional
advice and information about using
a snow plow on the vehicle. Also,
seeVehicle Load Limits 0239.
Emergency Roof Lamp
Provisions
Vehicles with the RPO VYU snow
plow prep package also have an
emergency roof lamp provision
package, RPO TRW. Wiring for the
emergency roof lamp is provided
above the overhead console. See
Auxiliary Roof-Mounted Lamp 0176
for switch location.
Pickup Conversion to
Chassis Cab
We are aware that some vehicle
owners might consider having the
pickup box removed and a
commercial or recreational body
installed. Owners should be aware
that, as manufactured, there are
differences between a chassis cab
and a pickup with the box removed
which could affect vehicle safety.
The components necessary to adapt
a pickup to permit its safe use with
a specialized body should be
installed by the body builder.