2018 CHEVROLET SILVERADO 1500 key
[x] Cancel search: keyPage 258 of 501
Chevrolet Silverado Owner Manual (GMNA-Localizing-U.S./Canada/Mexico-
11349200) - 2018 - CRC - 2/27/18
Driving and Operating 257
Running the Vehicle
While Parked
It is better not to park with the
engine running.
If the vehicle is left with the engine
running, follow the proper steps to
be sure the vehicle will not move.
SeeShifting Into Park 0253 and
Engine Exhaust 0256. If the vehicle
has a manual transmission, see
Parking (Manual Transmission)
0 255.
If parking on a hill and pulling a
trailer, see Driving Characteristics
and Towing Tips 0296.
Automatic
Transmission
If equipped, there is an electronic
shift lever position indicator within
the instrument cluster. This display
comes on when the ignition key is
turned on.
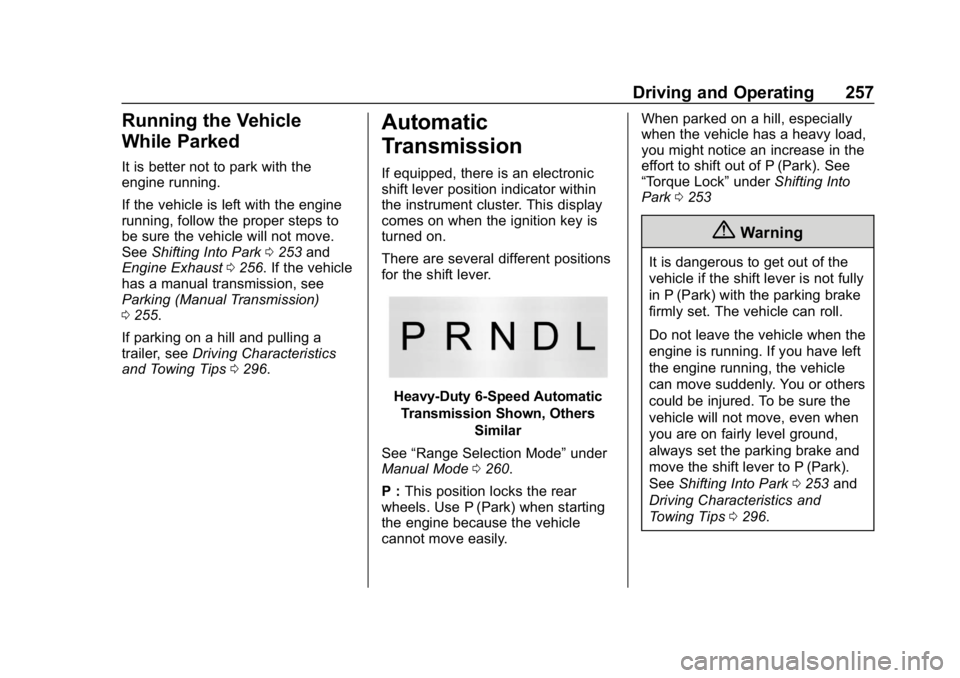
There are several different positions
for the shift lever.
Heavy-Duty 6-Speed Automatic
Transmission Shown, Others
Similar
See “Range Selection Mode” under
Manual Mode 0260.
P : This position locks the rear
wheels. Use P (Park) when starting
the engine because the vehicle
cannot move easily. When parked on a hill, especially
when the vehicle has a heavy load,
you might notice an increase in the
effort to shift out of P (Park). See
“Torque Lock”
underShifting Into
Park 0253
{Warning
It is dangerous to get out of the
vehicle if the shift lever is not fully
in P (Park) with the parking brake
firmly set. The vehicle can roll.
Do not leave the vehicle when the
engine is running. If you have left
the engine running, the vehicle
can move suddenly. You or others
could be injured. To be sure the
vehicle will not move, even when
you are on fairly level ground,
always set the parking brake and
move the shift lever to P (Park).
See Shifting Into Park 0253 and
Driving Characteristics and
Towing Tips 0296.
Page 260 of 501
Chevrolet Silverado Owner Manual (GMNA-Localizing-U.S./Canada/Mexico-
11349200) - 2018 - CRC - 2/27/18
Driving and Operating 259
D :This position is for normal
driving. It provides the best fuel
economy. If more power is needed
for passing, press the accelerator
pedal down.
. Going less than about 55 km/h
(35 mph), push the accelerator
pedal about halfway down.
. Going about 55 km/h (35 mph) or
more, push the accelerator all
the way down.
By doing this, the vehicle shifts
down to the next gear and has
more power.
Use D (Drive) and Tow/Haul Mode
when towing a trailer, carrying a
heavy load, driving on steep hills,
or driving off-road. Shift the
transmission to a lower gear
selection if the transmission shifts
too often.
Downshifting the transmission in
slippery road conditions could result
in skidding. See “Skidding”under
Loss of Control 0230. The vehicle has a shift stabilization
feature that adjusts the transmission
shifting to the current driving
conditions in order to reduce rapid
upshifts and downshifts. This shift
stabilization feature is designed to
determine, before making an
upshift, if the engine is able to
maintain vehicle speed by analyzing
things such as vehicle speed,
throttle position, and vehicle load.
If the shift stabilization feature
determines that a current vehicle
speed cannot be maintained, the
transmission does not upshift and
instead holds the current gear.
In some cases, this could appear to
be a delayed shift, however the
transmission is operating normally.
The transmission uses adaptive
shift controls. The adaptive shift
control process continually
compares key shift parameters to
pre-programmed ideal shifts stored
in the transmission’s computer. The
transmission constantly makes
adjustments to improve vehicle
performance according to how the
vehicle is being used, such as with
a heavy load or when the temperature changes. During this
adaptive shift control process,
shifting might feel different as the
transmission determines the best
settings.
When temperatures are very cold,
the transmission's gear shifting
could be delayed providing more
stable shifts until the engine warms
up. Shifts could be more noticeable
with a cold transmission. This
difference in shifting is normal.
L :
This position allows selection of
a range of gears appropriate for
current driving conditions.
If equipped, see “Range Selection
Mode” underManual Mode 0260.
Caution
Spinning the tires or holding the
vehicle in one place on a hill
using only the accelerator pedal
may damage the transmission.
The repair will not be covered by
the vehicle warranty. If the vehicle
is stuck, do not spin the tires.
(Continued)
Page 261 of 501
Chevrolet Silverado Owner Manual (GMNA-Localizing-U.S./Canada/Mexico-
11349200) - 2018 - CRC - 2/27/18
260 Driving and Operating
Caution (Continued)
When stopping on a hill, use the
brakes to hold the vehicle in
place.
Normal Mode Grade Braking
If equipped with a gasoline engine
and an automatic transmission,
Normal Mode Grade Braking is
enabled when the vehicle is started,
but is not enabled in Range
Selection Mode. It assists in
maintaining desired vehicle speeds
when driving on downhill grades by
using the engine and transmission
to slow the vehicle. The first time
the system engages for each
ignition key cycle, a DIC message
will be displayed.
To disable or enable Normal Mode
Grade Braking within the current
ignition key cycle, press and hold
the Tow/Haul button for
five seconds. When the button is
released, the requested mode
change is made. A DIC message
displays.For other forms of grade braking,
see
Tow/Haul Mode 0262 and
Cruise Control 0279.
Kickdown Mode
If equipped, the accelerator pedal
provides an additional downshift
after pressing through the kickdown
feature.
It requires extra pedal pressure near
the end of its travel to engage.
Manual Mode
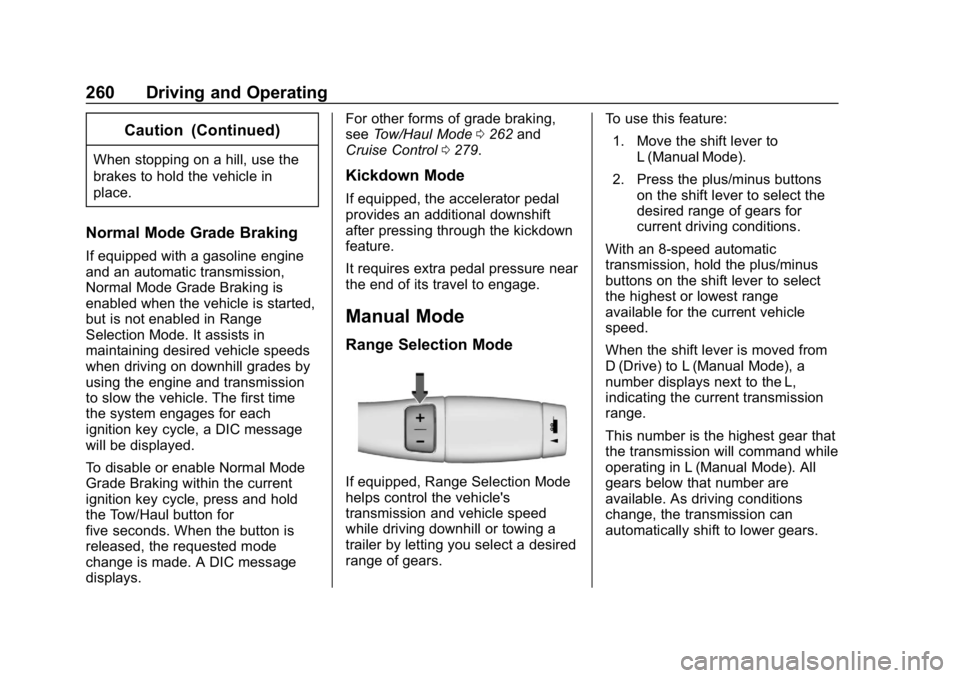
Range Selection Mode
If equipped, Range Selection Mode
helps control the vehicle's
transmission and vehicle speed
while driving downhill or towing a
trailer by letting you select a desired
range of gears. To use this feature:
1. Move the shift lever to L (Manual Mode).
2. Press the plus/minus buttons on the shift lever to select the
desired range of gears for
current driving conditions.
With an 8-speed automatic
transmission, hold the plus/minus
buttons on the shift lever to select
the highest or lowest range
available for the current vehicle
speed.
When the shift lever is moved from
D (Drive) to L (Manual Mode), a
number displays next to the L,
indicating the current transmission
range.
This number is the highest gear that
the transmission will command while
operating in L (Manual Mode). All
gears below that number are
available. As driving conditions
change, the transmission can
automatically shift to lower gears.
Page 264 of 501
Chevrolet Silverado Owner Manual (GMNA-Localizing-U.S./Canada/Mexico-
11349200) - 2018 - CRC - 2/27/18
Driving and Operating 263
Tow/Haul Mode Grade Braking
Tow/Haul Mode Grade Braking is
only enabled while the Tow/Haul
Mode is selected and the vehicle is
not in the Range Selection Mode.
See“Tow/Haul Mode” listed
previously and Manual Mode0260.
Tow/Haul Mode Grade Braking
assists in maintaining desired
vehicle speeds when driving on
downhill grades by using the engine
and transmission to slow the
vehicle.
If equipped, on vehicles with a
gasoline engine, to disable or
enable Tow/Haul Grade Braking
within the current ignition key cycle,
press and hold the Tow/Haul button
for five seconds. When the button is
released, the requested mode
change is made. A DIC message is
displayed. On vehicles with a diesel engine,
Tow/Haul Mode Grade Braking can
be enabled or disabled by pressing
the Tow/Haul Mode button. Use the
exhaust brake and Tow/Haul Mode
for maximum grade braking.
See
Towing Equipment 0318.
For other forms of grade braking,
see Automatic Transmission 0257
and Cruise Control 0279.
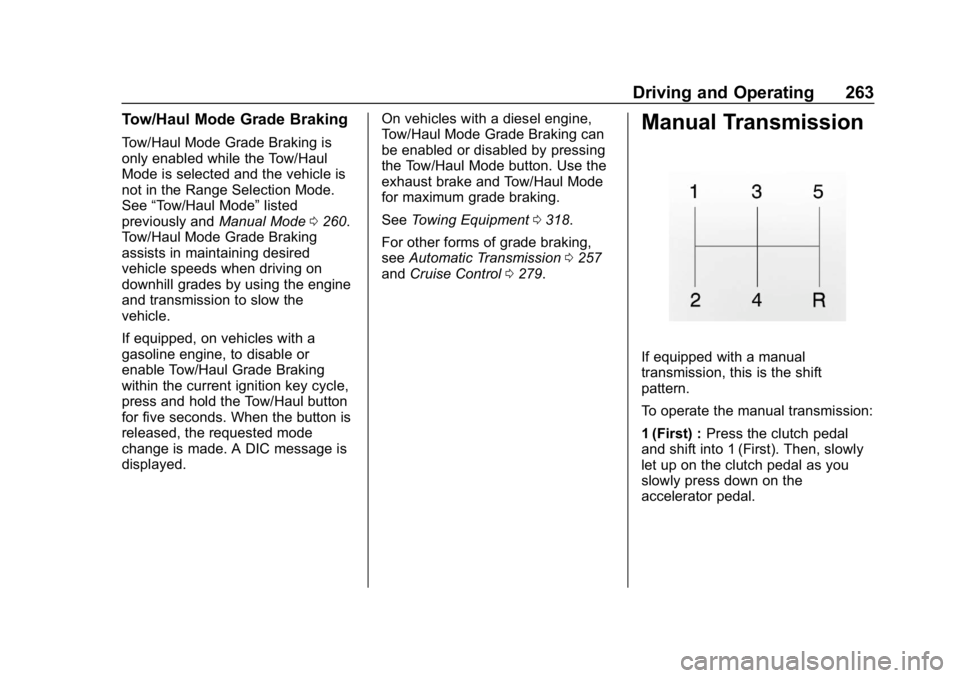
Manual Transmission
If equipped with a manual
transmission, this is the shift
pattern.
To operate the manual transmission:
1 (First) : Press the clutch pedal
and shift into 1 (First). Then, slowly
let up on the clutch pedal as you
slowly press down on the
accelerator pedal.
Page 282 of 501
Chevrolet Silverado Owner Manual (GMNA-Localizing-U.S./Canada/Mexico-
11349200) - 2018 - CRC - 2/27/18
Driving and Operating 281
Cruise Grade Braking is enabled
when the vehicle is started and
cruise control is active. It is not
enabled in Range Selection
Mode. It assists in maintaining
driver selected speed when
driving on downhill grades by
using the engine and
transmission to slow the vehicle.
To disable and enable Cruise
Grade Braking for the current
ignition key cycle, press and
hold the Tow/Haul button for
five seconds. A DIC message
displays. SeeVehicle Messages
0 159.
. Vehicles with a diesel engine
have Cruise Grade Braking
enabled when Tow/Haul Mode is
on, the exhaust brake is on,
or both are on. For other forms of descent control,
see
Hill Descent Control (HDC)
0 277, Automatic Transmission
0 257, and Tow/Haul Mode 0262.
Ending Cruise Control
There are four ways to end cruise
control:
. Step lightly on the brake pedal.
. Press
*.
. Shift the transmission to
N (Neutral).
. To turn off cruise control,
press
5.
Erasing Speed Memory
The cruise control set speed is
erased from memory if
5is pressed
or the ignition is turned off.
Driver Assistance
Systems
This vehicle may have features that
work together to help avoid crashes
or reduce crash damage while
driving, backing, and parking. Read
this entire section before using
these systems.
{Warning
Do not rely on the Driver
Assistance Systems. These
systems do not replace the need
for paying attention and driving
safely. You may not hear or feel
alerts or warnings provided by
these systems. Failure to use
proper care when driving may
result in injury, death, or vehicle
damage. See Defensive Driving
0 228.
(Continued)
Page 337 of 501
Chevrolet Silverado Owner Manual (GMNA-Localizing-U.S./Canada/Mexico-
11349200) - 2018 - CRC - 2/27/18
336 Vehicle Care
California Proposition
65 Warning
{Warning
Most motor vehicles, including
this one, as well as many of its
service parts and fluids, contain
and/or emit chemicals known to
the State of California to cause
cancer and birth defects or other
reproductive harm. Engine
exhaust, many parts and
systems, many fluids, and some
component wear by-products
contain and/or emit these
chemicals. For more information
go to www.P65Warnings.ca.gov/
passenger-vehicle.
See Battery - North America 0362
and Jump Starting - North America
0 421 and the back cover.
California Perchlorate
Materials Requirements
Certain types of automotive
applications, such as airbag
initiators, seat belt pretensioners,
and lithium batteries contained in
Remote Keyless Entry transmitters,
may contain perchlorate materials.
Special handling may be necessary.
For additional information, see
www.dtsc.ca.gov/hazardouswaste/
perchlorate.
Accessories and
Modifications
Adding non-dealer accessories or
making modifications to the vehicle
can affect vehicle performance and
safety, including such things as
airbags, braking, stability, ride and
handling, emissions systems,
aerodynamics, durability, and
electronic systems like antilock
brakes, traction control, and stability
control. These accessories or
modifications could even cause
malfunction or damage not covered
by the vehicle warranty. Damage to suspension components
caused by modifying vehicle height
outside of factory settings will not be
covered by the vehicle warranty.
Damage to vehicle components
resulting from modifications or the
installation or use of non-GM
certified parts, including control
module or software modifications, is
not covered under the terms of the
vehicle warranty and may affect
remaining warranty coverage for
affected parts.
GM Accessories are designed to
complement and function with other
systems on the vehicle. See your
dealer to accessorize the vehicle
using genuine GM Accessories
installed by a dealer technician.
Also, see
Adding Equipment to the
Airbag-Equipped Vehicle 090.
Page 369 of 501
Chevrolet Silverado Owner Manual (GMNA-Localizing-U.S./Canada/Mexico-
11349200) - 2018 - CRC - 2/27/18
368 Vehicle Care
Automatic Transmission
Shift Lock Control
Function Check
{Warning
When you are doing this
inspection, the vehicle could
move suddenly. If the vehicle
moves, you or others could be
injured.
1. Before starting this check, be sure there is enough room
around the vehicle. It should be
parked on a level surface.
2. Apply the parking brake. Be ready to apply the regular
brake immediately if the vehicle
begins to move.
3. With the engine off, turn the ignition on, but do not start the
engine. Without applying the
regular brake, try to move the
shift lever out of P (Park) with normal effort. If the shift lever
moves out of P (Park), contact
your dealer for service.
Ignition Transmission
Lock Check
While parked, and with the parking
brake set, try to turn the ignition off
in each shift lever position.
.
For automatic transmission
vehicles, the ignition should turn
to off only when the shift lever is
in P (Park).
. For manual transmission
vehicles, the ignition should turn
off only when you press the key
release button.
On all vehicles, the ignition key
should come out only when the
ignition is off.
Contact your dealer if service is
required.
Park Brake and P (Park)
Mechanism Check
{Warning
When you are doing this check,
the vehicle could begin to move.
You or others could be injured
and property could be damaged.
Make sure there is room in front
of the vehicle in case it begins to
roll. Be ready to apply the regular
brake at once should the vehicle
begin to move.
Park on a fairly steep hill, with the
vehicle facing downhill. Keeping
your foot on the regular brake, set
the parking brake.
. To check the parking brake's
holding ability: With the engine
running and the transmission in
N (Neutral), slowly remove foot
pressure from the regular brake
pedal. Do this until the vehicle is
held by the parking brake only.
Page 412 of 501
Chevrolet Silverado Owner Manual (GMNA-Localizing-U.S./Canada/Mexico-
11349200) - 2018 - CRC - 2/27/18
Vehicle Care 411
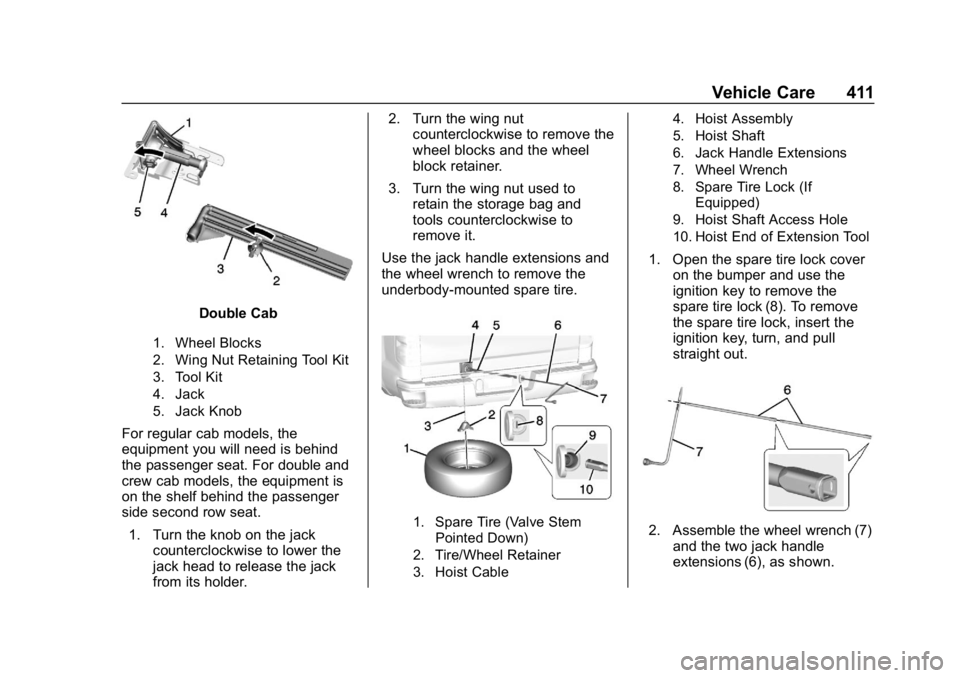
Double Cab
1. Wheel Blocks
2. Wing Nut Retaining Tool Kit
3. Tool Kit
4. Jack
5. Jack Knob
For regular cab models, the
equipment you will need is behind
the passenger seat. For double and
crew cab models, the equipment is
on the shelf behind the passenger
side second row seat.1. Turn the knob on the jack counterclockwise to lower the
jack head to release the jack
from its holder. 2. Turn the wing nut
counterclockwise to remove the
wheel blocks and the wheel
block retainer.
3. Turn the wing nut used to retain the storage bag and
tools counterclockwise to
remove it.
Use the jack handle extensions and
the wheel wrench to remove the
underbody-mounted spare tire.
1. Spare Tire (Valve Stem Pointed Down)
2. Tire/Wheel Retainer
3. Hoist Cable 4. Hoist Assembly
5. Hoist Shaft
6. Jack Handle Extensions
7. Wheel Wrench
8. Spare Tire Lock (If
Equipped)
9. Hoist Shaft Access Hole
10. Hoist End of Extension Tool
1. Open the spare tire lock cover on the bumper and use the
ignition key to remove the
spare tire lock (8). To remove
the spare tire lock, insert the
ignition key, turn, and pull
straight out.
2. Assemble the wheel wrench (7)and the two jack handle
extensions (6), as shown.