2018 CHEVROLET SILVERADO 1500 battery replacement
[x] Cancel search: battery replacementPage 38 of 501
Chevrolet Silverado Owner Manual (GMNA-Localizing-U.S./Canada/Mexico-
11349200) - 2018 - CRC - 2/27/18
Keys, Doors, and Windows 37
learned and all previously
known keys will no longer work
with the vehicle.
6. To learn a second key, turn the ignition off, insert the second
key to be learned, and turn the
ignition on.
After two keys are learned, the
remaining keys can be learned by
following the procedure in
“Programming with Two
Recognized Keys.”
The key has a bar-coded key tag
that the dealer or qualified locksmith
can use to make new keys. Store
this information in a safe place, not
in the vehicle.
See your dealer if a replacement
key or additional key is needed.
If it becomes difficult to turn a key,
inspect the key blade for debris.
Periodically clean with a brush
or pick.
With an active OnStar service plan,
an OnStar Advisor may remotely
unlock the vehicle. See OnStar
Overview 0475.Remote Keyless Entry
(RKE) System
See Radio Frequency Statement
0 471.
If there is a decrease in the Remote
Keyless Entry (RKE) operating
range:
. Check the distance. The
transmitter may be too far from
the vehicle.
. Check the location. Other
vehicles or objects may be
blocking the signal.
. Check the transmitter's battery.
See “Battery Replacement” later
in this section.
. If the transmitter is still not
working correctly, see your
dealer or a qualified technician
for service.
Remote Keyless Entry
(RKE) System Operation
The RKE transmitter functions may
work up to 60 m (197 ft) away from
the vehicle. Other conditions can affect the
performance of the transmitter. See
Remote Keyless Entry (RKE)
System
037.
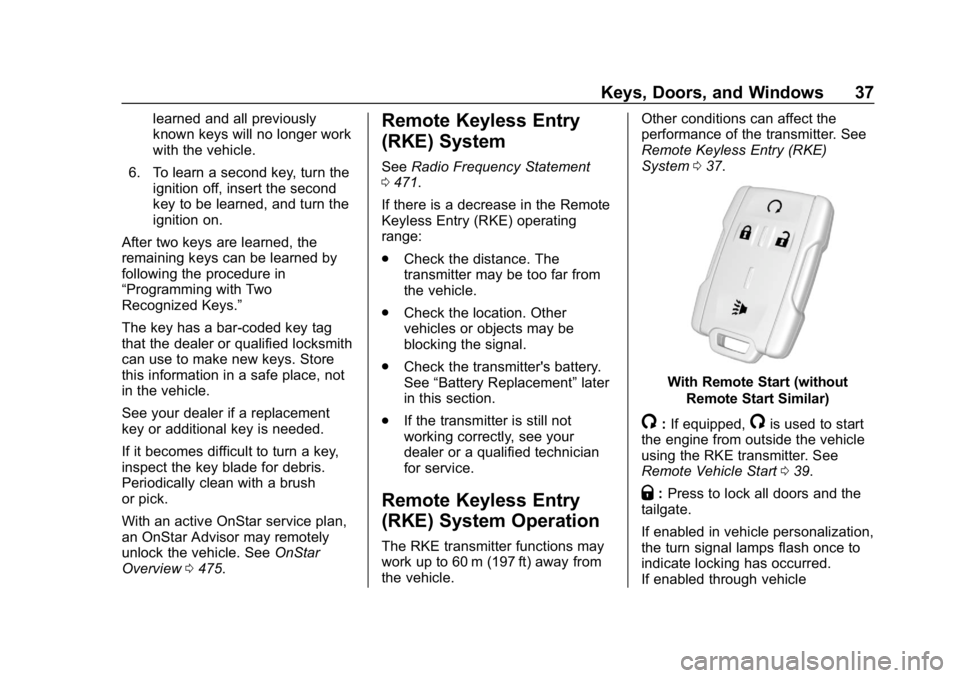
With Remote Start (without
Remote Start Similar)
/:If equipped,/is used to start
the engine from outside the vehicle
using the RKE transmitter. See
Remote Vehicle Start 039.
Q:Press to lock all doors and the
tailgate.
If enabled in vehicle personalization,
the turn signal lamps flash once to
indicate locking has occurred.
If enabled through vehicle
Page 39 of 501
Chevrolet Silverado Owner Manual (GMNA-Localizing-U.S./Canada/Mexico-
11349200) - 2018 - CRC - 2/27/18
38 Keys, Doors, and Windows
personalization, the horn chirps
when
Qis pressed again within
three seconds. See Vehicle
Personalization 0160.
Pressing
Qarms the alarm system.
See Vehicle Alarm System 044.
If equipped with auto mirror folding,
pressing and holding
Qfor
one second will fold the mirrors. The
auto mirror folding feature will not
operate unless it is enabled.
See Folding Mirrors 049 and
Vehicle Personalization 0160.
K:Press once to unlock only the
driver door. If
Kis pressed again
within three seconds, all remaining
doors and the tailgate unlock. The
interior lamps may come on and
stay on for 20 seconds or until the
ignition is turned on.
If enabled in vehicle personalization,
the turn signal lamps flash twice to
indicate unlocking has occurred.
See Vehicle Personalization 0160. If enabled through vehicle
personalization, the exterior lamps
may turn on. See
Vehicle
Personalization 0160.
Pressing
Kon the RKE transmitter
disarms the alarm system. See
Vehicle Alarm System 044.
If equipped with auto mirror folding,
pressing and holding
Kfor
one second will unfold the mirrors.
The auto mirror folding feature will
not operate unless it is enabled.
See Folding Mirrors 049 and
Vehicle Personalization 0160.
On some models, press, release,
and then press and hold
Kto open
all of the windows. Pressing the
button again will stop the windows.
See Vehicle Personalization 0160.
7:Press and release one time to
initiate vehicle locator. The turn
signal lamps flash and the horn
sounds three times. Press and hold
7for at least
three seconds to sound the panic
alarm. The turn signal lamps flash
and the horn sounds repeatedly for
30 seconds. The alarm turns off
when the ignition is turned on or
7
is pressed again. The ignition must
be off for the panic alarm to work.
Programming Transmitters to
the Vehicle
Only RKE transmitters programmed
to this vehicle will work. If a
transmitter is lost or stolen, a
replacement can be purchased and
programmed through your dealer.
Each vehicle can have up to
eight transmitters programmed to it.
See your dealer for transmitter
programming.
Battery Replacement
Replace the battery in the
transmitter soon if the REPLACE
BATTERY IN REMOTE KEY
message displays in the Driver
Information Center (DIC).
Page 161 of 501
Chevrolet Silverado Owner Manual (GMNA-Localizing-U.S./Canada/Mexico-
11349200) - 2018 - CRC - 2/27/18
160 Instruments and Controls
.Brakes
. Ride Control Systems
. Driver Assistance Systems
. Cruise Control
. Lighting and Bulb Replacement
. Wiper/Washer Systems
. Doors and Windows
. Seat Belts
. Airbag Systems
. Engine and Transmission
. Tire Pressure
. Battery
Engine Power Messages
ENGINE POWER IS REDUCED
This message displays when the
vehicle's propulsion power is
reduced. Reduced propulsion power
can affect the vehicle's ability to
accelerate. If this message is on,
but there is no observed reduction in performance, proceed to your
destination. The performance may
be reduced the next time the vehicle
is driven. The vehicle may be driven
while this message is on, but
maximum acceleration and speed
may be reduced. Anytime this
message stays on, or displays
repeatedly, the vehicle should be
taken to your dealer for service as
soon as possible.
Vehicle Speed Messages
SPEED LIMITED TO
XXX KM/H (MPH)
This message shows that the
vehicle speed has been limited to
the speed displayed. The limited
speed is a protection for various
propulsion and vehicle systems,
such as lubrication, thermal,
suspension, Teen Driver if
equipped, or tires.
Vehicle
Personalization
Use the audio system controls to
access the personalization menus
for customizing vehicle features.
The following are all possible
personalization features. Depending
on the vehicle, some may not be
available.
Base Radio Audio System
Controls
{:
Press to access the Home
Page Menu.
QorR: Touch to scroll through the
menus or setup items.
0: Touch to exit or return to the
previous screen or menu.
Uplevel Radio Audio System
Controls
1. Touch the desired feature to display a list of available
options.
2. Select the desired feature setting.
Page 253 of 501
Chevrolet Silverado Owner Manual (GMNA-Localizing-U.S./Canada/Mexico-
11349200) - 2018 - CRC - 2/27/18
252 Driving and Operating
turned from ON/RUN to LOCK/OFF,
the windows and sunroof continue
to work up to 10 minutes or until any
door is opened. The radio continues
to work for up to 10 minutes or until
the driver door is opened.
Accessory Power Outlets (APOs)
The vehicle may have Accessory
Power Outlets (APOs) in several
locations. SeePower Outlets0132.
The APOs in the console or center
seat position are powered by
Retained Accessory Power (RAP).
They will continue to work for up to
10 minutes after the key is turned
from ON/RUN to LOCK/OFF, or until
the driver door is opened.
The APOs on the center stack come
from the factory powered directly
from the vehicle battery, and supply
accessory power at all times,
regardless of ignition key position.
If electronic items are left plugged
into these APOs for long periods of
time with the vehicle off, the vehicle
battery could be drained. The vehicle may not start if the battery is
allowed to drain for an extended
period of time.
Engine Coolant Heater
The engine heater can provide
easier starting and better fuel
economy during engine warm-up in
cold weather conditions at or below
−18 °C (0 °F). Vehicles with an
engine heater should be plugged in
at least four hours before starting.
An internal thermostat in the
plug-end of the cord may exist,
which will prevent engine coolant
heater operation at temperatures
above
−18 °C (0 °F).
If the vehicle has a diesel engine,
see the Duramax diesel
supplement.
{Warning
Do not plug in the engine block
heater while the vehicle is parked
in a garage or under a carport.
Property damage or personal (Continued)
Warning (Continued)
injury may result. Always park the
vehicle in a clear open area away
from buildings or structures.
To Use the Engine Coolant
Heater
1. Turn off the engine.
2. Open the hood and unwrap theelectrical cord. The cord is
secured to the driver side
fender with a clip, next to the
engine compartment fuse
block. Carefully remove the
wire tie that bundles the
electrical plug. Do not cut the
electrical cord.
Check the heater cord for
damage. If it is damaged, do
not use it. See your dealer for
a replacement. Inspect the
cord for damage yearly.
3. Plug the cord into a normal, grounded 110-volt AC outlet.
Page 335 of 501
Chevrolet Silverado Owner Manual (GMNA-Localizing-U.S./Canada/Mexico-
11349200) - 2018 - CRC - 2/27/18
334 Vehicle Care
Vehicle Care
General Information
General Information . . . . . . . . . . 335
California Proposition65 Warning . . . . . . . . . . . . . . . . . 336
California Perchlorate Materials Requirements . . . . . 336
Accessories and Modifications . . . . . . . . . . . . . . . . 336
Vehicle Checks
Doing Your OwnService Work . . . . . . . . . . . . . . . 337
Hood . . . . . . . . . . . . . . . . . . . . . . . . . 337
Engine Compartment Overview . . . . . . . . . . . . . . . . . . . . 338
Engine Oil . . . . . . . . . . . . . . . . . . . . 343
Engine Oil Life System . . . . . . . 346
Automatic Transmission Fluid (6-Speed Transmission) . . . . . 347
Automatic Transmission Fluid (8-Speed Transmission) . . . . . 350
Manual Transmission Fluid . . . 350
Hydraulic Clutch . . . . . . . . . . . . . . 351
Engine Air Cleaner/Filter . . . . . . 351
Cooling System . . . . . . . . . . . . . . 352
Engine Overheating . . . . . . . . . . 356 Overheated Engine Protection
Operating Mode . . . . . . . . . . . . . 358
Engine Fan . . . . . . . . . . . . . . . . . . . 358
Power Steering Fluid (1500 Series) . . . . . . . . . . . . . . . . . . . . . . 359
Power Steering Fluid (2500/ 3500 Series) . . . . . . . . . . . . . . . . 359
Washer Fluid . . . . . . . . . . . . . . . . . 359
Brakes . . . . . . . . . . . . . . . . . . . . . . . 360
Brake Fluid . . . . . . . . . . . . . . . . . . . 361
Battery - North America . . . . . . 362
Four-Wheel Drive . . . . . . . . . . . . . 363
Front Axle . . . . . . . . . . . . . . . . . . . . 364
Rear Axle . . . . . . . . . . . . . . . . . . . . 365
Noise Control System . . . . . . . . 366
Starter Switch Check . . . . . . . . . 367
Automatic Transmission Shift Lock Control Function
Check . . . . . . . . . . . . . . . . . . . . . . . 368
Ignition Transmission Lock Check . . . . . . . . . . . . . . . . . . . . . . . 368
Park Brake and P (Park) Mechanism Check . . . . . . . . . . 368
Wiper Blade Replacement . . . . 369
Windshield Replacement . . . . . 369
Gas Strut(s) . . . . . . . . . . . . . . . . . . 370
Headlamp Aiming
Headlamp Aiming . . . . . . . . . . . . 371
Bulb Replacement
Bulb Replacement . . . . . . . . . . . . 371
Halogen Bulbs . . . . . . . . . . . . . . . . 371
High Intensity Discharge (HID) Lighting . . . . . . . . . . . . . . . . . . . . . 371
LED Lighting . . . . . . . . . . . . . . . . . 371
Headlamps, Front Turn Signal,
Sidemarker, and Parking
Lamps . . . . . . . . . . . . . . . . . . . . . . 372
Fog Lamps . . . . . . . . . . . . . . . . . . . 373
Taillamps (Chassis Cab Models) . . . . . . . . . . . . . . . . . . . . . 373
Taillamps, Turn Signal, Stoplamps, and Back-Up
Lamps . . . . . . . . . . . . . . . . . . . . . . 373
Center High-Mounted Stoplamp (CHMSL) and
Cargo Lamp . . . . . . . . . . . . . . . . . 375
Electrical System
High Voltage Devices andWiring . . . . . . . . . . . . . . . . . . . . . . . 375
Electrical System Overload . . . 375
Fuses and Circuit Breakers . . . 376
Engine Compartment Fuse Block . . . . . . . . . . . . . . . . . . . . . . . . 376
Instrument Panel Fuse Block (Right) . . . . . . . . . . . . . . . . . . . . . . 380
Instrument Panel Fuse Block (Left) . . . . . . . . . . . . . . . . . 381
Page 363 of 501
Chevrolet Silverado Owner Manual (GMNA-Localizing-U.S./Canada/Mexico-
11349200) - 2018 - CRC - 2/27/18
362 Vehicle Care
Warning (Continued)
Add brake fluid only when work is
done on the brake hydraulic
system.
When the brake fluid falls to a low
level, the brake warning light comes
on. See Brake System Warning
Light 0149.
Brake fluid absorbs water over time.
Replace brake fluid at the specified
intervals to prevent increased
stopping distance. See Maintenance
Schedule 0443.
Checking Brake Fluid
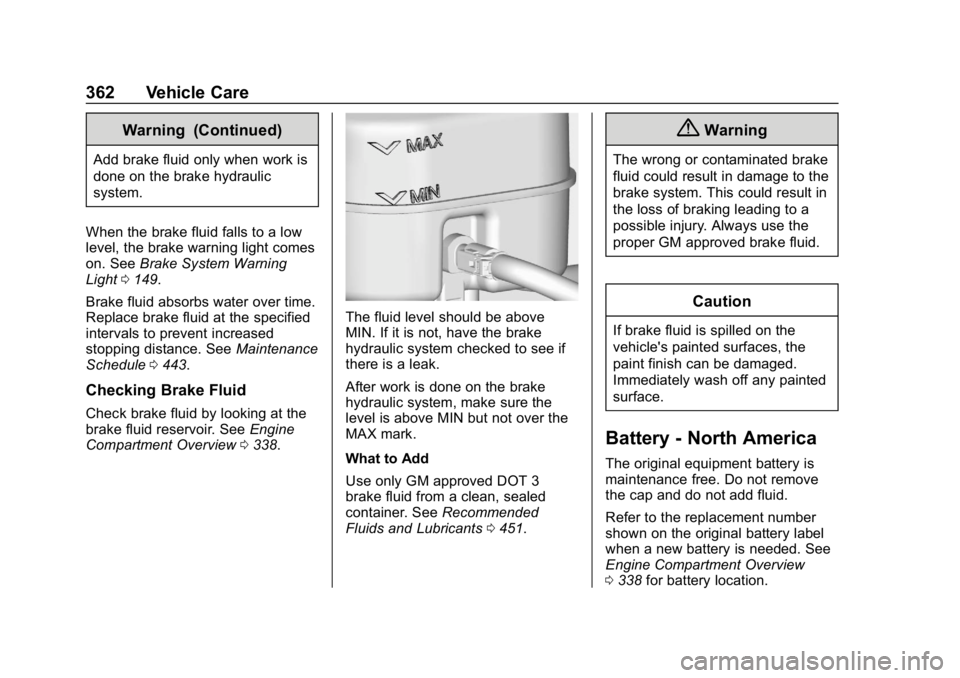
Check brake fluid by looking at the
brake fluid reservoir. See Engine
Compartment Overview 0338.
The fluid level should be above
MIN. If it is not, have the brake
hydraulic system checked to see if
there is a leak.
After work is done on the brake
hydraulic system, make sure the
level is above MIN but not over the
MAX mark.
What to Add
Use only GM approved DOT 3
brake fluid from a clean, sealed
container. See Recommended
Fluids and Lubricants 0451.
{Warning
The wrong or contaminated brake
fluid could result in damage to the
brake system. This could result in
the loss of braking leading to a
possible injury. Always use the
proper GM approved brake fluid.
Caution
If brake fluid is spilled on the
vehicle's painted surfaces, the
paint finish can be damaged.
Immediately wash off any painted
surface.
Battery - North America
The original equipment battery is
maintenance free. Do not remove
the cap and do not add fluid.
Refer to the replacement number
shown on the original battery label
when a new battery is needed. See
Engine Compartment Overview
0338 for battery location.
Page 373 of 501
Chevrolet Silverado Owner Manual (GMNA-Localizing-U.S./Canada/Mexico-
11349200) - 2018 - CRC - 2/27/18
372 Vehicle Care
Headlamps, Front Turn
Signal, Sidemarker, and
Parking Lamps
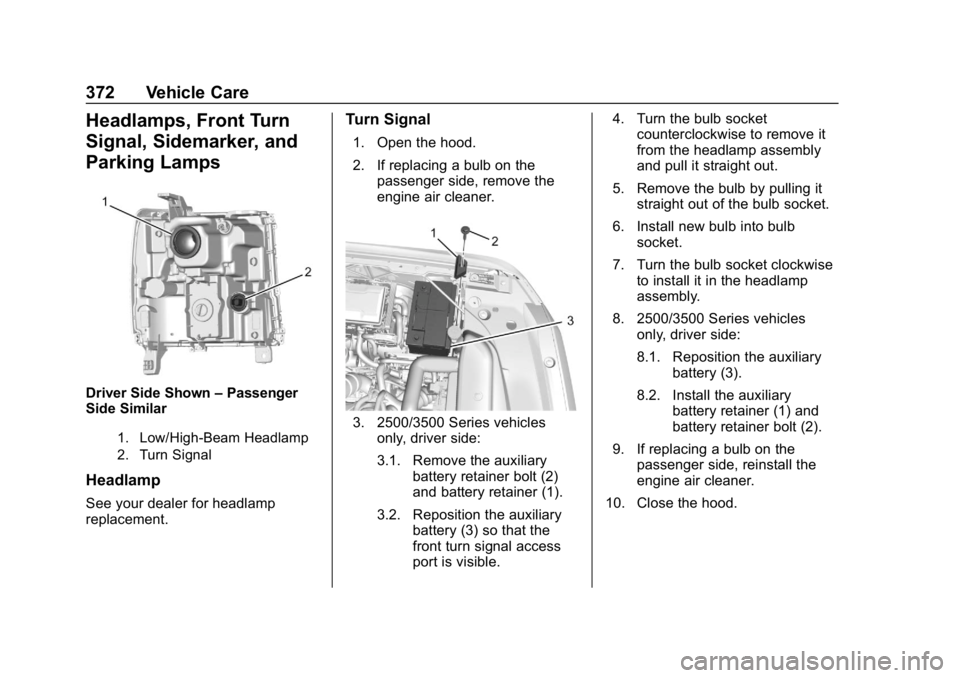
Driver Side Shown–Passenger
Side Similar
1. Low/High-Beam Headlamp
2. Turn Signal
Headlamp
See your dealer for headlamp
replacement.
Turn Signal
1. Open the hood.
2. If replacing a bulb on the
passenger side, remove the
engine air cleaner.
3. 2500/3500 Series vehicles
only, driver side:
3.1. Remove the auxiliary battery retainer bolt (2)
and battery retainer (1).
3.2. Reposition the auxiliary battery (3) so that the
front turn signal access
port is visible. 4. Turn the bulb socket
counterclockwise to remove it
from the headlamp assembly
and pull it straight out.
5. Remove the bulb by pulling it straight out of the bulb socket.
6. Install new bulb into bulb socket.
7. Turn the bulb socket clockwise to install it in the headlamp
assembly.
8. 2500/3500 Series vehicles only, driver side:
8.1. Reposition the auxiliary
battery (3).
8.2. Install the auxiliary battery retainer (1) and
battery retainer bolt (2).
9. If replacing a bulb on the passenger side, reinstall the
engine air cleaner.
10. Close the hood.
Page 450 of 501
Chevrolet Silverado Owner Manual (GMNA-Localizing-U.S./Canada/Mexico-
11349200) - 2018 - CRC - 2/27/18
Service and Maintenance 449
Battery
The 12-volt battery supplies power
to start the engine and operate any
additional electrical accessories.
.To avoid break-down or failure to
start the vehicle, maintain a
battery with full cranking power.
. Trained dealer technicians have
the diagnostic equipment to test
the battery and ensure that the
connections and cables are
corrosion-free.
Belts
. Belts may need replacing if they
squeak or show signs of
cracking or splitting.
. Trained dealer technicians have
access to tools and equipment
to inspect the belts and
recommend adjustment or
replacement when necessary. Brakes
Brakes stop the vehicle and are
crucial to safe driving.
.
Signs of brake wear may include
chirping, grinding, or squealing
noises, or difficulty stopping.
. Trained dealer technicians have
access to tools and equipment
to inspect the brakes and
recommend quality parts
engineered for the vehicle.
Fluids
Proper fluid levels and approved
fluids protect the vehicle’s systems
and components. See
Recommended Fluids and
Lubricants 0451 for GM approved
fluids.
. Engine oil and windshield
washer fluid levels should be
checked at every fuel fill.
. Instrument cluster lights may
come on to indicate that fluids
may be low and need to be
filled. Hoses
Hoses transport fluids and should
be regularly inspected to ensure
that there are no cracks or leaks.
With a multi-point inspection, your
dealer can inspect the hoses and
advise if replacement is needed.
Lamps
Properly working headlamps,
taillamps, and brake lamps are
important to see and be seen on
the road.
.
Signs that the headlamps need
attention include dimming, failure
to light, cracking, or damage.
The brake lamps need to be
checked periodically to ensure
that they light when braking.
. With a multi-point inspection,
your dealer can check the lamps
and note any concerns.