2018 CHEVROLET MALIBU phone
[x] Cancel search: phonePage 20 of 413
Chevrolet Malibu Owner Manual (GMNA-Localizing-U.S./Canada/Mexico-
11348460) - 2018 - crc - 5/3/17
In Brief 19
Hybrid Low Mode
When descending steep grades or
in stop-and-go traffic, L (Low)
provides the ability to slow the
vehicle with regenerative braking
when lifting off the accelerator
pedal. L2 provides moderate
braking and L1 provides maximum
braking below 80 km/h (50 mph).
When the battery reaches full
charge the engine may run to
maintain braking.
To use this feature:1. Move the shift lever to L (Low). The transmission will enter L2.
2. Press + (Plus) or −(Minus) on
the shift lever to shift between
L2 and L1.
See Manual Mode 0225.
Vehicle Features
Infotainment System
Base radio information is included in
this manual. See the infotainment
manual for information on other
available infotainment systems.
Read the following pages to
become familiar with the features.
{Warning
Taking your eyes off the road for
too long or too often while using
any infotainment feature can
cause a crash. You or others
could be injured or killed. Do not
give extended attention to
infotainment tasks while driving.
Limit your glances at the vehicle
displays and focus your attention
on driving. Use voice commands
whenever possible.
The infotainment system has built-in
features intended to help avoid
distraction by disabling some
functions when driving. These functions may gray out when they
are unavailable. Many infotainment
features are also available through
the instrument cluster and steering
wheel controls.
Before driving:
.
Become familiar with the
operation, center stack controls,
and infotainment display
controls.
. Set up the audio by presetting
favorite stations, setting the
tone, and adjusting the
speakers.
. Set up phone numbers in
advance so they can be called
easily by pressing a single
control or by using a single voice
command if equipped with
Bluetooth phone capability.
See Defensive Driving 0207.
To play the infotainment system with
the ignition off, see Retained
Accessory Power (RAP) 0221.
Page 22 of 413
Chevrolet Malibu Owner Manual (GMNA-Localizing-U.S./Canada/Mexico-
11348460) - 2018 - crc - 5/3/17
In Brief 21
Bluetooth
The Bluetooth system allows users
with a Bluetooth-enabled cell phone
to make and receive hands-free
calls using the vehicle audio system
and controls.
The Bluetooth-enabled cell phone
must be paired with the in-vehicle
Bluetooth system before it can be
used in the vehicle. Not all phones
will support all functions.
SeeBluetooth (Overview) 0182 or
Bluetooth (Infotainment Controls
Radio with Touchscreen) 0187 or
Bluetooth (Infotainment Controls
Radio without Touchscreen) 0183.
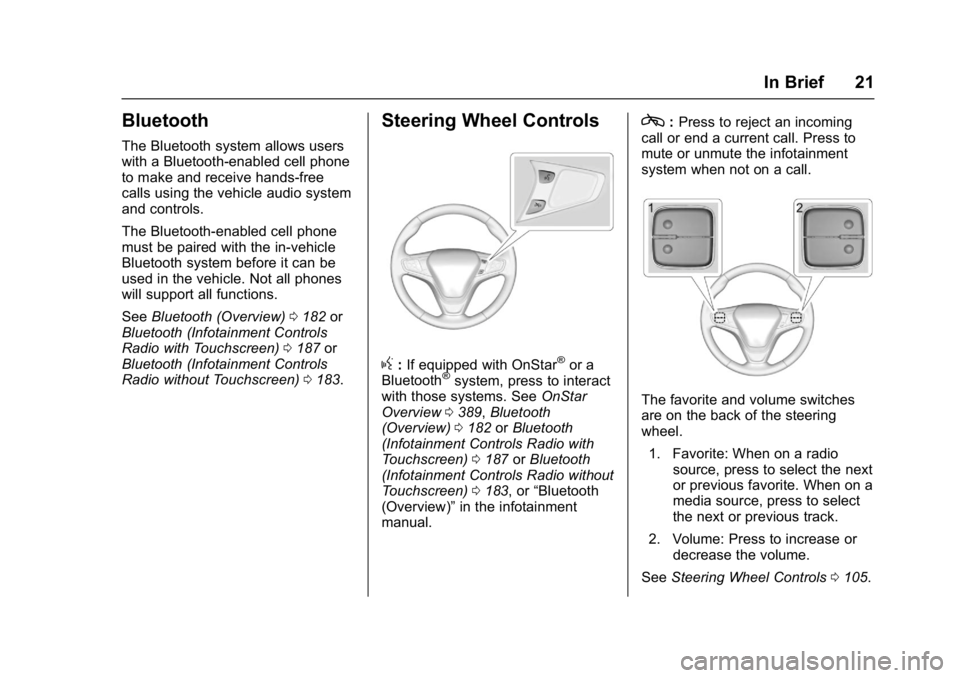
Steering Wheel Controls
g:If equipped with OnStar®or a
Bluetooth®system, press to interact
with those systems. See OnStar
Overview 0389, Bluetooth
(Overview) 0182 orBluetooth
(Infotainment Controls Radio with
Touchscreen) 0187 orBluetooth
(Infotainment Controls Radio without
Touchscreen) 0183, or “Bluetooth
(Overview)” in the infotainment
manual.
c: Press to reject an incoming
call or end a current call. Press to
mute or unmute the infotainment
system when not on a call.
The favorite and volume switches
are on the back of the steering
wheel.
1. Favorite: When on a radio source, press to select the next
or previous favorite. When on a
media source, press to select
the next or previous track.
2. Volume: Press to increase or decrease the volume.
See Steering Wheel Controls 0105.
Page 25 of 413

Chevrolet Malibu Owner Manual (GMNA-Localizing-U.S./Canada/Mexico-
11348460) - 2018 - crc - 5/3/17
24 In Brief
Rear Vision
Camera (RVC)
If equipped, RVC shows a view of
the area behind the vehicle on the
infotainment display when the
vehicle is shifted into R (Reverse) to
aid with parking and low-speed
backing maneuvers.
SeeAssistance Systems for Parking
or Backing 0243.
Rear Cross Traffic Alert
(RCTA) System
If equipped, the RCTA system uses
a triangle with an arrow on the
infotainment display to warn of
traffic behind your vehicle that may
cross your vehicle's path while in
R (Reverse). In addition, beeps will
sound.
See Assistance Systems for Parking
or Backing 0243.
Parking Assist
If equipped, Front and Rear Parking
Assist (FRPA) uses sensors on the
front and rear bumpers to assist with parking and avoiding objects
during low-speed parking
maneuvers. It operates at speeds
less than 8 km/h (5 mph). The
system may show a warning triangle
on the infotainment display and a
graphic on the instrument cluster to
provide the object distance. In
addition, multiple beeps may occur
if very close to an object.
See
Assistance Systems for Parking
or Backing 0243.
Automatic Parking
Assist (APA)
If equipped, the APA system helps
to search for and maneuver the
vehicle into parallel or perpendicular
parking spots using automatic
steering, DIC displays, and beeps.
When the vehicle speed is below
30 km/h (18 mph), press
Oto
enable the system.
See “Automatic Parking Assist
(APA)” underAssistance Systems
for Parking or Backing 0243.
Power Outlets
The accessory power outlets can be
used to plug in electrical equipment,
such as a cell phone or MP3 player.
There are two accessory power
outlets:
.
One on the center stack below
the climate control system.
. One on the rear of the center
console.
Open the protective cover to use the
accessory power outlet.
See Power Outlets 0109.
Page 110 of 413
Chevrolet Malibu Owner Manual (GMNA-Localizing-U.S./Canada/Mexico-
11348460) - 2018 - crc - 5/3/17
Instruments and Controls 109
Power Outlets
Power Outlet 12-Volt Direct
Current
The accessory power outlets can be
used to plug in electrical equipment,
such as a cell phone or MP3 player.
There are two accessory power
outlets:
.One on the center stack below
the climate control system.
. One on the rear of the center
console.
The outlet is powered when the
ignition is on or in ACC/
ACCESSORY, or until the driver
door is opened within 10 minutes of
turning off the vehicle. See Retained
Accessory Power (RAP) 0221.
Open the protective cover to use the
accessory power outlet.
Certain electrical accessories may
not be compatible with the
accessory power outlets and could
overload vehicle or adapter fuses.
If there is a problem, see your
dealer. When adding electrical equipment,
be sure to follow the installation
instructions included with the
equipment. See
Add-On Electrical
Equipment 0267.
Caution
Hanging heavy equipment from
the power outlet can cause
damage not covered by the
vehicle warranty. The power
outlets are designed for
accessory power plugs only, such
as cell phone charge cords.
Always unplug electrical equipment
when not in use and do not plug in
equipment that exceeds the
maximum 20 amps rating.
Power Outlet 110/120-Volt
Alternating Current
If equipped with this power outlet it
can be used to plug in electrical
equipment that uses a maximum
limit of 150 watts.
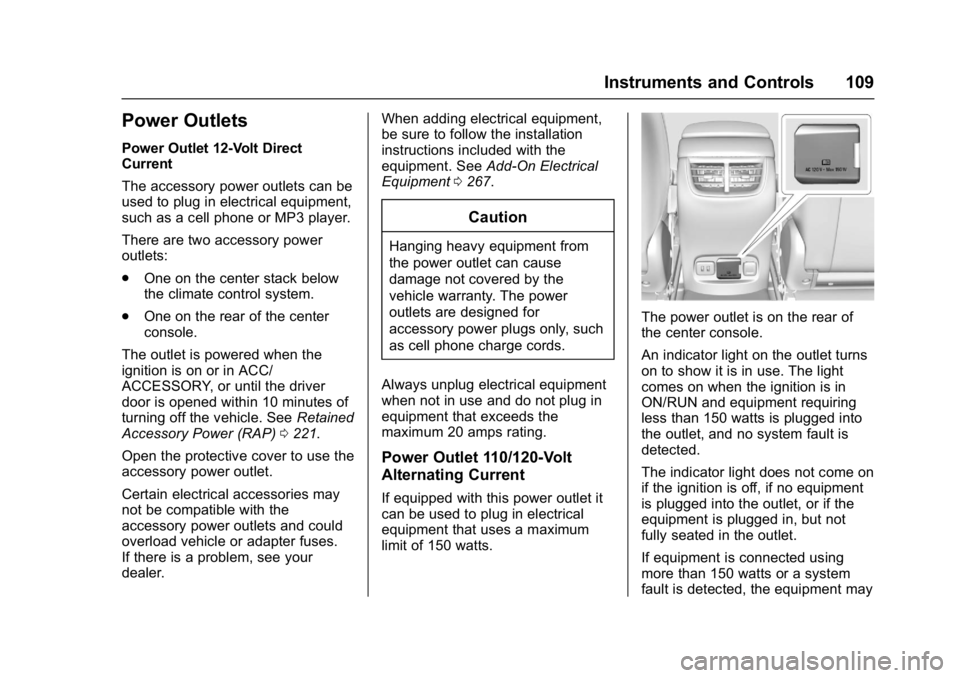
The power outlet is on the rear of
the center console.
An indicator light on the outlet turns
on to show it is in use. The light
comes on when the ignition is in
ON/RUN and equipment requiring
less than 150 watts is plugged into
the outlet, and no system fault is
detected.
The indicator light does not come on
if the ignition is off, if no equipment
is plugged into the outlet, or if the
equipment is plugged in, but not
fully seated in the outlet.
If equipment is connected using
more than 150 watts or a system
fault is detected, the equipment may
Page 111 of 413
Chevrolet Malibu Owner Manual (GMNA-Localizing-U.S./Canada/Mexico-
11348460) - 2018 - crc - 5/3/17
110 Instruments and Controls
operate briefly then turn off.
A protection circuit shuts off the
power supply and the indicator light
turns off. To reset the circuit, unplug
the item and plug it back in or turn
the Retained Accessory Power
(RAP) off and then back on. See
Retained Accessory Power (RAP)
0221. The power restarts when
equipment using 150 watts or less is
plugged into the outlet and a system
fault is not detected.
The power outlet is not designed for
the following, and may not work
properly if they are plugged in:
. Equipment with high initial peak
wattage, such as
compressor-driven refrigerators
and electric power tools
. Other equipment requiring an
extremely stable power supply,
such as
microcomputer-controlled
electric blankets and touch
sensor lamps
. Medical equipment
See High Voltage Devices and
Wiring 0300.Wireless Charging
The vehicle may have a wireless
charging pocket outside the armrest
of the center console. The system
operates at 145 kHz and wirelessly
charges one PMA or Qi compatible
mobile device. The power output of
the system is capable of charging at
a rate up to 1 amp (5W), as
requested by the compatible mobile
device. See Radio Frequency
Statement 0385.
To check for phone or other device
compatibility:
. In the U.S., see
my.chevrolet.com/learn.
. In Canada, see
gmtotalconnect.ca.
. Or, see your dealer for details.
{Warning
Wireless charging can affect the
operation of an implanted
pacemaker or other medical
devices. If you have one, it is
(Continued)
Warning (Continued)
recommended to consult with
your doctor before using the
wireless charging system.
The vehicle must be on, in ACC/
ACCESSORY, or Retained
Accessory Power (RAP) must be
active. The wireless charging
feature may not correctly indicate
charging when the vehicle is in RAP.
See Retained Accessory Power
(RAP) 0221.
The operating temperature is −20 °C
(−4 °F) to 60 °C (140 °F) for the
charging system and 0 °C (32 °F) to
35 °C (95 °F) for the mobile device.
{Warning
Remove all objects from the
charging pocket before charging
your mobile phone. Objects, such
as coins, keys, rings, paper clips,
or cards, between the mobile
phone and the charger will
(Continued)
Page 112 of 413
Chevrolet Malibu Owner Manual (GMNA-Localizing-U.S./Canada/Mexico-
11348460) - 2018 - crc - 5/3/17
Instruments and Controls 111
Warning (Continued)
become very hot. On the rare
occasion that the charging system
does not detect an object, and the
object gets wedged between the
mobile phone and the charger,
remove the mobile phone and
allow the object to cool before
removing it from the charging
pocket, to prevent burns.
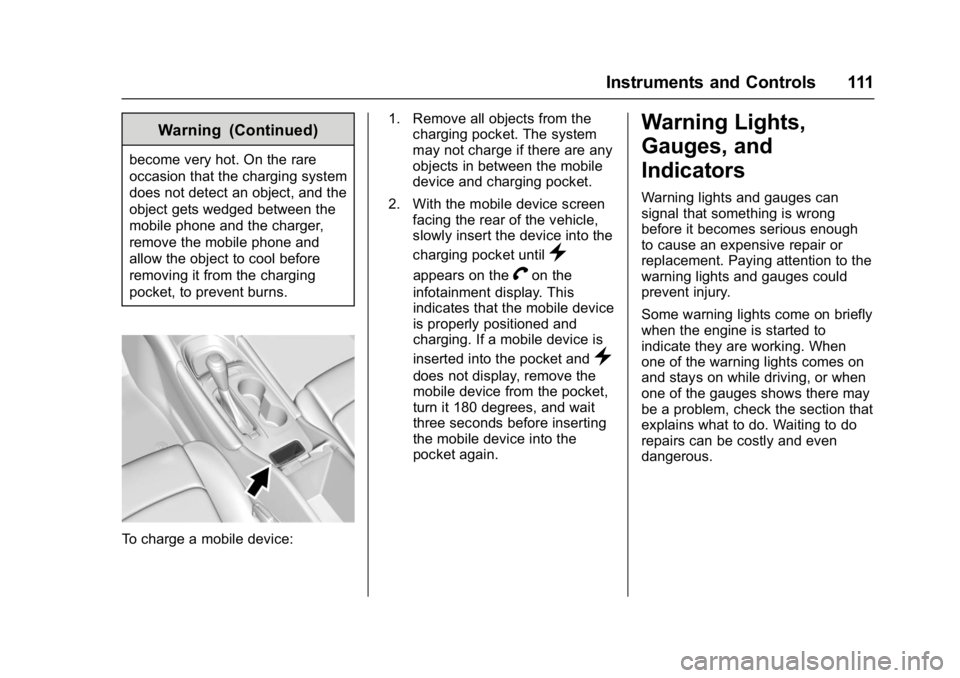
To charge a mobile device:1. Remove all objects from the
charging pocket. The system
may not charge if there are any
objects in between the mobile
device and charging pocket.
2. With the mobile device screen facing the rear of the vehicle,
slowly insert the device into the
charging pocket until
}
appears on theVon the
infotainment display. This
indicates that the mobile device
is properly positioned and
charging. If a mobile device is
inserted into the pocket and
}
does not display, remove the
mobile device from the pocket,
turn it 180 degrees, and wait
three seconds before inserting
the mobile device into the
pocket again.
Warning Lights,
Gauges, and
Indicators
Warning lights and gauges can
signal that something is wrong
before it becomes serious enough
to cause an expensive repair or
replacement. Paying attention to the
warning lights and gauges could
prevent injury.
Some warning lights come on briefly
when the engine is started to
indicate they are working. When
one of the warning lights comes on
and stays on while driving, or when
one of the gauges shows there may
be a problem, check the section that
explains what to do. Waiting to do
repairs can be costly and even
dangerous.
Page 117 of 413

Chevrolet Malibu Owner Manual (GMNA-Localizing-U.S./Canada/Mexico-
11348460) - 2018 - crc - 5/3/17
116 Instruments and Controls
Cluster Menu
There is an interactive display area
in the center of the instrument
cluster.
Use the right steering wheel control
to open and scroll through the
different items and displays.
Press
oto access the cluster
applications. Use
worxto scroll
through the list of available
applications. Not all applications will
be available on all vehicles.
. Info app. This is where you can
view the selected Driver
Information Center (DIC) displays.
See
Driver Information Center
(DIC) (Uplevel) 0134 orDriver
Information Center (DIC) (Base
Level) 0131.
. Audio
. Phone
. Navigation
. Options
Audio
In the main view of the Audio app,
press
worxto scroll through
radio stations or move to the next/
previous track of a CD/USB/
Bluetooth device that is connected
to the vehicle. Press
Vto select the
Audio app, then press
pto enter
the Audio menu. In the Audio menu
browse for music, select from the
favorites, or change the audio
source.
Phone
Press
Vto select the Phone app,
then press
pto enter the Phone
menu. In the Phone menu, if there is no active phone call, view recent
calls, scroll through contacts,
or select from the favorites. If there
is an active call, mute or unmute the
phone or switch to handset or
handsfree operation.
Navigation
Press
Vto select the Navigation
app, then press
pto enter the
Navigation menu. If there is no
active route, you can resume the
last route and turn the voice
prompts on/off. If there is an active
route, press
Vto cancel route
guidance or turn the voice prompts
on/off.
Options
Press
Vto select the Options app.
Use
worxto scroll through the
items in the Options menu.
Units : Press
pwhile Units is
displayed to enter the Units menu.
Choose U.S. or metric units by
pressing
Vwhile the desired item is
highlighted.
Page 140 of 413
Chevrolet Malibu Owner Manual (GMNA-Localizing-U.S./Canada/Mexico-
11348460) - 2018 - crc - 5/3/17
Instruments and Controls 139
Entering the Personalization
Menus
Select Settings from the
Home Page.
The following menus may be
available:
.Phone Connection (MTP Only)
. Time and Date
. Tone Settings
. Auto Volume Control
. Maximum Startup Volume
. Vehicle Settings
Phone Connection (MTP Only)
Select and the following may
display:
.
Charging Only
. Scan Music Folder Only
. Scan All Folders
Charging Only
This feature will charge a Media
Transfer Protocol (MTP) device
when connected to the USB port.
Bluetooth audio will be unavailable. Turn MENU to highlight, then press
to select.
Scan Music Folder Only
This feature will scan and index
music folders on an MTP device
when connected to the USB port.
Turn MENU to highlight, then press
to select.
Scan All Folders
This feature will scan and index all
folders on an MTP device when
connected to the USB port.
Turn MENU to highlight, then press
to select.Time and Date
Select Time and Date to adjust the
clock. See
Clock0107.
Tone Settings
Select to set the radio tone. See
“Tone Settings” under“Radio
Controls without Touchscreen” in
Operation 0167.
Auto Volume Control
This feature automatically adjusts
the radio volume based on the
speed of the vehicle.
Select the desired value.
Maximum Startup Volume
When the vehicle is started and the
radio volume is greater than this set
level, the volume is adjusted to this
level.
Select the desired value.
Vehicle Settings
Select and the following may
display:
.
Climate and Air Quality
. Comfort and Convenience
. Languages
. Lighting
. Power Door Locks
. Remote Lock, Unlock, Start
. Return to Factory Settings
. Software Information
. Valet Mode