2018 CHEVROLET MALIBU Door
[x] Cancel search: DoorPage 241 of 413
Chevrolet Malibu Owner Manual (GMNA-Localizing-U.S./Canada/Mexico-
11348460) - 2018 - crc - 5/3/17
240 Driving and Operating
indicator will flash as a reminder to
check traffic before proceeding. In
addition, three beeps will sound.
See“Adaptive Cruise Go Notifier” in
“Collision/Detection Systems” under
Vehicle Personalization 0138.
When the vehicle ahead drives
away, press +RES or the
accelerator pedal to resume ACC.
If stopped for more than
two minutes or if the driver door is
opened and the driver seat belt is
unbuckled, the ACC automatically
applies the Electric Parking Brake
(EPB) to hold the vehicle. The EPB
status light will turn on. See Parking
Brake 0227. To release the EPB,
press the accelerator pedal.
A DIC warning message may
display indicating to shift to P (Park)
before exiting the vehicle. See
Vehicle Messages 0137.
{Warning
If ACC has stopped the vehicle,
and if ACC is disengaged, turned
off, or canceled, the vehicle will
(Continued)
Warning (Continued)
no longer be held at a stop. The
vehicle can move. When ACC is
holding the vehicle at a stop,
always be prepared to manually
apply the brakes.
{Warning
Leaving the vehicle without
placing it in P (Park) can be
dangerous. Do not leave the
vehicle while it is being held at a
stop by ACC. Always place the
vehicle in P (Park) and turn off
the ignition before leaving the
vehicle.
ACC Override
If using the accelerator pedal while
ACC is active, a warning message
on the DIC will indicate that
automatic braking will not occur.
See Vehicle Messages 0137. ACC will resume operation when the
accelerator pedal is not being
pressed.
{Warning
The ACC will not automatically
apply the brakes if your foot is
resting on the accelerator pedal.
You could crash into a vehicle
ahead of you.
Curves in the Road
{Warning
On curves, ACC may not detect a
vehicle ahead in your lane. You
could be startled if the vehicle
accelerates up to the set speed,
especially when following a
vehicle exiting or entering exit
ramps. You could lose control of
the vehicle or crash. Do not use
ACC while driving on an entrance
or exit ramp. Always be ready to
use the brakes if necessary.
Page 260 of 413
Chevrolet Malibu Owner Manual (GMNA-Localizing-U.S./Canada/Mexico-
11348460) - 2018 - crc - 5/3/17
Driving and Operating 259
occurs, return to your authorized
dealer for diagnosis. If it is
determined that the condition is
caused by the type of fuel used,
repairs may not be covered by the
vehicle warranty.
Fuels in Foreign
Countries
The U.S., Canada, and Mexico post
fuel octane ratings in anti-knock
index (AKI). For fuel not to use in a
foreign country, see“Prohibited
Fuels” inFuel 0257.
Fuel Additives
To keep fuel systems clean, TOP
TIER detergent gasoline is
recommended. See Fuel0257.
If TOP TIER detergent gasoline is
not available, one bottle of GM Fuel
System Treatment Cleaner added to
the fuel tank at every engine oil
change, can help. GM Fuel System
Treatment Cleaner is the only
gasoline additive recommended by
General Motors. It is available at
your dealer.
Filling the Tank
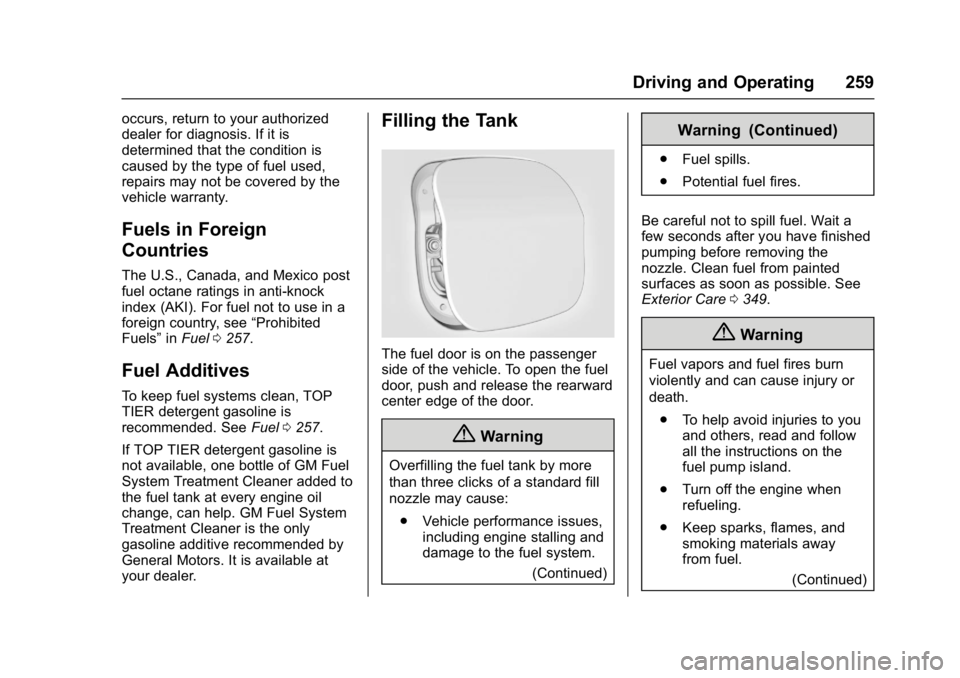
The fuel door is on the passenger
side of the vehicle. To open the fuel
door, push and release the rearward
center edge of the door.
{Warning
Overfilling the fuel tank by more
than three clicks of a standard fill
nozzle may cause: . Vehicle performance issues,
including engine stalling and
damage to the fuel system.
(Continued)
Warning (Continued)
.Fuel spills.
. Potential fuel fires.
Be careful not to spill fuel. Wait a
few seconds after you have finished
pumping before removing the
nozzle. Clean fuel from painted
surfaces as soon as possible. See
Exterior Care 0349.
{Warning
Fuel vapors and fuel fires burn
violently and can cause injury or
death.
. To help avoid injuries to you
and others, read and follow
all the instructions on the
fuel pump island.
. Turn off the engine when
refueling.
. Keep sparks, flames, and
smoking materials away
from fuel.
(Continued)
Page 293 of 413
Chevrolet Malibu Owner Manual (GMNA-Localizing-U.S./Canada/Mexico-
11348460) - 2018 - crc - 5/3/17
292 Vehicle Care
test, or replace the high voltage
battery. See your dealer if the high
voltage battery needs service. The
dealer has information on how to
recycle the high voltage battery.
The hybrid high voltage battery is
cooled with air drawn from the
vehicle interior. The cold air intake
for the battery is under the rear
seat. Do not block the area in front
of the cold air intake.
{Warning
Damage to the high voltage
battery or high voltage system
can create a risk of electric shock,
overheating, or fire.
If the vehicle is damaged from a
moderate to severe crash, flood,
fire, or other event, the vehicle
should be inspected as soon as
possible. Until the vehicle has
been inspected, store it outside at
least 15 m (50 ft) from any(Continued)
Warning (Continued)
structure or anything that can
burn. Ventilate the vehicle by
opening a window or a door.
Contact Customer Assistance as
soon as possible to determine
whether an inspection is needed.
SeeCustomer Assistance Offices
0 377.
Stop/Start System
If equipped with the 1.5L L4 engine,
the vehicle has a Stop/Start system
to shut off the engine to help
conserve fuel. See Starting the
Engine 0218.
Vehicles with a 1.5L engine have an
Absorbed Glass Mat (AGM) 12-volt
battery. Installation of a standard
12-volt battery will result in reduced
12-volt battery life.
When using a 12-volt battery
charger on the 12-volt AGM battery,
some chargers have an AGM
battery setting on the charger. If available, use the AGM setting on
the charger, to limit charge voltage
to 14.8 volts.
{Warning
WARNING:
Battery posts,
terminals, and related
accessories contain lead and lead
compounds, chemicals known to
the State of California to cause
cancer and birth defects or other
reproductive harm. Batteries also
contain other chemicals known to
the State of California to cause
cancer. WASH HANDS AFTER
HANDLING. For more information
go to www.P65Warnings.ca.gov/
passenger-vehicle.
See California Proposition
65 Warning 0269 and the back
cover.
Page 312 of 413
Chevrolet Malibu Owner Manual (GMNA-Localizing-U.S./Canada/Mexico-
11348460) - 2018 - crc - 5/3/17
Vehicle Care 311
Caution
High performance summer tires
have rubber compounds that lose
flexibility and may develop
surface cracks in the tread area
at temperatures below−7 °C
(20 °F). Always store high
performance summer tires
indoors and at temperatures
above −7 °C (20 °F) when not in
use. If the tires have been
subjected to −7 °C (20 °F) or less,
let them warm up in a heated
space to at least 5 °C (40 °F) for
24 hours or more before being
installed or driving a vehicle on
which they are installed. Do not
apply heat or blow heated air
directly on the tires. Always
inspect tires before use. See Tire
Inspection 0322.
Tire Sidewall Labeling
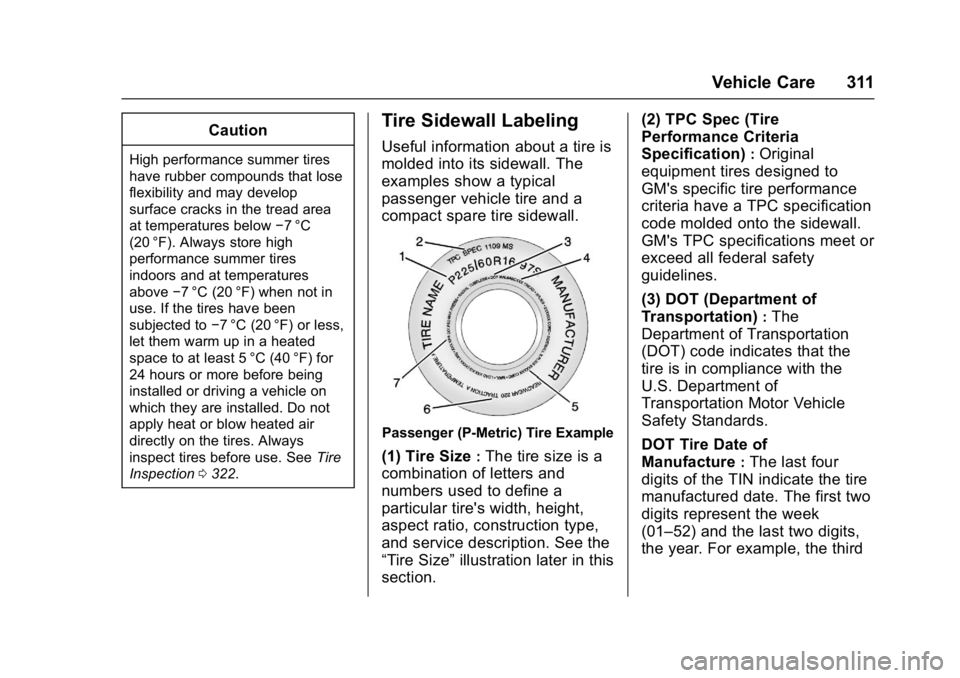
Useful information about a tire is
molded into its sidewall. The
examples show a typical
passenger vehicle tire and a
compact spare tire sidewall.
Passenger (P-Metric) Tire Example
(1) Tire Size:The tire size is a
combination of letters and
numbers used to define a
particular tire's width, height,
aspect ratio, construction type,
and service description. See the
“Tire Size” illustration later in this
section. (2) TPC Spec (Tire
Performance Criteria
Specification)
:Original
equipment tires designed to
GM's specific tire performance
criteria have a TPC specification
code molded onto the sidewall.
GM's TPC specifications meet or
exceed all federal safety
guidelines.
(3) DOT (Department of
Transportation)
:The
Department of Transportation
(DOT) code indicates that the
tire is in compliance with the
U.S. Department of
Transportation Motor Vehicle
Safety Standards.
DOT Tire Date of
Manufacture
:The last four
digits of the TIN indicate the tire
manufactured date. The first two
digits represent the week
(01–52) and the last two digits,
the year. For example, the third
Page 328 of 413
Chevrolet Malibu Owner Manual (GMNA-Localizing-U.S./Canada/Mexico-
11348460) - 2018 - crc - 5/3/17
Vehicle Care 327
upon the actual conditions of
their use, however, and may
depart significantly from the
norm due to variations in driving
habits, service practices and
differences in road
characteristics and climate.
Traction
The traction grades, from
highest to lowest, are AA, A, B,
and C. Those grades represent
the tire's ability to stop on wet
pavement as measured under
controlled conditions on
specified government test
surfaces of asphalt and
concrete. A tire marked C may
have poor traction performance.
Warning: The traction grade
assigned to this tire is based on
straight-ahead braking traction
tests, and does not include
acceleration, cornering,
hydroplaning, or peak traction
characteristics.Temperature
The temperature grades are A
(the highest), B, and C,
representing the tire's resistance
to the generation of heat and its
ability to dissipate heat when
tested under controlled
conditions on a specified indoor
laboratory test wheel. Sustained
high temperature can cause the
material of the tire to degenerate
and reduce tire life, and
excessive temperature can lead
to sudden tire failure. The grade
C corresponds to a level of
performance which all
passenger car tires must meet
under the Federal Motor Safety
Standard No. 109. Grades B and
A represent higher levels of
performance on the laboratory
test wheel than the minimum
required by law. Warning: The
temperature grade for this tire is
established for a tire that is
properly inflated and not
overloaded. Excessive speed,underinflation, or excessive
loading, either separately or in
combination, can cause heat
buildup and possible tire failure.
Wheel Alignment and Tire
Balance
The tires and wheels were aligned
and balanced at the factory to
provide the longest tire life and best
overall performance. Adjustments to
wheel alignment and tire balancing
are not necessary on a regular
basis. Consider an alignment check
if there is unusual tire wear or the
vehicle is significantly pulling to one
side or the other. Some slight pull to
the left or right, depending on the
crown of the road and/or other road
surface variations such as troughs
or ruts, is normal. If the vehicle is
vibrating when driving on a smooth
road, the tires and wheels may need
to be rebalanced. See your dealer
for proper diagnosis.
Page 334 of 413
Chevrolet Malibu Owner Manual (GMNA-Localizing-U.S./Canada/Mexico-
11348460) - 2018 - crc - 5/3/17
Vehicle Care 333
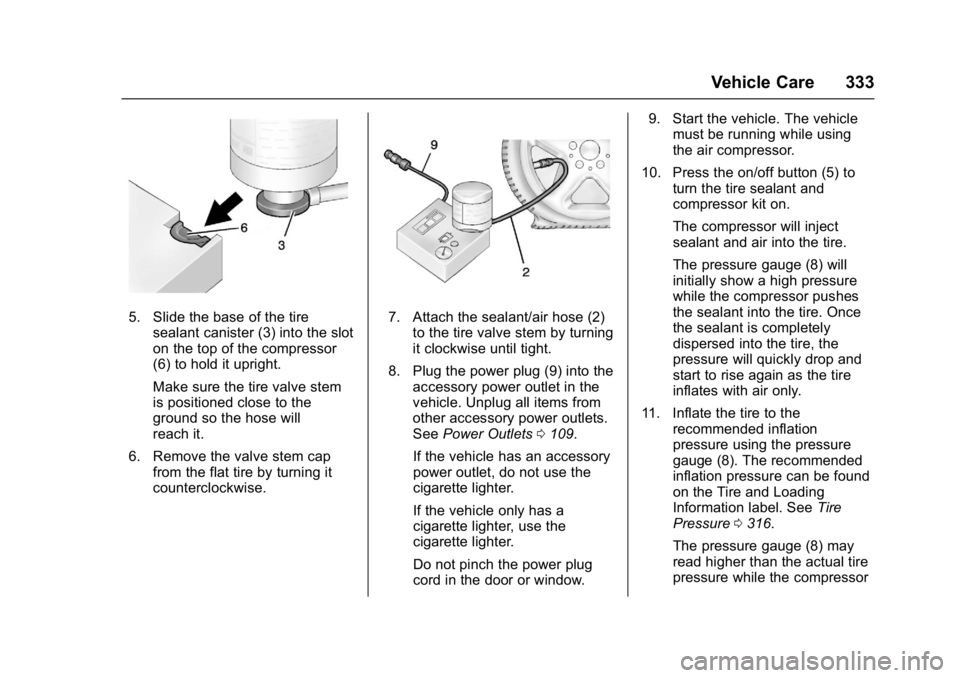
5. Slide the base of the tiresealant canister (3) into the slot
on the top of the compressor
(6) to hold it upright.
Make sure the tire valve stem
is positioned close to the
ground so the hose will
reach it.
6. Remove the valve stem cap from the flat tire by turning it
counterclockwise.7. Attach the sealant/air hose (2)
to the tire valve stem by turning
it clockwise until tight.
8. Plug the power plug (9) into the accessory power outlet in the
vehicle. Unplug all items from
other accessory power outlets.
See Power Outlets 0109.
If the vehicle has an accessory
power outlet, do not use the
cigarette lighter.
If the vehicle only has a
cigarette lighter, use the
cigarette lighter.
Do not pinch the power plug
cord in the door or window. 9. Start the vehicle. The vehicle
must be running while using
the air compressor.
10. Press the on/off button (5) to turn the tire sealant and
compressor kit on.
The compressor will inject
sealant and air into the tire.
The pressure gauge (8) will
initially show a high pressure
while the compressor pushes
the sealant into the tire. Once
the sealant is completely
dispersed into the tire, the
pressure will quickly drop and
start to rise again as the tire
inflates with air only.
11. Inflate the tire to the recommended inflation
pressure using the pressure
gauge (8). The recommended
inflation pressure can be found
on the Tire and Loading
Information label. See Tire
Pressure 0316.
The pressure gauge (8) may
read higher than the actual tire
pressure while the compressor
Page 337 of 413
Chevrolet Malibu Owner Manual (GMNA-Localizing-U.S./Canada/Mexico-
11348460) - 2018 - crc - 5/3/17
336 Vehicle Care
SeeIf a Tire Goes Flat 0329 for
other important safety warnings.
1. Remove the compressor from its storage location. See
Storing the Tire Sealant and
Compressor Kit 0337.
2. Remove the air only hose (10) and the power plug (9) from the
bottom of the compressor.
3. Place the compressor on the ground near the flat tire.
Make sure the tire valve stem
is positioned close to the
ground so the hose will
reach it.
4. Remove the valve stem cap from the flat tire by turning it
counterclockwise.
5. Attach the air only hose (10) to the tire valve stem by turning it
clockwise until tight.
6. Plug the power plug (9) into the accessory power outlet in the
vehicle. Unplug all items from
other accessory power outlets.
See Power Outlets 0109. If the vehicle has an accessory
power outlet, do not use the
cigarette lighter.
If the vehicle only has a
cigarette lighter, use the
cigarette lighter.
Do not pinch the power plug
cord in the door or window.
7. Start the vehicle. The vehicle must be running while using
the air compressor.
8. Press the on/off button (5) to turn the tire sealant and
compressor kit on.
The compressor will inflate the
tire with air only.
9. Inflate the tire to the recommended inflation
pressure using the pressure
gauge (8). The recommended
inflation pressure can be found
on the Tire and Loading
Information label. See Tire
Pressure 0316.
The pressure gauge (8) may
read higher than the actual tire
pressure while the compressor
is on. Turn the compressor off to get an accurate pressure
reading. The compressor may
be turned on/off until the
correct pressure is reached.
Caution
If the recommended pressure
cannot be reached after
approximately 25 minutes, the
vehicle should not be driven
farther. The tire is too severely
damaged and the tire sealant and
compressor kit cannot inflate the
tire. Remove the power plug from
the accessory power outlet and
unscrew the inflating hose from
the tire valve. See
Roadside
Assistance Program 0379.
10. Press the on/off button (5) to turn the tire sealant and
compressor kit off.
Be careful while handling the
compressor as it could be
warm after usage.
11. Unplug the power plug (9) from the accessory power outlet in
the vehicle.
Page 354 of 413
Chevrolet Malibu Owner Manual (GMNA-Localizing-U.S./Canada/Mexico-
11348460) - 2018 - crc - 5/3/17
Vehicle Care 353
Tires
Use a stiff brush with tire cleaner to
clean the tires.
Caution
Using petroleum-based tire
dressing products on the vehicle
may damage the paint finish and/
or tires. When applying a tire
dressing, always wipe off any
overspray from all painted
surfaces on the vehicle.
Wheels and Trim—Aluminum
or Chrome
Use a soft, clean cloth with mild
soap and water to clean the wheels.
After rinsing thoroughly with clean
water, dry with a soft, clean towel.
A wax may then be applied.
Caution
Chrome wheels and other chrome
trim may be damaged if the
vehicle is not washed after driving
(Continued)
Caution (Continued)
on roads that have been sprayed
with magnesium, calcium,
or sodium chloride. These
chlorides are used on roads for
conditions such as ice and dust.
Always wash the chrome with
soap and water after exposure.
Caution
To avoid surface damage, do not
use strong soaps, chemicals,
abrasive polishes, cleaners,
brushes, or cleaners that contain
acid on aluminum or
chrome-plated wheels. Use only
approved cleaners. Also, never
drive a vehicle with aluminum or
chrome-plated wheels through an
automatic car wash that uses
silicone carbide tire cleaning
brushes. Damage could occur
and the repairs would not be
covered by the vehicle warranty.
Brake System
Visually inspect brake lines and
hoses for proper hook-up, binding,
leaks, cracks, chafing, etc. Inspect
disc brake pads for wear and rotors
for surface condition. Inspect drum
brake linings/shoes for wear or
cracks. Inspect all other brake parts.
Steering, Suspension, and
Chassis Components
Visually inspect steering,
suspension, and chassis
components for damaged, loose,
or missing parts or signs of wear at
least once a year.
Inspect power steering for proper
attachment, connections, binding,
leaks, cracks, chafing, etc.
Visually check constant velocity joint
boots and axle seals for leaks.
Body Component Lubrication
Lubricate all key lock cylinders,
hood hinges, decklid hinges, steel
fuel door hinge, unless the
components are plastic. Applying
silicone grease on weatherstrips