2018 CHEVROLET MALIBU Door
[x] Cancel search: DoorPage 152 of 413
Chevrolet Malibu Owner Manual (GMNA-Localizing-U.S./Canada/Mexico-
11348460) - 2018 - crc - 5/3/17
Instruments and Controls 151
instructions refer to a garage door
opener, but can be used for other
devices.
Do not use the Universal Remote
system with any garage door opener
that does not have the stop and
reverse feature. This includes any
garage door opener model
manufactured before April 1, 1982.
Read these instructions completely
before programming the Universal
Remote system. It may help to have
another person assist with the
programming process.
Keep the original hand-held
transmitter for use in other vehicles
as well as for future programming.
Erase the programming when
vehicle ownership is terminated.
See“Erasing Universal Remote
System Buttons” later in this
section.
To program a garage door opener,
park outside directly in line with and
facing the garage door opener
receiver. Clear all people and
objects near the garage door. Make sure the hand-held transmitter
has a new battery for quick and
accurate transmission of the
radio-frequency signal.
Programming the Universal
Remote System
For questions or help programming
the Universal Remote system, call
1-800-355-3515 or see
www.homelink.com.
Programming involves
time-sensitive actions, and may time
out causing the procedure to be
repeated.
To program up to three devices:
1. Hold the end of the hand-held transmitter about 3 to 8 cm (1
to 3 in) away from the
Universal Remote system
buttons with the indicator light
in view. The hand-held
transmitter was supplied by the
manufacturer of the garage
door opener receiver.
2. At the same time, press and hold both the hand-held
transmitter button and one of
the three Universal Remote system buttons to be used to
operate the garage door. Do
not release either button until
the indicator light changes from
a slow to a rapid flash. Then
release both buttons.
Some garage door openers
may require substitution of
Step 2 with the procedure
under
“Radio Signals for
Canada and Some Gate
Operators” later in this section.
3. Press and hold the newly programmed Universal Remote
system button for five seconds
while watching the indicator
light and garage door
activation.
.If the indicator light stays on
continuously or the garage
door moves when the
button is pressed, then
programming is complete.
There is no need to
complete Steps 4–6.
. If the indicator light does
not come on or the garage
door does not move, a
second button press may
Page 153 of 413
Chevrolet Malibu Owner Manual (GMNA-Localizing-U.S./Canada/Mexico-
11348460) - 2018 - crc - 5/3/17
152 Instruments and Controls
be required. For a second
time, press and hold the
newly programmed button
for five seconds. If the light
stays on or the garage door
moves, programming is
complete.
. If the indicator light blinks
rapidly for two seconds,
then changes to a solid light
and the garage door does
not move, continue with
programming Steps 4–6.
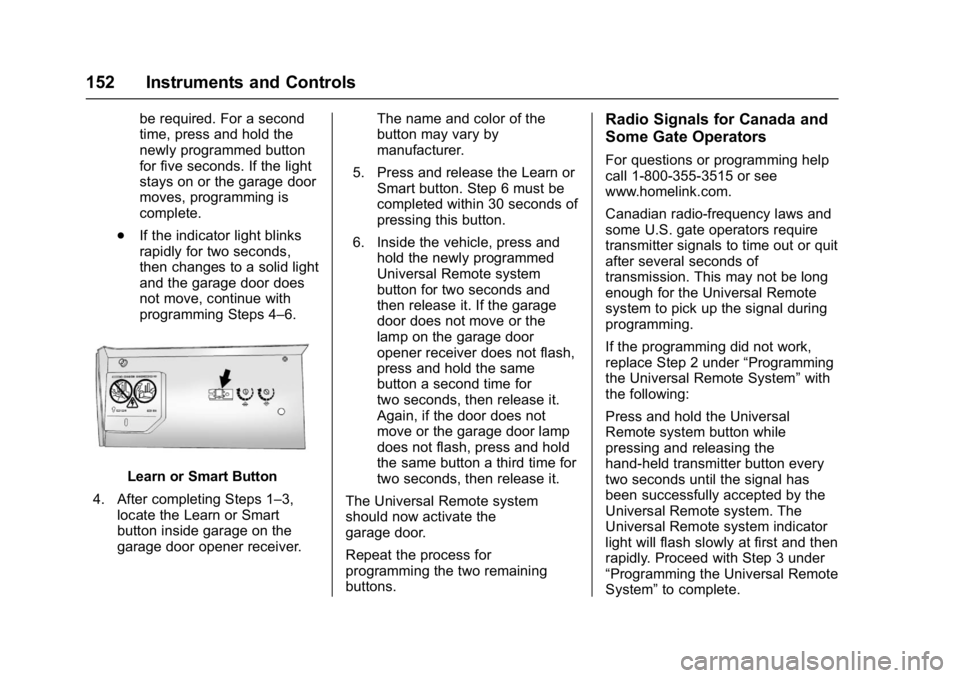
Learn or Smart Button
4. After completing Steps 1–3, locate the Learn or Smart
button inside garage on the
garage door opener receiver. The name and color of the
button may vary by
manufacturer.
5. Press and release the Learn or Smart button. Step 6 must be
completed within 30 seconds of
pressing this button.
6. Inside the vehicle, press and hold the newly programmed
Universal Remote system
button for two seconds and
then release it. If the garage
door does not move or the
lamp on the garage door
opener receiver does not flash,
press and hold the same
button a second time for
two seconds, then release it.
Again, if the door does not
move or the garage door lamp
does not flash, press and hold
the same button a third time for
two seconds, then release it.
The Universal Remote system
should now activate the
garage door.
Repeat the process for
programming the two remaining
buttons.
Radio Signals for Canada and
Some Gate Operators
For questions or programming help
call 1-800-355-3515 or see
www.homelink.com.
Canadian radio-frequency laws and
some U.S. gate operators require
transmitter signals to time out or quit
after several seconds of
transmission. This may not be long
enough for the Universal Remote
system to pick up the signal during
programming.
If the programming did not work,
replace Step 2 under “Programming
the Universal Remote System” with
the following:
Press and hold the Universal
Remote system button while
pressing and releasing the
hand-held transmitter button every
two seconds until the signal has
been successfully accepted by the
Universal Remote system. The
Universal Remote system indicator
light will flash slowly at first and then
rapidly. Proceed with Step 3 under
“Programming the Universal Remote
System” to complete.
Page 157 of 413
Chevrolet Malibu Owner Manual (GMNA-Localizing-U.S./Canada/Mexico-
11348460) - 2018 - crc - 5/3/17
156 Lighting
The high beams may not turn off
automatically if the system cannot
detect another vehicle's lamps
because of any of the following:
.The other vehicle's lamps are
missing, damaged, obstructed
from view, or otherwise
undetected.
. The other vehicle's lamps are
covered with dirt, snow, and/or
road spray.
. The other vehicle's lamps cannot
be detected due to dense
exhaust, smoke, fog, snow, road
spray, mist, or other airborne
obstructions.
. The vehicle's windshield is dirty,
cracked, or obstructed by
something that blocks the view
of the light sensor.
. The vehicle is loaded such that
the front end points upward,
causing the light sensor to aim
high and not detect headlamps
and taillamps.
. Driving on winding or hilly roads. The IntelliBeam system may need to
be disabled if any of the above
conditions exist.
Exterior Lamps Off
Reminder
A warning chime sounds if the driver
door is opened while the ignition is
off and the exterior lamps are on.
Headlamp High/
Low-Beam Changer
3
:
Push the turn signal lever away
from you and release, to turn the
high beams on. To return to low
beams, push the lever again or pull
it toward you and release.
This indicator light turns on in the
instrument cluster when the
high-beam headlamps are on.
Flash-to-Pass
To flash the high beams, pull the
turn signal lever toward you, and
release.
Daytime Running
Lamps (DRL)
DRL can make it easier for others to
see the front of your vehicle during
the day. Fully functional DRL are
required on all vehicles first sold in
Canada.
The DRL system comes on in
daylight when the following
conditions are met:
. The ignition is on.
. The exterior lamp control is in
AUTO, if equipped.
. The light sensor determines it is
daytime.
. The vehicle is not in P (Park).
When the DRL are on, the taillamps,
sidemarker lamps, instrument panel
lights, and other lamps will not
be on.
Page 160 of 413
Chevrolet Malibu Owner Manual (GMNA-Localizing-U.S./Canada/Mexico-
11348460) - 2018 - crc - 5/3/17
Lighting 159
Courtesy Lamps
The courtesy lamps come on when
any door is opened unless the dome
lamp override is activated. To
deactivate the dome lamp override,
press
jOFF and the indicator
light on the button will turn off.
Dome Lamps
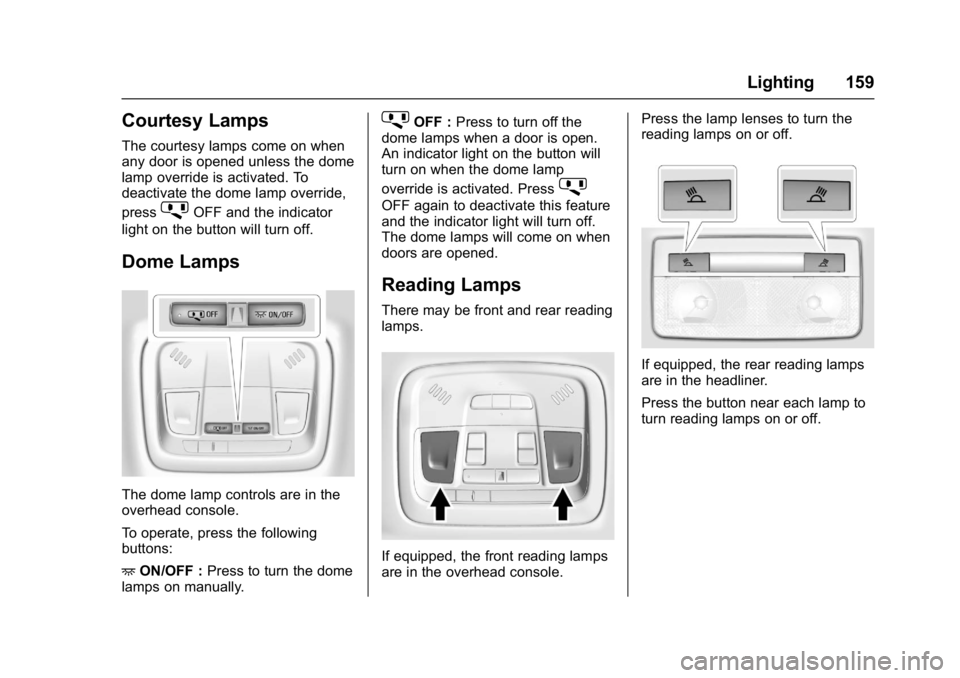
The dome lamp controls are in the
overhead console.
To operate, press the following
buttons:
+ ON/OFF : Press to turn the dome
lamps on manually.
jOFF : Press to turn off the
dome lamps when a door is open.
An indicator light on the button will
turn on when the dome lamp
override is activated. Press
j
OFF again to deactivate this feature
and the indicator light will turn off.
The dome lamps will come on when
doors are opened.
Reading Lamps
There may be front and rear reading
lamps.
If equipped, the front reading lamps
are in the overhead console. Press the lamp lenses to turn the
reading lamps on or off.
If equipped, the rear reading lamps
are in the headliner.
Press the button near each lamp to
turn reading lamps on or off.
Page 161 of 413
Chevrolet Malibu Owner Manual (GMNA-Localizing-U.S./Canada/Mexico-
11348460) - 2018 - crc - 5/3/17
160 Lighting
Lighting Features
Entry Lighting
Some exterior lamps and most of
the interior lamps turn on briefly at
night or in areas with limited lighting
when the Remote Keyless Entry
(RKE) transmitter
Kbutton is
pressed. See Remote Keyless Entry
(RKE) System Operation 032. After
about 30 seconds the exterior lamps
turn off, then the dome lamps and
remaining interior lamps dim to off.
Entry lighting can be disabled
manually by turning the ignition on
or to ACC/ACCESSORY, or by
pressing
Qon the RKE transmitter.
This feature can be changed. See
Vehicle Personalization 0138.
Exit Lighting
Some exterior lamps and interior
lights come on at night, or in areas
with limited lighting, when the driver
door is opened after the ignition is
turned off. The dome lamp comes
on after the ignition is turned off. The exterior lamps and dome lamp
remain on for a set amount of time,
then automatically turn off.
The exterior lamps turn off
immediately by turning the exterior
lamp control off.
This feature can be changed. See
Vehicle Personalization
0138.
Battery Load
Management
The vehicle has Electric Power
Management (EPM) that estimates
the battery's temperature and state
of charge. It then adjusts the voltage
for best performance and extended
life of the battery.
When the battery's state of charge
is low, the voltage is raised slightly
to quickly bring the charge back up.
When the state of charge is high,
the voltage is lowered slightly to
prevent overcharging. If the vehicle
has a voltmeter gauge or a voltage
display on the Driver Information
Center (DIC), you may see the voltage move up or down. This is
normal. If there is a problem, an
alert will be displayed.
The battery can be discharged at
idle if the electrical loads are very
high. This is true for all vehicles.
This is because the generator
(alternator) may not be spinning fast
enough at idle to produce all of the
power needed for very high
electrical loads.
A high electrical load occurs when
several of the following are on, such
as: headlamps, high beams, rear
window defogger, climate control fan
at high speed, heated seats, engine
cooling fans, trailer loads, and loads
plugged into accessory power
outlets.
EPM works to prevent excessive
discharge of the battery. It does this
by balancing the generator's output
and the vehicle's electrical needs.
It can increase engine idle speed to
generate more power whenever
needed. It can temporarily reduce
the power demands of some
accessories.
Page 205 of 413
Chevrolet Malibu Owner Manual (GMNA-Localizing-U.S./Canada/Mexico-
11348460) - 2018 - crc - 5/3/17
204 Climate Controls
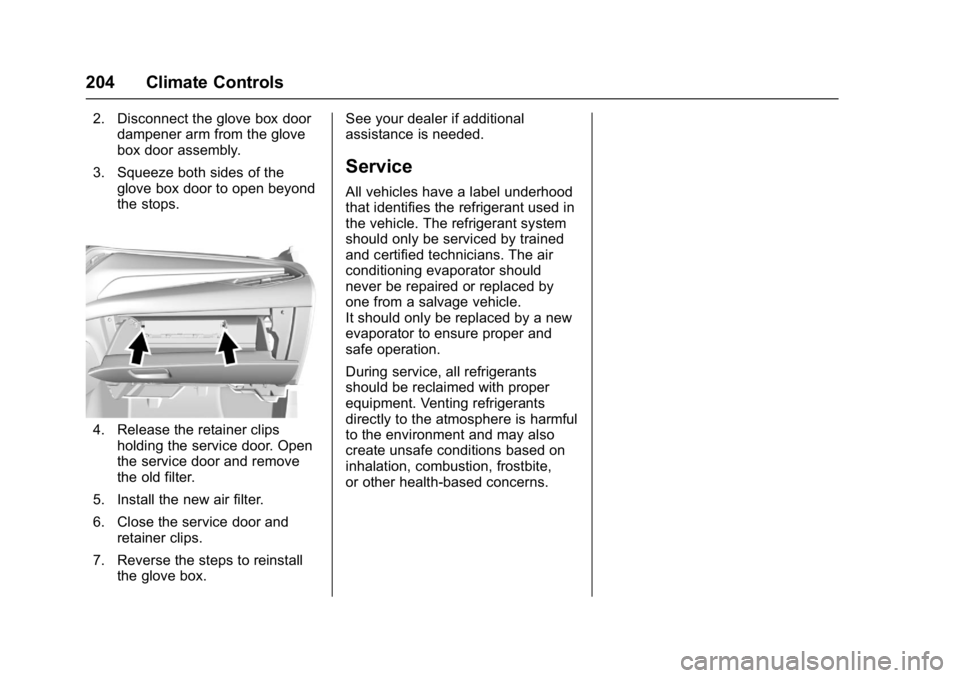
2. Disconnect the glove box doordampener arm from the glove
box door assembly.
3. Squeeze both sides of the glove box door to open beyond
the stops.
4. Release the retainer clipsholding the service door. Open
the service door and remove
the old filter.
5. Install the new air filter.
6. Close the service door and retainer clips.
7. Reverse the steps to reinstall the glove box. See your dealer if additional
assistance is needed.
Service
All vehicles have a label underhood
that identifies the refrigerant used in
the vehicle. The refrigerant system
should only be serviced by trained
and certified technicians. The air
conditioning evaporator should
never be repaired or replaced by
one from a salvage vehicle.
It should only be replaced by a new
evaporator to ensure proper and
safe operation.
During service, all refrigerants
should be reclaimed with proper
equipment. Venting refrigerants
directly to the atmosphere is harmful
to the environment and may also
create unsafe conditions based on
inhalation, combustion, frostbite,
or other health-based concerns.
Page 222 of 413
Chevrolet Malibu Owner Manual (GMNA-Localizing-U.S./Canada/Mexico-
11348460) - 2018 - crc - 5/3/17
Driving and Operating 221
Retained Accessory
Power (RAP)
Some vehicle accessories may be
used after the ignition is turned off.
The power windows and sunroof,
if equipped, will continue to work for
up to 10 minutes or until any door is
opened.
The infotainment system will
continue to work for 10 minutes,
until the driver door is opened,
or until the ignition is turned on or
placed in ACC/ACCESSORY.
Shifting Into Park
1. Hold the brake pedal down andset the parking brake. See
Parking Brake 0227 and
Electric Parking Brake 0228.
2. Move the shift lever into P (Park) by holding in the
button on the shift lever and
pushing the shift lever all the
way toward the front of the
vehicle.
3. Turn the ignition off.
Leaving the Vehicle with the
Engine Running
{Warning
It can be dangerous to leave the
vehicle with the engine running.
It could overheat and catch fire.
It is dangerous to get out of the
vehicle if the shift lever is not fully
in P (Park) with the parking brake
firmly set. The vehicle can roll.
Do not leave the vehicle when the
engine is running. If you have left
the engine running, the vehicle
can move suddenly. You or others
could be injured. To be sure the
vehicle will not move, even when
you are on fairly level ground,
always set the parking brake and
move the shift lever to P (Park).
See Shifting Into Park 0221.
If you have to leave the vehicle with
the engine running, be sure the
vehicle is in P (Park) and the
parking brake is firmly set before
you leave it. After you have moved the shift lever into P (Park), hold the
regular brake pedal down. Then,
see if you can move the shift lever
away from P (Park) without first
pressing the button.
If you can, it means that the shift
lever was not fully locked in
P (Park).
Torque Lock
Torque lock is when the weight of
the vehicle puts too much force on
the parking pawl in the
transmission. This happens when
parking on a hill and shifting the
transmission into P (Park) is not
done properly, then it is difficult to
shift out of P (Park). To prevent
torque lock, set the parking brake
and then shift into P (Park). To find
out how, see
“Shifting Into Park”
listed previously.
If torque lock does occur, your
vehicle may need to be pushed
uphill by another vehicle to relieve
the parking pawl pressure, so you
can shift out of P (Park).
Page 231 of 413
Chevrolet Malibu Owner Manual (GMNA-Localizing-U.S./Canada/Mexico-
11348460) - 2018 - crc - 5/3/17
230 Driving and Operating
the driving situation dictates. The
Brake Assist feature will
automatically disengage when the
brake pedal is released or brake
pedal pressure is quickly
decreased.
Hill Start Assist (HSA)
The Hill Start Assist (HSA) feature
will activate when the vehicle is
stopped on a moderate to steep
grade to help prevent it from rolling
in an unintended direction. After the
brake pedal has been released and
before the accelerator pedal has
been pressed, HSA uses braking
pressure to hold the vehicle
stationary. If HSA is holding the
vehicle, a Driver Information Center
(DIC) message displays. HSA will
not activate in a forward drive gear
when facing downhill, or in
R (Reverse) when facing uphill.
Select the duration of the HSA
feature through vehicle
personalization. See”Extended Hill
Start Assist” under“Comfort and
Convenience” inVehicle
Personalization 0138. When Standard Hold is selected, the
vehicle is held stationary for up to
two seconds after the brake pedal is
released. When Extended Hold is
selected, the vehicle is held
stationary for up to five minutes
after the brake pedal is released. In
either case, override the hold
feature by pressing the accelerator
pedal and attempting to drive away.
If Standard Hold is selected, it will
hold the vehicle for two seconds
unless the driver door is opened or
the driver seat belt is unbuckled
after releasing the brake pedal.
If Extended Hold is selected, it will
hold the vehicle for five minutes
unless the driver door is opened
and the driver seat belt is unbuckled
prior to releasing the brake pedal.
When deactivated after five minutes,
or if it is deactivated when the driver
seat belt is unlatched or the driver
door is opened, the Electric Parking
Brake will engage to prevent vehicle
movement.
Regenerative Braking
(Hybrid Only)
Regenerative braking takes some of
the energy from the moving vehicle
and turns it back into electrical
energy. This energy is then stored
back into the high voltage battery
system, contributing to increased
energy efficiency.
The hydraulic disc brakes work with
the regenerative braking to ensure
effective braking, such as when a
high braking demand is requested.
The braking system is computer
controlled and blends the
regenerative braking with the
conventional hydraulic disc brakes
to meet any requirements for
deceleration. The controller
interprets the braking request and
uses regenerative braking,
conventional hydraulic braking, or a
combination of both as necessary.
Because the hydraulic braking
system uses an electronic booster
for boost assist on demand, under
certain conditions a motor noise
may be heard. This is normal
operation.