2018 CHEVROLET MALIBU trunk
[x] Cancel search: trunkPage 262 of 413
Chevrolet Malibu Owner Manual (GMNA-Localizing-U.S./Canada/Mexico-
11348460) - 2018 - crc - 5/3/17
Driving and Operating 261
3. Remove and clean the funneladapter and return it to the
storage location.
Filling a Portable Fuel
Container
{Warning
Filling a portable fuel container
while it is in the vehicle can cause
fuel vapors that can ignite either
by static electricity or other
means. You or others could be
badly burned and the vehicle
could be damaged. Always:
. Use approved fuel
containers.
. Remove the container from
the vehicle, trunk, or pickup
bed before filling.
. Place the container on the
ground.
. Place the nozzle inside the
fill opening of the container
before dispensing fuel, and
(Continued)
Warning (Continued)
keep it in contact with the fill
opening until filling is
complete.
. Fill the container no more
than 95% full to allow for
expansion.
. Do not smoke, light
matches, or use lighters
while pumping fuel.
. Avoid using cell phones or
other electronic devices.
Trailer Towing
General Towing
Information
Only use towing equipment that has
been designed for the vehicle.
Contact your dealer or trailering
dealer for assistance with preparing
the vehicle for towing a trailer. Read
the entire section before towing a
trailer.
When towing with the 2.0L L4
engine, only use unleaded gasoline
with an octane rating of 89 or
higher. Using gasoline with a lower
octane rating while towing may
damage the engine and may not be
covered by the vehicle warranty.
See Fuel 0257.
For towing a disabled vehicle, see
Towing the Vehicle 0346. For
towing the vehicle behind another
vehicle such as a motor home, see
Recreational Vehicle Towing 0347.
Page 263 of 413
Chevrolet Malibu Owner Manual (GMNA-Localizing-U.S./Canada/Mexico-
11348460) - 2018 - crc - 5/3/17
262 Driving and Operating
Driving Characteristics
and Towing Tips
Driving with a Trailer
When towing a trailer:
.Become familiar with the state
and local laws that apply
specifically to trailer towing.
. Do not tow a trailer during the
first 800 km (500 mi), to prevent
damage to the engine, axle,
or other parts.
. Then, during the first 800 km
(500 mi) of trailer towing, do not
drive over 80 km/h (50 mph) and
do not make starts at full throttle.
. The vehicle can tow in D (Drive)
but Manual Mode is
recommended. See Manual
Mode 0225. Use a lower gear if
the transmission shifts too often.
. Turn off Parking Assist when
towing.
. Do not use Adaptive Cruise
Control (ACC) when towing. See
Adaptive Cruise Control 0235. .
Turn off Lane Keep Assist (LKA)
when towing. See Lane Keep
Assist (LKA) 0255.
. Turn off Forward Automatic
Braking when towing. See
Forward Automatic Braking
(FAB) 0249.
. The Front Pedestrian Braking
system should be set to Alert or
Off when towing. See Front
Pedestrian Braking (FPB)
System 0251.
{Warning
When towing a trailer, exhaust
gases may collect at the rear of
the vehicle and enter if the
liftgate, trunk/hatch, or rear-most
window is open.
When towing a trailer:
. Do not drive with the
liftgate, trunk/hatch,
or rear-most window open.
(Continued)
Warning (Continued)
.Fully open the air outlets on
or under the instrument
panel.
. Also adjust the climate
control system to a setting
that brings in only outside
air. See “Climate Control
Systems” in the Index.
For information about carbon
monoxide, see Engine Exhaust
0 223.
Towing a trailer requires a certain
amount of experience. The
combination you are driving is
longer and not as responsive as the
vehicle itself. Get acquainted with
the handling and braking of the rig
before setting out for the open road.
Before starting, check all trailer hitch
parts and attachments, safety
chains, electrical connectors, lamps,
tires, and mirrors. If the trailer has
electric brakes, start the
Page 292 of 413
Chevrolet Malibu Owner Manual (GMNA-Localizing-U.S./Canada/Mexico-
11348460) - 2018 - crc - 5/3/17
Vehicle Care 291
.A fluid leak in the brake
hydraulic system. Have the
brake hydraulic system fixed.
With a leak, the brakes will not
work well.
Always clean the brake fluid
reservoir cap and the area around
the cap before removing it.
Do not top off the brake fluid.
Adding fluid does not correct a leak.
If fluid is added when the linings are
worn, there will be too much fluid
when new brake linings are
installed. Add or remove fluid, as
necessary, only when work is done
on the brake hydraulic system.
{Warning
If too much brake fluid is added, it
can spill on the engine and burn,
if the engine is hot enough. You
or others could be burned, and
the vehicle could be damaged.
Add brake fluid only when work is
done on the brake hydraulic
system. When the brake fluid falls to a low
level, the brake warning light comes
on. See
Brake System Warning
Light 0124.
Brake fluid absorbs water over time
which degrades the effectiveness of
the brake fluid. Replace brake fluid
at the specified intervals to prevent
increased stopping distance. See
Maintenance Schedule 0360.
What to Add
Use only GM approved DOT 3
brake fluid from a clean, sealed
container. See Recommended
Fluids and Lubricants 0369.
{Warning
The wrong or contaminated brake
fluid could result in damage to the
brake system. This could result in
the loss of braking leading to a
possible injury. Always use the
proper GM approved brake fluid.
Caution
If brake fluid is spilled on the
vehicle's painted surfaces, the
paint finish can be damaged.
Immediately wash off any painted
surface.
Battery - North America
The original equipment battery is
maintenance free. Do not remove
the cap and do not add fluid.
The non-hybrid vehicle has a
standard 12-volt battery under the
hood. See Engine Compartment
Overview 0273.
Refer to the replacement number
shown on the original battery label
when a new 12-volt battery is
needed.
Hybrid Vehicle
The hybrid vehicle 12-volt battery is
in the trunk on the driver side.
Hybrid vehicles also have a high
voltage battery. Only a trained
service technician with the proper
knowledge and tools should inspect,
Page 296 of 413
Chevrolet Malibu Owner Manual (GMNA-Localizing-U.S./Canada/Mexico-
11348460) - 2018 - crc - 5/3/17
Vehicle Care 295
3. With the latch open, pull thewiper blade down toward the
windshield far enough to
release it from the J-hooked
end of the wiper arm.
4. Remove the wiper blade.
5. Reverse Steps 1–3 for wiper blade replacement.
Gas Strut(s)
This vehicle is equipped with gas
strut(s) to provide assistance in
lifting and holding open the hood/
trunk/liftgate system in full open
position.
{Warning
If the gas struts that hold open
the hood, trunk, and/or liftgate fail,
you or others could be seriously
injured. Take the vehicle to your
dealer for service immediately.
Visually inspect the gas struts for
signs of wear, cracks, or other
damage periodically. Check to
make sure the hood/trunk/liftgate
(Continued)
Warning (Continued)
is held open with enough force.
If struts are failing to hold the
hood/trunk/liftgate, do not
operate. Have the vehicle
serviced.
Caution
Do not apply tape or hang any
objects from gas struts. Also do
not push down or pull on gas
struts. This may cause damage to
the vehicle.
See Maintenance Schedule 0360.Hood
Trunk
Page 299 of 413
Chevrolet Malibu Owner Manual (GMNA-Localizing-U.S./Canada/Mexico-
11348460) - 2018 - crc - 5/3/17
298 Vehicle Care
4. Remove the bulb from thesocket.
5. Replace the bulb in the bulb socket.
6. Install the bulb socket in the headlamp assembly by turning
it clockwise.
7. For the driver side, reinstall the windshield washer bottle filler
neck by firmly pushing it
straight into the bottle. Make
sure that the filler neck clip
engages into the bracket on
the upper tie-bar.
8. Replace the engine air cleaner housing by aligning the pegs
with the grommets and
pressing firmly down.Taillamps, Turn Signal,
Stoplamps, and Back-Up
Lamps (LS and LT)
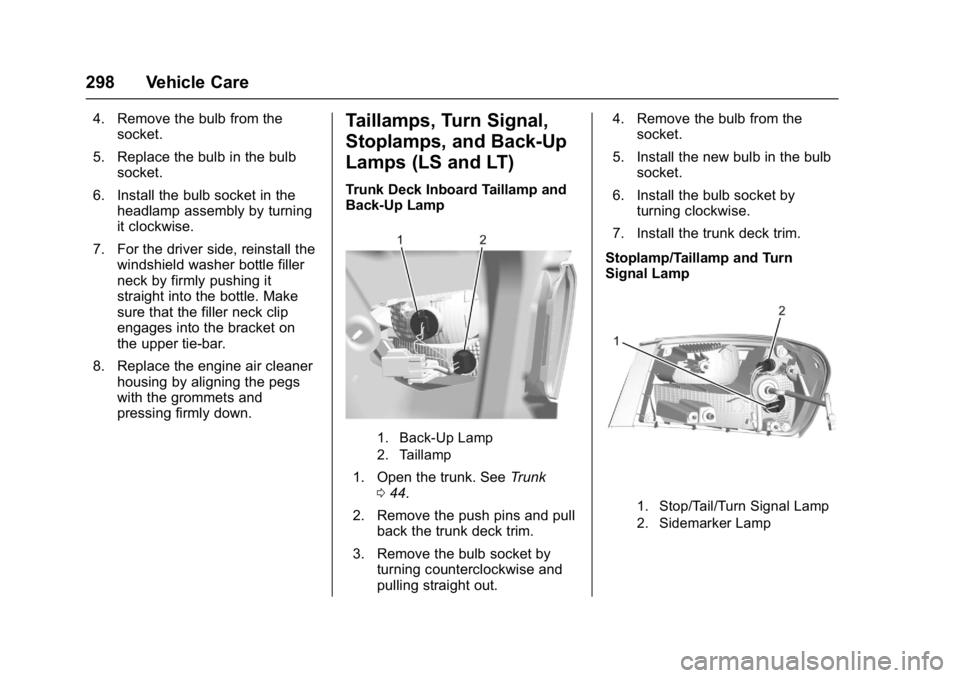
Trunk Deck Inboard Taillamp and
Back-Up Lamp
1. Back-Up Lamp
2. Taillamp
1. Open the trunk. See Trunk
0 44.
2. Remove the push pins and pull back the trunk deck trim.
3. Remove the bulb socket by turning counterclockwise and
pulling straight out. 4. Remove the bulb from the
socket.
5. Install the new bulb in the bulb socket.
6. Install the bulb socket by turning clockwise.
7. Install the trunk deck trim.
Stoplamp/Taillamp and Turn
Signal Lamp
1. Stop/Tail/Turn Signal Lamp
2. Sidemarker Lamp
Page 300 of 413
Chevrolet Malibu Owner Manual (GMNA-Localizing-U.S./Canada/Mexico-
11348460) - 2018 - crc - 5/3/17
Vehicle Care 299
Caution
Improper lamp assembly removal
and installation can cause leaks
and water intrusion which may
cause damage to the taillamp. Do
not remove the taillamp assembly
to replace a bulb. Use the trunk
opening to access the bulb.
To replace any one of these bulbs: 1. Open the trunk. See Trunk
0 44.
2. Remove the push pins and pull the trunk trim away from the
taillamp assembly.
3. Remove three hex-nuts from each stud.
4. Remove the lamp by pulling it straight back.
5. Remove the bulb socket from the taillamp assembly by
turning it counterclockwise.
6. Remove the bulb from the socket by turning the bulb
counterclockwise one-quarter
turn and pulling it straight out. 7. Install a new bulb into the
socket.
8. Install the bulb socket into the taillamp assembly by turning it
clockwise.
9. Install the trunk trim, hex nuts, and push pins.
Taillamps, Turn Signal,
Stoplamps, and Back-Up
Lamps (LTZ)
Caution
Improper lamp assembly removal
and installation can cause leaks
and water intrusion which may
cause damage to the taillamp. Do
not remove the taillamp assembly
to replace a bulb. Use the trunk
opening to access the bulb.
The stoplamp/taillamp and trunk
deck inboard taillamp are LEDs. To
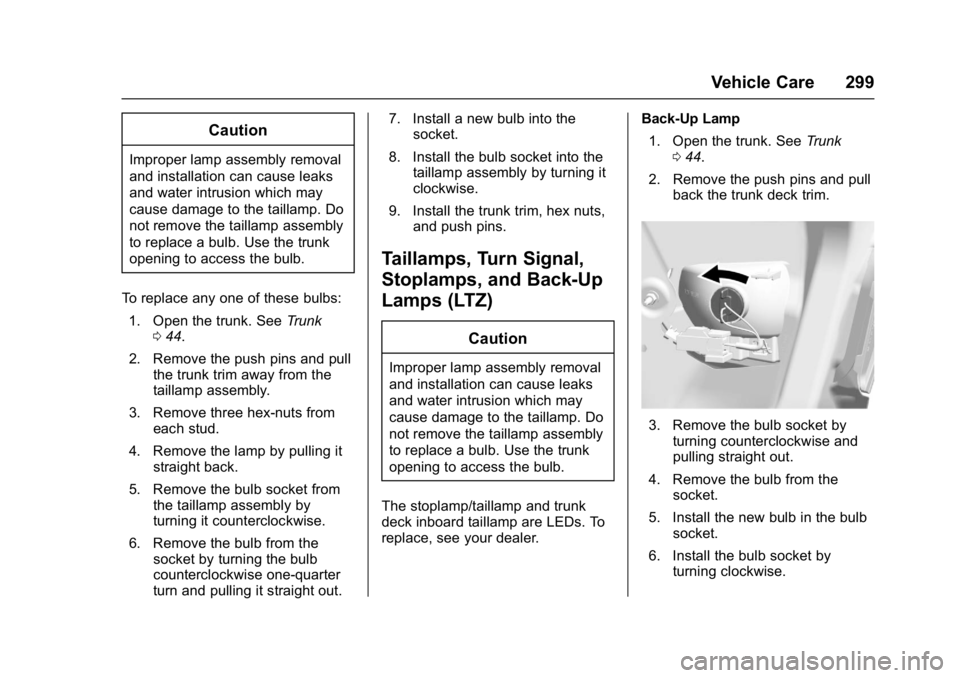
replace, see your dealer. Back-Up Lamp
1. Open the trunk. See Trunk
0 44.
2. Remove the push pins and pull back the trunk deck trim.
3. Remove the bulb socket byturning counterclockwise and
pulling straight out.
4. Remove the bulb from the socket.
5. Install the new bulb in the bulb socket.
6. Install the bulb socket by turning clockwise.
Page 301 of 413
Chevrolet Malibu Owner Manual (GMNA-Localizing-U.S./Canada/Mexico-
11348460) - 2018 - crc - 5/3/17
300 Vehicle Care
7. Install the trunk deck trim.
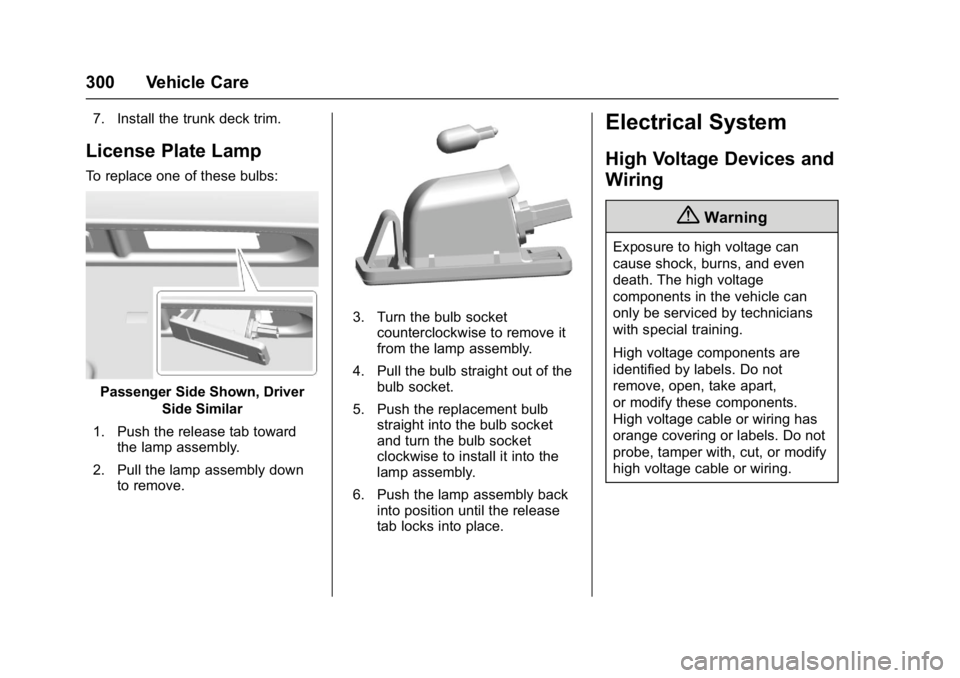
License Plate Lamp
To replace one of these bulbs:
Passenger Side Shown, DriverSide Similar
1. Push the release tab toward the lamp assembly.
2. Pull the lamp assembly down to remove.
3. Turn the bulb socketcounterclockwise to remove it
from the lamp assembly.
4. Pull the bulb straight out of the bulb socket.
5. Push the replacement bulb straight into the bulb socket
and turn the bulb socket
clockwise to install it into the
lamp assembly.
6. Push the lamp assembly back into position until the release
tab locks into place.
Electrical System
High Voltage Devices and
Wiring
{Warning
Exposure to high voltage can
cause shock, burns, and even
death. The high voltage
components in the vehicle can
only be serviced by technicians
with special training.
High voltage components are
identified by labels. Do not
remove, open, take apart,
or modify these components.
High voltage cable or wiring has
orange covering or labels. Do not
probe, tamper with, cut, or modify
high voltage cable or wiring.
Page 305 of 413

Chevrolet Malibu Owner Manual (GMNA-Localizing-U.S./Canada/Mexico-
11348460) - 2018 - crc - 5/3/17
304 Vehicle Care
The vehicle may not be equipped
with all of the fuses, relays, and
features shown.Fuses Usage
1 –
2 –
3 Antilock brake system pump
5 AC DC inverter
6 Trunk
7 Anti-theft warning siren/Horn
8 Window/Mirror/Seats
9 Electric brake boost
10 AOS/Airbag–HEV 11 DC DC battery 1
12 Rear defogger
13 Heated mirrors
14 –
15 Passive entry/Passive start
16 Front wiper
17 Passenger power seat Fuses Usage
18 Antilock brake system valve
19 Driver power seat
21 Sunroof
22 Parking lamp
23 Active headlamp leveling
24 –
26 Transmission control module/Ignition
27 Instrument panel/ body/Ignition
28 –
29 Regulated voltage control/Ventilation
30 Malfunction indicator lamp/SS
32 CVS
33 Front heated seat
34 BSM/ESS fan
35 Body control module 6/Body control
module 7 Fuses Usage
36 Fuel module
38 –
39 –
40 Steering column lock
41 –
43 Heated steering wheel
44 Active headlamp leveling
45 –
46 Engine control module/Ignition
47 –
48 Electric brake boost–HEV
49 DC DC battery 2
50 –
51 –
52 –
53 –
54 –
55 –