2018 CHEVROLET MALIBU buttons
[x] Cancel search: buttonsPage 152 of 413
Chevrolet Malibu Owner Manual (GMNA-Localizing-U.S./Canada/Mexico-
11348460) - 2018 - crc - 5/3/17
Instruments and Controls 151
instructions refer to a garage door
opener, but can be used for other
devices.
Do not use the Universal Remote
system with any garage door opener
that does not have the stop and
reverse feature. This includes any
garage door opener model
manufactured before April 1, 1982.
Read these instructions completely
before programming the Universal
Remote system. It may help to have
another person assist with the
programming process.
Keep the original hand-held
transmitter for use in other vehicles
as well as for future programming.
Erase the programming when
vehicle ownership is terminated.
See“Erasing Universal Remote
System Buttons” later in this
section.
To program a garage door opener,
park outside directly in line with and
facing the garage door opener
receiver. Clear all people and
objects near the garage door. Make sure the hand-held transmitter
has a new battery for quick and
accurate transmission of the
radio-frequency signal.
Programming the Universal
Remote System
For questions or help programming
the Universal Remote system, call
1-800-355-3515 or see
www.homelink.com.
Programming involves
time-sensitive actions, and may time
out causing the procedure to be
repeated.
To program up to three devices:
1. Hold the end of the hand-held transmitter about 3 to 8 cm (1
to 3 in) away from the
Universal Remote system
buttons with the indicator light
in view. The hand-held
transmitter was supplied by the
manufacturer of the garage
door opener receiver.
2. At the same time, press and hold both the hand-held
transmitter button and one of
the three Universal Remote system buttons to be used to
operate the garage door. Do
not release either button until
the indicator light changes from
a slow to a rapid flash. Then
release both buttons.
Some garage door openers
may require substitution of
Step 2 with the procedure
under
“Radio Signals for
Canada and Some Gate
Operators” later in this section.
3. Press and hold the newly programmed Universal Remote
system button for five seconds
while watching the indicator
light and garage door
activation.
.If the indicator light stays on
continuously or the garage
door moves when the
button is pressed, then
programming is complete.
There is no need to
complete Steps 4–6.
. If the indicator light does
not come on or the garage
door does not move, a
second button press may
Page 153 of 413
Chevrolet Malibu Owner Manual (GMNA-Localizing-U.S./Canada/Mexico-
11348460) - 2018 - crc - 5/3/17
152 Instruments and Controls
be required. For a second
time, press and hold the
newly programmed button
for five seconds. If the light
stays on or the garage door
moves, programming is
complete.
. If the indicator light blinks
rapidly for two seconds,
then changes to a solid light
and the garage door does
not move, continue with
programming Steps 4–6.
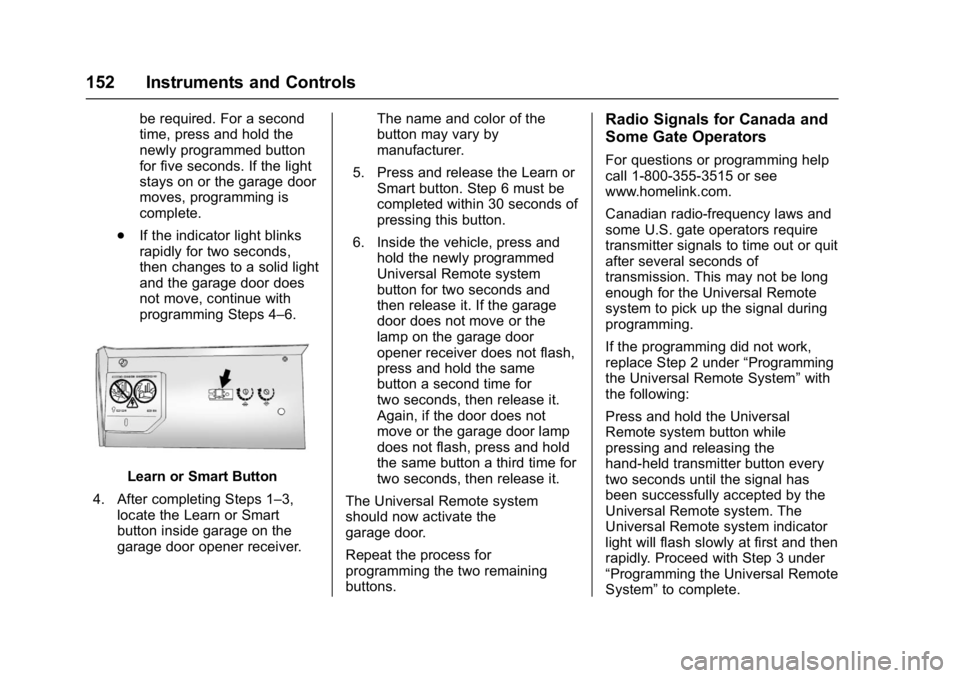
Learn or Smart Button
4. After completing Steps 1–3, locate the Learn or Smart
button inside garage on the
garage door opener receiver. The name and color of the
button may vary by
manufacturer.
5. Press and release the Learn or Smart button. Step 6 must be
completed within 30 seconds of
pressing this button.
6. Inside the vehicle, press and hold the newly programmed
Universal Remote system
button for two seconds and
then release it. If the garage
door does not move or the
lamp on the garage door
opener receiver does not flash,
press and hold the same
button a second time for
two seconds, then release it.
Again, if the door does not
move or the garage door lamp
does not flash, press and hold
the same button a third time for
two seconds, then release it.
The Universal Remote system
should now activate the
garage door.
Repeat the process for
programming the two remaining
buttons.
Radio Signals for Canada and
Some Gate Operators
For questions or programming help
call 1-800-355-3515 or see
www.homelink.com.
Canadian radio-frequency laws and
some U.S. gate operators require
transmitter signals to time out or quit
after several seconds of
transmission. This may not be long
enough for the Universal Remote
system to pick up the signal during
programming.
If the programming did not work,
replace Step 2 under “Programming
the Universal Remote System” with
the following:
Press and hold the Universal
Remote system button while
pressing and releasing the
hand-held transmitter button every
two seconds until the signal has
been successfully accepted by the
Universal Remote system. The
Universal Remote system indicator
light will flash slowly at first and then
rapidly. Proceed with Step 3 under
“Programming the Universal Remote
System” to complete.
Page 154 of 413
Chevrolet Malibu Owner Manual (GMNA-Localizing-U.S./Canada/Mexico-
11348460) - 2018 - crc - 5/3/17
Instruments and Controls 153
Universal Remote System
Operation
Using the Universal Remote
System
Press and hold the appropriate
Universal Remote system button for
at least one-half second. The
indicator light will come on while the
signal is being transmitted.
Erasing Universal Remote
System Buttons
Erase all programmed buttons when
vehicle ownership is terminated.
To erase:1. Press and hold the two outside buttons until the indicator light
begins to flash. This should
take about 10 seconds.
2. Release both buttons.
Reprogramming a Single
Universal Remote System
Button
To reprogram any of the system
buttons: 1. Press and hold any one of the buttons. Do not release the
button.
2. The indicator light will begin to flash after 20 seconds. Without
releasing the button, proceed
with Step 1 under
“Programming the Universal
Remote System.”
Page 160 of 413
Chevrolet Malibu Owner Manual (GMNA-Localizing-U.S./Canada/Mexico-
11348460) - 2018 - crc - 5/3/17
Lighting 159
Courtesy Lamps
The courtesy lamps come on when
any door is opened unless the dome
lamp override is activated. To
deactivate the dome lamp override,
press
jOFF and the indicator
light on the button will turn off.
Dome Lamps
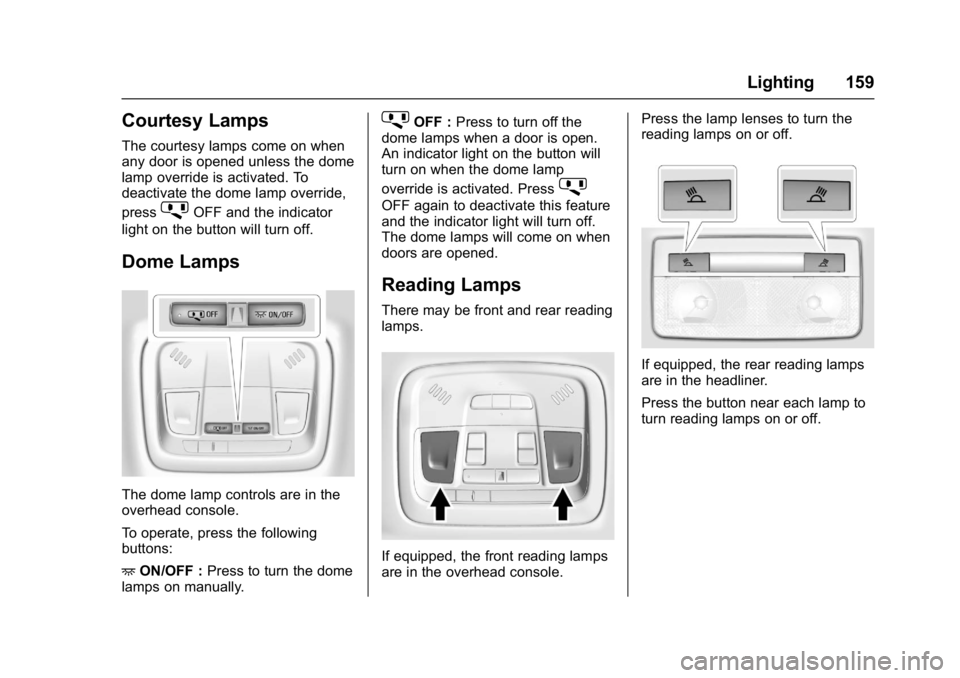
The dome lamp controls are in the
overhead console.
To operate, press the following
buttons:
+ ON/OFF : Press to turn the dome
lamps on manually.
jOFF : Press to turn off the
dome lamps when a door is open.
An indicator light on the button will
turn on when the dome lamp
override is activated. Press
j
OFF again to deactivate this feature
and the indicator light will turn off.
The dome lamps will come on when
doors are opened.
Reading Lamps
There may be front and rear reading
lamps.
If equipped, the front reading lamps
are in the overhead console. Press the lamp lenses to turn the
reading lamps on or off.
If equipped, the rear reading lamps
are in the headliner.
Press the button near each lamp to
turn reading lamps on or off.
Page 166 of 413
Chevrolet Malibu Owner Manual (GMNA-Localizing-U.S./Canada/Mexico-
11348460) - 2018 - crc - 5/3/17
Infotainment System 165
.Turn to highlight menu
items or to set values while
in a menu.
. Turn to manually select
radio stations.
9. Preset Buttons 1−4 .Press and hold to store a
station.
. Press to go to a preset
favorite station.
10. FAV .Press to go to a
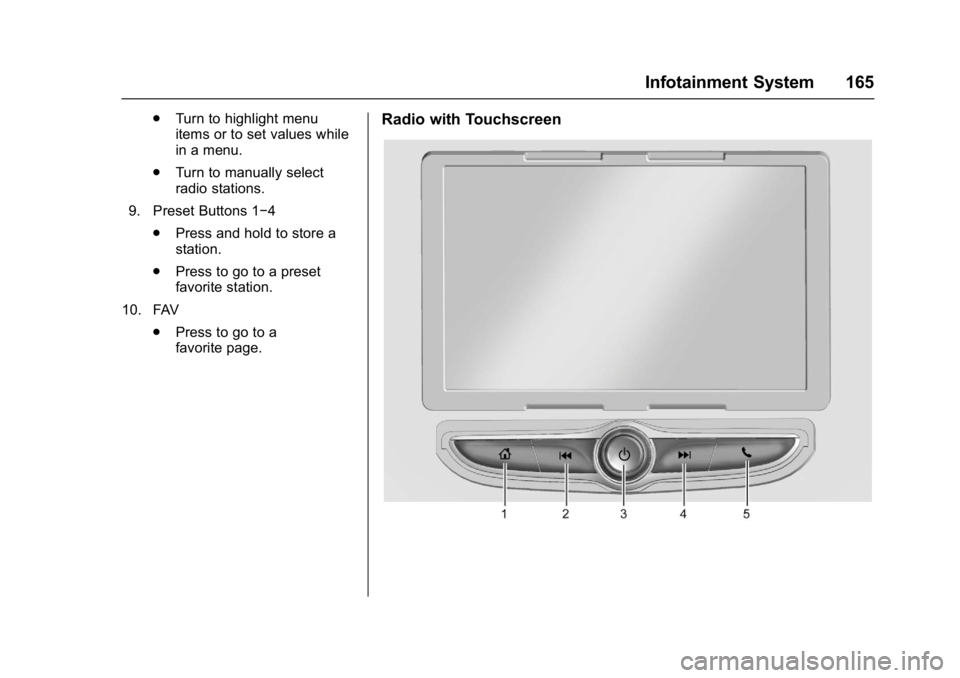
favorite page.Radio with Touchscreen
Page 167 of 413
Chevrolet Malibu Owner Manual (GMNA-Localizing-U.S./Canada/Mexico-
11348460) - 2018 - crc - 5/3/17
166 Infotainment System
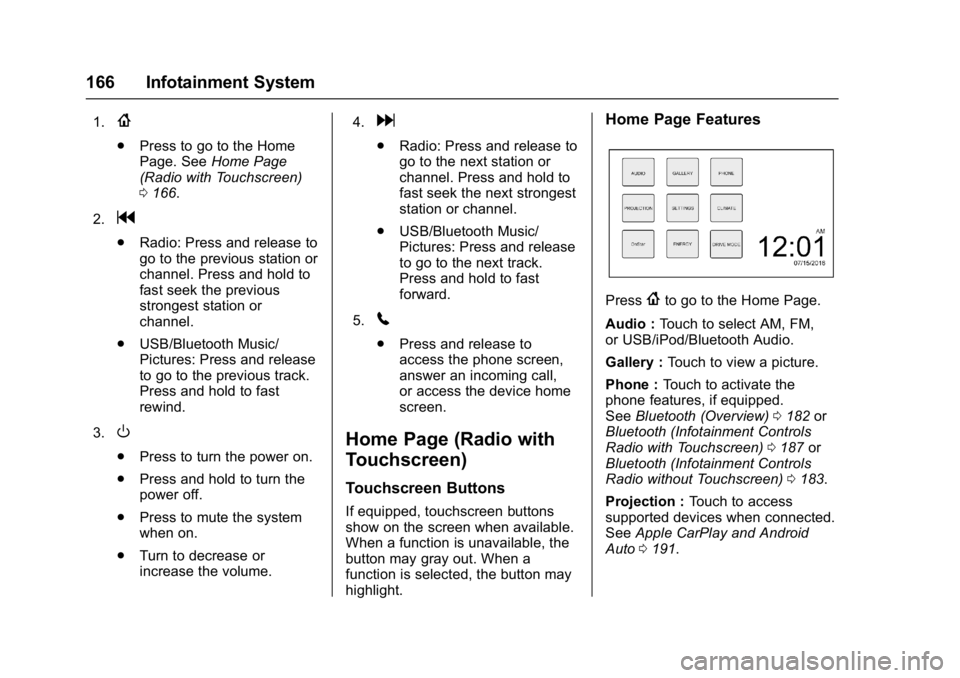
1.{
.Press to go to the Home
Page. See Home Page
(Radio with Touchscreen)
0 166.
2.
g
. Radio: Press and release to
go to the previous station or
channel. Press and hold to
fast seek the previous
strongest station or
channel.
. USB/Bluetooth Music/
Pictures: Press and release
to go to the previous track.
Press and hold to fast
rewind.
3.
O
. Press to turn the power on.
. Press and hold to turn the
power off.
. Press to mute the system
when on.
. Turn to decrease or
increase the volume. 4.
d
.
Radio: Press and release to
go to the next station or
channel. Press and hold to
fast seek the next strongest
station or channel.
. USB/Bluetooth Music/
Pictures: Press and release
to go to the next track.
Press and hold to fast
forward.
5.
5
. Press and release to
access the phone screen,
answer an incoming call,
or access the device home
screen.
Home Page (Radio with
Touchscreen)
Touchscreen Buttons
If equipped, touchscreen buttons
show on the screen when available.
When a function is unavailable, the
button may gray out. When a
function is selected, the button may
highlight.
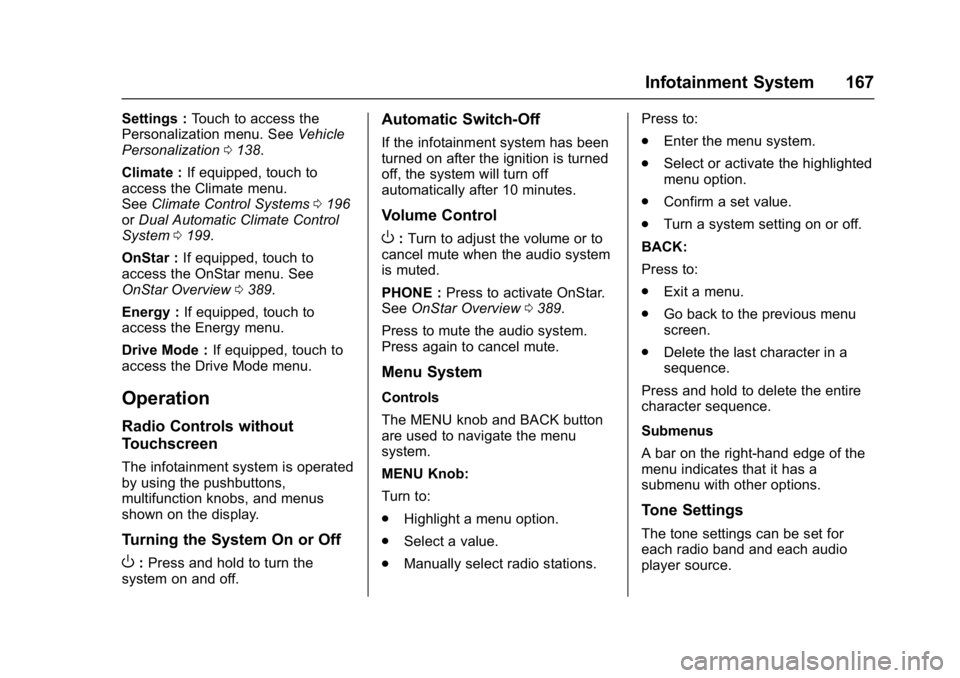
Home Page Features
Press{to go to the Home Page.
Audio : Touch to select AM, FM,
or USB/iPod/Bluetooth Audio.
Gallery : Touch to view a picture.
Phone : Touch to activate the
phone features, if equipped.
See Bluetooth (Overview) 0182 or
Bluetooth (Infotainment Controls
Radio with Touchscreen) 0187 or
Bluetooth (Infotainment Controls
Radio without Touchscreen) 0183.
Projection : Touch to access
supported devices when connected.
See Apple CarPlay and Android
Auto 0191.
Page 168 of 413
Chevrolet Malibu Owner Manual (GMNA-Localizing-U.S./Canada/Mexico-
11348460) - 2018 - crc - 5/3/17
Infotainment System 167
Settings :Touch to access the
Personalization menu. See Vehicle
Personalization 0138.
Climate : If equipped, touch to
access the Climate menu.
See Climate Control Systems 0196
or Dual Automatic Climate Control
System 0199.
OnStar : If equipped, touch to
access the OnStar menu. See
OnStar Overview 0389.
Energy : If equipped, touch to
access the Energy menu.
Drive Mode : If equipped, touch to
access the Drive Mode menu.
Operation
Radio Controls without
Touchscreen
The infotainment system is operated
by using the pushbuttons,
multifunction knobs, and menus
shown on the display.
Turning the System On or Off
O: Press and hold to turn the
system on and off.
Automatic Switch-Off
If the infotainment system has been
turned on after the ignition is turned
off, the system will turn off
automatically after 10 minutes.
Volume Control
O: Turn to adjust the volume or to
cancel mute when the audio system
is muted.
PHONE : Press to activate OnStar.
See OnStar Overview 0389.
Press to mute the audio system.
Press again to cancel mute.
Menu System
Controls
The MENU knob and BACK button
are used to navigate the menu
system.
MENU Knob:
Turn to:
. Highlight a menu option.
. Select a value.
. Manually select radio stations. Press to:
.
Enter the menu system.
. Select or activate the highlighted
menu option.
. Confirm a set value.
. Turn a system setting on or off.
BACK:
Press to:
. Exit a menu.
. Go back to the previous menu
screen.
. Delete the last character in a
sequence.
Press and hold to delete the entire
character sequence.
Submenus
A bar on the right-hand edge of the
menu indicates that it has a
submenu with other options.
Tone Settings
The tone settings can be set for
each radio band and each audio
player source.
Page 169 of 413
Chevrolet Malibu Owner Manual (GMNA-Localizing-U.S./Canada/Mexico-
11348460) - 2018 - crc - 5/3/17
168 Infotainment System
Adjusting the Bass, Midrange,
Treble, Fader, and Balance1. Press MENU.
2. Turn MENU to Settings.
3. Press MENU.
4. Turn MENU to Tone Settings.
5. Press MENU.
6. Turn MENU to the desired tone.
7. Press MENU to select the desired tone.
8. Turn MENU to adjust the desired tone.
9. Press MENU to save the setting.
10. Press BACK to go back to the Tone Settings menu.
Adjusting the EQ (Equalizer) 1. Press MENU.
2. Turn MENU to Settings.
3. Press MENU.
4. Turn MENU to Tone Settings.
5. Press MENU. 6. Turn MENU to EQ.
7. Press MENU.
8. Turn MENU to the desired
setting, then press MENU to
select it.
9. Continue pressing BACK to go back to the Tone
Settings menu.
System Settings
Configuring the Number of
Favorite Pages
Up to six favorite pages can be
saved, and each page can store up
to four radio stations.
To configure the number of available
favorite pages:
1. Press MENU.
2. Turn MENU to Set Number of Favorites Pages.
3. Press MENU.
4. Turn MENU to the desired number of pages.
5. Press MENU to select the desired number of pages.
6. Press BACK to exit. Auto Volume Control
This feature automatically adjusts
the radio volume to compensate for
road and wind noise.
The level of volume compensation
can be selected, or the feature can
be turned off.
1. Press MENU.
2. Turn MENU to Settings.
3. Press MENU.
4. Turn MENU to Auto Volume Control.
5. Press MENU.
6. Select the desired setting.
7. Press BACK to exit.
Radio Controls with
Touchscreen
The infotainment system is operated
by using the pushbuttons, menus
shown on the display, and steering
wheel controls.
Turning the System On or Off
O: Press to turn the radio on.
Press and hold to turn the radio off.