2018 CHEVROLET MALIBU automatic transmission
[x] Cancel search: automatic transmissionPage 220 of 413
Chevrolet Malibu Owner Manual (GMNA-Localizing-U.S./Canada/Mexico-
11348460) - 2018 - crc - 5/3/17
Driving and Operating 219
15 seconds between each try,
to allow the cranking motor to
cool down. When the engine
starts, let go of the button and
the accelerator. If the vehicle
starts briefly but then stops
again, do the same thing. This
clears the extra gasoline from
the engine. Do not race the
engine immediately after
starting it. Operate the engine
and transmission gently until
the oil warms up and lubricates
all moving parts.
Hybrid Operation (1.8 L
Engine Only)
This vehicle combines gasoline and
electric propulsion. The gasoline
engine will automatically start to
provide power and then shut off to
save fuel.
The engine may remain
running when:
.Accelerating aggressively or
climbing hills.
. Vehicle speed is greater than
88 km/h (55 mph). .
Charging the high voltage
battery.
. The heater is being used.
The engine and transmission work
together to provide propulsion
power at the highest efficiency. This
may result in higher engine speeds.
Stop/Start System
{Warning
Exiting the vehicle without first
shifting into P (Park) may cause
the vehicle to move. You or others
may be injured. Because the
vehicle may have an auto engine
Stop/Start feature, the vehicle's
engine might seem to be shut off;
however, once the brake pedal is
released, the engine will start up
again. The engine may restart
even while the brake is applied.
Shift to P (Park) and turn the
ignition off before exiting the
vehicle. This vehicle may be equipped with a
fuel saving Stop/Start system to
shut off the engine and help
conserve fuel.
Auto Stop/Start (1.5 L
Engine Only)
When the brakes are applied and
the vehicle is at a complete stop,
the engine may turn off. When
stopped, the tachometer displays
AUTO STOP. See
Tachometer
(Non-Hybrid) 0117. When the brake
pedal is released or the accelerator
pedal is pushed, the engine will
restart.
Auto Stop may be deactivated if:
. A minimum vehicle speed is not
reached.
. The engine or transmission is
not at the required operating
temperature.
. The outside temperature is not
in the required operating range,
typically below −10 °C (14 °F) or
above 50 °C (122 °F).
. The shift lever is in any gear
other than D (Drive).
Page 225 of 413
Chevrolet Malibu Owner Manual (GMNA-Localizing-U.S./Canada/Mexico-
11348460) - 2018 - crc - 5/3/17
224 Driving and Operating
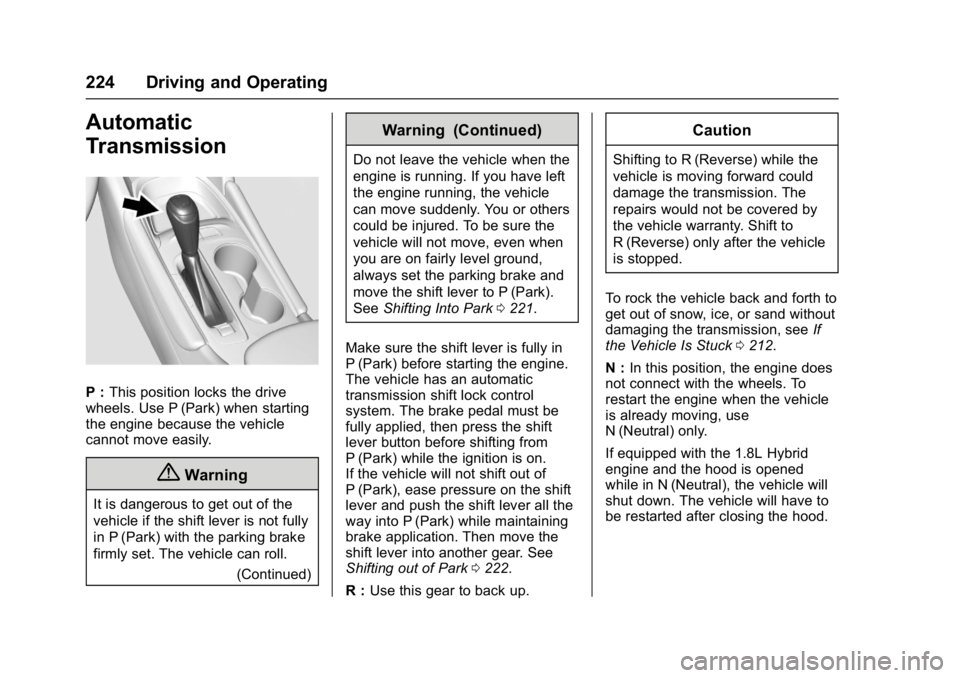
Automatic
Transmission
P :This position locks the drive
wheels. Use P (Park) when starting
the engine because the vehicle
cannot move easily.
{Warning
It is dangerous to get out of the
vehicle if the shift lever is not fully
in P (Park) with the parking brake
firmly set. The vehicle can roll.
(Continued)
Warning (Continued)
Do not leave the vehicle when the
engine is running. If you have left
the engine running, the vehicle
can move suddenly. You or others
could be injured. To be sure the
vehicle will not move, even when
you are on fairly level ground,
always set the parking brake and
move the shift lever to P (Park).
SeeShifting Into Park 0221.
Make sure the shift lever is fully in
P (Park) before starting the engine.
The vehicle has an automatic
transmission shift lock control
system. The brake pedal must be
fully applied, then press the shift
lever button before shifting from
P (Park) while the ignition is on.
If the vehicle will not shift out of
P (Park), ease pressure on the shift
lever and push the shift lever all the
way into P (Park) while maintaining
brake application. Then move the
shift lever into another gear. See
Shifting out of Park 0222.
R : Use this gear to back up.
Caution
Shifting to R (Reverse) while the
vehicle is moving forward could
damage the transmission. The
repairs would not be covered by
the vehicle warranty. Shift to
R (Reverse) only after the vehicle
is stopped.
To rock the vehicle back and forth to
get out of snow, ice, or sand without
damaging the transmission, see If
the Vehicle Is Stuck 0212.
N : In this position, the engine does
not connect with the wheels. To
restart the engine when the vehicle
is already moving, use
N (Neutral) only.
If equipped with the 1.8L Hybrid
engine and the hood is opened
while in N (Neutral), the vehicle will
shut down. The vehicle will have to
be restarted after closing the hood.
Page 226 of 413
Chevrolet Malibu Owner Manual (GMNA-Localizing-U.S./Canada/Mexico-
11348460) - 2018 - crc - 5/3/17
Driving and Operating 225
{Warning
Shifting into a drive gear while the
engine is running at high speed is
dangerous. Unless your foot is
firmly on the brake pedal, the
vehicle could move very rapidly.
You could lose control and hit
people or objects. Do not shift
into a drive gear while the engine
is running at high speed.
Caution
Shifting out of P (Park) or
N (Neutral) with the engine
running at high speed may
damage the transmission. The
repairs would not be covered by
the vehicle warranty. Be sure the
engine is not running at high
speed when shifting the vehicle.
For hybrid vehicles, the engine will
always be off while in N (Neutral).
The vehicle cannot charge the high
voltage battery while the shift lever is in N (Neutral). Only use
N (Neutral) when required. If the
high voltage battery state of charge
is low, the Driver Information
Center (DIC) will display a message
to shift out of N (Neutral). Shift to
P (Park), R (Reverse), D (Drive),
or L (Low) depending on the
situation. If the high voltage battery
is depleted too far, the vehicle will
shut down, requiring a shift to
P (Park) to restart the vehicle.
Caution
A transmission hot message may
display if the automatic
transmission fluid is too hot.
Driving under this condition can
damage the vehicle. Stop and idle
the engine to cool the automatic
transmission fluid. This message
clears when the transmission fluid
has cooled sufficiently.
D : This position is for normal
driving. If more power is needed for
passing, press the accelerator
pedal down. L :
This position allows you to
change gears similar to a manual
transmission. If the vehicle has this
feature, see Manual Mode 0225.
Operating Modes
The transmission may operate in a
lower gear than normal to improve
vehicle performance. The engine
speed may be higher and there may
be an increase in noise during the
following conditions:
. When climbing a grade.
. When driving downhill.
. When driving in hot
temperatures or at high altitude.
Manual Mode
Electronic Range Select
(ERS) Mode
ERS mode allows you to choose the
top-gear limit of the transmission
and the vehicle's speed while
driving downhill or towing a trailer.
The vehicle has an electronic shift
position indicator within the
instrument cluster. When using the
Page 227 of 413
Chevrolet Malibu Owner Manual (GMNA-Localizing-U.S./Canada/Mexico-
11348460) - 2018 - crc - 5/3/17
226 Driving and Operating
ERS mode a number will display
next to the L, indicating the current
gear that has been selected.
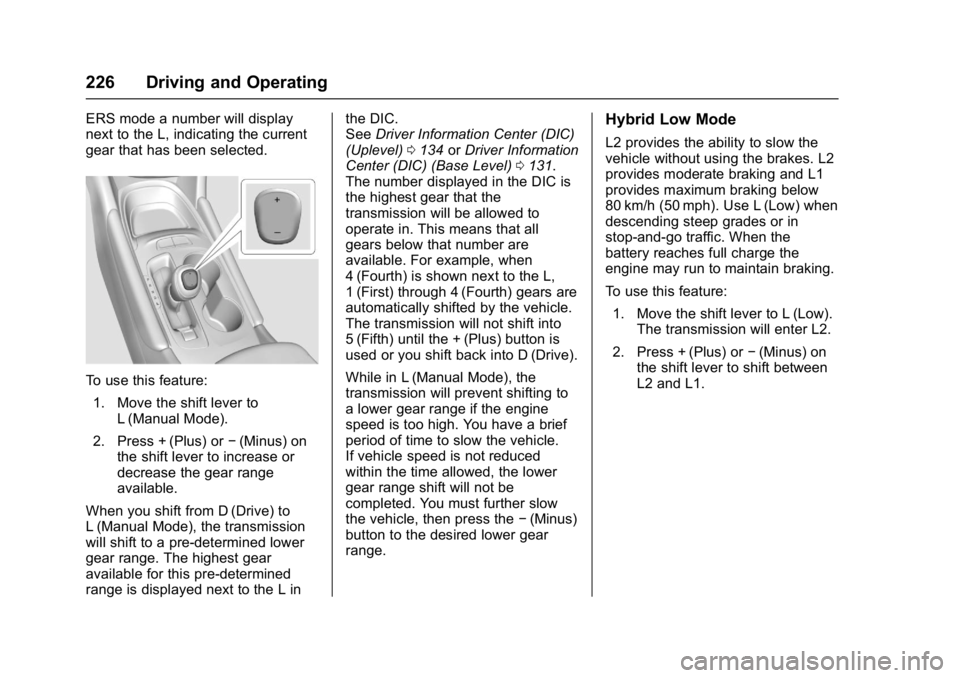
To use this feature:1. Move the shift lever to L (Manual Mode).
2. Press + (Plus) or −(Minus) on
the shift lever to increase or
decrease the gear range
available.
When you shift from D (Drive) to
L (Manual Mode), the transmission
will shift to a pre-determined lower
gear range. The highest gear
available for this pre-determined
range is displayed next to the L in the DIC.
See
Driver Information Center (DIC)
(Uplevel) 0134 orDriver Information
Center (DIC) (Base Level) 0131.
The number displayed in the DIC is
the highest gear that the
transmission will be allowed to
operate in. This means that all
gears below that number are
available. For example, when
4 (Fourth) is shown next to the L,
1 (First) through 4 (Fourth) gears are
automatically shifted by the vehicle.
The transmission will not shift into
5 (Fifth) until the + (Plus) button is
used or you shift back into D (Drive).
While in L (Manual Mode), the
transmission will prevent shifting to
a lower gear range if the engine
speed is too high. You have a brief
period of time to slow the vehicle.
If vehicle speed is not reduced
within the time allowed, the lower
gear range shift will not be
completed. You must further slow
the vehicle, then press the −(Minus)
button to the desired lower gear
range.
Hybrid Low Mode
L2 provides the ability to slow the
vehicle without using the brakes. L2
provides moderate braking and L1
provides maximum braking below
80 km/h (50 mph). Use L (Low) when
descending steep grades or in
stop-and-go traffic. When the
battery reaches full charge the
engine may run to maintain braking.
To use this feature:
1. Move the shift lever to L (Low). The transmission will enter L2.
2. Press + (Plus) or −(Minus) on
the shift lever to shift between
L2 and L1.
Page 236 of 413
Chevrolet Malibu Owner Manual (GMNA-Localizing-U.S./Canada/Mexico-
11348460) - 2018 - crc - 5/3/17
Driving and Operating 235
.To slow down in small
increments, briefly press -SET.
For each press, the vehicle goes
about 1 km/h (1 mph) slower.
The speedometer reading can be
displayed in either English or metric
units.
See Driver Information Center (DIC)
(Uplevel) 0134 orDriver Information
Center (DIC) (Base Level) 0131.
The increment value used depends
on the units displayed.
Passing Another Vehicle While
Using Cruise Control
Use the accelerator pedal to
increase the vehicle speed. When
you take your foot off the pedal, the
vehicle will slow down to the
previous set cruise speed. While
pressing the accelerator pedal or
shortly following the release to
override cruise control, briefly
pressing -SET will result in cruise
control set to the current vehicle
speed. Using Cruise Control on Hills
How well the cruise control works
on hills depends upon the vehicle
speed, load, and the steepness of
the hills. When going up steep hills,
you might have to step on the
accelerator pedal to maintain the
vehicle speed. When going
downhill, you might have to brake or
shift to a lower gear to keep your
speed down. If the brake pedal is
applied, cruise control will
disengage.
Ending Cruise Control
There are four ways to end cruise
control:
.
Step lightly on the brake pedal.
. Press
*.
. Shift the transmission to
N (Neutral).
. Press
5to turn cruise control
system off completely.
Erasing Speed Memory
The cruise control set speed is
erased from memory if
5is pressed
or if the vehicle is turned off.
Adaptive Cruise Control
If equipped with Adaptive Cruise
Control (ACC), it allows you to
select the cruise control set speed
and following gap. Read this entire
section before using this system.
The following gap is the following
time between your vehicle and a
vehicle detected directly ahead in
your path moving in the same
direction. If no vehicle is detected in
your path, ACC works like regular
cruise control. ACC uses camera
and radar sensors. See Radio
Frequency Statement 0385.
If a vehicle is detected in your path,
ACC can apply acceleration or
limited, moderate braking to
maintain the selected following gap.
To disengage ACC, apply the brake.
If ACC is controlling your vehicle
speed when the Traction Control
System (TCS) or StabiliTrak system
activates, the ACC may
automatically disengage. See
Traction Control/Electronic Stability
Control 0231. When road
Page 263 of 413
Chevrolet Malibu Owner Manual (GMNA-Localizing-U.S./Canada/Mexico-
11348460) - 2018 - crc - 5/3/17
262 Driving and Operating
Driving Characteristics
and Towing Tips
Driving with a Trailer
When towing a trailer:
.Become familiar with the state
and local laws that apply
specifically to trailer towing.
. Do not tow a trailer during the
first 800 km (500 mi), to prevent
damage to the engine, axle,
or other parts.
. Then, during the first 800 km
(500 mi) of trailer towing, do not
drive over 80 km/h (50 mph) and
do not make starts at full throttle.
. The vehicle can tow in D (Drive)
but Manual Mode is
recommended. See Manual
Mode 0225. Use a lower gear if
the transmission shifts too often.
. Turn off Parking Assist when
towing.
. Do not use Adaptive Cruise
Control (ACC) when towing. See
Adaptive Cruise Control 0235. .
Turn off Lane Keep Assist (LKA)
when towing. See Lane Keep
Assist (LKA) 0255.
. Turn off Forward Automatic
Braking when towing. See
Forward Automatic Braking
(FAB) 0249.
. The Front Pedestrian Braking
system should be set to Alert or
Off when towing. See Front
Pedestrian Braking (FPB)
System 0251.
{Warning
When towing a trailer, exhaust
gases may collect at the rear of
the vehicle and enter if the
liftgate, trunk/hatch, or rear-most
window is open.
When towing a trailer:
. Do not drive with the
liftgate, trunk/hatch,
or rear-most window open.
(Continued)
Warning (Continued)
.Fully open the air outlets on
or under the instrument
panel.
. Also adjust the climate
control system to a setting
that brings in only outside
air. See “Climate Control
Systems” in the Index.
For information about carbon
monoxide, see Engine Exhaust
0 223.
Towing a trailer requires a certain
amount of experience. The
combination you are driving is
longer and not as responsive as the
vehicle itself. Get acquainted with
the handling and braking of the rig
before setting out for the open road.
Before starting, check all trailer hitch
parts and attachments, safety
chains, electrical connectors, lamps,
tires, and mirrors. If the trailer has
electric brakes, start the
Page 265 of 413
Chevrolet Malibu Owner Manual (GMNA-Localizing-U.S./Canada/Mexico-
11348460) - 2018 - crc - 5/3/17
264 Driving and Operating
brakes might have to be used so
much that they would get hot and no
longer work well.
The vehicle can tow in D (Drive).
Use a lower gear if the transmission
shifts too often.
When towing at high altitude on
steep uphill grades, engine coolant
boils at a lower temperature than at
normal altitudes. If the engine is
turned off immediately after towing
at high altitude on steep uphill
grades, the vehicle could show
signs similar to engine overheating.
To avoid this, let the engine run
while parked, preferably on level
ground, with the transmission in
P (Park) for a few minutes before
turning the engine off. If the
overheat warning comes on, see
Engine Overheating0288.Parking on Hills
{Warning
Parking the vehicle on a hill with
the trailer attached can be
dangerous. If something goes
wrong, the rig could start to move.
People can be injured, and both
the vehicle and the trailer can be
damaged. When possible, always
park the rig on a flat surface.
If parking the rig on a hill: 1. Press the brake pedal, but do not shift into P (Park) yet. Turn
the wheels into the curb if
facing downhill or into traffic if
facing uphill.
2. Have someone place chocks under the trailer wheels.
3. When the wheel chocks are in place, release the brake pedal
until the chocks absorb
the load.
4. Reapply the brake pedal. Then apply the parking brake and
shift into P (Park). 5. Release the brake pedal.
Leaving After Parking on a Hill
1. Apply and hold the brake pedal
while you:
1.1. Start the engine.
1.2. Shift into a gear.
1.3. Release the parking brake.
2. Let up on the brake pedal.
3. Drive slowly until the trailer is clear of the chocks.
4. Stop and have someone pick up and store the chocks.
Maintenance When Trailer
Towing
The vehicle needs service more
often when pulling a trailer. See the
Maintenance Schedule 0360.
Things that are especially important
in trailer operation are automatic
transmission fluid, engine oil, axle
lubricant, belts, cooling system, and
brake system. Inspect these before
and during the trip.
Page 269 of 413
Chevrolet Malibu Owner Manual (GMNA-Localizing-U.S./Canada/Mexico-
11348460) - 2018 - crc - 5/3/17
268 Vehicle Care
Vehicle Care
General Information
General Information . . . . . . . . . . 269
California Proposition65 Warning . . . . . . . . . . . . . . . . . 269
California Perchlorate Materials Requirements . . . . . 270
Accessories and Modifications . . . . . . . . . . . . . . . . 270
Vehicle Checks
Doing Your OwnService Work . . . . . . . . . . . . . . . 270
Hood . . . . . . . . . . . . . . . . . . . . . . . . . 271
Engine Compartment Overview . . . . . . . . . . . . . . . . . . . . 273
Engine Oil . . . . . . . . . . . . . . . . . . . . 278
Engine Oil Life System . . . . . . . 281
Automatic Transmission Fluid . . . . . . . . . . . . . . . . . . . . . . . . 282
Engine Air Cleaner/Filter . . . . . . 282
Cooling System (Engine) . . . . . 283
Cooling System (Power Electronics) . . . . . . . . . . . . . . . . . 287
Engine Overheating . . . . . . . . . . 288
Washer Fluid . . . . . . . . . . . . . . . . . 289
Brakes . . . . . . . . . . . . . . . . . . . . . . . 289
Brake Fluid . . . . . . . . . . . . . . . . . . . 290
Battery - North America . . . . . . 291 Starter Switch Check . . . . . . . . . 293
Automatic Transmission Shift
Lock Control Function
Check . . . . . . . . . . . . . . . . . . . . . . . 293
Park Brake and P (Park)
Mechanism Check . . . . . . . . . . 294
Wiper Blade Replacement . . . . 294
Gas Strut(s) . . . . . . . . . . . . . . . . . . 295
Headlamp Aiming
Headlamp Aiming . . . . . . . . . . . . 296
Bulb Replacement
Bulb Replacement . . . . . . . . . . . . 296
Halogen Bulbs . . . . . . . . . . . . . . . . 296
LED Lighting . . . . . . . . . . . . . . . . . 296
Headlamps, Front Turn Signal, Sidemarker, and Parking
Lamps . . . . . . . . . . . . . . . . . . . . . . 297
Taillamps, Turn Signal, Stoplamps, and Back-Up
Lamps (LS and LT) . . . . . . . . . . 298
Taillamps, Turn Signal, Stoplamps, and Back-Up
Lamps (LTZ) . . . . . . . . . . . . . . . . 299
License Plate Lamp . . . . . . . . . . 300
Electrical System
High Voltage Devices and Wiring . . . . . . . . . . . . . . . . . . . . . . . 300
Electrical System Overload . . . 301
Fuses and Circuit Breakers . . . 301 Engine Compartment Fuse
Block . . . . . . . . . . . . . . . . . . . . . . . . 302
Instrument Panel Fuse Block . . . . . . . . . . . . . . . . . . . . . . . . 306
Wheels and Tires
Tires . . . . . . . . . . . . . . . . . . . . . . . . . . 308
All-Season Tires . . . . . . . . . . . . . . 309
Winter Tires . . . . . . . . . . . . . . . . . . 310
Low-Profile Tires . . . . . . . . . . . . . 310
Summer Tires . . . . . . . . . . . . . . . . 310
Tire Sidewall Labeling . . . . . . . . 311
Tire Designations . . . . . . . . . . . . . 313
Tire Terminology andDefinitions . . . . . . . . . . . . . . . . . . 314
Tire Pressure . . . . . . . . . . . . . . . . . 316
Tire Pressure for High-Speed Operation . . . . . . . . . . . . . . . . . . . 317
Tire Pressure Monitor System . . . . . . . . . . . . . . . . . . . . . . 318
Tire Pressure Monitor Operation . . . . . . . . . . . . . . . . . . . 319
Tire Inspection . . . . . . . . . . . . . . . . 322
Tire Rotation . . . . . . . . . . . . . . . . . 322
When It Is Time for New Tires . . . . . . . . . . . . . . . . . . . . . . . . 323
Buying New Tires . . . . . . . . . . . . . 324
Different Size Tires and Wheels . . . . . . . . . . . . . . . . . . . . . . 325
Uniform Tire Quality Grading . . . . . . . . . . . . . . . . . . . . . 326