Page 205 of 413

Chevrolet Malibu Owner Manual (GMNA-Localizing-U.S./Canada/Mexico-
11348460) - 2018 - crc - 5/3/17
204 Climate Controls
2. Disconnect the glove box doordampener arm from the glove
box door assembly.
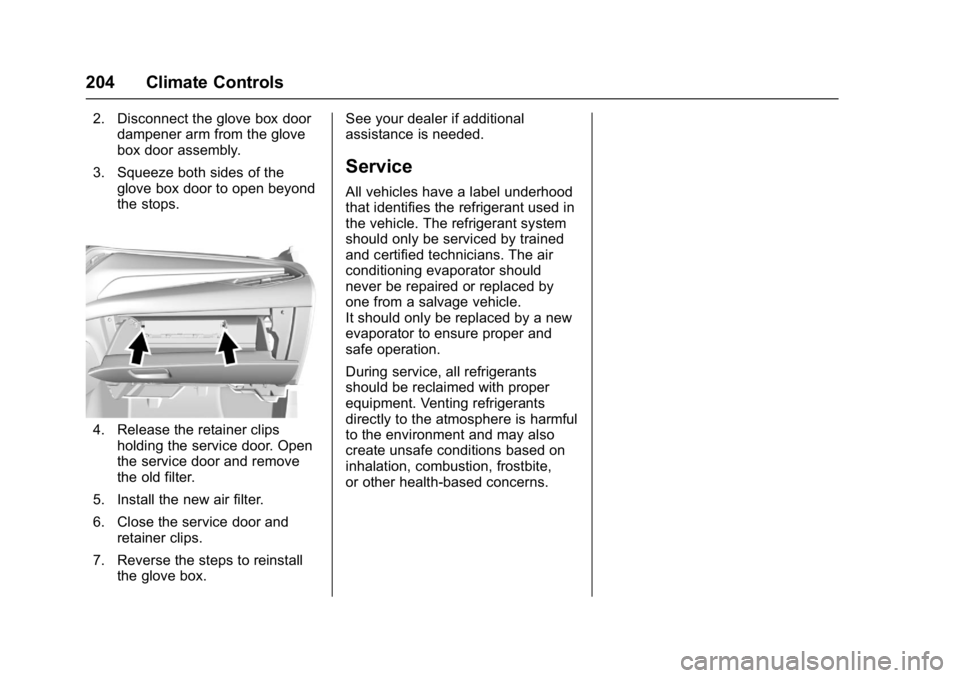
3. Squeeze both sides of the glove box door to open beyond
the stops.
4. Release the retainer clipsholding the service door. Open
the service door and remove
the old filter.
5. Install the new air filter.
6. Close the service door and retainer clips.
7. Reverse the steps to reinstall the glove box. See your dealer if additional
assistance is needed.
Service
All vehicles have a label underhood
that identifies the refrigerant used in
the vehicle. The refrigerant system
should only be serviced by trained
and certified technicians. The air
conditioning evaporator should
never be repaired or replaced by
one from a salvage vehicle.
It should only be replaced by a new
evaporator to ensure proper and
safe operation.
During service, all refrigerants
should be reclaimed with proper
equipment. Venting refrigerants
directly to the atmosphere is harmful
to the environment and may also
create unsafe conditions based on
inhalation, combustion, frostbite,
or other health-based concerns.
Page 221 of 413

Chevrolet Malibu Owner Manual (GMNA-Localizing-U.S./Canada/Mexico-
11348460) - 2018 - crc - 5/3/17
220 Driving and Operating
.The battery has been recently
disconnected.
. The battery charge is low.
. The interior comfort level has not
reached the required level for
the climate control system or
defog settings. Use the eco
(green indicator on) air
conditioning mode for better
efficiency.
See Climate Control Systems
0 196 andDual Automatic
Climate Control System 0199.
. The Auto Stop time is greater
than two minutes.
Engine Heater
The engine heater, if available, can
help in cold weather conditions at or
below −18 °C (0 °F) for easier
starting and better fuel economy
during engine warm-up. Plug in the
engine heater at least four hours
before starting the vehicle. An
internal thermostat in the plug end
of the cord will prevent engine
heater operation at temperatures
above −18 °C (0 °F).
To Use the Engine Heater
1. Turn off the engine.
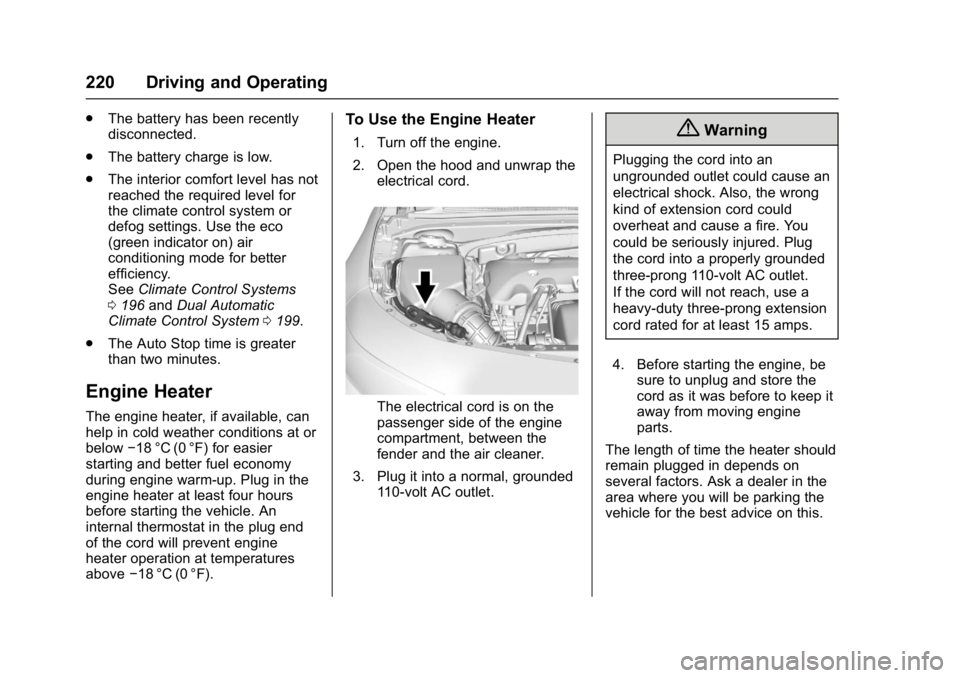
2. Open the hood and unwrap the
electrical cord.
The electrical cord is on the
passenger side of the engine
compartment, between the
fender and the air cleaner.
3. Plug it into a normal, grounded 110-volt AC outlet.
{Warning
Plugging the cord into an
ungrounded outlet could cause an
electrical shock. Also, the wrong
kind of extension cord could
overheat and cause a fire. You
could be seriously injured. Plug
the cord into a properly grounded
three-prong 110-volt AC outlet.
If the cord will not reach, use a
heavy-duty three-prong extension
cord rated for at least 15 amps.
4. Before starting the engine, be sure to unplug and store the
cord as it was before to keep it
away from moving engine
parts.
The length of time the heater should
remain plugged in depends on
several factors. Ask a dealer in the
area where you will be parking the
vehicle for the best advice on this.
Page 289 of 413

Chevrolet Malibu Owner Manual (GMNA-Localizing-U.S./Canada/Mexico-
11348460) - 2018 - crc - 5/3/17
288 Vehicle Care
Engine Overheating
The vehicle has an engine coolant
temperature gauge on the
instrument cluster to warn of engine
overheating. SeeEngine Coolant
Temperature Gauge 0119.
If the decision is made not to lift the
hood when this warning appears,
get service help right away. Contact
your dealer for additional
information.
If the decision is made to lift the
hood, make sure the vehicle is
parked on a level surface.
Then check to see if the engine
cooling fans are running. If the
engine is overheating, both fans
should be running. If they are not,
do not continue to run the engine
and have the vehicle serviced.
Caution
Do not run the engine if there is a
leak in the engine cooling system.
This can cause a loss of all (Continued)
Caution (Continued)
coolant and can damage the
system and vehicle. Have any
leaks fixed right away.
If Steam Is Coming from the
Engine Compartment
{Warning
Steam and scalding liquids from a
hot cooling system are under
pressure. Turning the pressure
cap, even a little, can cause them
to come out at high speed and
you could be burned. Never turn
the cap when the cooling system,
including the pressure cap, is hot.
Wait for the cooling system and
pressure cap to cool.
If No Steam Is Coming from
the Engine Compartment
If an engine overheat warning is
displayed but no steam can be seen
or heard, the problem may not be too serious. Sometimes the engine
can get a little too hot when the
vehicle:
.
Climbs a long hill on a hot day.
. Stops after high-speed driving.
. Idles for long periods in traffic.
If the overheat warning is displayed
with no sign of steam: 1. Turn the air conditioning off.
2. Turn the heater on to the highest temperature and to the
highest fan speed. Open the
windows as necessary.
3. When it is safe to do so, pull off the road, shift to P (Park) or
N (Neutral), and let the
engine idle.
If the engine coolant temperature
gauge is no longer in the overheat
zone, the vehicle can be driven.
Continue to drive the vehicle slowly
for about 10 minutes. Keep a safe
distance from the vehicle in front.
If the warning does not come back
on, continue to drive normally and
have the cooling system checked
for proper fill and function.
Page 306 of 413
Chevrolet Malibu Owner Manual (GMNA-Localizing-U.S./Canada/Mexico-
11348460) - 2018 - crc - 5/3/17
Vehicle Care 305
FusesUsage
56 Starter motor
57 Transmission auxiliary pump
58 –
59 High-beam headlamps
60 Cooling fan
61 –
62 –
63 –
65 Air conditioning–HEV
67 –
68 –
69 Right low-beam HID headlamp
70 Left low-beam HID headlamp
72 Starter pinion
74 – Fuses
Usage
75 Engine control module main
76 Powertrain off engine
78 Horn
79 Washer pump
81 Transmission control module/Engine control
module
82 –
83 Ignition coil
84 Powertrain on engine
85 Engine control module switch 2
86 Engine control module switch 1
87 SAI reaction pump
88 Aeroshutter
89 Headlamp washer
91 – Fuses
Usage
92 Traction power inverter module/Motor
generator unit pump
93 Active headlamp leveling
95 SAI reaction solenoid
96 Fuel heater
97 –
99 Coolant pump
Relays Usage
4 AC DC inverter
20 Rear defogger
25 Front wiper control
31 Run/Crank
37 Front wiper speed
42 Transmission auxiliary pump
64 Starter motor
Page 307 of 413
Chevrolet Malibu Owner Manual (GMNA-Localizing-U.S./Canada/Mexico-
11348460) - 2018 - crc - 5/3/17
306 Vehicle Care
RelaysUsage
66 Powertrain
71 Low-beam HID headlamps
73 Air conditioning
80 Starter pinion/Starter motor
90 SAI reaction solenoid
94 Headlamp washer
98 SAI reaction pumpInstrument Panel Fuse
Block
The instrument panel fuse block is
on the driver side of the instrument
panel. To access the fuses: 1. Pull out at the center of the right edge, and swing the cover
out and to the left.
2. Remove the cover.
To reinstall the cover, line up the
tabs on the left edge, and press the
cover into place.
Page 308 of 413
Chevrolet Malibu Owner Manual (GMNA-Localizing-U.S./Canada/Mexico-
11348460) - 2018 - crc - 5/3/17
Vehicle Care 307
The vehicle may not be equipped
with all of the fuses, relays, and
features shown.Fuses Usage
F1 Left power windows
F2 Right power windows
F3 –
F4 Heating, ventilation, and air conditioning
blower Fuses Usage
F5 Body control module 2
F6 Left rear heated seat
F7 Right rear heated seat
F8 Body control module 3
F9 Engine control module/Rear battery
F10 Body control module 2 (w/ Stop/Start option) Fuses Usage
F11 –
F12 –
F13 –
F14 –
F15 Transmission control module (w/ Stop/Start
option)
F16 Amplifier
F17 Seat power lumbar
F18 OnStar
F19 –
F20 Body control module 1
F21 Body control module 4
F22 –
F23 Electric steering column lock –China
and Russia only
F24 Airbag
F25 Data link connector
F26 –
F27 AC DC inverter
Page 309 of 413

Chevrolet Malibu Owner Manual (GMNA-Localizing-U.S./Canada/Mexico-
11348460) - 2018 - crc - 5/3/17
308 Vehicle Care
FusesUsage
F28 –
F29 Body control module 8
F30 Overhead console
F31 Steering wheel controls
F32 –
F33 Heating, ventilation, and air conditioning
F34 Gateway
F35 –
F36 Wireless charger
F37 Front accessory power outlets/
Cigarette lighter –
China only
F38 OnStar
F39 Display
F40 Obstacle detection
F41 Body control module 1 (w/ Stop/Start option)
F42 Radio
CB1 – Fuses
Usage
CB2 Console accessory power outlet
Relays Usage
K1 –
K2 Retained accessory power
K3 –
K4 –
K5 –Wheels and Tires
Tires
Every new GM vehicle has
high-quality tires made by a
leading tire manufacturer. See
the warranty manual for
information regarding the tire
warranty and where to get
service. For additional
information refer to the tire
manufacturer.
{Warning
.Poorly maintained and
improperly used tires are
dangerous.
.Overloading the tires can
cause overheating as a
result of too much
flexing. There could be a
blowout and a serious
crash. See Vehicle Load
Limits 0212.
(Continued)
Page 315 of 413

Chevrolet Malibu Owner Manual (GMNA-Localizing-U.S./Canada/Mexico-
11348460) - 2018 - crc - 5/3/17
314 Vehicle Care
Tire Terminology and
Definitions
Air Pressure:The amount of
air inside the tire pressing
outward on each square inch of
the tire. Air pressure is
expressed in kPa (kilopascal)
or psi (pounds per square inch).
Accessory Weight
:The
combined weight of optional
accessories. Some examples of
optional accessories are
automatic transmission, power
windows, power seats, and air
conditioning.
Aspect Ratio
:The relationship
of a tire's height to its width.
Belt
:A rubber coated layer of
cords between the plies and the
tread. Cords may be made from
steel or other reinforcing
materials. Bead
:The tire bead contains
steel wires wrapped by steel
cords that hold the tire onto
the rim.
Bias Ply Tire
:A pneumatic tire
in which the plies are laid at
alternate angles less than
90 degrees to the centerline of
the tread.
Cold Tire Pressure
:The
amount of air pressure in a tire,
measured in kPa (kilopascal)
or psi (pounds per square inch)
before a tire has built up heat
from driving. See Tire Pressure
0 316.
Curb Weight
:The weight of a
motor vehicle with standard and
optional equipment including the
maximum capacity of fuel, oil,
and coolant, but without
passengers and cargo.
DOT Markings
:A code molded
into the sidewall of a tire
signifying that the tire is in
compliance with the U.S. Department of Transportation
(DOT) Motor Vehicle Safety
Standards. The DOT code
includes the Tire Identification
Number (TIN), an alphanumeric
designator which can also
identify the tire manufacturer,
production plant, brand, and
date of production.
GVWR
:Gross Vehicle Weight
Rating. See Vehicle Load Limits
0 212.
GAWR FRT
:Gross Axle Weight
Rating for the front axle. See
Vehicle Load Limits 0212.
GAWR RR
:Gross Axle Weight
Rating for the rear axle. See
Vehicle Load Limits 0212.
Intended Outboard Sidewall
:
The side of an asymmetrical tire
that must always face outward
when mounted on a vehicle.
Kilopascal (kPa)
:The metric
unit for air pressure.