2018 CHEVROLET CRUZE ignition
[x] Cancel search: ignitionPage 231 of 404
Chevrolet Cruze Owner Manual (GMNA-Localizing-U.S./Canada/Mexico-
11348462) - 2018 - crc - 5/15/17
230 Driving and Operating
3. Hold the release button in asyou move the brake lever all
the way down.
Caution
Driving with the parking brake on
can overheat the brake system
and cause premature wear or
damage to brake system parts.
Make sure that the parking brake
is fully released and the brake
warning light is off before driving.
Driving with the parking brake
applied will cause a warning chime
to sound and a DIC (Driver
Information Center) message to
display. The message will remain on
until the parking brake is released or
the vehicle is stopped. Release the
parking brake or stop the vehicle.
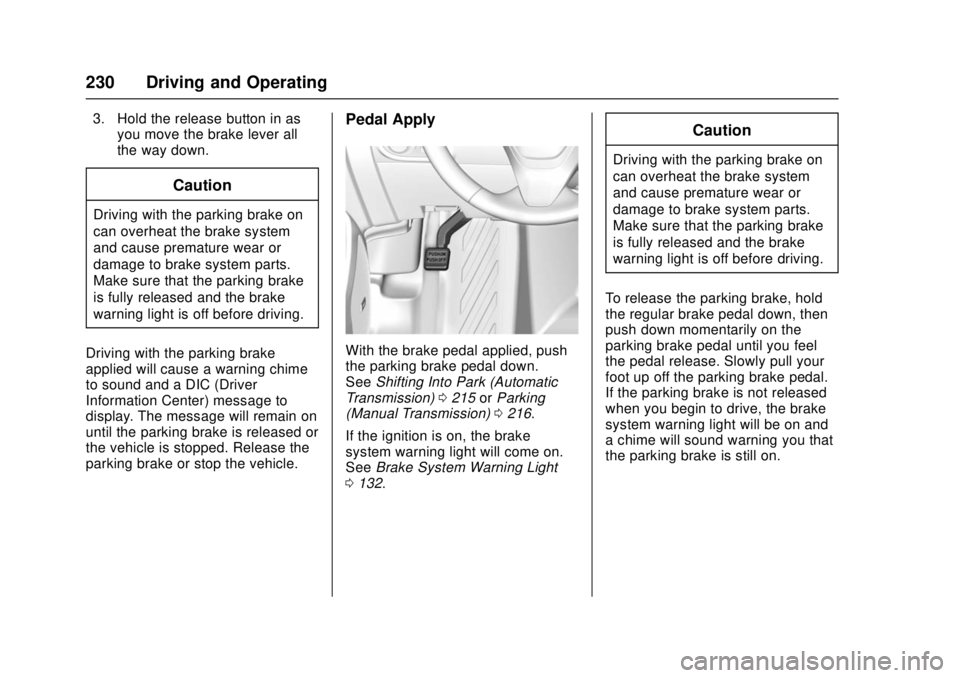
Pedal Apply
With the brake pedal applied, push
the parking brake pedal down.
See Shifting Into Park (Automatic
Transmission) 0215 orParking
(Manual Transmission) 0216.
If the ignition is on, the brake
system warning light will come on.
See Brake System Warning Light
0 132.
Caution
Driving with the parking brake on
can overheat the brake system
and cause premature wear or
damage to brake system parts.
Make sure that the parking brake
is fully released and the brake
warning light is off before driving.
To release the parking brake, hold
the regular brake pedal down, then
push down momentarily on the
parking brake pedal until you feel
the pedal release. Slowly pull your
foot up off the parking brake pedal.
If the parking brake is not released
when you begin to drive, the brake
system warning light will be on and
a chime will sound warning you that
the parking brake is still on.
Page 251 of 404
Chevrolet Cruze Owner Manual (GMNA-Localizing-U.S./Canada/Mexico-
11348462) - 2018 - crc - 5/15/17
250 Driving and Operating
refueling provides the best
opportunity to have a supply of fresh
fuel. Storage at hot ambient
temperatures will accelerate
biodiesel degradation.
Owners who use very little fuel,
or who have vehicles stored for
extended periods of time, should
avoid the use of biodiesel blended
fuels above 5% by volume. When
vehicles are stored for longer than
one month, they should be run out
of biodiesel to below one-quarter
tank, refueled with Ultra Low Sulfur
Diesel fuel, and driven at least
32 km (20 mi) before storage.
At temperatures below 0 °C (32 °F),
it is recommended to switch to Ultra
Low Sulfur Diesel fuel with no
biodiesel content, or to blends with
biodiesel containing less than 5% by
volume. At these extreme cold
temperatures, biodiesel blends
higher than 5% by volume may
cause fuel filter plugging and
system gelling, which can lead to
vehicle operability problems.Fuels improperly blended for cold
temperature operation may result in
restricted fuel filters and degraded
vehicle performance. GM diesel
vehicles are equipped with a fuel
heating system to provide an extra
level of protection against filter
plugging from gelling or waxing of
conventional diesel fuel and
biodiesel blends. If the operating
temperature is far below the
temperature at which gelling or
waxing of the fuel occurs, the
system cannot prevent all cases of
filter plugging.
If the vehicle experiences a fuel
filter restriction, the on-board
monitoring system will alert the
driver that the fuel filter requires
service. The fuel filter, however, will
not prevent all damage caused by
poor quality biodiesel.
Cold Weather Operation
(Diesel)
In cold weather, the fuel filter may
become clogged by wax naturally
present in the fuel. To unclog it,
move the vehicle to a warm garagearea and allow the filter to warm up.
The fuel filter may need to be
replaced. See
Fuel Filter
Replacement (Diesel) 0254.
At temperatures below 0 °C (32 °F),
it is recommended to avoid using
biodiesel blends above 5% blend.
This blend may cause fuel filter
plugging, system gelling, and
freezing that may affect vehicle
starting. You may need to place the
ignition in Service Mode and off a
few times before the vehicle will
start.
See Ignition Positions (Key Access)
0 206 orIgnition Positions (Keyless
Access) 0208. Also, idle the vehicle
for a couple of minutes before
accelerating.
For additional information for better
cold weather operation, see Engine
Heater 0213.
Water in Fuel (Diesel)
Improper fuel tank inspection or
cleaning, or contaminated fuel from
suppliers, can cause water to be
pumped into the fuel tank along with
the diesel fuel. If a WATER IN FUEL
Page 252 of 404
Chevrolet Cruze Owner Manual (GMNA-Localizing-U.S./Canada/Mexico-
11348462) - 2018 - crc - 5/15/17
Driving and Operating 251
- CONTACT SERVICE message
displays, the water must be drained
immediately.
{Warning
Diesel fuel containing water is still
combustible. You or others could
be burned. If the fuel needs to be
drained, keep sparks, flames, and
smoking materials away from the
mixture.
As an added precaution, drain the
diesel fuel filter of residual water at
every engine oil change. If the
WATER IN FUEL - CONTACT
SERVICE message comes on
frequently, even after draining water
from the fuel filter, see your dealer. Water in Fuel Troubleshooting
If the WATER IN FUEL - CONTACT
SERVICE message comes on:
Problem Recommended
Action
Message
displays but
goes off during
the ignition
cycle. The fuel filter is
partially filled
with water. Drain
the water as
soon as
possible. See
"Removing
Water from the
Fuel Filter"
following. Problem
Recommended
Action
Message
displays and
stays on. Drain the fuel
filter
immediately.
If no water can
be drained, and
the temperature
is below
freezing, then
water may be
frozen in the
filter. Move the
vehicle to a
warm location to
thaw the water,
then drain the
fuel. If water still
does not drain,
see your dealer.
Page 254 of 404
Chevrolet Cruze Owner Manual (GMNA-Localizing-U.S./Canada/Mexico-
11348462) - 2018 - crc - 5/15/17
Driving and Operating 253
5. Retighten the drain plug byturning it clockwise.
6. Properly dispose of the water contaminated fuel.
7. Start the engine and let it run for a few minutes. During the
draining process, air may have
entered the fuel system. If the
engine stalls, the fuel system
may need to be primed. See
“Fuel Priming” following.
Fuel Priming
For the fuel system to work properly,
air cannot be in the fuel lines. If air
gets in, the engine may not start
and the fuel lines will need to be
primed before operating the vehicle.
If air is present, the following may
have happened:
. The vehicle ran out of fuel.
. The fuel filter was removed.
. The fuel lines were removed or
disconnected.
. The fuel filter water drain valve
was opened while the engine
was running. To prime the fuel system:
1. With the engine off, press and hold ENGINE START/STOP
without applying the brake for
five seconds to place the
vehicle in Service Mode. Wait
for 30 seconds to allow fuel to
fully cycle. Press ENGINE
START/STOP again to turn it
off. Do this step three times or
more while the engine is off.
2. Press ENGINE START/STOP with the brake applied for a
maximum of 40 seconds at a
time, with five seconds
between ignition attempts, until
the engine starts. If the engine
tries to run, but does not run
smoothly, increase the RPMs
slightly by using the accelerator
pedal. This will help force air
through the system.
3. Repeat Step 2 if the engine stalls and will not restart.
4. After a few attempts, if the engine still does not start, see
your dealer.Running Out of Fuel
(Diesel)
{Warning
Diesel fuel is flammable. It could
start a fire if something ignites it,
and people could be burned. Do
not let it get on hot engine parts,
and keep matches or other
ignition sources away.
If the engine has stalled due to
running out of fuel, add at least
7.6 L (2 gal) of fuel if parked on a
level surface, or up to 18.9 L (5 gal)
of fuel if parked on a slope, and
perform the procedure under “Fuel
Priming” previously in this section.
Page 255 of 404
Chevrolet Cruze Owner Manual (GMNA-Localizing-U.S./Canada/Mexico-
11348462) - 2018 - crc - 5/15/17
254 Driving and Operating
Fuel Filter Replacement
(Diesel)
{Warning
Diesel fuel is flammable. It could
start a fire if something ignites it,
and people could be burned. Do
not let it get on hot engine parts,
and keep matches or other
ignition sources away.
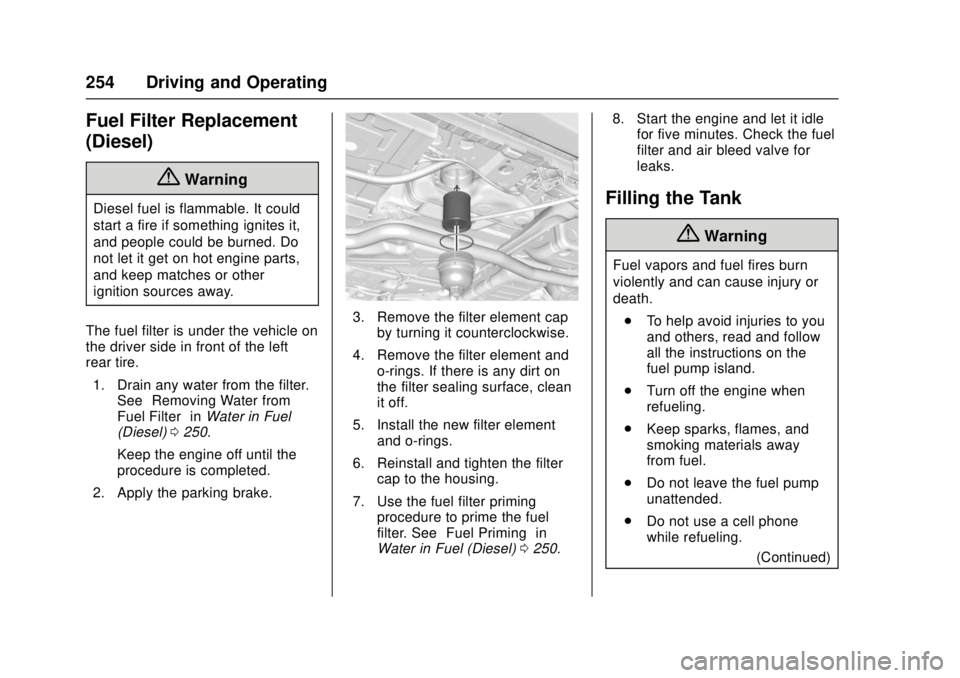
The fuel filter is under the vehicle on
the driver side in front of the left
rear tire. 1. Drain any water from the filter. See “Removing Water from
Fuel Filter” inWater in Fuel
(Diesel) 0250.
Keep the engine off until the
procedure is completed.
2. Apply the parking brake.
3. Remove the filter element cap by turning it counterclockwise.
4. Remove the filter element and o-rings. If there is any dirt on
the filter sealing surface, clean
it off.
5. Install the new filter element and o-rings.
6. Reinstall and tighten the filter cap to the housing.
7. Use the fuel filter priming procedure to prime the fuel
filter. See “Fuel Priming” in
Water in Fuel (Diesel) 0250. 8. Start the engine and let it idle
for five minutes. Check the fuel
filter and air bleed valve for
leaks.
Filling the Tank
{Warning
Fuel vapors and fuel fires burn
violently and can cause injury or
death.
. To help avoid injuries to you
and others, read and follow
all the instructions on the
fuel pump island.
. Turn off the engine when
refueling.
. Keep sparks, flames, and
smoking materials away
from fuel.
. Do not leave the fuel pump
unattended.
. Do not use a cell phone
while refueling.
(Continued)
Page 259 of 404
Chevrolet Cruze Owner Manual (GMNA-Localizing-U.S./Canada/Mexico-
11348462) - 2018 - crc - 5/15/17
258 Vehicle Care
Vehicle Care
General Information
General Information . . . . . . . . . . 259
California Proposition65 Warning . . . . . . . . . . . . . . . . . 259
California Perchlorate Materials Requirements . . . . . 260
Accessories and Modifications . . . . . . . . . . . . . . . . 260
Vehicle Checks
Doing Your OwnService Work . . . . . . . . . . . . . . . 260
Hood . . . . . . . . . . . . . . . . . . . . . . . . . 261
Engine Compartment Overview . . . . . . . . . . . . . . . . . . . . 262
Engine Oil . . . . . . . . . . . . . . . . . . . . 265
Engine Oil Life System . . . . . . . 268
Automatic Transmission Fluid . . . . . . . . . . . . . . . . . . . . . . . . 269
Manual Transmission Fluid . . . 270
Hydraulic Clutch . . . . . . . . . . . . . . 270
Engine Air Cleaner/Filter . . . . . . 270
Cooling System . . . . . . . . . . . . . . 272
Engine Overheating . . . . . . . . . . 275
Washer Fluid . . . . . . . . . . . . . . . . . 276
Brakes . . . . . . . . . . . . . . . . . . . . . . . 277
Brake Fluid . . . . . . . . . . . . . . . . . . . 278
Battery - North America . . . . . . 279 Fuel Filter . . . . . . . . . . . . . . . . . . . . 280
Starter Switch Check . . . . . . . . . 280
Automatic Transmission Shift
Lock Control Function
Check . . . . . . . . . . . . . . . . . . . . . . . 281
Ignition Transmission Lock Check . . . . . . . . . . . . . . . . . . . . . . . 281
Park Brake and P (Park) Mechanism Check . . . . . . . . . . 281
Wiper Blade Replacement . . . . 282
Gas Strut(s) . . . . . . . . . . . . . . . . . . 283
Headlamp Aiming
Headlamp Aiming . . . . . . . . . . . . 284
Bulb Replacement
Bulb Replacement . . . . . . . . . . . . 284
Halogen Bulbs . . . . . . . . . . . . . . . . 284
High Intensity Discharge (HID) Lighting . . . . . . . . . . . . . . . . . . . . . 285
Headlamps and Front Turn Signal . . . . . . . . . . . . . . . . . . . . . . . 285
Taillamps and Back-Up Lamps . . . . . . . . . . . . . . . . . . . . . . 286
License Plate Lamp (Liftgate Models) . . . . . . . . . . . . . . . . . . . . . 289
Electrical System
Electrical System Overload . . . 290
Fuses and Circuit Breakers . . . 290
Engine Compartment FuseBlock . . . . . . . . . . . . . . . . . . . . . . . . 291 Instrument Panel Fuse
Block . . . . . . . . . . . . . . . . . . . . . . . . 295
Wheels and Tires
Tires . . . . . . . . . . . . . . . . . . . . . . . . . . 298
All-Season Tires . . . . . . . . . . . . . . 298
Winter Tires . . . . . . . . . . . . . . . . . . 299
Low-Profile Tires . . . . . . . . . . . . . 299
Tire Sidewall Labeling . . . . . . . . 300
Tire Designations . . . . . . . . . . . . . 302
Tire Terminology andDefinitions . . . . . . . . . . . . . . . . . . 302
Tire Pressure . . . . . . . . . . . . . . . . . 305
Tire Pressure for High-Speed Operation . . . . . . . . . . . . . . . . . . . 306
Tire Pressure Monitor System . . . . . . . . . . . . . . . . . . . . . . 307
Tire Pressure Monitor Operation . . . . . . . . . . . . . . . . . . . 308
Tire Inspection . . . . . . . . . . . . . . . . 311
Tire Rotation . . . . . . . . . . . . . . . . . . 311
When It Is Time for New Tires . . . . . . . . . . . . . . . . . . . . . . . . 312
Buying New Tires . . . . . . . . . . . . . 313
Different Size Tires and Wheels . . . . . . . . . . . . . . . . . . . . . . 314
Uniform Tire Quality Grading . . . . . . . . . . . . . . . . . . . . . 315
Wheel Alignment and Tire Balance . . . . . . . . . . . . . . . . . . . . . 316
Wheel Replacement . . . . . . . . . . 316
Page 270 of 404

Chevrolet Cruze Owner Manual (GMNA-Localizing-U.S./Canada/Mexico-
11348462) - 2018 - crc - 5/15/17
Vehicle Care 269
change is not necessary for up to a
year. The engine oil and filter must
be changed at least once a year
and, at this time, the system must
be reset. Your dealer has trained
service people who will perform this
work and reset the system. It is also
important to check the oil regularly
over the course of an oil drain
interval and keep it at the proper
level.
If the system is ever reset
accidentally, the oil must be
changed at 5 000 km (3,000 mi)
since the last oil change.
Remember to reset the oil life
system whenever the oil is changed.
How to Reset the Engine Oil
Life System
Reset the system whenever the
engine oil is changed so that the
system can calculate the next
engine oil change. To reset the
system:Resetting the Oil Life System
(Base Level Cluster)
1. Display the REMAINING OIL LIFE on the DIC.
See Driver Information Center
(DIC) (Base) 0138 orDriver
Information Center (DIC)
(Uplevel) 0141.
2. Press and hold SET/CLR on the turn signal lever while the
Oil Life display is active. The
oil life will change to 100%.
Resetting the Oil Life System
(Uplevel Cluster) 1. Display the REMAINING OIL LIFE on the DIC.
See Driver Information Center
(DIC) (Base) 0138 orDriver
Information Center (DIC)
(Uplevel) 0141.
2. Press and hold
Von the DIC
while the Oil Life display is
active. The oil life will change
to 100%. The oil life system can also be reset
as follows:
1. Turn the ignition on with the engine off.
See Ignition Positions (Key
Access) 0206 orIgnition
Positions (Keyless Access)
0 208.
2. Fully press and release the accelerator pedal three times
within five seconds.
The system is reset when the
CHANGE ENGINE OIL SOON
message goes off.
If the CHANGE ENGINE OIL SOON
message comes back on when the
vehicle is started, the engine oil life
system has not been reset. Repeat
the procedure.Automatic Transmission
Fluid
How to Check Automatic
Transmission Fluid
It is not necessary to check the
transmission fluid level.
A transmission fluid leak is the only
Page 282 of 404
Chevrolet Cruze Owner Manual (GMNA-Localizing-U.S./Canada/Mexico-
11348462) - 2018 - crc - 5/15/17
Vehicle Care 281
For manual transmission
vehicles, put the shift lever in
Neutral, push the clutch pedal
down halfway, and try to start
the engine. The vehicle should
start only when the clutch
pedal is pushed down all the
way to the floor. If the vehicle
starts when the clutch pedal is
not pushed all the way down,
contact your dealer for service.
Automatic Transmission
Shift Lock Control
Function Check
{Warning
When you are doing this
inspection, the vehicle could
move suddenly. If the vehicle
moves, you or others could be
injured.
1. Before starting this check, be sure there is enough room
around the vehicle. It should be
parked on a level surface. 2. Apply the parking brake. Be
ready to apply the regular
brake immediately if the vehicle
begins to move.
3. With the engine off, turn the ignition on, but do not start the
engine. Without applying the
regular brake, try to move the
shift lever out of P (Park) with
normal effort. If the shift lever
moves out of P (Park), contact
your dealer for service.
Ignition Transmission
Lock Check
If equipped with a Key Access
ignition, while parked and with the
parking brake set, try to turn the
ignition off in each shift lever
position.
.The ignition should turn off only
when the shift lever is in
P (Park).
. The key should come out only
when the ignition is off.
Contact your dealer if service is
required.
Park Brake and P (Park)
Mechanism Check
{Warning
When you are doing this check,
the vehicle could begin to move.
You or others could be injured
and property could be damaged.
Make sure there is room in front
of the vehicle in case it begins to
roll. Be ready to apply the regular
brake at once should the vehicle
begin to move.
Park on a fairly steep hill, with the
vehicle facing downhill. Keeping
your foot on the regular brake, set
the parking brake.
. To check the parking brake's
holding ability: With the engine
running and the transmission in
N (Neutral), slowly remove foot
pressure from the regular brake
pedal. Do this until the vehicle is
held by the parking brake only.