2018 CHEVROLET CRUZE brake
[x] Cancel search: brakePage 240 of 404
Chevrolet Cruze Owner Manual (GMNA-Localizing-U.S./Canada/Mexico-
11348462) - 2018 - crc - 5/15/17
Driving and Operating 239
Detecting the Vehicle Ahead
FCA warnings will not occur unless
the FCA system detects a vehicle
ahead. When a vehicle is detected,
the vehicle ahead indicator will
display green. Vehicles may not be
detected on curves, highway exit
ramps, or hills, due to poor visibility;
or if a vehicle ahead is partially
blocked by pedestrians or other
objects. FCA will not detect another
vehicle ahead until it is completely
in the driving lane.
{Warning
FCA does not provide a warning
to help avoid a crash, unless it
detects a vehicle. FCA may not
detect a vehicle ahead if the FCA
sensor is blocked by dirt, snow,(Continued)
Warning (Continued)
or ice, or if the windshield is
damaged. It may also not detect a
vehicle on winding or hilly roads,
or in conditions that can limit
visibility such as fog, rain,
or snow, or if the headlamps or
windshield are not cleaned or in
proper condition. Keep the
windshield, headlamps, and FCA
sensors clean and in good repair.
Collision Alert
When your vehicle approaches
another detected vehicle too rapidly,
the red FCA display will flash on the
windshield. Also, eight rapid
high-pitched beeps will sound from
the front. When this Collision Alert
occurs, the brake system may
prepare for driver braking to occur more rapidly which can cause a
brief, mild deceleration. Continue to
apply the brake pedal as the driving
situation dictates. Cruise control
may be disengaged when the
Collision Alert occurs.
Tailgating Alert
The vehicle ahead indicator will
display amber when you are
following a detected vehicle ahead
much too closely.
Selecting the Alert Timing
The Collision Alert control is on the
steering wheel. Press
[to set the
FCA timing to far, medium, near,
or off. The first button press shows
the current control setting on the
DIC. Additional button presses will
change this setting. The chosen
setting will remain until it is changed
and will affect the timing of both the
Collision Alert and the Tailgating
Page 253 of 404

Chevrolet Cruze Owner Manual (GMNA-Localizing-U.S./Canada/Mexico-
11348462) - 2018 - crc - 5/15/17
252 Driving and Operating
ProblemRecommended
Action
Immediately
after refueling,
message
displays and
stays on. A large amount
of water is in the
fuel tank. Drain
the fuel filter
immediately.
If the message
stays on or
comes back on
without
refueling, then
fuel tank purging
is required. See
your dealer.
If the message
displays and the
engine stalls or
runs rough, do
not drive until
the water
contaminated
fuel is drained.Caution
Driving with this message on can
damage the fuel injection system
and the engine. If the message
comes on right after a refuel,
water was pumped into the fuel
tank. Turn off the engine and
drain the water immediately.
Removing Water from the Fuel
Filter
To drain water: 1. Turn the engine off and apply the parking brake.
2. Place a container under the filter drain valve, which is on
the bottom of the fuel filter.
3. Turn the drain plugcounterclockwise using a
suitable tool.
4. With the engine off, press and hold ENGINE START/STOP
without applying the brake for
five seconds to place the
vehicle in Service Mode. Wait
approximately five seconds,
and then press ENGINE
START/STOP again to turn it
off. This operation will enhance
water flow out of the filter. The
filter is drained as soon as
diesel fuel emerges from
the port.
Page 254 of 404
Chevrolet Cruze Owner Manual (GMNA-Localizing-U.S./Canada/Mexico-
11348462) - 2018 - crc - 5/15/17
Driving and Operating 253
5. Retighten the drain plug byturning it clockwise.
6. Properly dispose of the water contaminated fuel.
7. Start the engine and let it run for a few minutes. During the
draining process, air may have
entered the fuel system. If the
engine stalls, the fuel system
may need to be primed. See
“Fuel Priming” following.
Fuel Priming
For the fuel system to work properly,
air cannot be in the fuel lines. If air
gets in, the engine may not start
and the fuel lines will need to be
primed before operating the vehicle.
If air is present, the following may
have happened:
. The vehicle ran out of fuel.
. The fuel filter was removed.
. The fuel lines were removed or
disconnected.
. The fuel filter water drain valve
was opened while the engine
was running. To prime the fuel system:
1. With the engine off, press and hold ENGINE START/STOP
without applying the brake for
five seconds to place the
vehicle in Service Mode. Wait
for 30 seconds to allow fuel to
fully cycle. Press ENGINE
START/STOP again to turn it
off. Do this step three times or
more while the engine is off.
2. Press ENGINE START/STOP with the brake applied for a
maximum of 40 seconds at a
time, with five seconds
between ignition attempts, until
the engine starts. If the engine
tries to run, but does not run
smoothly, increase the RPMs
slightly by using the accelerator
pedal. This will help force air
through the system.
3. Repeat Step 2 if the engine stalls and will not restart.
4. After a few attempts, if the engine still does not start, see
your dealer.Running Out of Fuel
(Diesel)
{Warning
Diesel fuel is flammable. It could
start a fire if something ignites it,
and people could be burned. Do
not let it get on hot engine parts,
and keep matches or other
ignition sources away.
If the engine has stalled due to
running out of fuel, add at least
7.6 L (2 gal) of fuel if parked on a
level surface, or up to 18.9 L (5 gal)
of fuel if parked on a slope, and
perform the procedure under “Fuel
Priming” previously in this section.
Page 255 of 404
Chevrolet Cruze Owner Manual (GMNA-Localizing-U.S./Canada/Mexico-
11348462) - 2018 - crc - 5/15/17
254 Driving and Operating
Fuel Filter Replacement
(Diesel)
{Warning
Diesel fuel is flammable. It could
start a fire if something ignites it,
and people could be burned. Do
not let it get on hot engine parts,
and keep matches or other
ignition sources away.
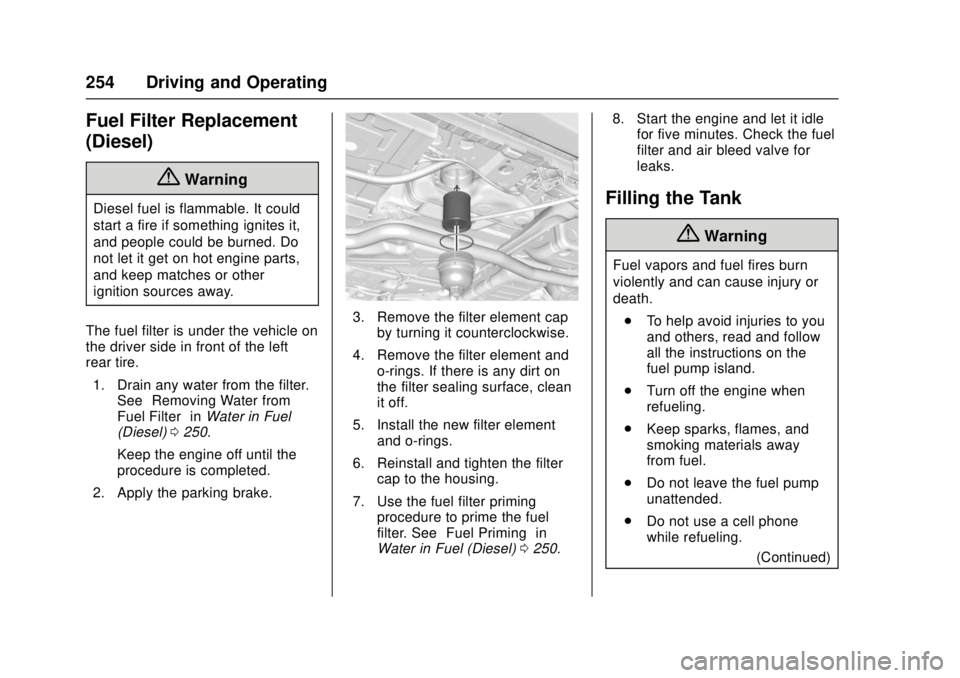
The fuel filter is under the vehicle on
the driver side in front of the left
rear tire. 1. Drain any water from the filter. See “Removing Water from
Fuel Filter” inWater in Fuel
(Diesel) 0250.
Keep the engine off until the
procedure is completed.
2. Apply the parking brake.
3. Remove the filter element cap by turning it counterclockwise.
4. Remove the filter element and o-rings. If there is any dirt on
the filter sealing surface, clean
it off.
5. Install the new filter element and o-rings.
6. Reinstall and tighten the filter cap to the housing.
7. Use the fuel filter priming procedure to prime the fuel
filter. See “Fuel Priming” in
Water in Fuel (Diesel) 0250. 8. Start the engine and let it idle
for five minutes. Check the fuel
filter and air bleed valve for
leaks.
Filling the Tank
{Warning
Fuel vapors and fuel fires burn
violently and can cause injury or
death.
. To help avoid injuries to you
and others, read and follow
all the instructions on the
fuel pump island.
. Turn off the engine when
refueling.
. Keep sparks, flames, and
smoking materials away
from fuel.
. Do not leave the fuel pump
unattended.
. Do not use a cell phone
while refueling.
(Continued)
Page 259 of 404
Chevrolet Cruze Owner Manual (GMNA-Localizing-U.S./Canada/Mexico-
11348462) - 2018 - crc - 5/15/17
258 Vehicle Care
Vehicle Care
General Information
General Information . . . . . . . . . . 259
California Proposition65 Warning . . . . . . . . . . . . . . . . . 259
California Perchlorate Materials Requirements . . . . . 260
Accessories and Modifications . . . . . . . . . . . . . . . . 260
Vehicle Checks
Doing Your OwnService Work . . . . . . . . . . . . . . . 260
Hood . . . . . . . . . . . . . . . . . . . . . . . . . 261
Engine Compartment Overview . . . . . . . . . . . . . . . . . . . . 262
Engine Oil . . . . . . . . . . . . . . . . . . . . 265
Engine Oil Life System . . . . . . . 268
Automatic Transmission Fluid . . . . . . . . . . . . . . . . . . . . . . . . 269
Manual Transmission Fluid . . . 270
Hydraulic Clutch . . . . . . . . . . . . . . 270
Engine Air Cleaner/Filter . . . . . . 270
Cooling System . . . . . . . . . . . . . . 272
Engine Overheating . . . . . . . . . . 275
Washer Fluid . . . . . . . . . . . . . . . . . 276
Brakes . . . . . . . . . . . . . . . . . . . . . . . 277
Brake Fluid . . . . . . . . . . . . . . . . . . . 278
Battery - North America . . . . . . 279 Fuel Filter . . . . . . . . . . . . . . . . . . . . 280
Starter Switch Check . . . . . . . . . 280
Automatic Transmission Shift
Lock Control Function
Check . . . . . . . . . . . . . . . . . . . . . . . 281
Ignition Transmission Lock Check . . . . . . . . . . . . . . . . . . . . . . . 281
Park Brake and P (Park) Mechanism Check . . . . . . . . . . 281
Wiper Blade Replacement . . . . 282
Gas Strut(s) . . . . . . . . . . . . . . . . . . 283
Headlamp Aiming
Headlamp Aiming . . . . . . . . . . . . 284
Bulb Replacement
Bulb Replacement . . . . . . . . . . . . 284
Halogen Bulbs . . . . . . . . . . . . . . . . 284
High Intensity Discharge (HID) Lighting . . . . . . . . . . . . . . . . . . . . . 285
Headlamps and Front Turn Signal . . . . . . . . . . . . . . . . . . . . . . . 285
Taillamps and Back-Up Lamps . . . . . . . . . . . . . . . . . . . . . . 286
License Plate Lamp (Liftgate Models) . . . . . . . . . . . . . . . . . . . . . 289
Electrical System
Electrical System Overload . . . 290
Fuses and Circuit Breakers . . . 290
Engine Compartment FuseBlock . . . . . . . . . . . . . . . . . . . . . . . . 291 Instrument Panel Fuse
Block . . . . . . . . . . . . . . . . . . . . . . . . 295
Wheels and Tires
Tires . . . . . . . . . . . . . . . . . . . . . . . . . . 298
All-Season Tires . . . . . . . . . . . . . . 298
Winter Tires . . . . . . . . . . . . . . . . . . 299
Low-Profile Tires . . . . . . . . . . . . . 299
Tire Sidewall Labeling . . . . . . . . 300
Tire Designations . . . . . . . . . . . . . 302
Tire Terminology andDefinitions . . . . . . . . . . . . . . . . . . 302
Tire Pressure . . . . . . . . . . . . . . . . . 305
Tire Pressure for High-Speed Operation . . . . . . . . . . . . . . . . . . . 306
Tire Pressure Monitor System . . . . . . . . . . . . . . . . . . . . . . 307
Tire Pressure Monitor Operation . . . . . . . . . . . . . . . . . . . 308
Tire Inspection . . . . . . . . . . . . . . . . 311
Tire Rotation . . . . . . . . . . . . . . . . . . 311
When It Is Time for New Tires . . . . . . . . . . . . . . . . . . . . . . . . 312
Buying New Tires . . . . . . . . . . . . . 313
Different Size Tires and Wheels . . . . . . . . . . . . . . . . . . . . . . 314
Uniform Tire Quality Grading . . . . . . . . . . . . . . . . . . . . . 315
Wheel Alignment and Tire Balance . . . . . . . . . . . . . . . . . . . . . 316
Wheel Replacement . . . . . . . . . . 316
Page 261 of 404
Chevrolet Cruze Owner Manual (GMNA-Localizing-U.S./Canada/Mexico-
11348462) - 2018 - crc - 5/15/17
260 Vehicle Care
California Perchlorate
Materials Requirements
Certain types of automotive
applications, such as airbag
initiators, seat belt pretensioners,
and lithium batteries contained in
Remote Keyless Entry transmitters,
may contain perchlorate materials.
Special handling may be necessary.
For additional information, see
www.dtsc.ca.gov/hazardouswaste/
perchlorate.
Accessories and
Modifications
Adding non-dealer accessories or
making modifications to the vehicle
can affect vehicle performance and
safety, including such things as
airbags, braking, stability, ride and
handling, emissions systems,
aerodynamics, durability, and
electronic systems like antilock
brakes, traction control, and stability
control. These accessories or
modifications could even cause
malfunction or damage not covered
by the vehicle warranty.Damage to suspension components
caused by modifying vehicle height
outside of factory settings will not be
covered by the vehicle warranty.
Damage to vehicle components
resulting from modifications or the
installation or use of non-GM
certified parts, including control
module or software modifications, is
not covered under the terms of the
vehicle warranty and may affect
remaining warranty coverage for
affected parts.
GM Accessories are designed to
complement and function with other
systems on the vehicle. See your
dealer to accessorize the vehicle
using genuine GM Accessories
installed by a dealer technician.
Also, see
Adding Equipment to the
Airbag-Equipped Vehicle 086.
Vehicle Checks
Doing Your Own
Service Work
{Warning
It can be dangerous to work on
your vehicle if you do not have
the proper knowledge, service
manual, tools, or parts. Always
follow owner ’s manual procedures
and consult the service manual
for your vehicle before doing any
service work.
If doing some of your own service
work, use the proper service
manual. It tells you much more
about how to service the vehicle
than this manual can. To order the
proper service manual, see Service
Publications Ordering Information
0 376.
This vehicle has an airbag system.
Before attempting to do your own
service work, see Servicing the
Airbag-Equipped Vehicle 085.
Page 264 of 404
Chevrolet Cruze Owner Manual (GMNA-Localizing-U.S./Canada/Mexico-
11348462) - 2018 - crc - 5/15/17
Vehicle Care 263
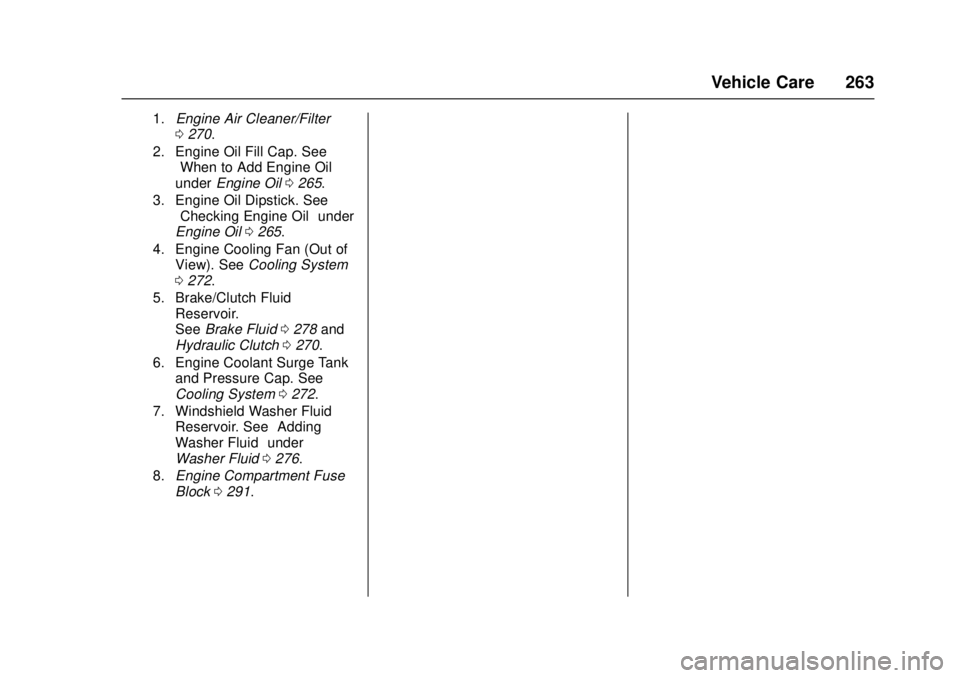
1.Engine Air Cleaner/Filter
0270.
2. Engine Oil Fill Cap. See “When to Add Engine Oil”
under Engine Oil 0265.
3. Engine Oil Dipstick. See “Checking Engine Oil” under
Engine Oil 0265.
4. Engine Cooling Fan (Out of View). See Cooling System
0 272.
5. Brake/Clutch Fluid Reservoir.
See Brake Fluid 0278 and
Hydraulic Clutch 0270.
6. Engine Coolant Surge Tank and Pressure Cap. See
Cooling System 0272.
7. Windshield Washer Fluid Reservoir. See “Adding
Washer Fluid” under
Washer Fluid 0276.
8. Engine Compartment Fuse
Block 0291.
Page 266 of 404
Chevrolet Cruze Owner Manual (GMNA-Localizing-U.S./Canada/Mexico-
11348462) - 2018 - crc - 5/15/17
Vehicle Care 265
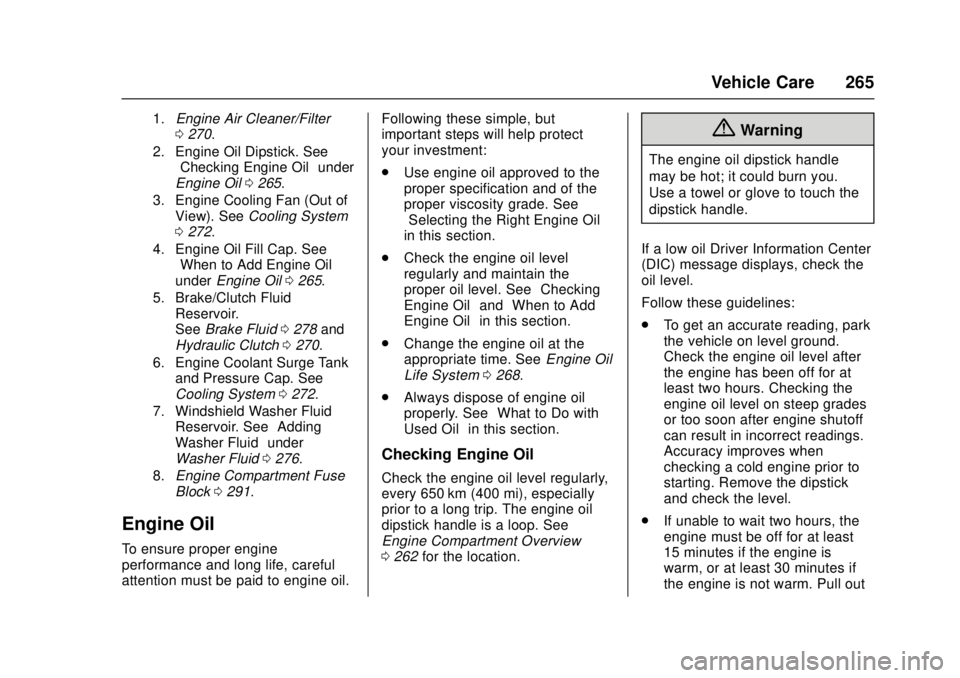
1.Engine Air Cleaner/Filter
0270.
2. Engine Oil Dipstick. See “Checking Engine Oil” under
Engine Oil 0265.
3. Engine Cooling Fan (Out of View). See Cooling System
0 272.
4. Engine Oil Fill Cap. See “When to Add Engine Oil”
under Engine Oil 0265.
5. Brake/Clutch Fluid Reservoir.
See Brake Fluid 0278 and
Hydraulic Clutch 0270.
6. Engine Coolant Surge Tank and Pressure Cap. See
Cooling System 0272.
7. Windshield Washer Fluid Reservoir. See “Adding
Washer Fluid” under
Washer Fluid 0276.
8. Engine Compartment Fuse
Block 0291.
Engine Oil
To ensure proper engine
performance and long life, careful
attention must be paid to engine oil. Following these simple, but
important steps will help protect
your investment:
.
Use engine oil approved to the
proper specification and of the
proper viscosity grade. See
“Selecting the Right Engine Oil”
in this section.
. Check the engine oil level
regularly and maintain the
proper oil level. See “Checking
Engine Oil” and“When to Add
Engine Oil” in this section.
. Change the engine oil at the
appropriate time. See Engine Oil
Life System 0268.
. Always dispose of engine oil
properly. See “What to Do with
Used Oil” in this section.
Checking Engine Oil
Check the engine oil level regularly,
every 650 km (400 mi), especially
prior to a long trip. The engine oil
dipstick handle is a loop. See
Engine Compartment Overview
0262 for the location.
{Warning
The engine oil dipstick handle
may be hot; it could burn you.
Use a towel or glove to touch the
dipstick handle.
If a low oil Driver Information Center
(DIC) message displays, check the
oil level.
Follow these guidelines:
. To get an accurate reading, park
the vehicle on level ground.
Check the engine oil level after
the engine has been off for at
least two hours. Checking the
engine oil level on steep grades
or too soon after engine shutoff
can result in incorrect readings.
Accuracy improves when
checking a cold engine prior to
starting. Remove the dipstick
and check the level.
. If unable to wait two hours, the
engine must be off for at least
15 minutes if the engine is
warm, or at least 30 minutes if
the engine is not warm. Pull out