Page 283 of 404

Chevrolet Cruze Owner Manual (GMNA-Localizing-U.S./Canada/Mexico-
11348462) - 2018 - crc - 5/15/17
282 Vehicle Care
.To check the P (Park)
mechanism's holding ability:
With the engine running, shift to
P (Park). Then release the
parking brake followed by the
regular brake.
Contact your dealer if service is
required.
Wiper Blade Replacement
Windshield wiper blades should be
inspected for wear and cracking.
See the Maintenance Schedule
0 350.
Replacement blades come in
different types and are removed in
different ways. For proper type and
length, see Maintenance
Replacement Parts 0360.
Caution
Allowing the wiper arm to touch
the windshield when no wiper
blade is installed could damage
the windshield. Any damage that
occurs would not be covered by
(Continued)
Caution (Continued)
the vehicle warranty. Do not allow
the wiper arm to touch the
windshield.
Front Wiper Blade
Replacement
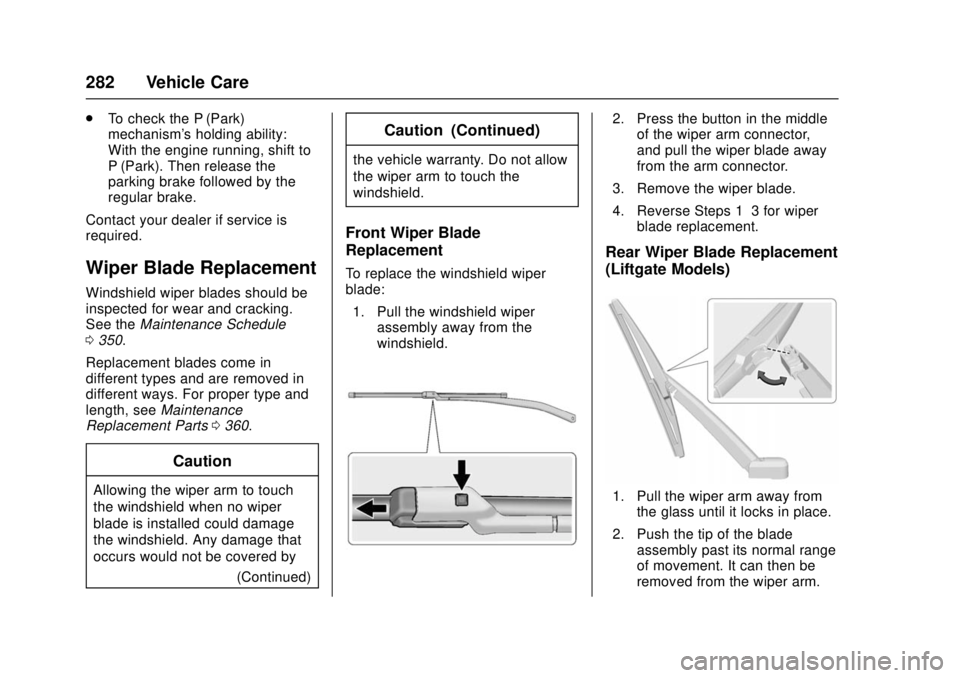
To replace the windshield wiper
blade:
1. Pull the windshield wiper assembly away from the
windshield.
2. Press the button in the middleof the wiper arm connector,
and pull the wiper blade away
from the arm connector.
3. Remove the wiper blade.
4. Reverse Steps 1–3 for wiper blade replacement.
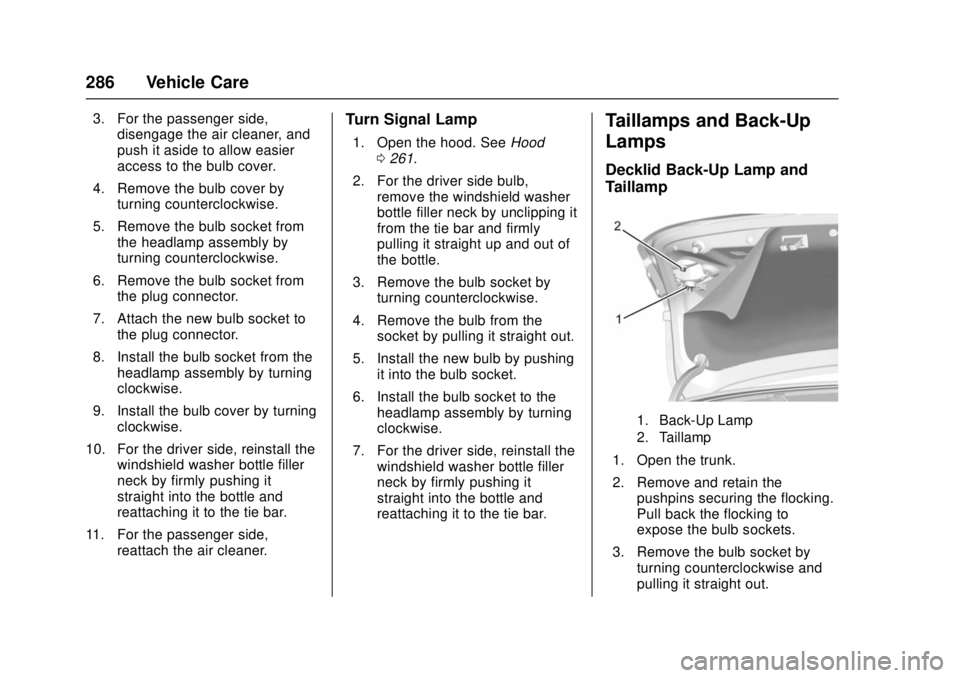
Rear Wiper Blade Replacement
(Liftgate Models)
1. Pull the wiper arm away fromthe glass until it locks in place.
2. Push the tip of the blade assembly past its normal range
of movement. It can then be
removed from the wiper arm.
Page 287 of 404

Chevrolet Cruze Owner Manual (GMNA-Localizing-U.S./Canada/Mexico-
11348462) - 2018 - crc - 5/15/17
286 Vehicle Care
3. For the passenger side,disengage the air cleaner, and
push it aside to allow easier
access to the bulb cover.
4. Remove the bulb cover by turning counterclockwise.
5. Remove the bulb socket from the headlamp assembly by
turning counterclockwise.
6. Remove the bulb socket from the plug connector.
7. Attach the new bulb socket to the plug connector.
8. Install the bulb socket from the headlamp assembly by turning
clockwise.
9. Install the bulb cover by turning clockwise.
10. For the driver side, reinstall the windshield washer bottle filler
neck by firmly pushing it
straight into the bottle and
reattaching it to the tie bar.
11. For the passenger side, reattach the air cleaner.Turn Signal Lamp
1. Open the hood. See Hood
0 261.
2. For the driver side bulb, remove the windshield washer
bottle filler neck by unclipping it
from the tie bar and firmly
pulling it straight up and out of
the bottle.
3. Remove the bulb socket by turning counterclockwise.
4. Remove the bulb from the socket by pulling it straight out.
5. Install the new bulb by pushing it into the bulb socket.
6. Install the bulb socket to the headlamp assembly by turning
clockwise.
7. For the driver side, reinstall the windshield washer bottle filler
neck by firmly pushing it
straight into the bottle and
reattaching it to the tie bar.
Taillamps and Back-Up
Lamps
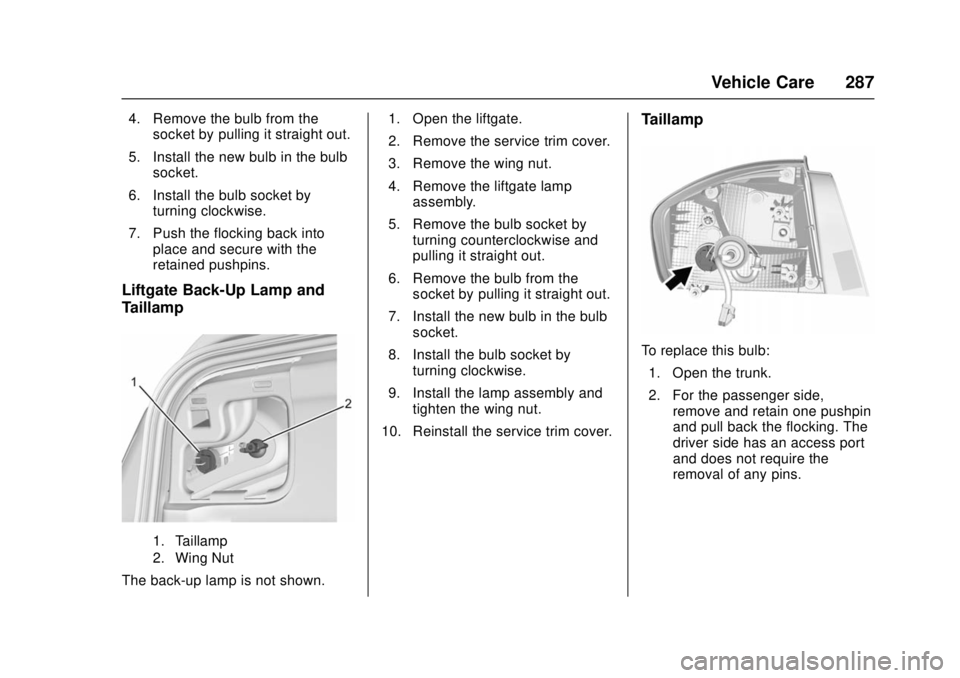
Decklid Back-Up Lamp and
Taillamp
1. Back-Up Lamp
2. Taillamp
1. Open the trunk.
2. Remove and retain thepushpins securing the flocking.
Pull back the flocking to
expose the bulb sockets.
3. Remove the bulb socket by turning counterclockwise and
pulling it straight out.
Page 288 of 404

Chevrolet Cruze Owner Manual (GMNA-Localizing-U.S./Canada/Mexico-
11348462) - 2018 - crc - 5/15/17
Vehicle Care 287
4. Remove the bulb from thesocket by pulling it straight out.
5. Install the new bulb in the bulb socket.
6. Install the bulb socket by turning clockwise.
7. Push the flocking back into place and secure with the
retained pushpins.
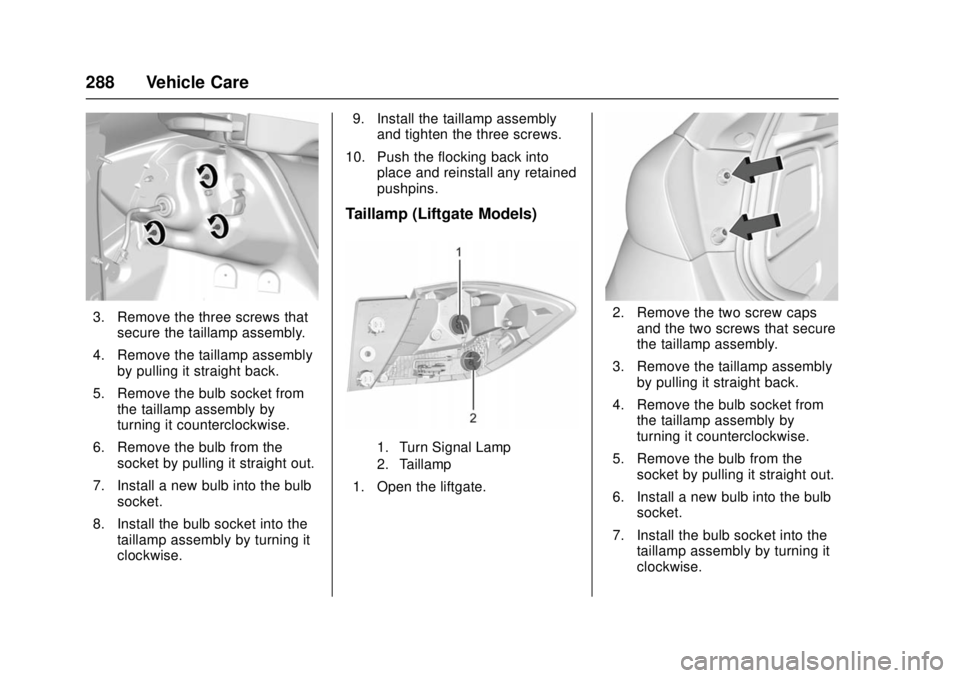
Liftgate Back-Up Lamp and
Taillamp
1. Taillamp
2. Wing Nut
The back-up lamp is not shown. 1. Open the liftgate.
2. Remove the service trim cover.
3. Remove the wing nut.
4. Remove the liftgate lamp
assembly.
5. Remove the bulb socket by turning counterclockwise and
pulling it straight out.
6. Remove the bulb from the socket by pulling it straight out.
7. Install the new bulb in the bulb socket.
8. Install the bulb socket by turning clockwise.
9. Install the lamp assembly and tighten the wing nut.
10. Reinstall the service trim cover.
Taillamp
To replace this bulb: 1. Open the trunk.
2. For the passenger side, remove and retain one pushpin
and pull back the flocking. The
driver side has an access port
and does not require the
removal of any pins.
Page 289 of 404

Chevrolet Cruze Owner Manual (GMNA-Localizing-U.S./Canada/Mexico-
11348462) - 2018 - crc - 5/15/17
288 Vehicle Care
3. Remove the three screws thatsecure the taillamp assembly.
4. Remove the taillamp assembly by pulling it straight back.
5. Remove the bulb socket from the taillamp assembly by
turning it counterclockwise.
6. Remove the bulb from the socket by pulling it straight out.
7. Install a new bulb into the bulb socket.
8. Install the bulb socket into the taillamp assembly by turning it
clockwise. 9. Install the taillamp assembly
and tighten the three screws.
10. Push the flocking back into place and reinstall any retained
pushpins.
Taillamp (Liftgate Models)
1. Turn Signal Lamp
2. Taillamp
1. Open the liftgate.
2. Remove the two screw capsand the two screws that secure
the taillamp assembly.
3. Remove the taillamp assembly by pulling it straight back.
4. Remove the bulb socket from the taillamp assembly by
turning it counterclockwise.
5. Remove the bulb from the socket by pulling it straight out.
6. Install a new bulb into the bulb socket.
7. Install the bulb socket into the taillamp assembly by turning it
clockwise.
Page 290 of 404
Chevrolet Cruze Owner Manual (GMNA-Localizing-U.S./Canada/Mexico-
11348462) - 2018 - crc - 5/15/17
Vehicle Care 289
8. Install the taillamp assemblyand tighten the two screws.
9. Install the two screw covers.License Plate Lamp
(Liftgate Models)
Lamp Assembly
Bulb Assembly
1. Bulb Socket
2. Bulb
3. Lamp Assembly
To replace one of these bulbs: 1. Open the liftgate partway. See Liftgate 050.
2. Push the lamp assembly outboard to remove.
3. Pull the lamp assembly down to remove it from the liftgate.
4. Turn the bulb socket (1) counterclockwise to remove it
from the lamp assembly (3).
5. Pull the bulb (2) straight out of the bulb socket (1).
6. Push the replacement bulb straight into the bulb socket
and turn the bulb socket
clockwise to install it into the
lamp assembly.
7. Push the lamp assembly into the liftgate engaging the clip
side first.
8. Push on the lamp side opposite the clip until the lamp assembly
snaps into place.
Page 292 of 404
Chevrolet Cruze Owner Manual (GMNA-Localizing-U.S./Canada/Mexico-
11348462) - 2018 - crc - 5/15/17
Vehicle Care 291
Fuses of the same amperage can
be temporarily borrowed from
another fuse location, if a fuse goes
out. Replace the fuse as soon as
possible.
Engine Compartment
Fuse Block
To remove the fuse block cover,
squeeze the clips and swing it up.
Caution
Spilling liquid on any electrical
component on the vehicle may
damage it. Always keep the
covers on any electrical
component.
Page 295 of 404
Chevrolet Cruze Owner Manual (GMNA-Localizing-U.S./Canada/Mexico-
11348462) - 2018 - crc - 5/15/17
294 Vehicle Care
FusesUsage
F44 Interior rearview mirror/Rear vision
camera/Trailer
F45 Heated steering wheel
F46 Instrument cluster
F47 Steering column lock
F48 Rear wiper
F49 –
F50 –
F51 –
F52 Engine/Transmission control module
F53 –
F54 Windshield wiper
F55 Diesel NOx
F56 Aeroshutter
F57 –
Relays Usage
K01 Starter
K02 A/C control Relays
Usage
K03 Engine functions
K04 –
K05 Starter
K06 Diesel fuel heating/ Secondary air
induction
K07 Right low-beam headlamp/Right
daytime
running lamp
K08 Transmission
K09 Diesel NOx
K10 Fuel pump K11 –
K12 High-beam headlamps
K13 Left daytime running lamp/Left low-beam
headlamp
K14 Run/Crank Relays
Usage
K15 Mirror defogger/Rear window defogger/
Anti-theft warning
sensor
K21 Rear window washer
K22 Front window washer
Additional fuses are located near
the vehicle battery.
Page 296 of 404
Chevrolet Cruze Owner Manual (GMNA-Localizing-U.S./Canada/Mexico-
11348462) - 2018 - crc - 5/15/17
Vehicle Care 295
FusesUsage
1 Transmission control module (vehicles
with automatic
transmission only)
2 Fuel pump
3 Engine control module
4 Power supply
Instrument Panel Fuse
Block
The instrument panel fuse block is
in the center of the console, under
the climate controls. To access the
fuses: 1. Open the fuse block cover by pulling out at the top.
2. Remove the lower edge of the cover.
3. Remove the cover.
To reinstall the cover, reverse the
steps.