2018 CADILLAC ESCALADE ECO mode
[x] Cancel search: ECO modePage 214 of 399

Cadillac Escalade Owner Manual (GMNA-Localizing-U.S./Canada/Mexico-
11349344) - 2018 - crc - 11/7/17
DRIVING AND OPERATING 213
Shifting Into 4mor AUTO
Turn the knob to the 4
mor AUTO
position at any speed, except from 4
n.
The indicator light will flash while
shifting and will remain on when the
shift is completed.
Shifting Into 2
m
Turn the knob to 2mat any speed,
except when shifting from 4
n. The
indicator light will flash while shifting
and will remain on when the shift is
completed.
Shifting Into 4
n
When 4nis engaged, keep vehicle
speed below 72 km/h (45 mph).
To shift:
1. The ignition must be on and the vehicle must be stopped or
moving less than 5 km/h (3 mph)
with the transmission in
N (Neutral). It is best for the
vehicle to be moving
1.6 to 3.2 km/h (1 to 2 mph). 2. Turn the knob to 4
n. Wait for
the 4
nindicator light to stop
flashing before shifting the
transmission into gear.
Caution
Shifting the transmission into gear
before the requested mode indicator
light has stopped flashing could
damage the transfer case.
If the transmission is in gear and/or
moving more than 5 km/h (3 mph), the
4
nindicator light will flash for
30 seconds and not complete the shift.
After 30 seconds the transfer case will
shift to 4
m. Turn the knob to 4mto
display the indicator. With the vehicle
moving less than 5 km/h (3 mph), and
the transmission in N (Neutral),
attempt the shift again.
Shifting Out of 4
n
To shift: 1. The vehicle must be stopped or
moving less than 5 km/h (3 mph)
with the transmission in
N (Neutral) and the ignition on.
It is best for the vehicle to be
moving 1.6 to 3.2 km/h
(1 to 2 mph).
2. Turn the knob to 4
m, AUTO, or
2
m. Wait for the 4m, AUTO, or
2
mindicator light to stop
flashing before shifting the
transmission into gear.
Caution
Shifting the transmission into gear
before the requested mode indicator
light has stopped flashing could
damage the transfer case.
If the transmission is in gear and/or
moving more than 5 km/h (3 mph), the
4
m, AUTO, or 2mindicator light will
flash for 30 seconds but will not
complete the shift. With the vehicle
moving less than 5 km/h (3 mph), and
the transmission in N (Neutral),
attempt the shift again.
Page 215 of 399

Cadillac Escalade Owner Manual (GMNA-Localizing-U.S./Canada/Mexico-
11349344) - 2018 - crc - 11/7/17
214 DRIVING AND OPERATING
Shifting Into N (Neutral)
To shift into N (Neutral):1. Park the vehicle on a level surface.
2. Set the parking brake and press and hold the brake pedal.
See Parking Brake 0215 or
Electric Parking Brake 0216.
3. Start the vehicle or turn the ignition on.
4. Shift the transmission to N (Neutral).
5. Shift the transfer case to 2
m.
6. Turn the transfer case knob clockwise to N (Neutral) until it
stops and hold it there until the
N (Neutral) light starts blinking.
This will take at least 10 seconds.
Then slowly release the knob to
the 4
nposition. The N (Neutral)
light will come on when the
transfer case shift to N (Neutral)
is complete. 7. With the engine running, verify
that the transfer case is in
N (Neutral) by shifting the
transmission to R (Reverse), then
shift the transmission to
D (Drive). There should be no
movement of the vehicle while
shifting the transmission.
8. Turn the engine off, and the ignition to ACC/ACCESSORY.
9. Place the transmission shift lever in P (Park). See Recreational
Vehicle Towing 0333.
10. Turn the ignition off.
Shifting Out of N (Neutral)
To shift out of N (Neutral): 1. Set the parking brake.
2. Press and hold START/STOP for 5 seconds with your foot off the
brake to place the vehicle in
Service Mode.
3. Shift the transmission to N (Neutral). 4. Turn the transfer case knob to
the desired setting.
After the transfer case has
shifted out of N (Neutral), the
N (Neutral) light will go out.
5. Release the parking brake.
6. Start the engine and shift the transmission to the desired gear.
Page 222 of 399

Cadillac Escalade Owner Manual (GMNA-Localizing-U.S./Canada/Mexico-
11349344) - 2018 - crc - 11/7/17
DRIVING AND OPERATING 221
Tow/Haul is most useful under the
following conditions:
.When pulling a heavy trailer or a
large or heavy load through rolling
terrain
. When pulling a heavy trailer or a
large or heavy load in stop-and-go
traffic
. When pulling a heavy trailer or a
large or heavy load in busy
parking lots where improved low
speed control of the vehicle is
desired
Operating the vehicle in Tow/Haul
when lightly loaded or with no trailer
at all will not cause damage. However,
there is no benefit to the selection of
Tow/Haul when the vehicle is
unloaded. Such a selection when
unloaded may result in unpleasant
engine and transmission driving
characteristics and reduced fuel
economy. Tow/Haul is recommended
only when pulling a heavy trailer or a
large or heavy load.
When selected, the Tow/Haul
indicator will display in the
instrument cluster.Magnetic Ride Control
The Magnetic Ride Control monitors
the suspension system.
Based on road conditions, steering
wheel angle, and vehicle speed, the
system automatically adjusts to
provide the best handling while
providing a smooth ride. The Tour and
Sport Modes will feel similar on a
smooth road.
Tour : Use for normal city and
highway driving. This setting provides
a smooth, soft ride.
8Sport : Use where road conditions
or personal preference demand more
control. This setting provides more
“feel,” or response to road conditions.
6Snow/Ice : Use when more
traction is needed during slippery
conditions.
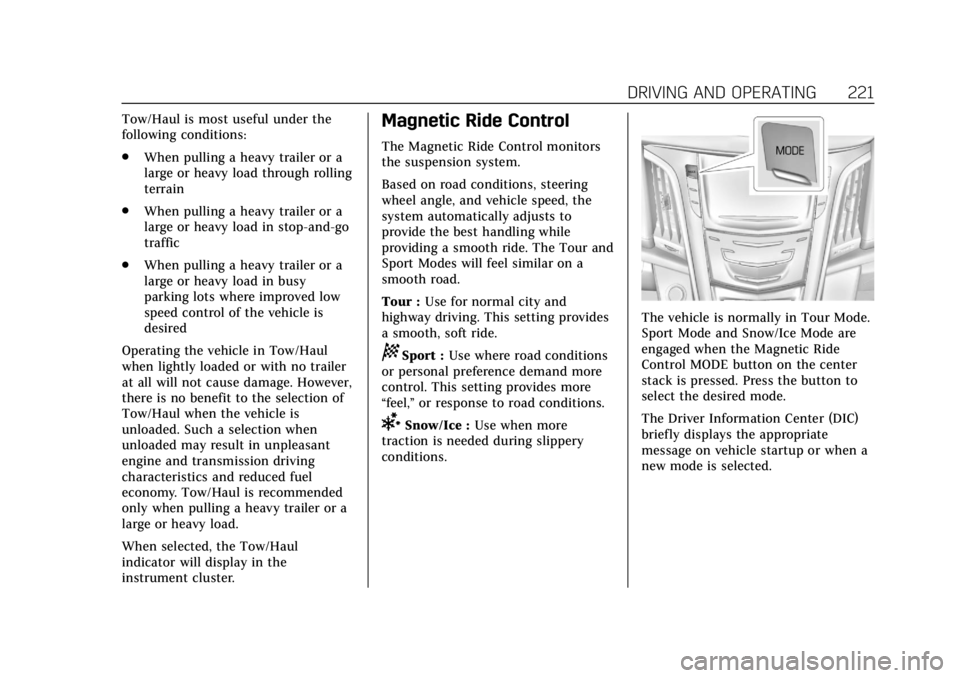
The vehicle is normally in Tour Mode.
Sport Mode and Snow/Ice Mode are
engaged when the Magnetic Ride
Control MODE button on the center
stack is pressed. Press the button to
select the desired mode.
The Driver Information Center (DIC)
briefly displays the appropriate
message on vehicle startup or when a
new mode is selected.
Page 225 of 399

Cadillac Escalade Owner Manual (GMNA-Localizing-U.S./Canada/Mexico-
11349344) - 2018 - crc - 11/7/17
224 DRIVING AND OPERATING
.To increase vehicle speed in small
increments, press +RES up briefly.
For each press, the vehicle goes
about 1.6 km/h (1 mph) faster.
The speedometer reading can be
displayed in either English or metric
units. See Instrument Cluster 0130.
The increment value used depends on
the units displayed.
Reducing Speed While Cruise
Control is at a Set Speed
If the cruise control system is already
activated:
. Press and hold SET− down until
the desired lower speed is reached,
then release it.
. To decrease the vehicle speed in
small increments, press SET−
down briefly. For each press, the
vehicle goes about 1.6 km/h
(1 mph) slower.
The speedometer reading can be
displayed in either English or metric
units. See Instrument Cluster 0130.
The increment value used depends on
the units displayed. Passing Another Vehicle While
Using Cruise Control
Use the accelerator pedal to increase
the vehicle speed. When you take your
foot off the pedal, the vehicle will slow
down to the previous set cruise speed.
While pressing the accelerator pedal
or shortly following the release to
override cruise, briefly applying the
SET−
control will result in cruise set
to the current vehicle speed.
Using Cruise Control on Hills
How well the cruise control works on
hills depends on the vehicle speed, the
load, and the steepness of the hills.
When going up steep hills, pressing
the accelerator pedal may be
necessary to maintain vehicle speed.
When going downhill, Cruise Grade
Braking helps maintain the driver
selected speed.
Cruise Grade Braking is enabled when
the vehicle is started and cruise
control is active. It is not enabled in
Range Selection Mode. It assists in
maintaining driver selected speed when driving on downhill grades by
using the engine and transmission to
slow the vehicle.
To disable and enable Cruise Grade
Braking for the current ignition cycle,
press and hold the Tow/Haul button
for five seconds. A Driver Information
Center (DIC) message displays.
For other forms of Grade Braking, see
Automatic Transmission
0206 and
Tow/Haul Mode 0210.
Ending Cruise Control
There are four ways to end cruise
control:
. Step lightly on the brake pedal.
. Press
*.
. Shift the transmission to
N (Neutral).
. To turn off cruise control,
press
J.
Erasing Speed Memory
The cruise control set speed is erased
from memory if
Jis pressed or if
the ignition is turned off.
Page 256 of 399

Cadillac Escalade Owner Manual (GMNA-Localizing-U.S./Canada/Mexico-
11349344) - 2018 - crc - 11/7/17
DRIVING AND OPERATING 255
Trailer Towing
Do not tow a trailer during break-in.
SeeNew Vehicle Break-In 0198.
Before towing a trailer, see
"Hands-Free Operation" under Liftgate
0 41.
{Warning
The driver can lose control when
pulling a trailer if the correct
equipment is not used or the
vehicle is not driven properly. For
example, if the trailer is too heavy
or the trailer brakes are inadequate
for the load, the vehicle may not
stop as expected. The driver and
passengers could be seriously
injured. The vehicle may also be
damaged; the resulting repairs
would not be covered by the vehicle
warranty. Pull a trailer only if all the
steps in this section have been
followed. Ask your dealer for advice
and information about towing a
trailer with the vehicle.
Caution
Pulling a trailer improperly can
damage the vehicle and result in
costly repairs not covered by the
vehicle warranty. To pull a trailer
correctly, follow the advice in this
section and see your dealer for
important information about
towing a trailer with the vehicle.
To identify the trailering capacity of
the vehicle, see “Weight of the Trailer”
following.
Trailering is different than just driving
the vehicle by itself. Trailering means
changes in handling, acceleration,
braking, durability and fuel economy.
Successful, safe trailering takes correct
equipment, and it has to be used
properly.
The following information has many
time-tested, important trailering tips
and safety rules. Many of these are
important for your safety and that of
your passengers. Read this section
carefully before pulling a trailer.
Weight of the Trailer
Safe trailering requires monitoring the
weight, speed, altitude, road grades,
outside temperature, and how
frequently the vehicle is used to pull a
trailer. Take into consideration any
special equipment on the vehicle, and
the amount of tongue weight the
vehicle can carry. See “Weight of the
Trailer Tongue ”later in this section.
Trailer Weight Rating (TWR) is
calculated assuming the tow vehicle
has not only the driver but all
required trailering equipment. Weight
of additional optional equipment,
passengers, and cargo in the tow
vehicle must be subtracted from
the TWR.
Use the following chart to determine
how much the trailer can weigh, based
upon the vehicle model and options.
Page 262 of 399

Cadillac Escalade Owner Manual (GMNA-Localizing-U.S./Canada/Mexico-
11349344) - 2018 - crc - 11/7/17
DRIVING AND OPERATING 261
Warning (Continued)
vehicle-trailer speed, or improperly
inflated or incorrect vehicle or
trailer tires. SeeTowing Equipment
0 258 for trailer ratings and hitch
setup recommendations.
Adding non-dealer accessories can
affect the vehicle performance. See
Accessories and Modifications 0265.
Electronic Trailer Sway Control
Devices
Some trailers may come equipped
with an electronic device designed to
reduce or control trailer sway.
Aftermarket equipment manufacturers
also offer similar devices that connect
to the wiring between the trailer and
the vehicle. These devices may
interfere with the vehicle’s trailer
brake or other systems, including
integrated anti-sway systems,
if equipped. Messages related to trailer
connections or trailer brakes could
appear on the Driver Information
Center (DIC). The effect that these devices may have on vehicle handling
or trailer brake performance is
unknown.
{Warning
Use of electronic trailer sway
control devices could result in
reduced trailer brake performance,
loss of trailer brakes, or other
malfunctions, and could cause a
crash. You or others could be
injured or killed. Before using one
of these devices:
. Ask the device or trailer
manufacturer if the device
has been thoroughly tested
for compatibility with the
make, model, and year of the
vehicle as well as optional
equipment installed on the
vehicle.
. Before driving on the open
roads, check that the trailer
brakes are working properly.
Drive the vehicle with the
trailer attached on a level
(Continued)
Warning (Continued)
road surface that is free of
traffic at about 32-40 km/h
(20-25 mph) and fully apply
the manual trailer brake apply
lever. Also check that the
trailer brake lamps and other
lamps are functioning
correctly.
. If the trailer brakes are not
operating properly at any
time, or if a DIC message
indicates problems with the
trailer connections or trailer
brakes, carefully pull the
vehicle over to the side of the
road when traffic conditions
allow.
Page 305 of 399

Cadillac Escalade Owner Manual (GMNA-Localizing-U.S./Canada/Mexico-
11349344) - 2018 - crc - 11/7/17
304 VEHICLE CARE
DOT Markings:A code molded
into the sidewall of a tire
signifying that the tire is in
compliance with the U.S.
Department of Transportation
(DOT) Motor Vehicle Safety
Standards. The DOT code includes
the Tire Identification Number
(TIN), an alphanumeric designator
which can also identify the tire
manufacturer, production plant,
brand, and date of production.
GVWR
:Gross Vehicle Weight
Rating. See Vehicle Load Limits
0 193.
GAWR FRT
:Gross Axle Weight
Rating for the front axle. See
Vehicle Load Limits 0193.
GAWR RR
:Gross Axle Weight
Rating for the rear axle. See
Vehicle Load Limits 0193.
Intended Outboard Sidewall
:
The side of an asymmetrical tire
that must always face outward
when mounted on a vehicle. Kilopascal (kPa)
:The metric unit
for air pressure.
Light Truck (LT-Metric) Tire
:A
tire used on light duty trucks and
some multipurpose passenger
vehicles.
Load Index
:An assigned number
ranging from 1 to 279 that
corresponds to the load carrying
capacity of a tire.
Maximum Inf lation Pressure
:
The maximum air pressure to
which a cold tire can be inflated.
The maximum air pressure is
molded onto the sidewall.
Maximum Load Rating
:The load
rating for a tire at the maximum
permissible inflation pressure for
that tire.
Maximum Loaded Vehicle
Weight
:The sum of curb weight,
accessory weight, vehicle capacity
weight, and production options
weight. Normal Occupant Weight
:The
number of occupants a vehicle is
designed to seat multiplied by
68 kg (150 lb). See Vehicle Load
Limits 0193.
Occupant Distribution
:
Designated seating positions.
Outward Facing Sidewall
:The
side of an asymmetrical tire that
has a particular side that faces
outward when mounted on a
vehicle. The side of the tire that
contains a whitewall, bears white
lettering, or bears manufacturer,
brand, and/or model name
molding that is higher or deeper
than the same moldings on the
other sidewall of the tire.
Passenger (P-Metric) Tire
:A tire
used on passenger cars and some
light duty trucks and
multipurpose vehicles.
Recommended Inf lation
Pressure
:Vehicle manufacturer's
recommended tire inflation
pressure as shown on the tire
Page 312 of 399

Cadillac Escalade Owner Manual (GMNA-Localizing-U.S./Canada/Mexico-
11349344) - 2018 - crc - 11/7/17
VEHICLE CARE 311
the next ignition cycle. The sensors
are matched to the tire/wheel
positions, using a TPMS relearn tool,
in the following order: driver side
front tire, passenger side front tire,
passenger side rear tire, and driver
side rear tire. See your dealer for
service or to purchase a relearn tool.
A TPMS relearn tool can also be
purchased. See Tire Pressure Monitor
Sensor Activation Tool at
www.gmtoolsandequipment.com or
call 1-800-GM TOOLS
(1-800-468-6657).
There are two minutes to match the
first tire/wheel position, and
five minutes overall to match all four
tire/wheel positions. If it takes longer,
the matching process stops and must
be restarted.
The TPMS sensor matching process is:1. Set the parking brake.
2. Place the vehicle in Service Mode. See Ignition Positions
0 199.
3. Make sure the Tire Pressure info display option is turned on. The
info displays on the DIC can be turned on and off through the
Settings menu. See
Driver
Information Center (DIC) 0145.
4. Use the five-way DIC control on the right side of the steering
wheel to scroll to the Tire
Pressure screen under the DIC
info page. See Driver Information
Center (DIC) 0145.
5. Press and hold SEL in the center of the five-way DIC control.
The horn sounds twice to signal
the receiver is in relearn mode
and the TIRE LEARNING ACTIVE
message displays on the DIC
screen.
6. Start with the driver side front tire.
7. Place the relearn tool against the tire sidewall, near the valve stem.
Then press the button to activate
the TPMS sensor. A horn chirp
confirms that the sensor
identification code has been
matched to this tire and wheel
position. 8. Proceed to the passenger side
front tire, and repeat the
procedure in Step 7.
9. Proceed to the passenger side rear tire, and repeat the
procedure in Step 7.
10. Proceed to the driver side rear tire, and repeat the procedure in
Step 7. The horn sounds two
times to indicate the sensor
identification code has been
matched to the driver side rear
tire, and the TPMS sensor
matching process is no longer
active. The TIRE LEARNING
ACTIVE message on the DIC
display screen goes off.
11. Turn the vehicle off.
12. Set all four tires to the recommended air pressure level
as indicated on the Tire and
Loading Information label.