Page 105 of 365
Buick Envision Owner Manual (GMNA-Localizing-U.S./Canada/Mexico-
11434432) - 2018 - CRC - 10/25/17
104 Storage
Rear Storage
There is storage in the floor of the
rear cargo area. Lift the handle to
access. There is a removable
divider to help organize.
Use the hook underneath to hold
open the cargo floor cover.
Center Console Storage
Press the button to access the
storage in the center console.
If equipped there is an auxiliary
jack, an SD card reader, and a
single or dual USB port inside.
Page 106 of 365
Buick Envision Owner Manual (GMNA-Localizing-U.S./Canada/Mexico-
11434432) - 2018 - CRC - 10/25/17
Storage 105
There is a small covered bin directly
in front of the center console. Use
the handle to open the covered bin.
Additional Storage
Features
Cargo Cover
{Warning
An unsecured cargo cover could
strike people in a sudden stop or
turn, or in a crash. Store the
cargo cover securely or remove it
from the vehicle.
{Warning
Do not place objects on the cargo
cover. Sudden stops or turns can
cause objects to be thrown in the
vehicle. You or others could be
injured.
If equipped, use the cargo cover to
cover items in the rear of the
vehicle.
To remove the cover from the
vehicle, pull both ends toward each
other. To reinstall, place each end of
the cover in the holes behind the
rear seat.
Page 107 of 365
Buick Envision Owner Manual (GMNA-Localizing-U.S./Canada/Mexico-
11434432) - 2018 - CRC - 10/25/17
106 Storage
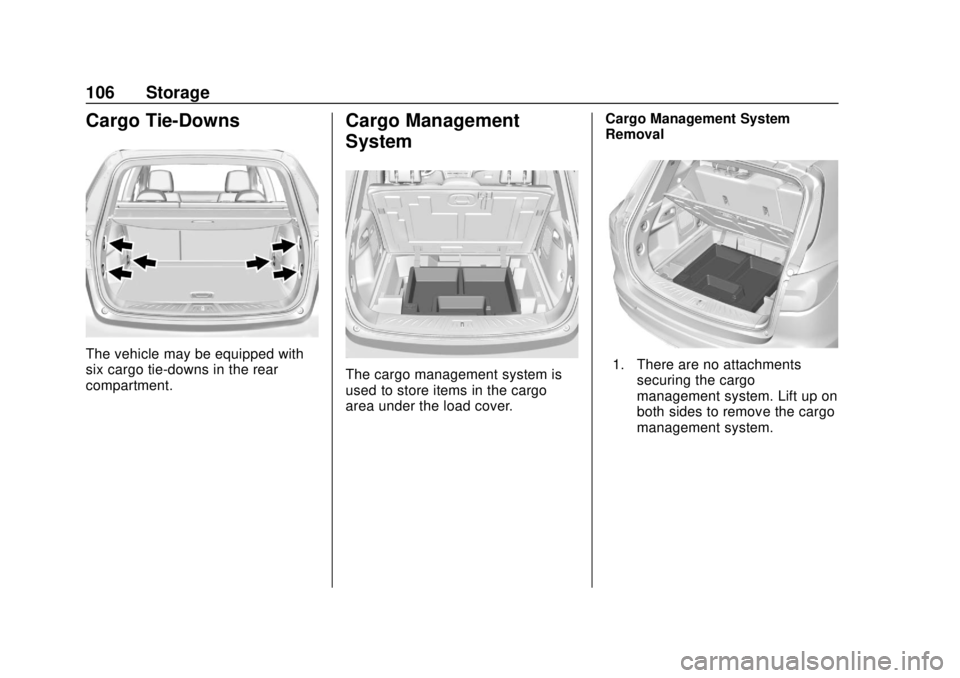
Cargo Tie-Downs
The vehicle may be equipped with
six cargo tie-downs in the rear
compartment.
Cargo Management
System
The cargo management system is
used to store items in the cargo
area under the load cover.Cargo Management System
Removal1. There are no attachments
securing the cargo
management system. Lift up on
both sides to remove the cargo
management system.
Page 108 of 365

Buick Envision Owner Manual (GMNA-Localizing-U.S./Canada/Mexico-
11434432) - 2018 - CRC - 10/25/17
Storage 107
2. The spare tire is nowaccessible.
3. Store the cargo management system outside of the vehicle.
Convenience Net
This vehicle may have a
convenience net in the rear of the
vehicle. Attach it to the cargo
tie-downs for storing small loads.
Do not use the net to store heavy
loads.
Roof Rack System
{Warning
If something is carried on top of
the vehicle that is longer or wider
than the roof rack —like paneling,
plywood, or a mattress —the
wind can catch it while the vehicle
is being driven. The item being
carried could be violently torn off,
and this could cause a collision
and damage the vehicle. Never
carry something longer or wider
than the roof rack on top of the
vehicle unless using a GM
certified accessory carrier.
If equipped, the roof rack can be
used to load items. For roof racks
that do not have crossrails included,
GM certified crossrails can be
purchased as an accessory. See
your dealer.
Page 109 of 365
Buick Envision Owner Manual (GMNA-Localizing-U.S./Canada/Mexico-
11434432) - 2018 - CRC - 10/25/17
108 Storage
Caution
Loading cargo on the roof rack
that weighs more than 100 kg
(220 lb) or hangs over the rear or
sides of the vehicle may damage
the vehicle. Load cargo so that it
rests evenly between the
crossrails, making sure to fasten
cargo securely.
To prevent damage or loss of cargo
when driving, check to make sure
crossrails and cargo are securely
fastened. Loading cargo on the roofrack will make the vehicle’
s center
of gravity higher. Avoid high speeds,
sudden starts, sharp turns, sudden
braking, or abrupt maneuvers;
otherwise it may result in loss of
control. If driving for a long distance,
on rough roads, or at high speeds,
occasionally stop the vehicle to
make sure the cargo remains in its
place. Do not exceed the maximum
vehicle capacity when loading the
vehicle. For more information on
vehicle capacity and loading, see
Vehicle Load Limits 0178.
Page 110 of 365

Buick Envision Owner Manual (GMNA-Localizing-U.S./Canada/Mexico-
11434432) - 2018 - CRC - 10/25/17
Instruments and Controls 109
Instruments and
Controls
Controls
Steering Wheel Adjustment . . . 110
Steering Wheel Controls . . . . . . 110
Heated Steering Wheel . . . . . . . 110
Horn . . . . . . . . . . . . . . . . . . . . . . . . . . 110
Windshield Wiper/Washer . . . . 110
Rear Window Wiper/Washer . . . . . . . . . . . . . . . . . . . . . . 112
Headlamp Washer . . . . . . . . . . . . 113
Compass . . . . . . . . . . . . . . . . . . . . . 113
Clock . . . . . . . . . . . . . . . . . . . . . . . . . 113
Power Outlets . . . . . . . . . . . . . . . . 114
Warning Lights, Gauges, and
Indicators
Warning Lights, Gauges, and Indicators . . . . . . . . . . . . . . . . . . . 116
Instrument Cluster . . . . . . . . . . . . 117
Speedometer . . . . . . . . . . . . . . . . . 120
Odometer . . . . . . . . . . . . . . . . . . . . . 120
Trip Odometer . . . . . . . . . . . . . . . . 120
Tachometer . . . . . . . . . . . . . . . . . . . 120
Fuel Gauge . . . . . . . . . . . . . . . . . . . 121
Engine Coolant Temperature
Gauge . . . . . . . . . . . . . . . . . . . . . . 122 Seat Belt Reminders . . . . . . . . . 123
Airbag Readiness Light . . . . . . . 124
Passenger Airbag Status
Indicator . . . . . . . . . . . . . . . . . . . . 124
Charging System Light . . . . . . . 125
Malfunction Indicator Lamp
(Check Engine Light) . . . . . . . . 125
Brake System Warning Light . . . . . . . . . . . . . . . . . . . . . . . . 127
Electric Parking Brake Light . . . . . . . . . . . . . . . . . . . . . . . . 128
Service Electric Parking Brake Light . . . . . . . . . . . . . . . . . . . . . . . . 128
Antilock Brake System (ABS) Warning Light . . . . . . . . . . . . . . . 128
Lane Keep Assist (LKA) Light . . . . . . . . . . . . . . . . . . . . . . . . 129
Vehicle Ahead Indicator . . . . . . 129
Traction Off Light . . . . . . . . . . . . . 130
StabiliTrak OFF Light . . . . . . . . . 130
Traction Control System (TCS)/ StabiliTrak Light . . . . . . . . . . . . . 130
Engine Coolant Temperature Warning Light . . . . . . . . . . . . . . . 131
Tire Pressure Light . . . . . . . . . . . 131
Engine Oil Pressure Light . . . . 132
Low Fuel Warning Light . . . . . . 132
Security Light . . . . . . . . . . . . . . . . . 132
High-Beam On Light . . . . . . . . . . 133 Adaptive Forward Lighting
(AFL) Light . . . . . . . . . . . . . . . . . . 133
Front Fog Lamp Light . . . . . . . . . 133
Lamps On Reminder . . . . . . . . . 134
Cruise Control Light . . . . . . . . . . 134
Door Ajar Light . . . . . . . . . . . . . . . 134
Information Displays
Driver Information Center (DIC) (Base Level) . . . . . . . . . . . . . . . . 134
Driver Information Center (DIC) (Uplevel) . . . . . . . . . . . . . . . . . . . . 137
Head-Up Display (HUD) . . . . . . 139
Vehicle Messages
Vehicle Messages . . . . . . . . . . . . 142
Engine Power Messages . . . . . 143
Vehicle Speed Messages . . . . . 143
Vehicle Personalization
Vehicle Personalization . . . . . . . 143
Universal Remote System
Universal Remote System . . . . 150
Universal Remote System Programming . . . . . . . . . . . . . . . 150
Universal Remote System Operation . . . . . . . . . . . . . . . . . . . 152
Page 111 of 365
Buick Envision Owner Manual (GMNA-Localizing-U.S./Canada/Mexico-
11434432) - 2018 - CRC - 10/25/17
110 Instruments and Controls
Controls
Steering Wheel
Adjustment
To adjust the steering wheel:1. Pull the lever down.
2. Move the steering wheel up or down.
3. Pull or push the steering wheel closer or away from you.
4. Pull the lever up to lock the steering wheel in place. Do not adjust the steering wheel
while driving.
Steering Wheel Controls
The infotainment system can be
operated by using the steering
wheel controls. See "Steering
Wheel Controls" in the infotainment
manual.
Heated Steering Wheel
(:
If equipped with a heated
steering wheel, press to turn on or
off. A light near the button displays
when the feature is turned on. The steering wheel takes about
three minutes to start heating.
Horn
Pressaon the steering wheel pad
to sound the horn.
Windshield Wiper/Washer
Windshield Wiper with Rainsense
(AUTO Shown)
Page 112 of 365

Buick Envision Owner Manual (GMNA-Localizing-U.S./Canada/Mexico-
11434432) - 2018 - CRC - 10/25/17
Instruments and Controls 111
Windshield Wiper with IntermittentWipes (INT Shown)
With the ignition on or in ACC/
ACCESSORY, move the windshield
wiper lever to select the wiper
speed.
HI : Use for fast wipes.
LO : Use for slow wipes.
INT : Use for intermittent wipes or
Rainsense, if equipped and
enabled. To adjust wipe frequency,
turn the band up for more frequent
wipes or down for less frequent
wipes. If Rainsense is enabled, see
“Rainsense” later in this section.
OFF : Use to turn the wipers off.
1x : For a single wipe, briefly move
the wiper lever down. For several
wipes, hold the wiper lever down.
Clear snow and ice from the wiper
blades before using them. If frozen
to the windshield, carefully loosen or
thaw them. Damaged blades should
be replaced. See Wiper Blade
Replacement 0257.
Heavy snow or ice can overload the
wiper motor.
Wipe Parking
If the ignition is turned off while the
wipers are on LO, HI, or INT, they
will immediately stop. If the windshield wiper lever is then
moved to OFF before the driver
door is opened or within 10 minutes,
the wipers will restart and move to
the base of the windshield.
If the ignition is turned off while the
wipers are performing wipes due to
windshield washing or Rainsense,
the wipers continue to run until they
reach the base of the windshield.
Rainsense
If equipped with Rainsense, a
sensor located near the top center
of the windshield detects the
amount of water on the windshield
and automatically controls the
frequency of the windshield wiper.
When Rainsense is enabled, the
normal intermittent control operates
as a sensitivity control.
Keep this area of the windshield
clear of debris to allow for best
system performance.