Page 9 of 20
9
POWER LIFTGATE
Open/Close the Power Liftgate
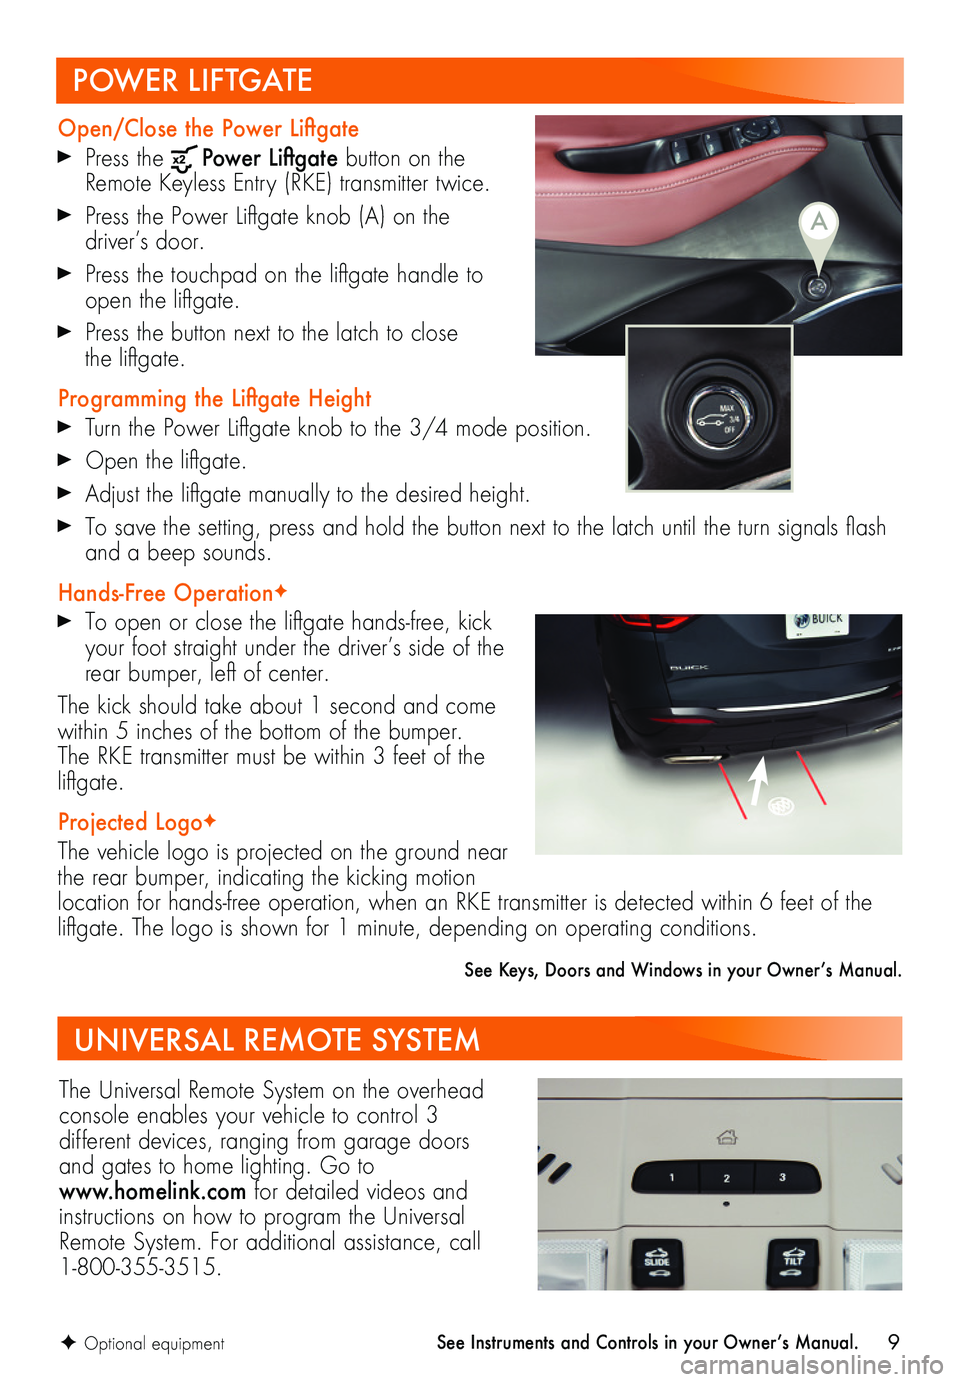
Press the Power Liftgate button on the Remote Keyless Entry (RKE) transmitter twice.
Press the Power Liftgate knob (A) on the driver’s door.
Press the touchpad on the liftgate handle to open the liftgate.
Press the button next to the latch to close the liftgate.
Programming the Liftgate Height
Turn the Power Liftgate knob to the 3/4 mode position.
Open the liftgate.
Adjust the liftgate manually to the desired height.
To save the setting, press and hold the button next to the latch until the turn signals flash and a beep sounds.
Hands-Free OperationF
To open or close the liftgate hands-free, kick your foot straight under the driver’s side of the rear bumper, left of center.
The kick should take about 1 second and come within 5 inches of the bottom of the bumper. The RKE transmitter must be within 3 feet of the liftgate.
Projected LogoF
The vehicle logo is projected on the ground near the rear bumper, indicating the kicking motion location for hands-free operation, when an RKE transmitter is detected within 6 feet of the liftgate. The logo is shown for 1 minute, depending on operating conditions.
See Keys, Doors and Windows in your Owner’s Manual.
F Optional equipment
A
UNIVERSAL REMOTE SYSTEM
The Universal Remote System on the overhead console enables your vehicle to control 3
different devices, ranging from garage doors and gates to home lighting. Go to www.homelink.com for detailed videos and instructions on how to program the Universal Remote System. For additional assistance, call 1-800-355-3515.
See Instruments and Controls in your Owner’s Manual.
Page 10 of 20
10
DRIVER INFORMATION CENTER
AUDIO STEERING WHEEL CONTROLS
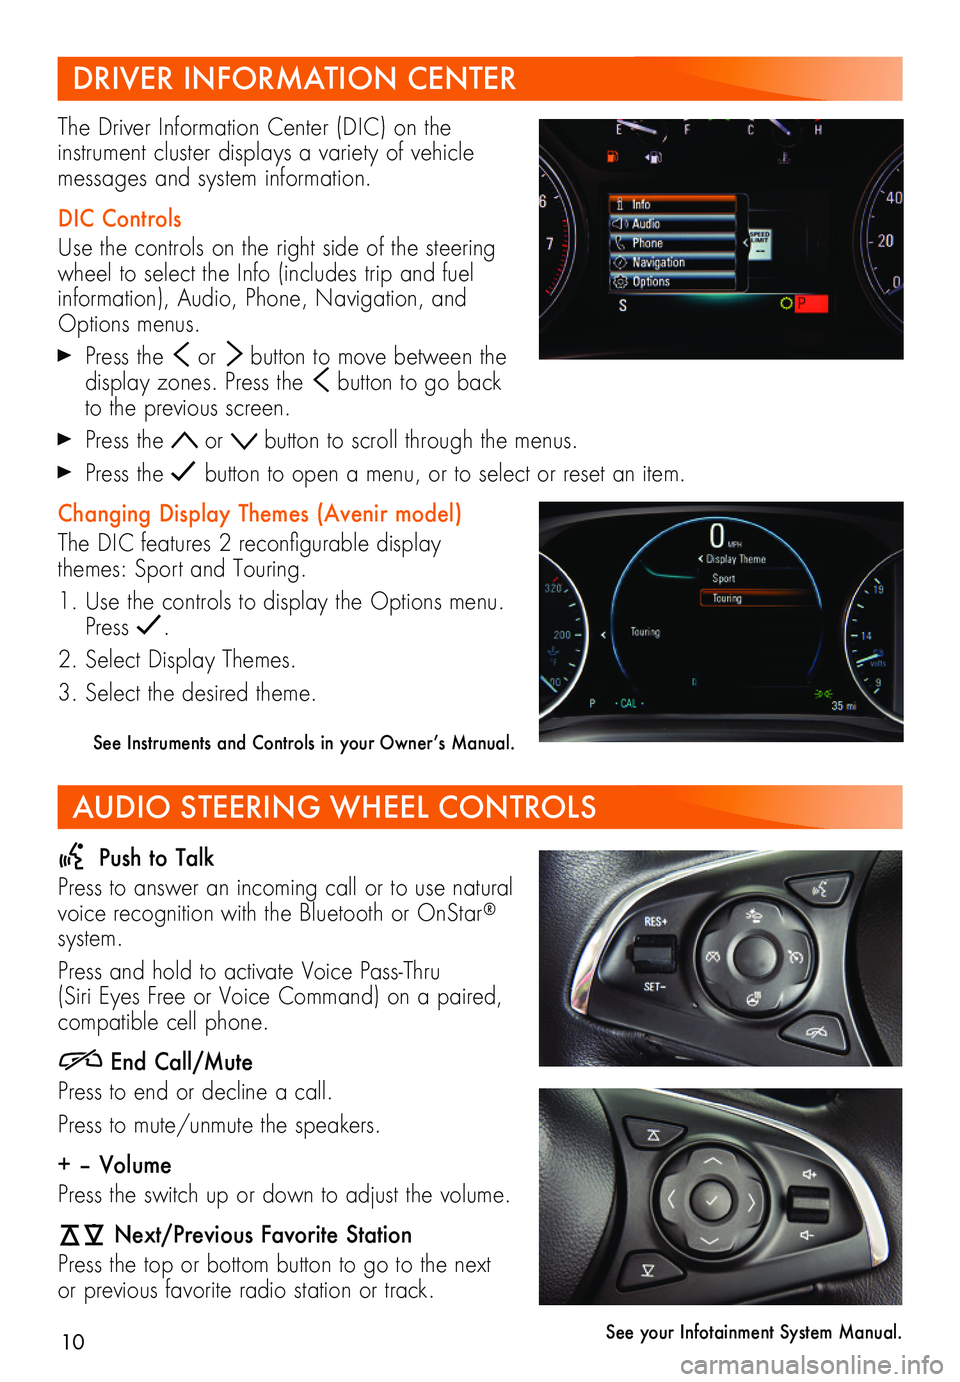
The Driver Information Center (DIC) on the
instrument cluster displays a variety of vehicle messages and system information.
DIC Controls
Use the controls on the right side of the steering wheel to select the Info (includes trip and fuel information), Audio, Phone, Navigation, and Options menus.
Press the or button to move between the display zones. Press the button to go back to the previous screen.
Press the or button to scroll through the menus.
Press the button to open a menu, or to select or reset an item.
Changing Display Themes (Avenir model)
The DIC features 2 reconfigurable display themes: Sport and Touring.
1. Use the controls to display the Options menu. Press .
2. Select Display Themes.
3. Select the desired theme.
See Instruments and Controls in your Owner’s Manual.
Push to Talk
Press to answer an incoming call or to use natural voice recognition with the Bluetooth or OnStar® system.
Press and hold to activate Voice Pass-Thru (Siri Eyes Free or Voice Command) on a paired,
compatible cell phone.
End Call/Mute
Press to end or decline a call.
Press to mute/unmute the speakers.
+ – Volume
Press the switch up or down to adjust the volume.
Next/Previous Favorite Station
Press the top or bottom button to go to the next or previous favorite radio station or track.
See your Infotainment System Manual.
Page 11 of 20
11
Refer to your Owner’s Manual for important information about using the infotainment system while driving.
BUICK INFOTAINMENT SYSTEM
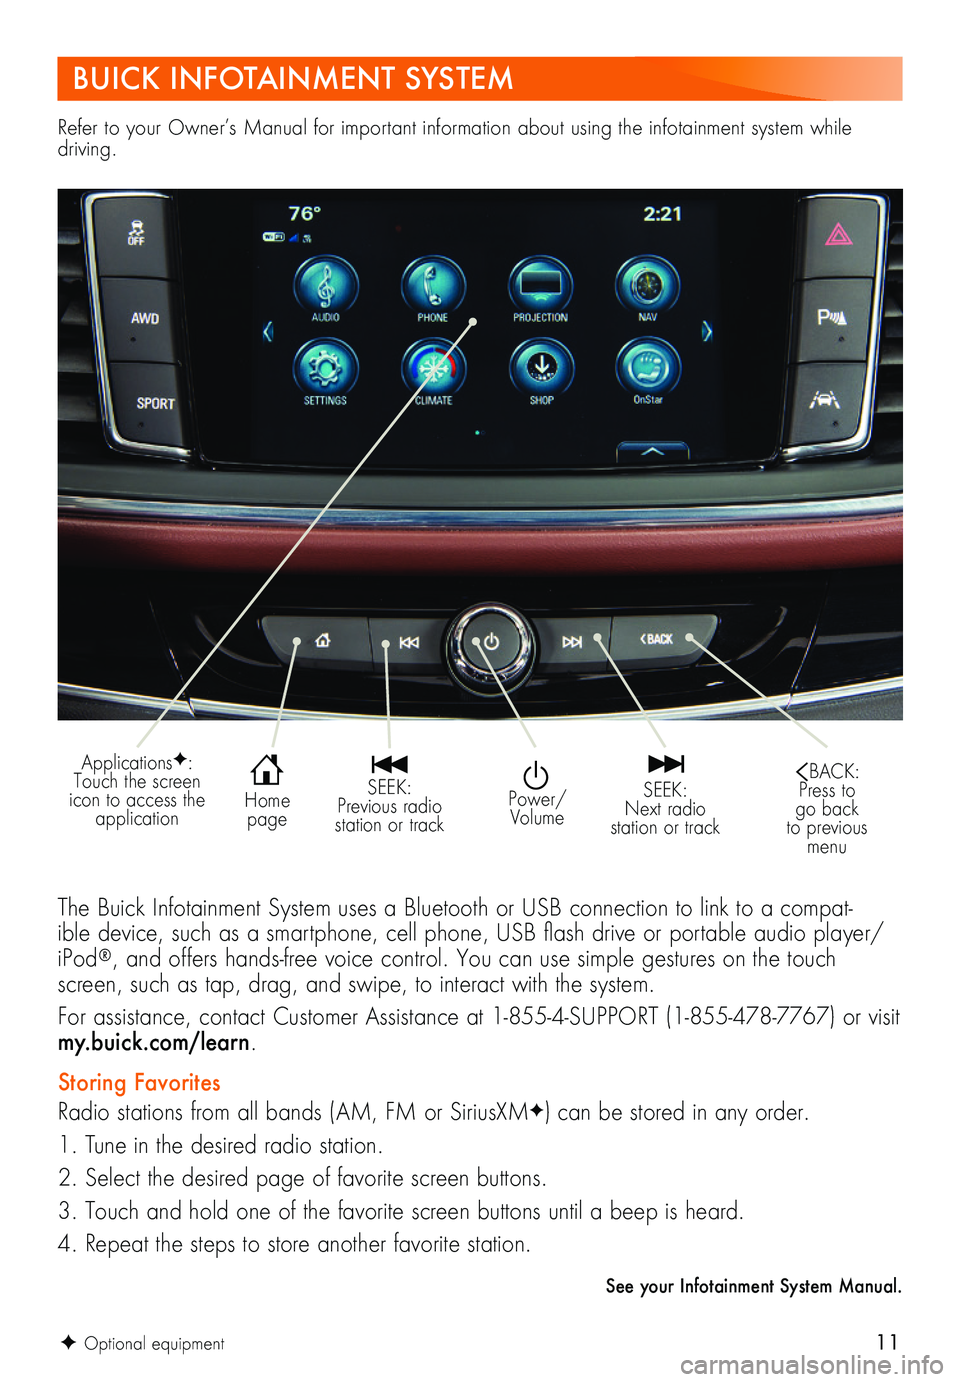
The Buick Infotainment System uses a Bluetooth or USB connection to link to a compat-ible device, such as a smartphone, cell phone, USB flash drive or portable audio player/iPod®, and offers hands-free voice control. You can use simple gestures on the touch screen, such as tap, drag, and swipe, to interact with the system.
For assistance, contact Customer Assistance at 1-855-4-SUPPORT (1-855-478-7767) or visit my.buick.com/learn.
Storing Favorites
Radio stations from all bands (AM, FM or SiriusXMF) can be stored in any order.
1. Tune in the desired radio station.
2. Select the desired page of favorite screen buttons.
3. Touch and hold one of the favorite screen buttons until a beep is heard.
4. Repeat the steps to store another favorite station.
See your Infotainment System Manual.
Power/Volume
SEEK: Previous radio station or track
SEEK: Next radio station or track
BACK: Press to go back to previous menu
Home page
ApplicationsF: Touch the screen icon to access the application
F Optional equipment
Page 12 of 20
12
BUICK INFOTAINMENT SYSTEM
Visit my.buick.com/learn for more information about the infotainment system.
Natural Voice Recognition
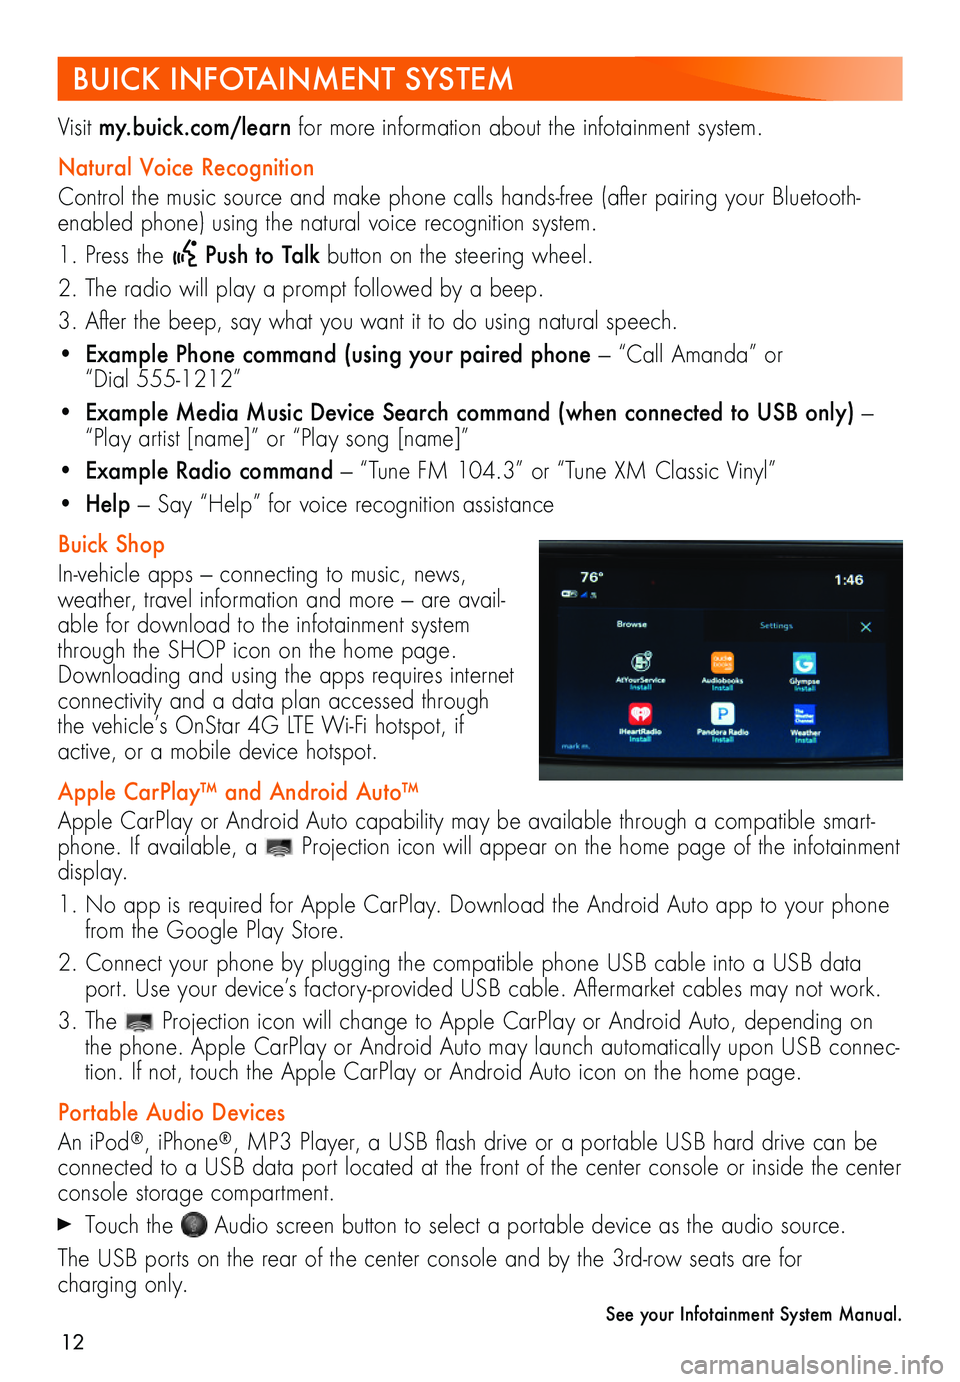
Control the music source and make phone calls hands-free (after pairing your Bluetooth-enabled phone) using the natural voice recognition system.
1. Press the Push to Talk button on the steering wheel.
2. The radio will play a prompt followed by a beep.
3. After the beep, say what you want it to do using natural speech.
• Example Phone command (using your paired phone — “Call Amanda” or “Dial 555-1212”
• Example Media Music Device Search command (when connected to USB only) — “Play artist [name]” or “Play song [name]”
• Example Radio command — “Tune FM 104.3” or “Tune XM Classic Vinyl”
• Help — Say “Help” for voice recognition assistance
Buick Shop
In-vehicle apps — connecting to music, news, weather, travel information and more — are avail-able for download to the infotainment system through the SHOP icon on the home page. Downloading and using the apps requires internet connectivity and a data plan accessed through the vehicle’s OnStar 4G LTE Wi-Fi hotspot, if active, or a mobile device hotspot.
Apple CarPlay™ and Android Auto™
Apple CarPlay or Android Auto capability may be available through a compatible smart-phone. If available, a Projection icon will appear on the home page of the infotainment display.
1. No app is required for Apple CarPlay. Download the Android Auto app to your phone from the Google Play Store.
2. Connect your phone by plugging the compatible phone USB cable into a USB data port. Use your device’s factory-provided USB cable. Aftermarket cables may not work.
3. The Projection icon will change to Apple CarPlay or Android Auto, depending on the phone. Apple CarPlay or Android Auto may launch automatically upon USB connec-tion. If not, touch the Apple CarPlay or Android Auto icon on the home page.
Portable Audio Devices
An iPod®, iPhone®, MP3 Player, a USB flash drive or a portable USB hard drive can be connected to a USB data port located at the front of the center console or inside the center console storage compartment.
Touch the Audio screen button to select a portable device as the audio source.
The USB ports on the rear of the center console and by the 3rd-row seats are for
charging only.
See your Infotainment System Manual.
Page 13 of 20
13
BLUETOOTH® SYSTEM
Refer to your Owner's Manual for important information about using the Bluetooth system while driving.
Before using a Bluetooth-enabled device in the vehicle, it must be paired with the in- vehicle Bluetooth system. The pairing process is disabled when the vehicle is moving. Not all
devices will support all functions. Visit my.buick.com/learn for more information.
Pair a Phone
1. To use voice recognition, press the Push to Talk button on the steering wheel; after the beep, say “Pair Phone.” To use the infotainment screen, select the Phone icon > Phones > Pair Device.
2. Start the pairing process on the phone. From your phone’s Bluetooth settings, select the name shown on the infotainment screen.
3. Confirm the codes that appear on the infotainment screen and the phone.
4. When pairing is complete, the phone screen is displayed. Your phone book may be downloaded depending on the phone.
See your Infotainment System Manual.
ONSTAR® WITH 4G LTE AND WI-FI®
WIRELESS CHARGING (AVENIR MODEL)
With OnStar 4G LTE and Wi-Fi, up to 7 devices (smartphones, tablets and laptops) can be connected to high-speed internet through the vehicle’s built-in Wi-Fi hotspot.
To retrieve the SSID and password for the hotspot, go to Settings > Wi-Fi; or press the OnStar Voice Command button on the overhead console, wait for the prompt, and then say “Wi-Fi settings.” The information will be displayed on the infotainment screen.
For assistance, press the blue OnStar button or call 1-888-4-ONSTAR (1-888-466-7827).
Note: See onstar.com for a detailed instruction guide, vehicle availability and system limitations.
See your Infotainment System Manual.
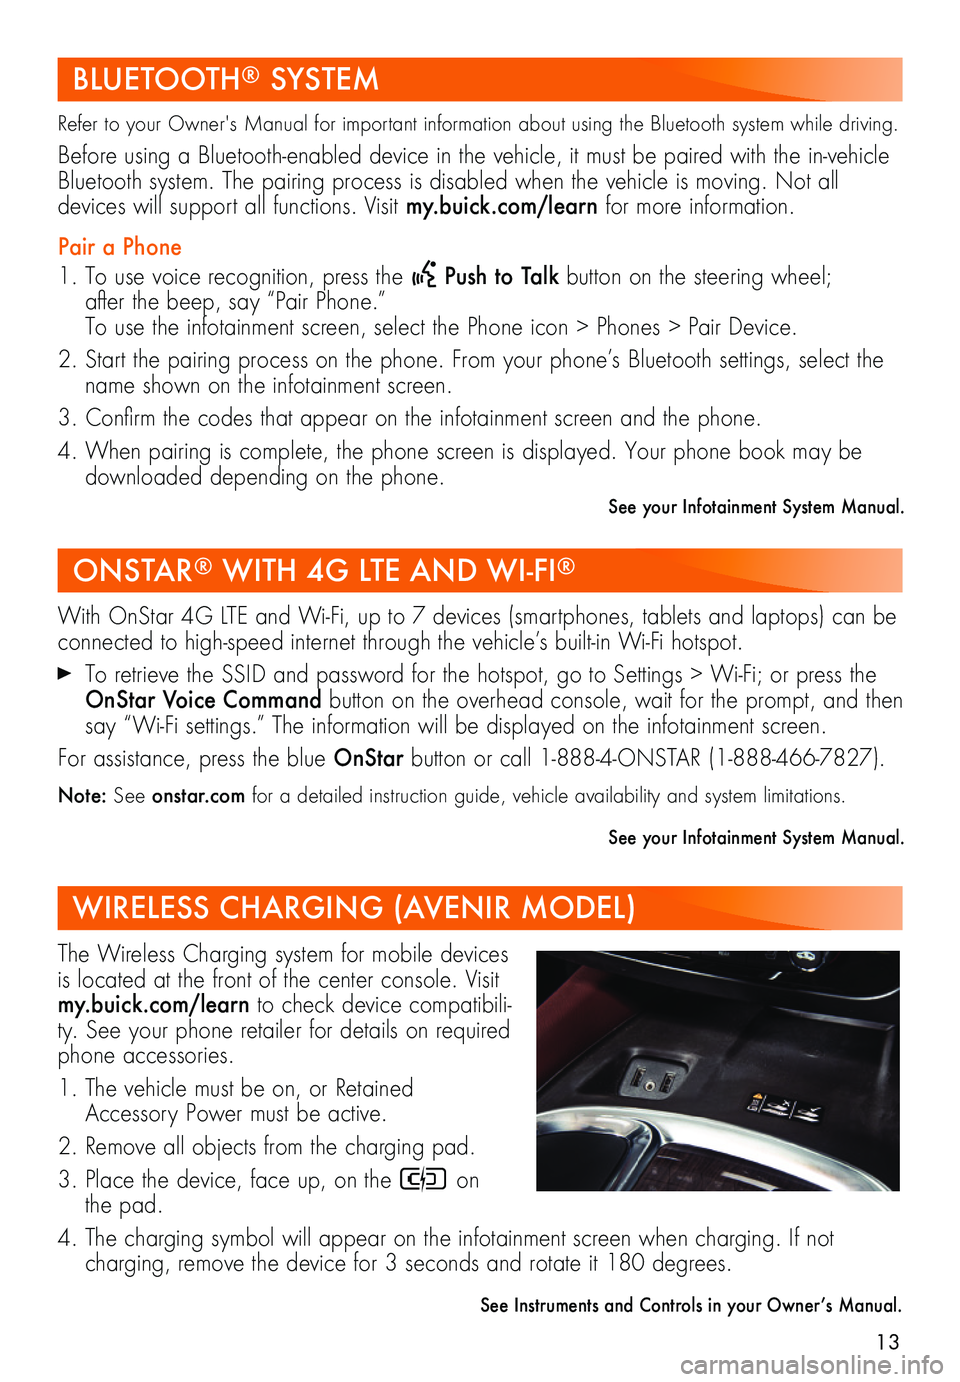
The Wireless Charging system for mobile devices is located at the front of the center console. Visit my.buick.com/learn to check device compatibili-ty. See your phone retailer for details on required phone accessories.
1. The vehicle must be on, or Retained Accessory Power must be active.
2. Remove all objects from the charging pad.
3. Place the device, face up, on the on the pad.
4. The charging symbol will appear on the infotainment screen when charging. If not
charging, remove the device for 3 seconds and rotate it 180 degrees.
See Instruments and Controls in your Owner’s Manual.
Page 14 of 20
14
VEHICLE PERSONALIZATION
SUNROOF/SUNSHADEF
EXTERIOR LIGHTING
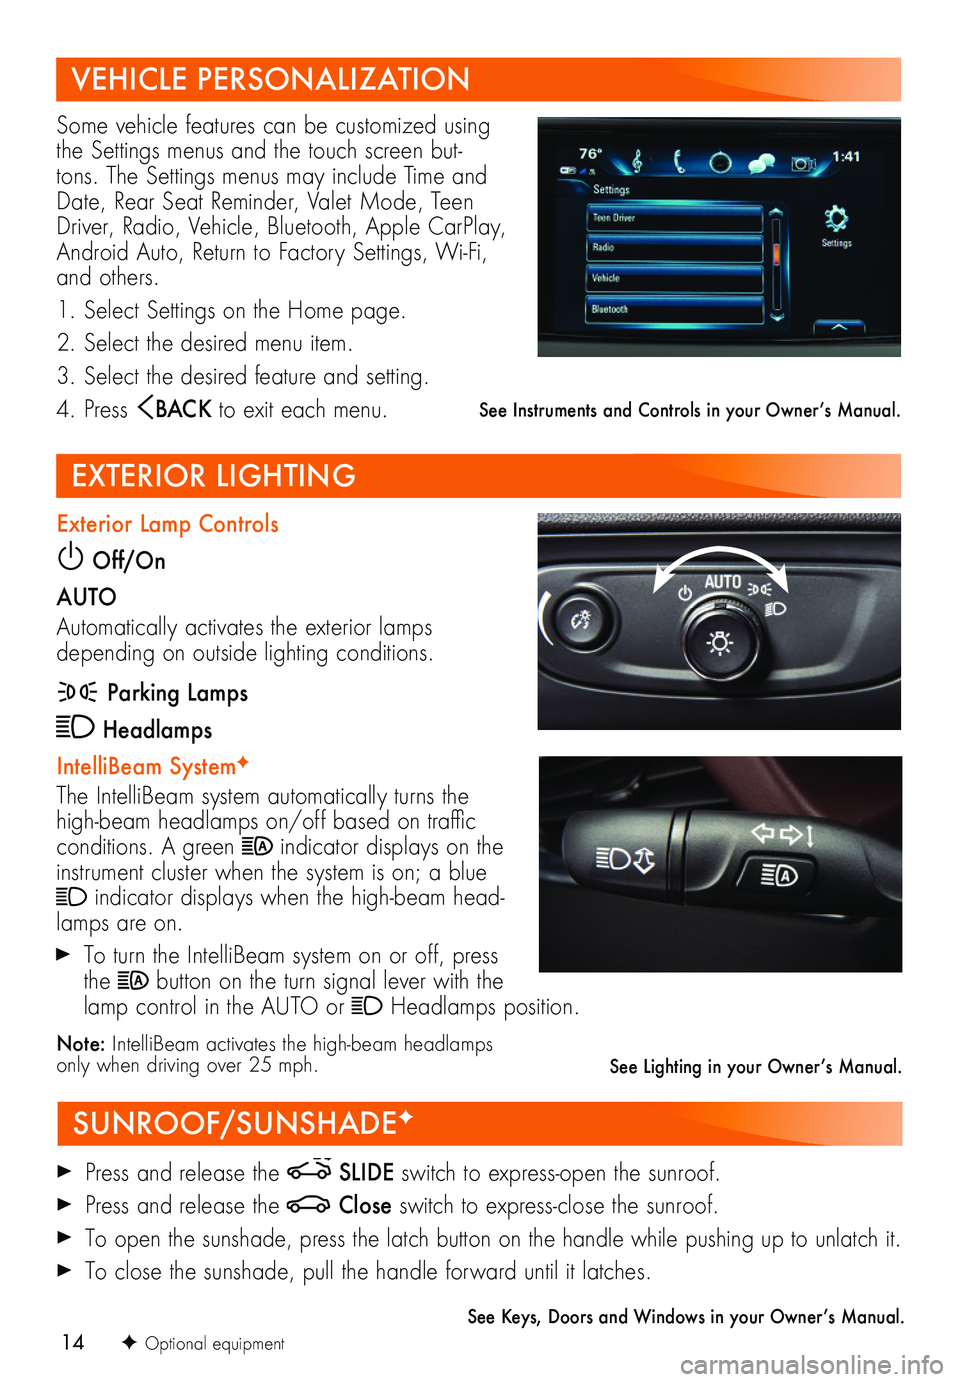
Some vehicle features can be customized using the Settings menus and the touch screen but-tons. The Settings menus may include Time and Date, Rear Seat Reminder, Valet Mode, Teen Driver, Radio, Vehicle, Bluetooth, Apple CarPlay, Android Auto, Return to Factory Settings, Wi-Fi, and others.
1. Select Settings on the Home page.
2. Select the desired menu item.
3. Select the desired feature and setting.
4. Press BAC K to exit each menu.
Press and release the SLIDE switch to express-open the sunroof.
Press and release the Close switch to express-close the sunroof.
To open the sunshade, press the latch button on the handle while pushing up to unlatch it.
To close the sunshade, pull the handle forward until it latches.
See Keys, Doors and Windows in your Owner’s Manual.
Exterior Lamp Controls
Off/On
AUTO
Automatically activates the exterior lamps depending on outside lighting conditions.
Parking Lamps
Headlamps
IntelliBeam SystemF
The IntelliBeam system automatically turns the high-beam headlamps on/off based on traffic conditions. A green indicator displays on the instrument cluster when the system is on; a blue indicator displays when the high-beam head-lamps are on.
To turn the IntelliBeam system on or off, press the button on the turn signal lever with the lamp control in the AUTO or Headlamps position.
Note: IntelliBeam activates the high-beam headlamps only when driving over 25 mph.
See Instruments and Controls in your Owner’s Manual.
F Optional equipment
See Lighting in your Owner’s Manual.
Page 15 of 20
15
AUTOMATIC CLIMATE CONTROLS
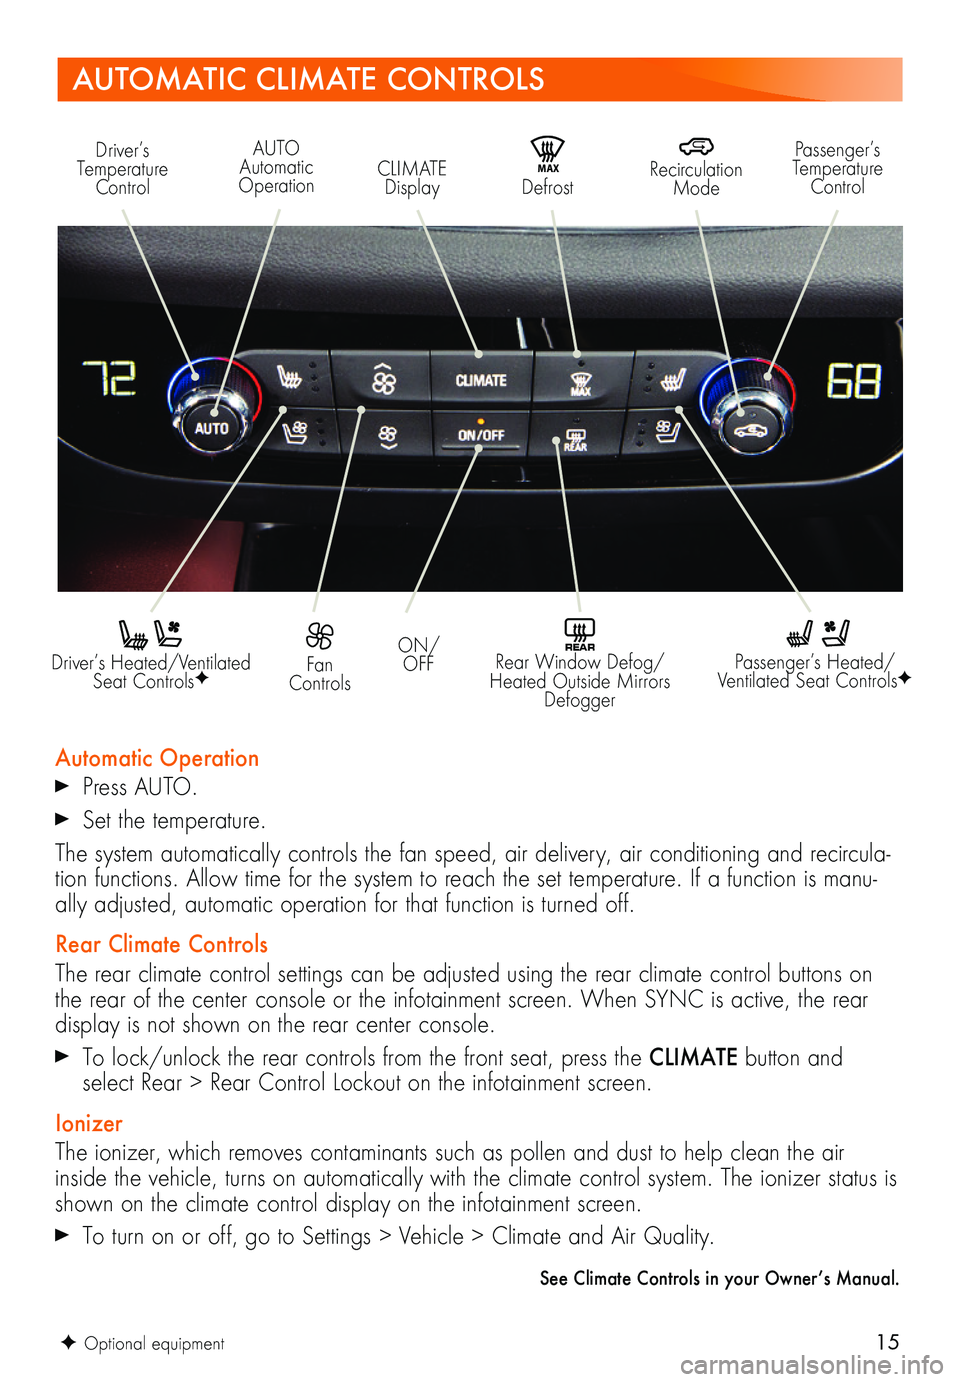
Driver’s Heated/Ventilated Seat ControlsF
Automatic Operation
Press AUTO.
Set the temperature.
The system automatically controls the fan speed, air delivery, air conditioning and recircula-tion functions. Allow time for the system to reach the set temperature. If a function is manu-ally adjusted, automatic operation for that function is turned off.
Rear Climate Controls
The rear climate control settings can be adjusted using the rear climate control buttons on the rear of the center console or the infotainment screen. When SYNC is active, the rear display is not shown on the rear center console.
To lock/unlock the rear controls from the front seat, press the CLIMATE button and select Rear > Rear Control Lockout on the infotainment screen.
Ionizer
The ionizer, which removes contaminants such as pollen and dust to help clean the air inside the vehicle, turns on automatically with the climate control system. The ionizer status is shown on the climate control display on the infotainment screen.
To turn on or off, go to Settings > Vehicle > Climate and Air Quality.
See Climate Controls in your Owner’s Manual.
Passenger’s Heated/Ventilated Seat ControlsF
Fan Controls
ON/OFF
Driver’s Temperature ControlMA X Defrost
Recirculation Mode
Passenger’s Temperature ControlCLIMATE Display
AUTO Automatic Operation
REAR Rear Window Defog/Heated Outside Mirrors Defogger
F Optional equipment
Page 16 of 20
16
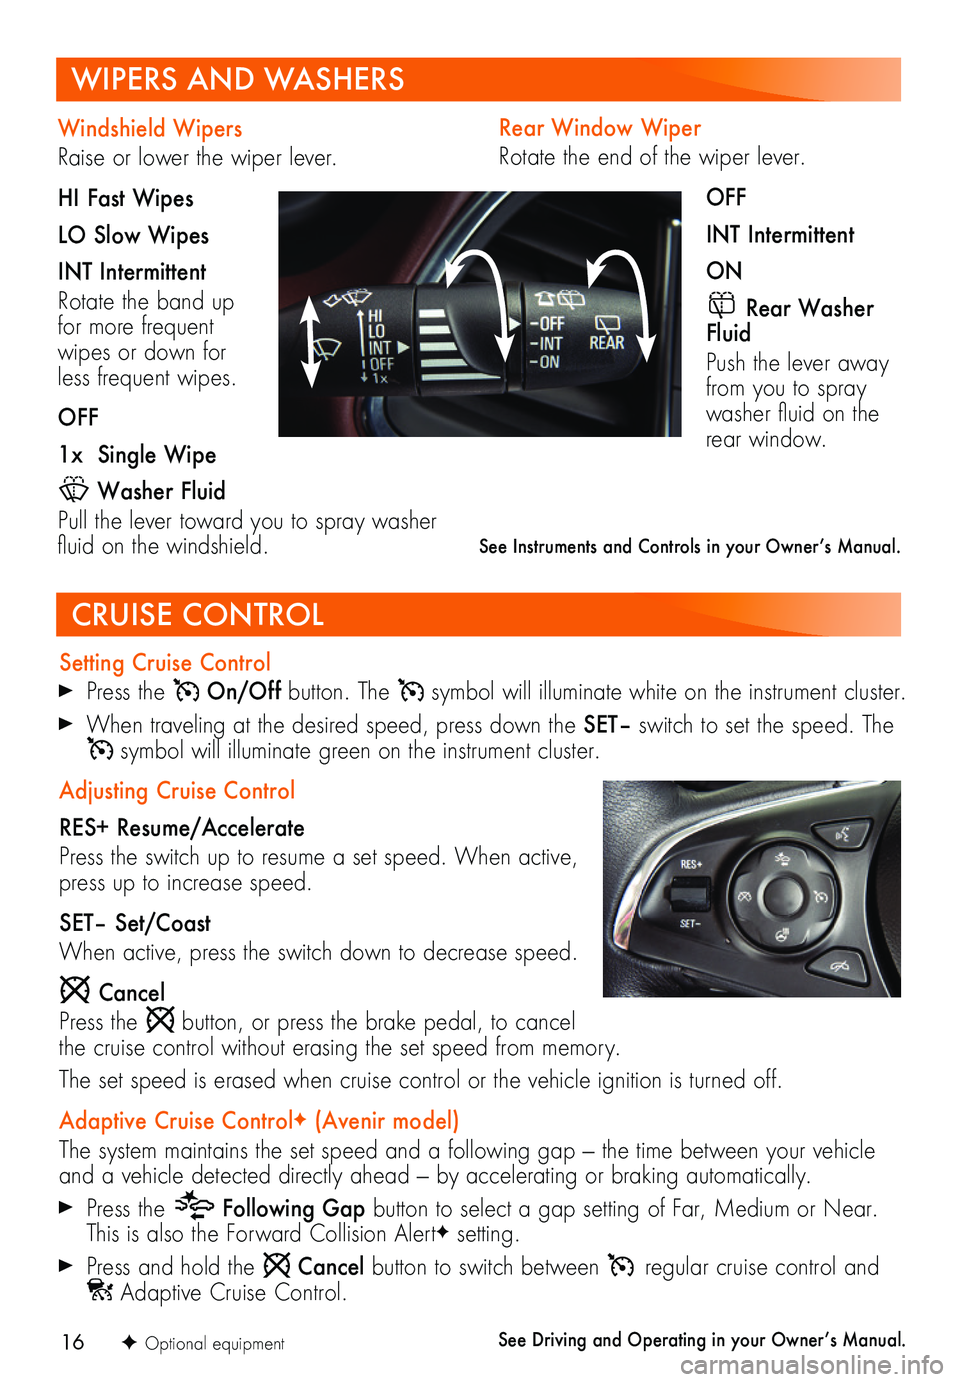
Rear Window Wiper
Rotate the end of the wiper lever.
OFF
INT Intermittent
ON
Rear Washer Fluid
Push the lever away from you to spray washer fluid on the rear window.
WIPERS AND WASHERS
CRUISE CONTROL
Setting Cruise Control
Press the On/Off button. The symbol will illuminate white on the instrument cluster.
When traveling at the desired speed, press down the SET– switch to set the speed. The symbol will illuminate green on the instrument cluster.
Adjusting Cruise Control
RES+ Resume/Accelerate
Press the switch up to resume a set speed. When active, press up to increase speed.
SET– Set/Coast
When active, press the switch down to decrease speed.
Cancel
Press the button, or press the brake pedal, to cancel the cruise control without erasing the set speed from memory.
The set speed is erased when cruise control or the vehicle ignition is turned off.
Adaptive Cruise ControlF (Avenir model)
The system maintains the set speed and a following gap — the time between your vehicle and a vehicle detected directly ahead — by accelerating or braking automatically.
Press the Following Gap button to select a gap setting of Far, Medium or Near. This is also the Forward Collision AlertF setting.
Press and hold the Cancel button to switch between regular cruise control and Adaptive Cruise Control.
See Driving and Operating in your Owner’s Manual.
Windshield Wipers
Raise or lower the wiper lever.
HI Fast Wipes
LO Slow Wipes
INT Intermittent
Rotate the band up for more frequent wipes or down for less frequent wipes.
OFF
1x Single Wipe
Washer Fluid
Pull the lever toward you to spray washer fluid on the windshield. See Instruments and Controls in your Owner’s Manual.
F Optional equipment