2018 AUDI Q3 belt
[x] Cancel search: beltPage 150 of 230
Child safety
Location
;
a: ex, a,
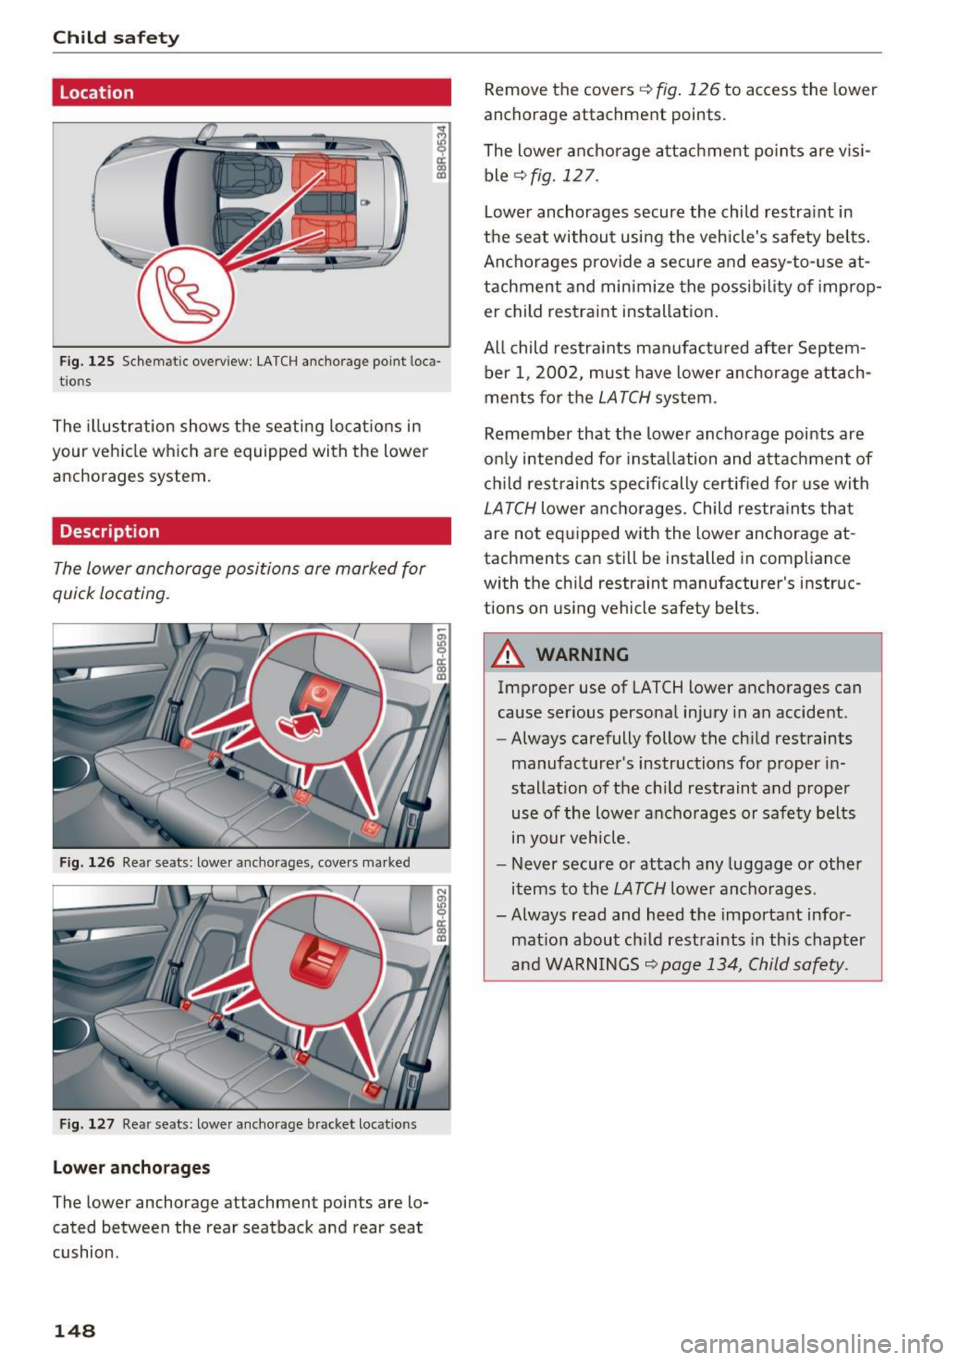
Fig. 125 Schem atic overv iew : LA TCH anchorage point loca
tio ns
The illustration shows the seating locat ions in
your vehicle w hich are equipped with the lower
anchorages system.
Description
The lower anchorage positions are marked for
quick locating.
F ig. 126 Re ar s eats: lowe r an cho rages, covers ma rked
F ig . 127 Re ar seats: lowe r an cho rage b racket locatio ns
Lowe r ancho rage s
The lower anchorage attachment points are lo
cated between the rear seatback and rear seat
cushion .
148
Remove the covers c::> fig. 126 to access the lower
anchorage attachment po ints.
The lower anchorage a ttachment po in ts are v is i
ble
c::> fig. 12 7 .
Lower anchorages secure the child restra int in
the seat without using the vehicle's safety bel ts.
Ancho rages prov ide a secure and easy-to- use at
tachment and minimize the possib ility of improp
er child restraint installat ion .
All child restraints manufact ured after Septem
ber 1 , 2002, must have lower anchorage attach
ments for t he
LATCH system.
Remember that the lower ancho rage points are
on ly intended for insta llation and attachment of
ch ild rest raints spec ifically certif ied for use wi th
LATCH lower anchorages. Child restraints that
are not eq uipped with the lower anchorage at
tachments can still be installed in compliance
with the chi ld restraint manufacturer's instruc
tions on us ing vehicle safety belts.
A WARNING
Improper use of LATCH lower anchorages can
cause ser ious persona l injury in an accide nt.
- Always carefully follow the ch ild restraints
manufacturer's instructions for proper in
stallation of the child restraint and proper
use of the lower ancho rages or safety belts
in your vehicle.
- Never secure or attach any luggage or othe r
items to the
LATCH lower anchorages.
-Always read and heed the important infor mat ion about c hild restraints in this chapter
and WARN INGS
c::> page 134, Child safety .
Page 151 of 230
a
co
...... N r--. N
'"' 0 0 ::, co
Installing a child restraint with LATCH
lower anchorages
Whenever you install a child restraint always fol
low the child restraint manufacturer's instruc
tions.
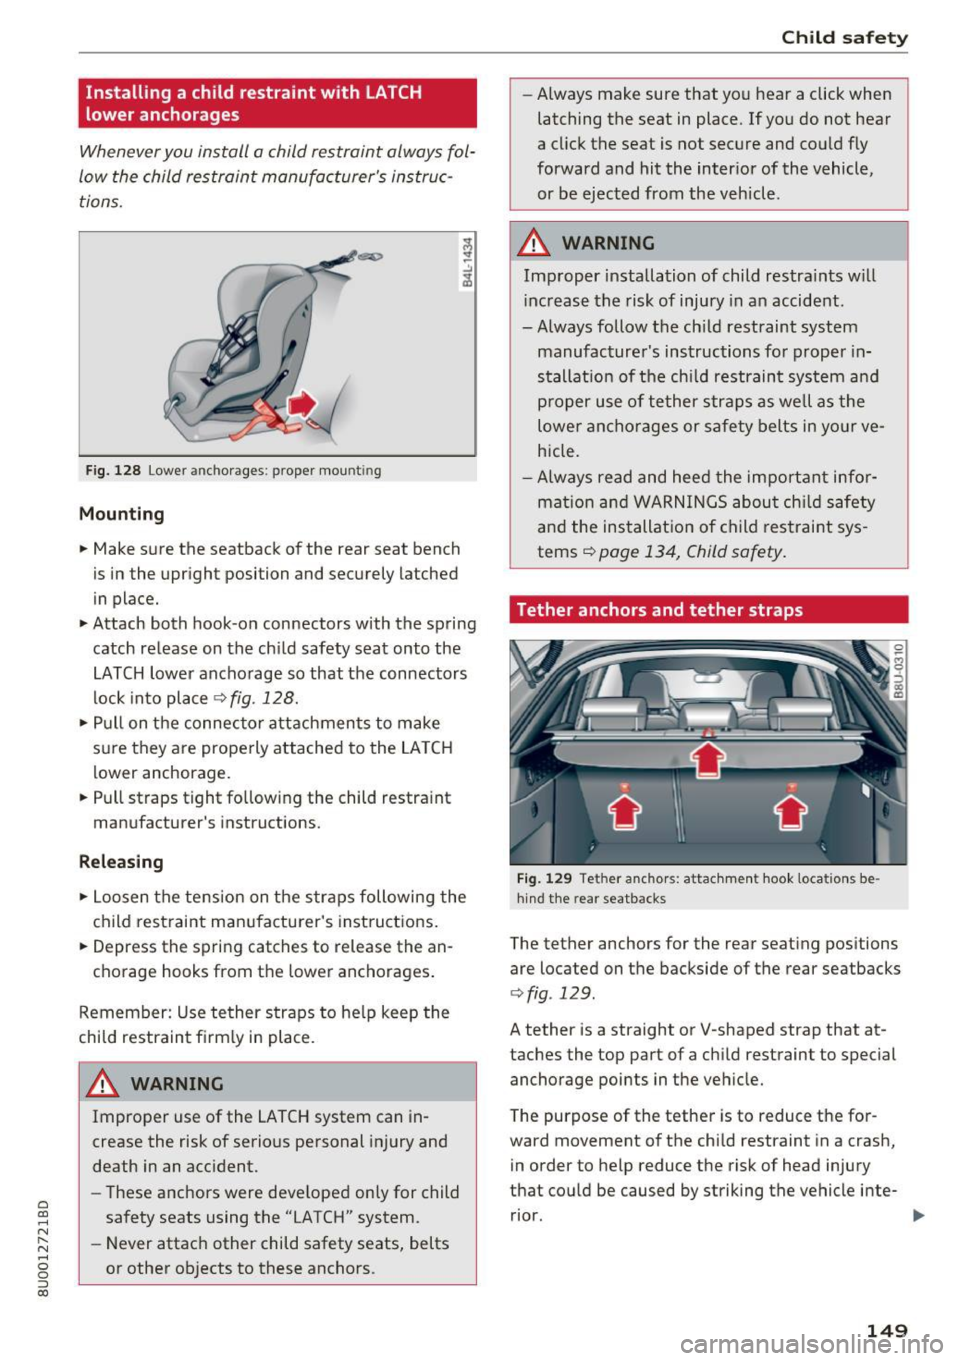
Fig. 128 Lower anchorages: proper mount ing
Mounting
.,. Make sure the seatback of the rear seat bench
is in the upright position and securely latched
in place.
.,. Attach both hook-on connectors with the spring
catch release on the child safety seat onto the
LATCH lower anchorage so that the connectors
lock into place
¢ fig. 128 .
.,. Pull on the connector attachments to make
sure they are properly attached to the LA TC H
lower anchorage .
.,. Pull straps tight fo llowing the child restraint
manufacturer's instructions.
R ele asing
.,. Loosen the tension on the straps following the
child restraint manufacturer's instructions.
.,. Depress the spring catches to release the an
chorage hooks from the lower anchorages .
Remember: Use tether straps to he lp keep the
child restraint firmly in place.
A WARNING
Improper use of the LATCH system can in
crease the risk of serious personal injury and
death in an accident.
- These anchors were deve loped only for child
safety seats using the "LATCH" system.
- Never attach other child safety seats, belts
or other objects to these anchors.
Ch ild sa fety
- Always make sure that you hear a click when
latching the seat in place . If yo u do not hear
a cl ick the seat is not secure and could fly
forward and hit the inter ior of the vehicle,
or be ejected from the veh icle.
A WARNING
-Improper installation of child restra ints w ill
i ncrease the risk of injury in an accident.
-Always follow the ch ild restraint system
manufacturer's instructions for proper in
stallat ion of the chi ld restraint system a nd
p roper use of tether straps as well as the
lowe r ancho rages or safety belts in yo ur
ve
hicle.
- Always read and heed the important info r
mat ion and WARN INGS abou t ch ild safety
a nd the installat ion of child restraint sys
tems¢
page 134, Child safety.
Tether anchors and tether straps
Fig. 129 Tether ancho rs: attac hmen t hook locatio ns be
hind the rear sea tbacks
The tether anchors for the rear seating positions
are located on the backside of the rear seatbacks
¢ fig . 129 .
A tether is a straight or V-shaped strap that at
taches the top part of a child restraint to special
anchorage points in the veh icle.
T he purpose of the tether is to reduce the for
ward movement of the chi ld restraint in a crash,
in order to help reduce the risk of head injury
that could be caused by striking the vehicle inte-
rior.
liJ,
149
Page 152 of 230
Child safety
Forward facing child restraints manufactured af
ter September 1, 1999, are required by U.S. fed
eral regulations to comply with new child head
movement performance requirements. These
new performance requirements make a tether
necessary on most new child safety seats.
A WARNING
Improper installation of child restraints will
increase the risk of injury and death in a
crash.
- Always follow the instructions provided by
the manufacturer of the child restraint you
intend to install in your Audi.
- Improper use of child restraint anchors (in
cluding tether anchors) can lead to injury in
a collision. The anchors are designed to
withstand only those loads imposed by cor
rectly fitted child restraints.
- Never mount two child restraint systems on
one LATCH lower anchor point.
- Never attach two child restraint systems to
one tether strap or tether anchorage.
- Never attach a tether strap to a tie-down
hook in the luggage compartment.
- Never use child restraint tether anchorages
to secure safety belts or other kinds of occu pant restraints.
- Never secure or attach any luggage or other
items to the LATCH lower anchorages or to
the tether anchors.
- If a tether or other strap is used to attach a
child restraint to the front passenger seat,
make sure that it is not so tight, that it
causes the weight-sensing mat to measure
more weight than is actually on the seat.
- The heavier weight registered can make the Advanced Airbag System work as though an
adult were on the seat and deploy the Ad
vanced Airbag when it must be suppressed
caus ing serious or even fatal injury to the
child .
- If you must install a rearward facing child
safety seat on the front passenger seat be
cause of exceptional circumstances and the
PASSENGER AIR BAG OFF light does not
come on and stay on, immediately install
the rear-facing child safety seat in a rear
150
seating position and have the airbag system
inspected by your Audi dealer.
Installing the upper tether strap on the
anchorage
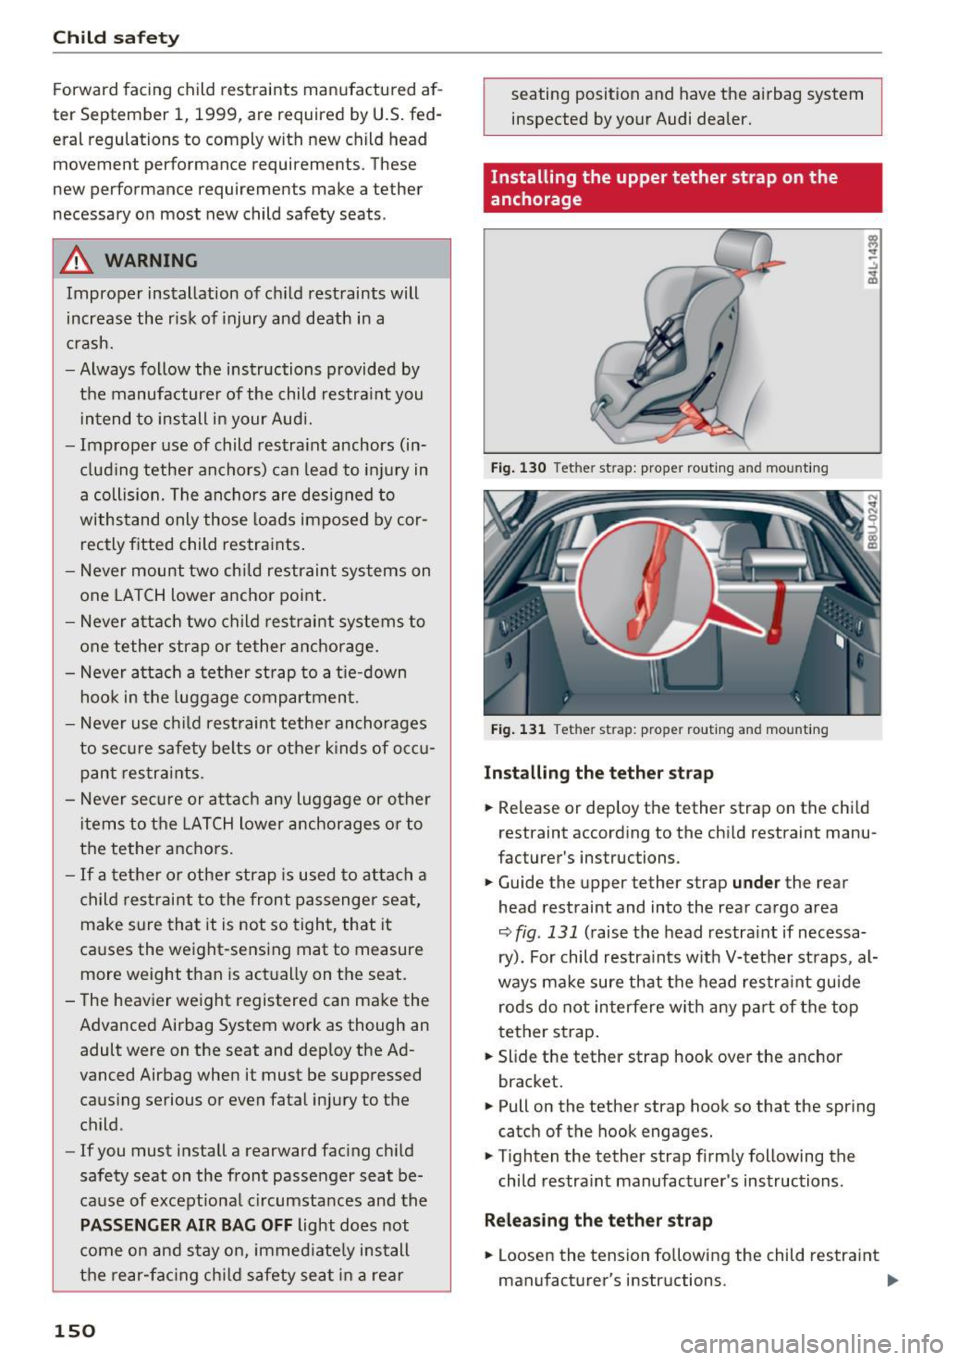
Fig. 130 Tether strap: proper routing and mounting
Fig. 131 Tether strap: proper rout ing and mount ing
Installing the tether strap
.,. Release or deploy the tether strap on the child
restraint according to the chi ld restraint manu
facturer's instructions.
.,. Guide the upper tether strap
under the rear
head restraint and into the rear cargo area
r:::;, fig. 131 (raise the head restraint if necessa
ry). For child restraints with V-tether straps, al
ways make sure that the head restraint guide
rods do not interfere with any part of the top
tether strap.
.,. Slide the tether strap hook over the anchor
bracket.
.,. Pull on the tether strap hook so that the spring
catch of the hook engages .
.,. Tighten the tether strap f irmly following the
child restraint manufacturer's instructions.
Releasing the tether strap
.,. Loosen the tension following the child restraint
manufacturer's instructions.
II>
Page 153 of 230
0 co ......
"' ,....
"' ...... 0 0 :::,
00
~ Depress the spring catch on the hook and re
lease it from the anchorage.
@ Note
If you leave the ch ild restraint with the tether
strap firmly installed for several days, this
could leave a mark on the upholstery on the
seat cushion and backrest in the area where
the tether strap was installed. The upholstery
would also be permanently stretched around the tether strap . This applies especially to
leather seats .
Using tether straps on rearward-facing
child restraints
Current ly, few rear-facing chi ld restraint systems
come with a tether. Please read and heed the
child restraint system manufacturer's instruc
tions carefully to determine how to properly in
stall the tether.
A WARNING
A child in a rearward-facing child safety seat
installed on the front passenger seat w ill be
ser iously injured and can be killed if the front
airbag inflates -even w ith an Advanced Ai rbag
System.
- T he inflating airbag will hit the child safety
seat or infant carrier with great force and
will smash the child safety seat and child
against the backrest, center armrest, or
door.
- A tight tether or other strap on a rearward
f acing child restraint attached to the front
passenger seat can put too much pressure
on the weight-mat in the seat and register a
heavier weight in the Advanced Airbag Sys
tem. The heav ier weight registered can
make the system work as though an adult
were on the seat and deploy the Advanced
Airbag when it must be supp ressed causing
serious or even fatal injury to the child.
-If you must install a rearward facing ch ild
safety seat on the front passenger seat be
caus e of exceptiona l circumstances and the
PASSENGER AIR BAG OFF light does not
come on and stay on, immed iate ly install
Child safety
the rear-facing child safety seat in a rear
seating position and have the airbag system
inspected by your Audi dealer.
Additional information
Sources of information about child restraints and their use
There are a number of sources of additional in
formation about child restraint se lection, instal
lation and use :
NH TSA advises that the best child safety seat is
the one that fits your child and fits in your vehi
cle, and that you will use correctly and consis
tent ly.
Try before you buy!
U.S National Highway Traffic Safety Administra
tion
T el.: 1-888 -327-4236 ( TTY : 1-800-424-9153)
http:/ /www.nhtsa.gov
http:/ /www.safercar.gov
National SAFE KIDS Campaign
Tel.: (202) 662-0600
http:/ /www.sa fekids .org
Safety BeltSafe U.S .A
T el.: (800) 745-SAFE (E nglish)
Tel.: (800) 747-SANO (Spanish)
http:/ /www.carseat.org
Transport Canada Information Centre
T el.: 1-800 -333-0371 or call 1-613-998-8616 if
you are in the Ottawa area
http://www.tc.gc.ca/ eng/roadsafety/men u. htm
Audi Customer Relations
Tel.: (800) 822-2834
151
Page 158 of 230

Checking and Filling
-Never open the cap on the coolant expan
sion tank when the engine is warm. The
cooling system is under pressure.
- To protect your face, hands, and arms from
hot steam or coolant, cover the cap with a
large cloth when opening.
- Do not remove the engine cover under any circumstances. This increases the risk of
burns.
- If tests need to be performed with the en
gine running, there is additional danger due
to moving components (such as the ribbed belt, alternator and radiator fan) and from
the high-voltage ignition system.
- Do not under any circumstances give gas in
advertently (for example, by hand from the
engine compartment) if the vehicle is sta
tionary but the engine is running and a gear
is engaged. Otherwise, the vehicle will start
to move immediately and this could result
in an accident.
- Pay attention to the following warnings list
ed when work on the fuel system or on the
electrical equipment is required.
- Do not smoke .
- Never work near open flames.
- Always have a working fire extinguisher
nearby.
- All work on the battery or electrical system
in your vehicle can result in injuries, chemi
cal burns, accidents or burns. Because of
this, all work must be performed
only by an
authorized Audi dealer or authorized Audi
Service Facility.
- To reduce the risk of electric shock and in
jury, never touch the following components when the engine is running or is being start
ed:
- Ignition cable
- Other components in the electronic high-
voltage ignition system
- If you must check or perform work on the
engine while it is running:
- Set the parking brake and place the selec
tor lever in the P (park) position first .
- Always proceed with extreme caution so
that clothing, jewelry or long hair do not
156
become caught in the radiator fan, fan
belt or other moving components or do
not come into contact with hot compo
nents. Tie back long hair before beginning
work and do not wear clothing that can
hang down into the engine .
- Limit your exposure to exhaust and chemi cals to as short a time as possible
¢ &, .
A WARNING
California Proposition 65 Warning:
- Engi ne exhaust, some of its constituents,
and certain vehicle components contain or
emit chemicals known to the State of Cali
fornia to cause cancer and birth defects and
reproductive harm . In addition, certain flu
ids contained in vehicles and certain prod
ucts of component wear contain or emit
chemicals known to the State of California
to cause cancer and birth defects or other reproductive harm .
- Battery posts, terminals and related acces
sories contain lead and lead compounds,
chemicals known to the State of California
to cause cancer and reproductive harms.
Wash hands after handling.
@ Note
When filling fluids, be sure not to mix the flu
ids up. Otherwise severe malfunctions and en
gine damage will occur .
@ For the sake of the environment
You should regularly check the ground under
your vehicle in order to detect leaks quickly. If there are visible spots from oil or other fluids,
bring your vehicle to an authorized Audi deal
er or authorized Audi Service Facility to be
checked.
Page 189 of 230
0 co .-I
"' ,....
"' ...... 0 0 :::,
00
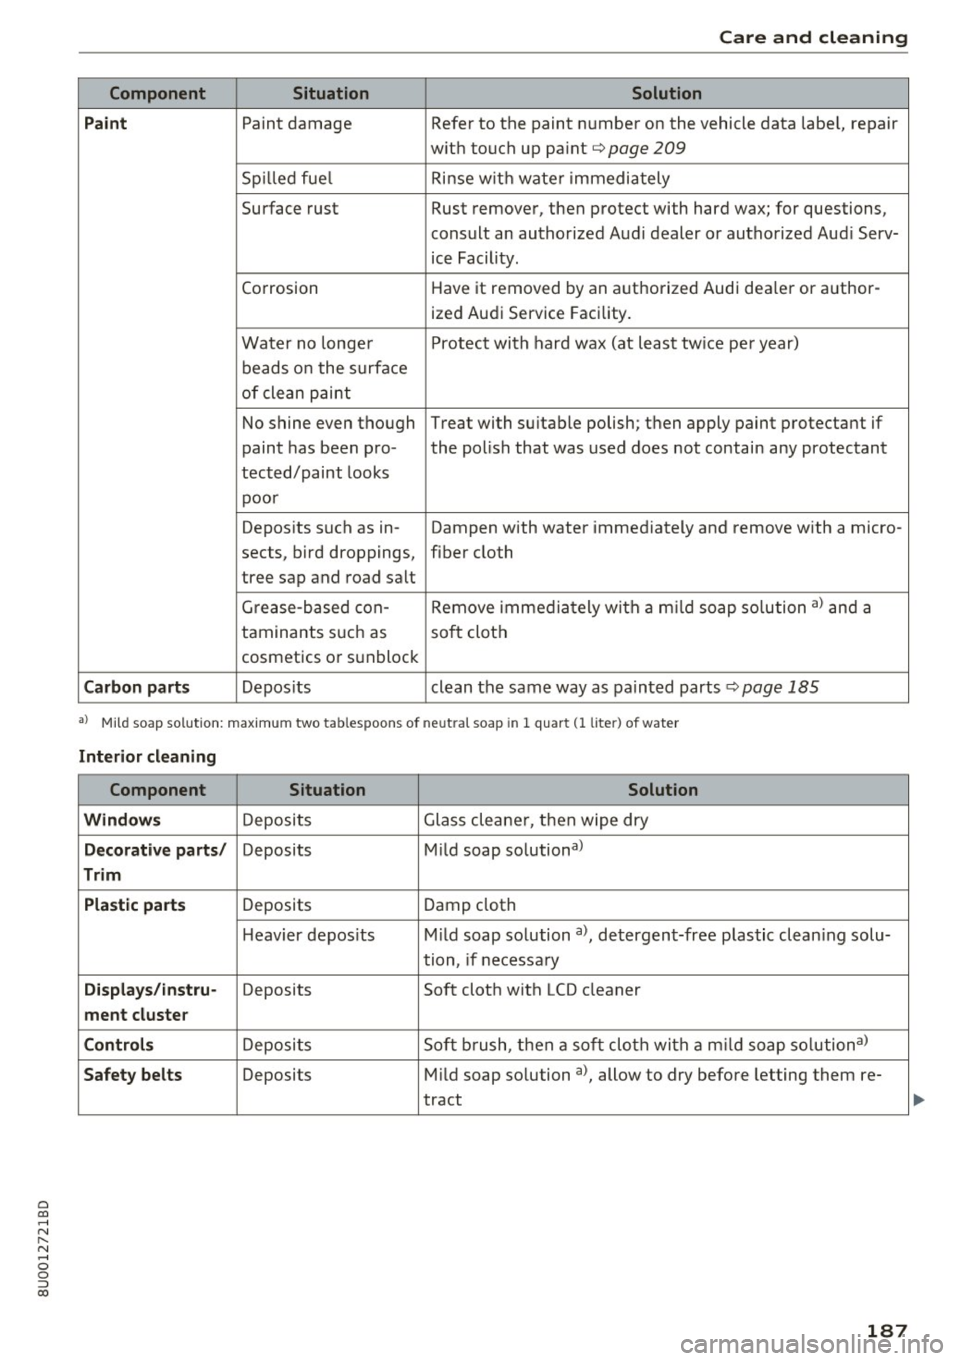
Care and cleaning
Component Situation Solution
Paint
Paint damage Refer to the paint number on the vehicle data label, repair
w ith touch up pa int
c;,poge 209
Spilled fuel Rinse with wate r immediately
Surface rust Rust remover, then protect with hard wax; for questions,
consult an authorized Audi dealer or authorized Aud i Serv-
ice Facility.
Corrosion Have
it removed by an authorized Audi dea ler or author-
ized Audi Service Facility.
Water no longer Protect with hard wax (at least twice per year)
beads on the surface
of clean paint
No shine even though Treat with su itable polish; then apply paint protectant if
paint has been pro- the polish that was used does not contain any protectant
tected/paint looks poor
Deposits such as in -Dampen with water immediately and remove w ith a micro-
sects, bird droppings, fiber clloth
tree sap and road salt
Grease-based con- Remove
immediat ely with a mild soap so lution
al and a
taminants such as soft cloth
cosmetics or sunblock
Carbon parts Depos its clean the same way as painted parts ¢page 185
a) Mi ld soap solution: maximum two tab lespoons of neu tral soap in 1 quart (1 lite r) of water
Interior cleaning
Component Situation Solution
Windows
Deposits Glass cleaner, then wipe dry
Decorative parts/ Deposits Mild soap solutiona>
Trim
Plastic parts
Deposits Damp cloth
He avier deposits Mild soap solution a), detergent-free plastic clean ing solu-
tion, if necessa ry
Oisplays/instru -Deposits Soft
cloth with LCD cleaner
ment cluster
Controls
Deposits Soft brush, then a soft
cloth with a mild soap solutiona>
Safety belts Deposits Mild
soap solution al, allow to dry before letting them re-
tract
187
Page 191 of 230

0 co ......
"' ,....
"' ...... 0 0 :::,
00
avoid scratches, move the scraper only in
one direction and not back and forth.
- Never remove snow or ice from door win
dows and mirrors using warm or hot water
because this could cause cracks to form.
- To avoid damage to the rear window de fogger, do not apply any stickers on the
heating wires on the inside of the window.
- Decorative part .s/trim
- Never use chrome care or cleaning prod-
ucts .
- Paint
- To reduce the risk of scratches, the vehicle
must be free of dirt and dust before pol
ishing or waxing.
- To prevent paint damage, do not polish or
wax the vehicle in direct sunlight .
- To reduce the risk of paint damage, do not
polish away rust spots .
- Remove cosmetics and sunscreen immedi
ately- these could damage the paint.
- Displays/instrument cluster
- The displays/instrument cluster and the
trim surrounding them must not be
cleaned with dry cleaning methods be
cause they could be scratched.
- Make sure that the instrument cluster is
switched off and has cooled off before
cleaning it.
- Make sure no fluids enter the spaces be
tween the instrument cluster and the
trim, because that could cause damage.
- Controls
- Make sure that no fluids enter the con-
trols, because this could cause damage.
- Safety belts
- Do not remove the safety belts to clean
them.
- Never clean safety belts or their compo
nents chemically or with corrosive fluids
or solvents and never allow sharp objects
to come into contact with the safety belts.
This could cause damage to the belt web bing.
- If there is damage to the webbing, the
connections, the retractors or the buckles,
Care and cleaning
have them replaced by an authorized Audi
dealer or authorized Audi Service Facility.
- Textiles/artificial leather/ Alcantara
- Never treat artificial leather/Alcantara
with leather care products, solvents, floor
polish, shoe polish, spot remove or similar
products.
- Have a specialist remove stubborn stains
to prevent damage.
- Never use steam cleaners, brushes, hard
sponges, etc . when cleaning.
- Do not turn on the seat heating* to dry the
seat .
- Objects with sharp edges, such as zippers
or rivets on clothing or belts, can cause
damage to the surface.
- Open hook and loop fasteners, for exam
ple on clothing, can damage seat covers .
Make sure hook and loop fasteners are
closed .
- Natural leather
- Never treat leather with solvents, floor
polish, shoe polish, spot remover or simi
lar products.
- Objects with sharp edges, such as zippers
or rivets on clothing or belts, can cause
damage to the surface.
- Never use steam cleaners, brushes, hard
sponges, etc. when cleaning.
- Do not turn on the seat heating* to dry the
seat.
- To help prevent the leather from fading,
do not leave the vehicle in direct sunlight
for long periods of time. If leaving the ve
hicle parked for long periods of time, you
should cover the leather to protect it from
direct sunlight.
(D Tips
- Insects are easier to remove from paint that
has been freshly waxed.
- Regular waxing can prevent rust spots from
forming.
189
Page 218 of 230

Index
A
A/C (automatic climate control system) 54
A/C (manual cl imate control system) . . . . . . 52
ABS
refer to Anti-lock braking system . . . . . . . . 89
Accessories .. .. .. ............. .... 44, 214
Adaptive dampers. . . . . . . . . . . . . . . . . . . . . . 81
Adaptive light . . . . . . . . . . . . . . . . . . . . . . . . . 81
also refer to Audi adaptive light . . . . . . . . . 16
Addit ional accessories . . . . . . . . . . . . . . . . . 214
Adjusting the air distribution Automatic climate control system . . . . . . . 55
Manual climate control system . . . . . . . . . . S2
Adjusting the air vents Automatic climate control system . . . . . . . S5
Manual climate control system . . . . . . . . . . 52
Adjusting the center console lighting . . . . . . 3S
Adjusting the temperature
H eating/ventilat ion system and manual cli-
mate control system . . . . . . . . . . . . . . . . . . 52
Advanced key
refer to Convenience key . . . . . . . . . . . . . . . 61
Airbag . . . . . . . . . . . . . . . . . . . . . . . . . . . . . . 114
Airbag system . . . . . . . . . . . . . . . . . . . . . . . . 129
Advanced Airbag System . . . . . . . . . . . . . . 118
Advanced Airbag System components . . . 120
Care . . . . . . . . . . . . . . . . . . . . . . . . . . . . . . 127
Children . . . . . . . . . . . . . . . . . . . . . . . . . . . 135
Child restraints . . . . . . . . . . . . . . . . . . . . . 136
Components (front airbags) . . . . . . . . . . . 120
Danger of fitting a child safety seat on the
front passenger seat . . . . . . . . . . . . . . . . . 115
Disposal . . . . . . . . . . . . . . . . . . . . . . . . . . . 127
Front air bags . ............... .... .. . 118
How do the front airbags work? . . . . . . . . 122
H ow many airbags does my vehicle have? 120
How the Advanced Airbag System compo-
nents work together . . . . . . . . . . . . . . . . . 122
Important information . . . . . . . . . . . . . . . 114
Indicator light . . . . . . . . . . . . . . . . . . . . . . 124
Monitoring . . . . . . . . . . . . . . . . . . . . . . . . . 124
PASSENGER AIR BAG OFF light . . . . . . . . . 125
Repairs . . . . . . . . . . . . . . . . . . . . . . . . . . . . 127
Safety instructions . . . . . . . . . . . . . . . . . . . 126
Side airbags . . . . . . . . . . . . . . . . . . . . . . . . 128
Side curtain airbags . . . . . . . . . . . . . . . . . . 131
216
Weight-sensing mat . . . . . . . . . . . . . . . . . 136
When must the system be inspected? . . . 124
Air pressure (tires) . . . . . . . . . . . . . . . . . . . . 176
Air pressure (tire) . . . . . . . . . . . . . . . . . . . . . 183
All season tires . . . . . . . . . . . . . . . . . . . . . . . 181
All weather lights . . . . . . . . . . . . . . . . . . . . . . 33
All wheel drive . . . . . . . . . . . . . . . . . . . . . . . . 93
Ant i-freeze
Windshield washer system . . . . . . . . . . . . 165
Anti -lock braking system . . . . . . . . . . . . . . . . 89
Anti-Slip Regulation . . . . . . . . . . . . . . . . . . . . 89
Armrest.... .... .. .. .. ............. ... 43
ASR
refer to Anti-Slip Regulation . . . . . . . . . . . . 89
Audi adaptive light . . . . . . . . . . . . . . . . . . . . . 16
Audi drive select . . . . . . . . . . . . . . . . . . . . . . . 80
Audi Service Repair Manuals and Literature 212
Audi side assist . . . . . . . . . . . . . . . . . . . . . . . . 78
Adjusting the brightness . . . . . . . . . . . . . . . 80
Cleaning the sensors . . . . . . . . . . . . . . . . . 186
Sensor range . . . . . . . . . . . . . . . . . . . . . . . . 78
Switching on and off . . . . . . . . . . . . . . . . . . 80
AUTO Automatic climate control system . . . . . . . 54
Automatic headlights . . . . . . . . . . . . . . . . . 33
Auto Lock (central locking system) . . . . . . . . 22
Automatic belt retractor . . . . . . . . . . . . . . . 109
Automatic climate control
refer to Climate control system
(automatic) . . . . . . . . . . . . . . . . . . . . . . 51, 54
Automat ic climate control system
refer to Climate control system
(automatic) . . . . . . . . . . . . . . . . . . . . . . 51, 54
Automat ic transmission . . . . . . . . . . . . . . . . . 66
Driving tips . . . . . . . . . . . . . . . . . . . . . . . . . . 69
Emergency mode . . . . . . . . . . . . . . . . . . . . . 71
Hill descent control . . . . . . . . . . . . . . . . . . . 70
Kick-down . . . . . . . . . . . . . . . . . . . . . . . . . . . 71
Manua l shifting . . . . . . . . . . . . . . . . . . . . . . 70
Selector lever emergency release . . . . . . . . 72
Se lector lever positions . . . . . . . . . . . . . . . . 67
Steering wheel with shift paddles. . . . . . . . 70
tiptronic mode . . . . . . . . . . . . . . . . . . . . . . . 70
Automatic wipe/wash system . . . . . . . . . . . . 38
Auto Safety Hotline . . . . . . . . . . . . . . . . . . . 104
Average consumption . . . . . . . . . . . . . . . . . . . 19