2018 AUDI Q3 warning
[x] Cancel search: warningPage 150 of 230

Child safety
Location
;
a: ex, a,
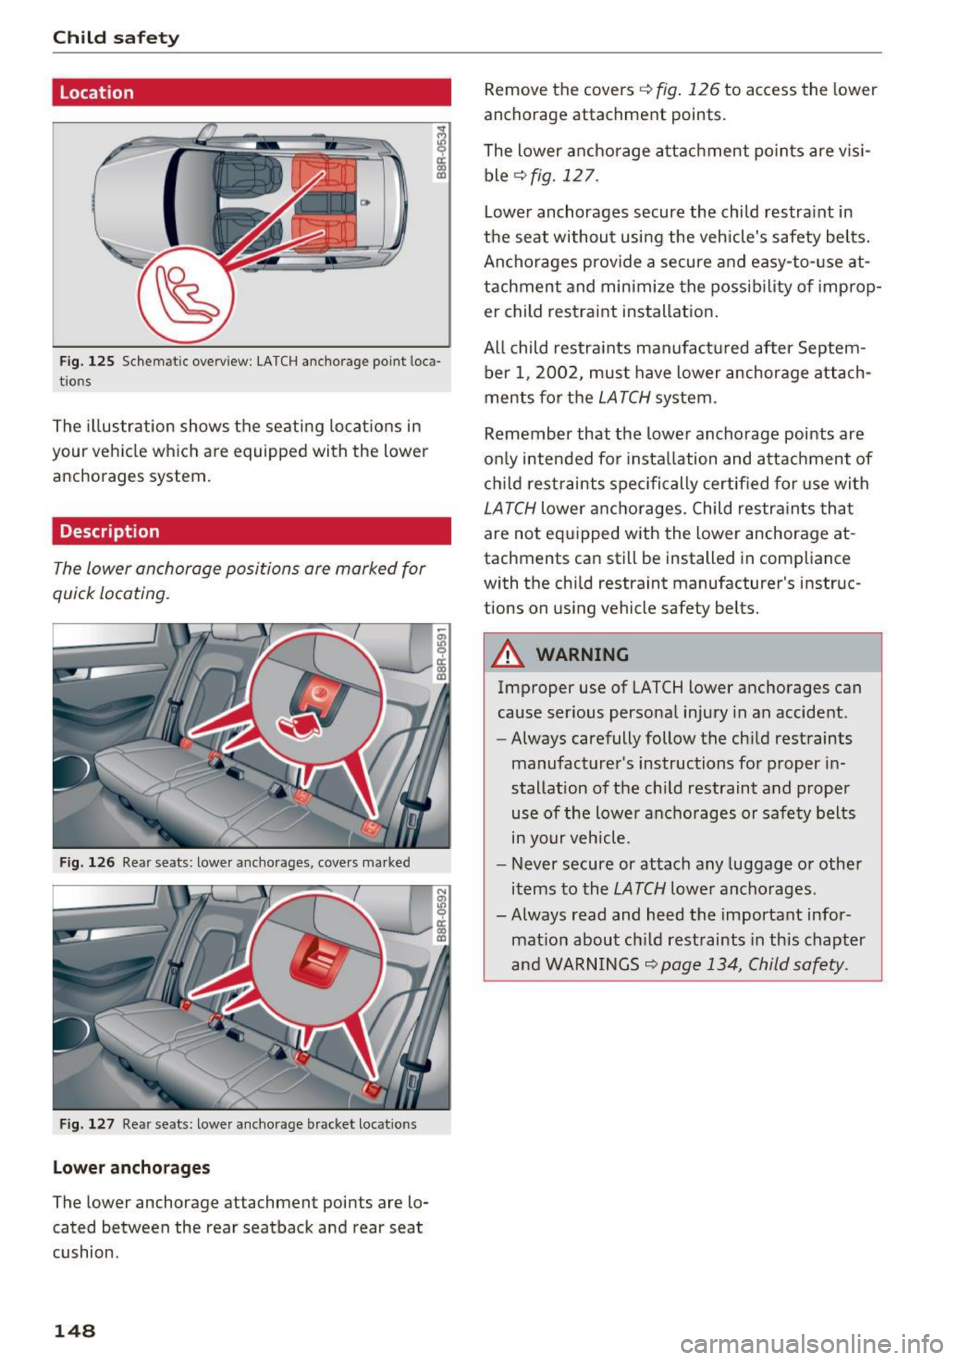
Fig. 125 Schem atic overv iew : LA TCH anchorage point loca
tio ns
The illustration shows the seating locat ions in
your vehicle w hich are equipped with the lower
anchorages system.
Description
The lower anchorage positions are marked for
quick locating.
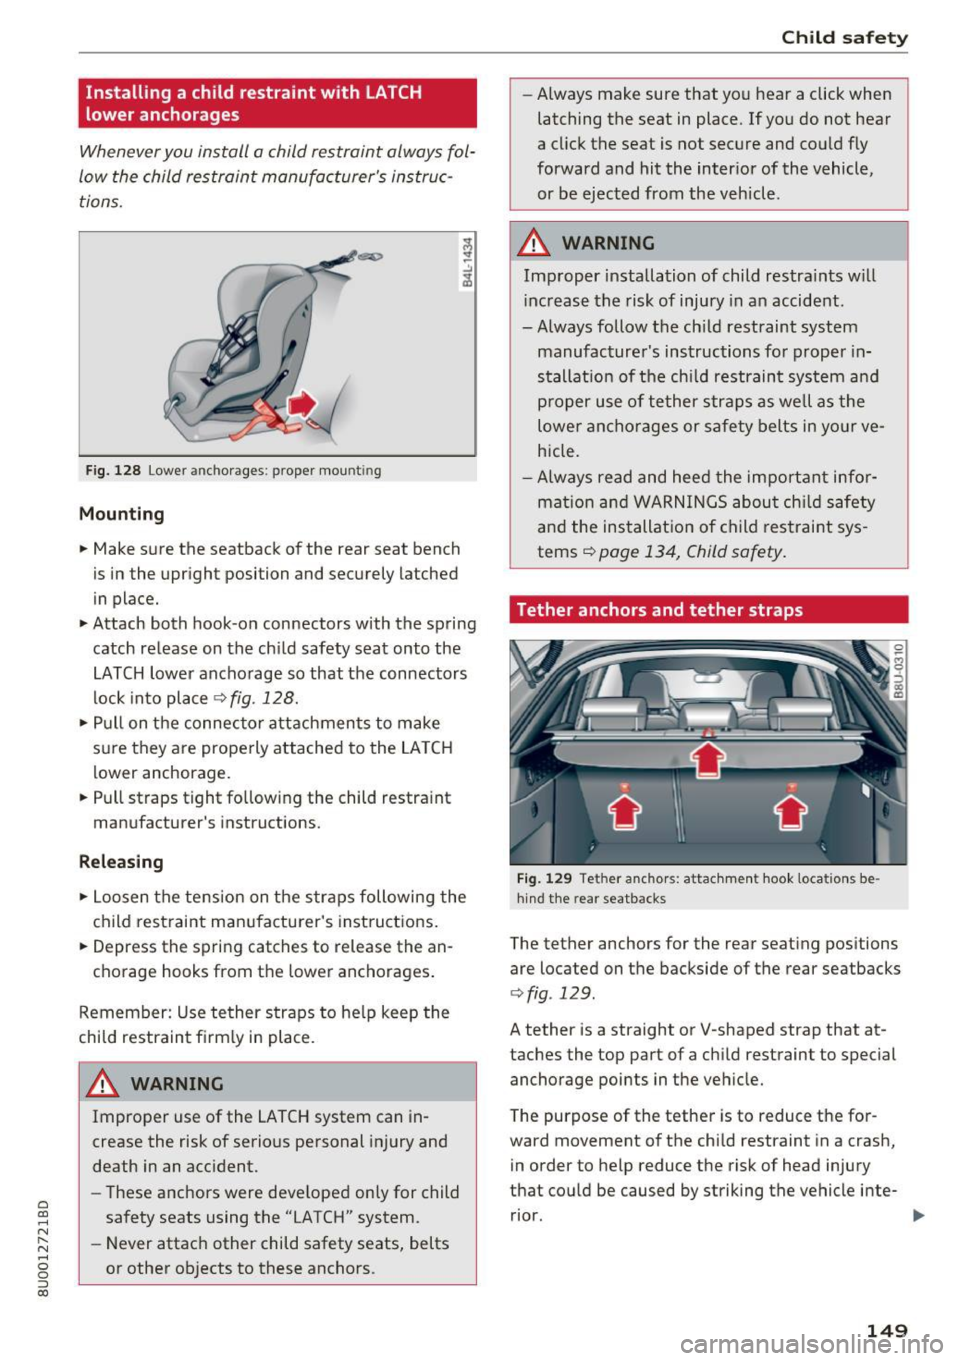
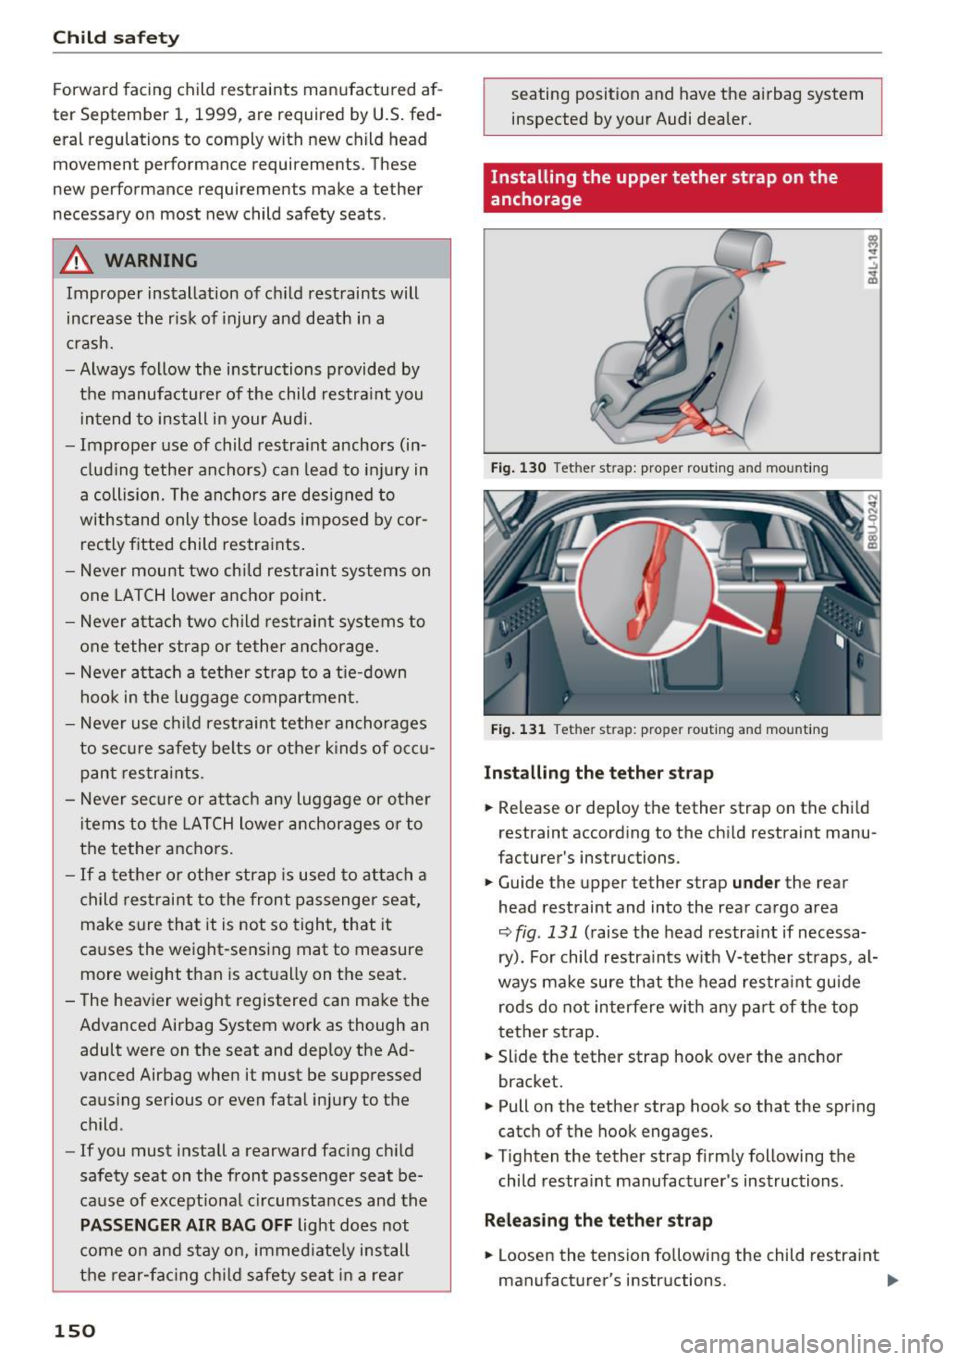
F ig. 126 Re ar s eats: lowe r an cho rages, covers ma rked
F ig . 127 Re ar seats: lowe r an cho rage b racket locatio ns
Lowe r ancho rage s
The lower anchorage attachment points are lo
cated between the rear seatback and rear seat
cushion .
148
Remove the covers c::> fig. 126 to access the lower
anchorage attachment po ints.
The lower anchorage a ttachment po in ts are v is i
ble
c::> fig. 12 7 .
Lower anchorages secure the child restra int in
the seat without using the vehicle's safety bel ts.
Ancho rages prov ide a secure and easy-to- use at
tachment and minimize the possib ility of improp
er child restraint installat ion .
All child restraints manufact ured after Septem
ber 1 , 2002, must have lower anchorage attach
ments for t he
LATCH system.
Remember that the lower ancho rage points are
on ly intended for insta llation and attachment of
ch ild rest raints spec ifically certif ied for use wi th
LATCH lower anchorages. Child restraints that
are not eq uipped with the lower anchorage at
tachments can still be installed in compliance
with the chi ld restraint manufacturer's instruc
tions on us ing vehicle safety belts.
A WARNING
Improper use of LATCH lower anchorages can
cause ser ious persona l injury in an accide nt.
- Always carefully follow the ch ild restraints
manufacturer's instructions for proper in
stallation of the child restraint and proper
use of the lower ancho rages or safety belts
in your vehicle.
- Never secure or attach any luggage or othe r
items to the
LATCH lower anchorages.
-Always read and heed the important infor mat ion about c hild restraints in this chapter
and WARN INGS
c::> page 134, Child safety .
Page 151 of 230

a
co
...... N r--. N
'"' 0 0 ::, co
Installing a child restraint with LATCH
lower anchorages
Whenever you install a child restraint always fol
low the child restraint manufacturer's instruc
tions.
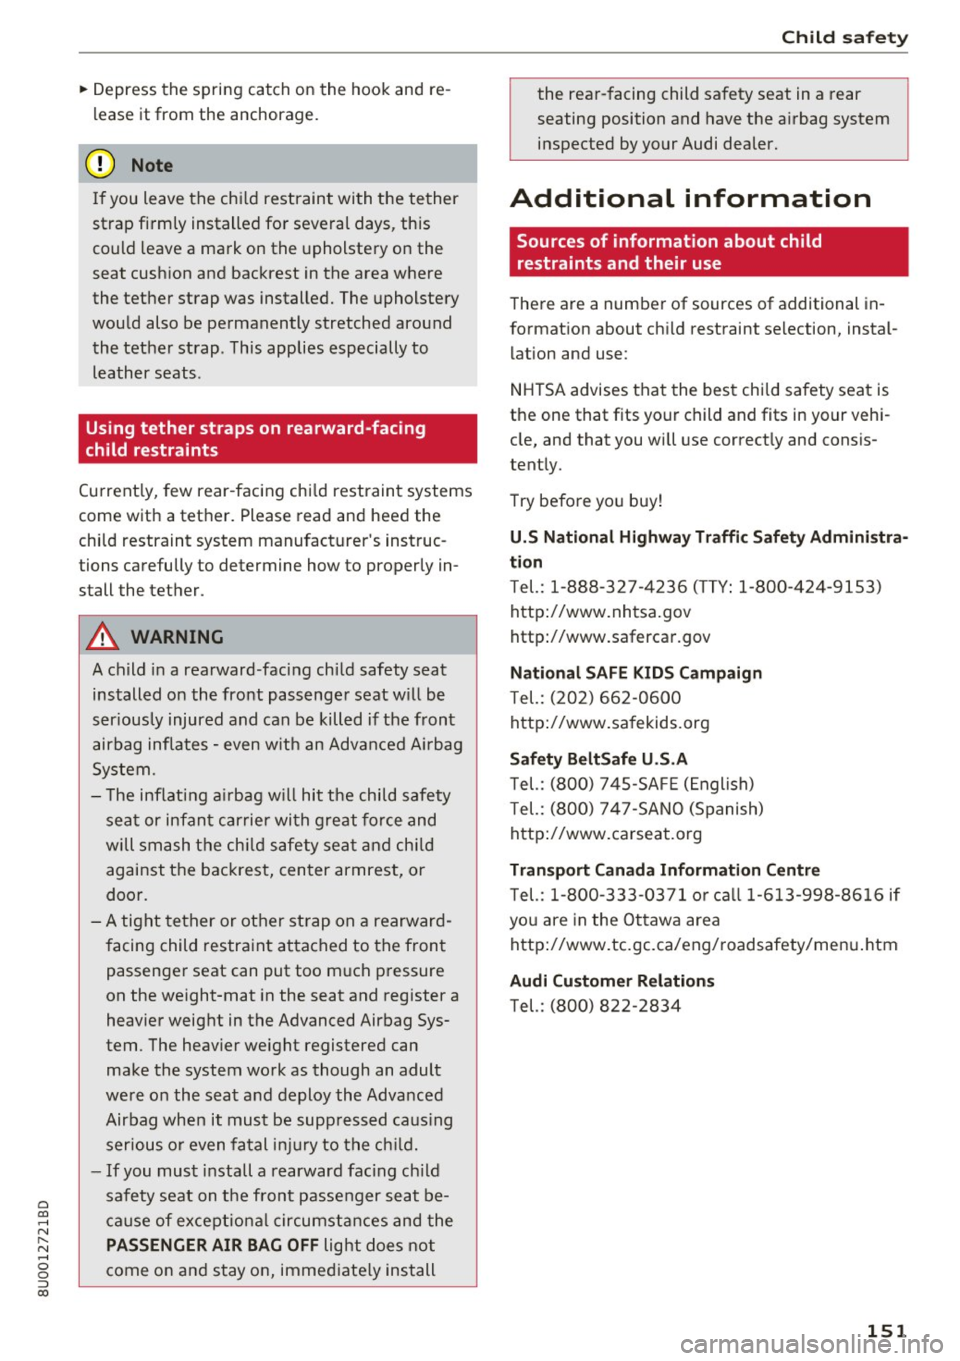
Fig. 128 Lower anchorages: proper mount ing
Mounting
.,. Make sure the seatback of the rear seat bench
is in the upright position and securely latched
in place.
.,. Attach both hook-on connectors with the spring
catch release on the child safety seat onto the
LATCH lower anchorage so that the connectors
lock into place
¢ fig. 128 .
.,. Pull on the connector attachments to make
sure they are properly attached to the LA TC H
lower anchorage .
.,. Pull straps tight fo llowing the child restraint
manufacturer's instructions.
R ele asing
.,. Loosen the tension on the straps following the
child restraint manufacturer's instructions.
.,. Depress the spring catches to release the an
chorage hooks from the lower anchorages .
Remember: Use tether straps to he lp keep the
child restraint firmly in place.
A WARNING
Improper use of the LATCH system can in
crease the risk of serious personal injury and
death in an accident.
- These anchors were deve loped only for child
safety seats using the "LATCH" system.
- Never attach other child safety seats, belts
or other objects to these anchors.
Ch ild sa fety
- Always make sure that you hear a click when
latching the seat in place . If yo u do not hear
a cl ick the seat is not secure and could fly
forward and hit the inter ior of the vehicle,
or be ejected from the veh icle.
A WARNING
-Improper installation of child restra ints w ill
i ncrease the risk of injury in an accident.
-Always follow the ch ild restraint system
manufacturer's instructions for proper in
stallat ion of the chi ld restraint system a nd
p roper use of tether straps as well as the
lowe r ancho rages or safety belts in yo ur
ve
hicle.
- Always read and heed the important info r
mat ion and WARN INGS abou t ch ild safety
a nd the installat ion of child restraint sys
tems¢
page 134, Child safety.
Tether anchors and tether straps
Fig. 129 Tether ancho rs: attac hmen t hook locatio ns be
hind the rear sea tbacks
The tether anchors for the rear seating positions
are located on the backside of the rear seatbacks
¢ fig . 129 .
A tether is a straight or V-shaped strap that at
taches the top part of a child restraint to special
anchorage points in the veh icle.
T he purpose of the tether is to reduce the for
ward movement of the chi ld restraint in a crash,
in order to help reduce the risk of head injury
that could be caused by striking the vehicle inte-
rior.
liJ,
149
Page 152 of 230

Child safety
Forward facing child restraints manufactured af
ter September 1, 1999, are required by U.S. fed
eral regulations to comply with new child head
movement performance requirements. These
new performance requirements make a tether
necessary on most new child safety seats.
A WARNING
Improper installation of child restraints will
increase the risk of injury and death in a
crash.
- Always follow the instructions provided by
the manufacturer of the child restraint you
intend to install in your Audi.
- Improper use of child restraint anchors (in
cluding tether anchors) can lead to injury in
a collision. The anchors are designed to
withstand only those loads imposed by cor
rectly fitted child restraints.
- Never mount two child restraint systems on
one LATCH lower anchor point.
- Never attach two child restraint systems to
one tether strap or tether anchorage.
- Never attach a tether strap to a tie-down
hook in the luggage compartment.
- Never use child restraint tether anchorages
to secure safety belts or other kinds of occu pant restraints.
- Never secure or attach any luggage or other
items to the LATCH lower anchorages or to
the tether anchors.
- If a tether or other strap is used to attach a
child restraint to the front passenger seat,
make sure that it is not so tight, that it
causes the weight-sensing mat to measure
more weight than is actually on the seat.
- The heavier weight registered can make the Advanced Airbag System work as though an
adult were on the seat and deploy the Ad
vanced Airbag when it must be suppressed
caus ing serious or even fatal injury to the
child .
- If you must install a rearward facing child
safety seat on the front passenger seat be
cause of exceptional circumstances and the
PASSENGER AIR BAG OFF light does not
come on and stay on, immediately install
the rear-facing child safety seat in a rear
150
seating position and have the airbag system
inspected by your Audi dealer.
Installing the upper tether strap on the
anchorage
Fig. 130 Tether strap: proper routing and mounting
Fig. 131 Tether strap: proper rout ing and mount ing
Installing the tether strap
.,. Release or deploy the tether strap on the child
restraint according to the chi ld restraint manu
facturer's instructions.
.,. Guide the upper tether strap
under the rear
head restraint and into the rear cargo area
r:::;, fig. 131 (raise the head restraint if necessa
ry). For child restraints with V-tether straps, al
ways make sure that the head restraint guide
rods do not interfere with any part of the top
tether strap.
.,. Slide the tether strap hook over the anchor
bracket.
.,. Pull on the tether strap hook so that the spring
catch of the hook engages .
.,. Tighten the tether strap f irmly following the
child restraint manufacturer's instructions.
Releasing the tether strap
.,. Loosen the tension following the child restraint
manufacturer's instructions.
II>
Page 153 of 230

0 co ......
"' ,....
"' ...... 0 0 :::,
00
~ Depress the spring catch on the hook and re
lease it from the anchorage.
@ Note
If you leave the ch ild restraint with the tether
strap firmly installed for several days, this
could leave a mark on the upholstery on the
seat cushion and backrest in the area where
the tether strap was installed. The upholstery
would also be permanently stretched around the tether strap . This applies especially to
leather seats .
Using tether straps on rearward-facing
child restraints
Current ly, few rear-facing chi ld restraint systems
come with a tether. Please read and heed the
child restraint system manufacturer's instruc
tions carefully to determine how to properly in
stall the tether.
A WARNING
A child in a rearward-facing child safety seat
installed on the front passenger seat w ill be
ser iously injured and can be killed if the front
airbag inflates -even w ith an Advanced Ai rbag
System.
- T he inflating airbag will hit the child safety
seat or infant carrier with great force and
will smash the child safety seat and child
against the backrest, center armrest, or
door.
- A tight tether or other strap on a rearward
f acing child restraint attached to the front
passenger seat can put too much pressure
on the weight-mat in the seat and register a
heavier weight in the Advanced Airbag Sys
tem. The heav ier weight registered can
make the system work as though an adult
were on the seat and deploy the Advanced
Airbag when it must be supp ressed causing
serious or even fatal injury to the child.
-If you must install a rearward facing ch ild
safety seat on the front passenger seat be
caus e of exceptiona l circumstances and the
PASSENGER AIR BAG OFF light does not
come on and stay on, immed iate ly install
Child safety
the rear-facing child safety seat in a rear
seating position and have the airbag system
inspected by your Audi dealer.
Additional information
Sources of information about child restraints and their use
There are a number of sources of additional in
formation about child restraint se lection, instal
lation and use :
NH TSA advises that the best child safety seat is
the one that fits your child and fits in your vehi
cle, and that you will use correctly and consis
tent ly.
Try before you buy!
U.S National Highway Traffic Safety Administra
tion
T el.: 1-888 -327-4236 ( TTY : 1-800-424-9153)
http:/ /www.nhtsa.gov
http:/ /www.safercar.gov
National SAFE KIDS Campaign
Tel.: (202) 662-0600
http:/ /www.sa fekids .org
Safety BeltSafe U.S .A
T el.: (800) 745-SAFE (E nglish)
Tel.: (800) 747-SANO (Spanish)
http:/ /www.carseat.org
Transport Canada Information Centre
T el.: 1-800 -333-0371 or call 1-613-998-8616 if
you are in the Ottawa area
http://www.tc.gc.ca/ eng/roadsafety/men u. htm
Audi Customer Relations
Tel.: (800) 822-2834
151
Page 156 of 230

Check ing and F illing
The correct fuel type for your vehicle can be
found on a label located on the inside of the fue l
f ill er door . For addit iona l information on fuel,
see
¢ page 152 .
For the tank capacity in yo ur vehicle, refer to the
Technical Data
¢ page 210.
To reduce the r isk of fuel leak ing out or vapo rs
escaping, make sure that the fuel tank is closed
correct ly. Otherwise th@
¢'41
) indicator light may
turn on.
If the central loc king system malf unc tions, the
f u e l filler door may emergency release
¢ page 155.
A WARNING
An improper fue ling procedure and improper
hand ling of fue l can lead to explosions, f ires,
severe bu rns and other injur ies.
- Do not smoke and keep away from open
flames.
- The ignition must be switched off when re
fueling .
- Cell phones, radio devices and other radio
equipment should always be switched
off
when refueling. Electromagnet ic rays cou ld
cause sparks and start a fire.
- If you do not insert t he fue l pump nozzle a ll
the way into the filler tube, then f ue l can
leak out. Spilled fuel can ignite and start a
fire .
- Never get into the vehicle when refueling. If
there is an exceptional situation where t he
vehicle must be entered, close the door and
touch a metal surface before touching the
fuel pump nozzle agai n. This will reduce the
r isk of e lectros tat ic discharge t hat can ca use
flying spar ks. Sparks can start a fire when
ref ue ling.
A WARNING
We recommend that you do not t ransport any
fuel containers in the vehicle . Fuel could leak
out of t he container and ignite, especially dur-
l) Market -s pecific
154 ing an accident. Th
is can ca use explos ions,
f ires and injuries.
- If you must transport fuel in a fue l contain
er, p lease note the following:
- Always place a fue l co nta iner on the
ground befo re fil ling . Neve r fill the fuel
contai ne r with fuel whi le i t is in o r o n the
vehicle. Elect rostatic charge can oc cu r
while refueling and the fuel vapo rs could
ignite.
- Fo r fuel con tai ners made o f me tal, the
fuel p ump nozzle must a lways maintai n
contact with the container to reduce the
risk of stat ic charge.
- Insert the fuel pump nozz le as far as pos
sible into the f iller opening wh ile refuel
ing .
- Fo llow lega l req uirements when using,
stor ing and transporting fuel conta iners .
- Make su re t hat the fuel container meets
the i nd ustry standards, for example ANSI
or ASTM F852-86.
(D Note
- Remove fue l tha t has overflowed onto any
vehicle components immediately to reduce
the risk of damage to the vehicle.
- Never drive unt il the fuel tan k is com plete ly
empty . The i rreg ular s upply of fue l that re
sults from that can cause eng ine misfires .
Uncombusted fuel will ente r the exhaust
system and increase the risk of damage to
the catalytic converter .
(® For the sake of the environment
Do not overfill the fuel tank, otherwise fuel
can leak out when the veh icle is warming up.
(D Tips
The fuel filler door o n your veh icle does not
l ock if you lock the veh icle from the inside us
i ng the centra l locking switch.
Page 157 of 230

a
co
...... N r--. N .... 0 0 ::, co
Fuel filler door emergency release
If the central locking system is faulty, the fuel filler door can be unlocked manually.
Fi g. 134 Right si de tr im j:>ane l in the luggage compart
ment: emergen cy release mechani sm
The emergency opening mechanism is located
behind the right side trim panel in the luggage
compa rtme nt.
• Remove the cover in the side panel.
• Loosen the strap from its bracket -arrow- and
pull on it carefully<=:>
fig. 134 c:>(D . The filler
doo r is released .
• Press on the lef t side of the fuel fille r doo r to
open it
<=:> page 153, fig. 132 .
(D Note
Onl y pull o n the loop until you feel resi stance.
You will not he ar it relea se. O therwise yo u
co uld d amage the eme rge ncy re lea se me ch a
nism .
Catalytic converter
The vehicle may o nly be dr iven with unleaded
gasoline, otherwise the catalyt ic converter will be
destroyed .
N ever d rive until the tank is comp letely e mpty .
The irregular supply of f uel th at resul ts from that
can cause engine m isfires. Uncombus ted f uel will
enter the exhaust system, wh ic h can cau se ove r
heat ing and damage to the catalyt ic converter .
A WARNING
-The temperature in the ex ha ust system is
high, both when dr iving and after stopping
the engine.
-
Checking and Filling
- Never touch the exhaust tail pipes o nce they
have become hot . This cou ld resu lt in burns.
- Do not par k your vehicle over flammable
mate ria ls s uch as grass or leaves because
the high temperature of the emissions con
trol system could start a fire.
- Do not app ly unde rbody protectant in the
exhaust system area, because this increases
the risk of fire.
Engine compartment
' Working in the engine compartment
Special care is required if you are working in the
engine compartmen t
For work in the engine compartment, such as
checking and fill ing fluids, there is a risk of in
jury, scalding, accident s, and burns . For thi s
reason, follow all the warnings and general
s afety pre caution s provided in the following in
formation. The engine compartment is a dan
gerous a rea on the vehicle .
<=:> .&.
A WARNING
-Turn the engine off .
- Sw itch th e ignition off .
- Se t the p arking brak e.
- M ove the selec tor lever i nto the P position.
- Never open the hood whe n th ere is steam o r
coo lant escaping from the engine comp art
men t, bec ause there is a risk that yo u could
be burned. Wai t until no s te a m o r coolan t is
escaping .
- Le t t he eng ine cool down.
- Keep children away from th e eng in e com-
p ar tme nt.
- N ever sp ill fluid s on a ho t engine . These flu
i d s (su ch as the free ze p ro te ct ion contained
in the coolant) c an catch fi re.
- Avoid short circui ts in th e electrical system.
- When working in the engine compartment,
remember that the radiator fan can swi tch
o n even if t he igni tion i s sw itched off, w hich
i n cre a ses the r is k of person al injury.
~
155
Page 158 of 230

Checking and Filling
-Never open the cap on the coolant expan
sion tank when the engine is warm. The
cooling system is under pressure.
- To protect your face, hands, and arms from
hot steam or coolant, cover the cap with a
large cloth when opening.
- Do not remove the engine cover under any circumstances. This increases the risk of
burns.
- If tests need to be performed with the en
gine running, there is additional danger due
to moving components (such as the ribbed belt, alternator and radiator fan) and from
the high-voltage ignition system.
- Do not under any circumstances give gas in
advertently (for example, by hand from the
engine compartment) if the vehicle is sta
tionary but the engine is running and a gear
is engaged. Otherwise, the vehicle will start
to move immediately and this could result
in an accident.
- Pay attention to the following warnings list
ed when work on the fuel system or on the
electrical equipment is required.
- Do not smoke .
- Never work near open flames.
- Always have a working fire extinguisher
nearby.
- All work on the battery or electrical system
in your vehicle can result in injuries, chemi
cal burns, accidents or burns. Because of
this, all work must be performed
only by an
authorized Audi dealer or authorized Audi
Service Facility.
- To reduce the risk of electric shock and in
jury, never touch the following components when the engine is running or is being start
ed:
- Ignition cable
- Other components in the electronic high-
voltage ignition system
- If you must check or perform work on the
engine while it is running:
- Set the parking brake and place the selec
tor lever in the P (park) position first .
- Always proceed with extreme caution so
that clothing, jewelry or long hair do not
156
become caught in the radiator fan, fan
belt or other moving components or do
not come into contact with hot compo
nents. Tie back long hair before beginning
work and do not wear clothing that can
hang down into the engine .
- Limit your exposure to exhaust and chemi cals to as short a time as possible
¢ &, .
A WARNING
California Proposition 65 Warning:
- Engi ne exhaust, some of its constituents,
and certain vehicle components contain or
emit chemicals known to the State of Cali
fornia to cause cancer and birth defects and
reproductive harm . In addition, certain flu
ids contained in vehicles and certain prod
ucts of component wear contain or emit
chemicals known to the State of California
to cause cancer and birth defects or other reproductive harm .
- Battery posts, terminals and related acces
sories contain lead and lead compounds,
chemicals known to the State of California
to cause cancer and reproductive harms.
Wash hands after handling.
@ Note
When filling fluids, be sure not to mix the flu
ids up. Otherwise severe malfunctions and en
gine damage will occur .
@ For the sake of the environment
You should regularly check the ground under
your vehicle in order to detect leaks quickly. If there are visible spots from oil or other fluids,
bring your vehicle to an authorized Audi deal
er or authorized Audi Service Facility to be
checked.
Page 159 of 230

a
co
,....,
N r--. N
'"' 0 0 ::, co
Opening/closing the hood
The hood is released from inside the vehicle.
Fig. 135 Driver footwell: release lever
Fig. 136 Rocker switch under the hood
"' 0 0
0
=i
~
Make sure the wiper arms are not raised up from
the windshield. Otherwise the paint could be
damaged.
Opening the hood
.. With the driver's door open, pull the lever be
low the instrument panel in the direction of the
arrow¢fig.135.
Checking and Filling
.. Raise the hood slightly¢,& .
.. Press the rocker switch under the hood upward
¢fig. 136. This releases the catch .
.. Open the hood.
Closing the hood
.. Push the hood down until you override the
force of the strut .
.. Let the hood fall lightly into the latch.
Do not
press it in.
c> ,&.
A WARNING
-
-Never open the hood when there is steam or
coolant escaping from the engine compart
ment, because there is a risk that you could
be burned. Wait until no steam or coolant is
escaping.
- If the hood is not latched completely, it
could fly up while you are driving and ob
struct your vision.
- For safety reasons, the hood must always be
closed securely while driving. Because of
this, always check the hood after closing it
to make sure it is latched correctly. The
hood is latched if the front corners cannot
be lifted.
- If you notice that the hood is not latched
while you are driving, stop immediately and
close it, because dr iving when the hood is
not latched increases the risk of an accident .
157