2018 Alfa Romeo Stelvio instrument panel
[x] Cancel search: instrument panelPage 128 of 276
Warning!
Do not drill, cut, or tamper with the knee
impact bolsters in any way.
Do not mount any accessories to the knee
impact bolsters such as alarm lights,
stereos, citizen band radios, etc.
Supplemental Driver And Front
Passenger Knee Air Bags
This vehicle is equipped with a
Supplemental Driver Knee Air Bag
mounted in the instrument panel below
the steering column and a Supplemental
Passenger Knee Air Bag mounted in the
instrument panel below the glove
compartment. The Supplemental Knee
Air Bags provide enhanced protection
during a frontal impact by working
together with the seat belts,
pretensioners, and front air bags.
Supplemental Side Air Bags
Supplemental Seat-Mounted Side Air
Bags (SABs)
This vehicle is equipped with
Supplemental Seat-Mounted Side Air
Bags (SABs).
Supplemental Seat-Mounted Side Air
Bags (SABs) are located in the outboard
side of the front seats. The SABs are
marked with “SRS AIRBAG” or “AIRBAG” on a label or on the seat trim on the
outboard side of the seats.
The SABs may help to reduce the risk of
occupant injury during certain side
impacts, in addition to the injury
reduction potential provided by the seat
belts and body structure.
When the SAB deploys, it opens the seam
on the outboard side of the seatback’s
trim cover. The inflating SAB deploys
through the seat seam into the space
between the occupant and the door. The
SAB moves at a very high speed and with
such a high force that it could injure
occupants if they are not seated
properly, or if items are positioned in the
area where the SAB inflates. Children are
at an even greater risk of injury from a
deploying air bag.
Warning!
Do not use accessory seat covers or place
objects between you and the Side Air Bags;
the performance could be adversely
affected and/or objects could be pushed into
you, causing serious injury.
Supplemental Side Air Bag Inflatable
Curtains (SABICs)
This vehicle is equipped with
Supplemental Side Air Bag Inflatable
Curtains (SABICs).
Supplemental Side Air Bag Inflatable
Curtains (SABICs) are located above the
side windows. The trim covering the
SABICs is labeled “SRS AIRBAG” or
“AIRBAG.”
0101132163USFront Supplemental Seat-Mounted Side
Air Bag
0101132180USSupplemental Side Air Bag InflatableCurtain (SABIC) Location
126
SAFETY
Page 130 of 276

Relying on the Side Air Bags alone could
lead to more severe injuries in a collision.
The Side Air Bags work with your seat belt
to restrain you properly. In some collisions,
Side Air Bags won’t deploy at all. Always
wear your seat belt even though you have
Side Air Bags.
Note: Air bag covers may not be obvious
in the interior trim, but they will open
during air bag deployment.
Rollover Events
Side Air Bags are designed to activate in
certain rollover events. The ORC
determines whether the deployment of
the Side Air Bags in a particular rollover
event is appropriate, based on the
severity and type of collision. Vehicle
damage by itself is not a good indicator
of whether or not Side Air Bags should
have deployed.
The Side Air Bags will not deploy in all
rollover events. The rollover sensing
system determines if a rollover event
may be in progress and whether
deployment is appropriate. In the event
the vehicle experiences a rollover or near
rollover event, and deployment of the
Side Air Bags is appropriate, the rollover
sensing system will also deploy the seat
belt pretensioners on both sides of the
vehicle.
The SABICs may help reduce the risk of
partial or complete ejection of vehicle
occupants through side windows in
certain rollover or side impact events.
Air Bag System Components
Note: The Occupant Restraint Controller
(ORC) monitors the internal circuits and
interconnecting wiring associated with
electrical Air Bag System Components
listed below:
Occupant Restraint Controller (ORC)
Air Bag Warning Light
Steering Wheel and Column
Instrument Panel
Knee Impact Bolsters
Driver and Front Passenger Air Bags
Seat Belt Buckle Switch
Supplemental Side Air Bags
Supplemental Knee Air Bags
Front and Side Impact Sensors
Seat Belt Pretensioners
Seat Track Position Sensors
If A Deployment Occurs
The front air bags are designed to deflate
immediately after deployment.
Note: Front and/or side air bags will not
deploy in all collisions. This does not
mean something is wrong with the air bag
system. If you do have a collision which deploys
the air bags, any or all of the following
may occur:
The air bag material may sometimes
cause abrasions and/or skin reddening to
the occupants as the air bags deploy and
unfold. The abrasions are similar to
friction rope burns or those you might get
sliding along a carpet or gymnasium floor.
They are not caused by contact with
chemicals. They are not permanent and
normally heal quickly. However, if you
haven’t healed significantly within a few
days, or if you have any blistering, see
your doctor immediately.
As the air bags deflate, you may see
some smoke-like particles. The particles
are a normal by-product of the process
that generates the non-toxic gas used for
air bag inflation. These airborne particles
may irritate the skin, eyes, nose, or
throat. If you have skin or eye irritation,
rinse the area with cool water. For nose
or throat irritation, move to fresh air. If
the irritation continues, see your doctor.
If these particles settle on your clothing,
follow the garment manufacturer’s
instructions for cleaning.
Do not drive your vehicle after the air
bags have deployed. If you are involved in
another collision, the air bags will not be
in place to protect you.
128
SAFETY
Page 131 of 276
Warning!
Deployed air bags and seat belt
pretensioners cannot protect you in another
collision. Have the air bags, seat belt
pretensioners, and the seat belt retractor
assemblies replaced by an authorized dealer
immediately. Also, have the Occupant
Restraint Controller System serviced as
well.
Note:
Air bag covers may not be obvious in
the interior trim, but they will open
during air bag deployment.
After any collision, the vehicle should
be taken to an authorized dealer
immediately.
Enhanced Accident Response
System
In the event of an impact, if the
communication network remains intact,
and the power remains intact, depending
on the nature of the event, the ORC will
determine whether to have the Enhanced
Accident Response System perform the
following functions:
Cut off fuel to the engine (If Equipped)
Cut off battery power to the electric
motor (If Equipped)
Flash hazard lights as long as the
battery has power
Turn on the interior lights, which
remain on as long as the battery has
power or for 15 minutes from the
intervention of the Enhanced Accident
Response System.
Unlock the power door locks.
Your vehicle may also be designed to
perform any of these other functions in
response to the Enhanced Accident
Response System:
Turn off the Fuel Filter Heater, Turn off
the HVAC Blower Motor, Close the HVAC
Circulation Door
Cut off battery power to the:
– Engine
– Electric Motor (if equipped)
– Electric power steering
– Brake booster
– Electric park brake
– Automatic transmission gear selector
– Horn
– Front wiper
– Headlamp washer pump
Note: After an accident, remember to
cycle the ignition to the STOP
(OFF/LOCK) position and remove the key from the ignition switch to avoid draining
the battery. Carefully check the vehicle
for fuel leaks in the engine compartment
and on the ground near the engine
compartment and fuel tank before
resetting the system and starting the
engine. If there are no fuel leaks or
damage to the vehicle electrical devices
(e.g. headlights) after an accident, reset
the system by following the procedure
described below.
Enhanced Accident Response
System Reset Procedure
After the event occurs, when the system
is active, a message regarding fuel cutoff
is displayed. Turn the ignition switch from
ignition AVV/START or MAR/ACC/ON/
RUN to ignition STOP/OFF/LOCK.
Carefully check the vehicle for fuel leaks
in the engine compartment and on the
ground near the engine compartment and
fuel tank before resetting the system and
starting the engine.
Depending on the nature of the event the
left and right turn signal lights, located in
the instrument panel, may both be
blinking and will continue to blink. In order
to move your vehicle to the side of the
road, you must follow the system reset
procedure.
129
Page 133 of 276
Maintaining Your Air Bag System
Warning!
Modifications to any part of the air bag
system could cause it to fail when you need
it. You could be injured if the air bag system
is not there to protect you. Do not modify
the components or wiring, including adding
any kind of badges or stickers to the
steering wheel hub trim cover or the upper
right side of the instrument panel. Do not
modify the front bumper, vehicle body
structure, or add aftermarket side steps or
running boards.
It is dangerous to try to repair any part of
the air bag system yourself. Be sure to tell
anyone who works on your vehicle that it
has an air bag system.
Do not attempt to modify any part of your
air bag system. The air bag may inflate
accidentally or may not function properly if
modifications are made. Take your vehicle
to an authorized dealer for any air bag
system service. If your seat, including your
trim cover and cushion, needs to be serviced
in any way (including removal or
loosening/tightening of seat attachment
bolts), take the vehicle to your authorized
dealer. Only manufacturer approved seat
accessories may be used. If it is necessary
to modify the air bag system for persons
with disabilities, contact your authorized
dealer.
Event Data Recorder (EDR)
This vehicle is equipped with an event
data recorder (EDR). The main purpose of
an EDR is to record, in certain crash or
near crash-like situations, such as an air
bag deployment or hitting a road
obstacle, data that will assist in
understanding how a vehicle’s systems
performed. The EDR is designed to
record data related to vehicle dynamics
and safety systems for a short period of
time, typically 30 seconds or less. The
EDR in this vehicle is designed to record
such data as:
How various systems in your vehicle
were operating;
Whether or not the driver and
passenger safety belts were
buckled/fastened;
How far (if at all) the driver was
depressing the accelerator and/or brake
pedal; and,
How fast the vehicle was traveling.
These data can help provide a better
understanding of the circumstances in
which crashes and injuries occur.
Note: EDR data are recorded by your
vehicle only if a non-trivial crash situation
occurs; no data are recorded by the EDR
under normal driving conditions and no
personal data (e.g., name, gender, age,
and crash location) are recorded.
However, other parties, such as law
enforcement, could combine the EDR data with the type of personally
identifying data routinely acquired during
a crash investigation.
To read data recorded by an EDR, special
equipment is required, and access to the
vehicle or the EDR is needed. In addition
to the vehicle manufacturer, other
parties, such as law enforcement, that
have the special equipment, can read the
information if they have access to the
vehicle or the EDR.
Child Restraints
Everyone in your vehicle needs to be
buckled up at all times, including babies
and children. Every state in the United
States, and every Canadian province,
requires that small children ride in proper
restraint systems. This is the law, and you
can be prosecuted for ignoring it.
Children 12 years or younger should ride
properly buckled up in a rear seat, if
available. According to crash statistics,
children are safer when properly
restrained in the rear seats rather than in
the front.
131
Page 145 of 276
Warning!
An improperly attached, damaged, folded, or
stacked floor mat, or damaged floor mat
fasteners may cause your floor mat to
interfere with the accelerator, brake, or
clutch pedals and cause a loss of vehicle
control. To prevent SERIOUS INJURY or
DEATH:
ALWAYS securely attachyour floor
mat using the floor mat fasteners. DO NOT
install your floor mat upside down or turn
your floor mat over. Lightly pull to confirm
mat is secured using the floor mat fasteners
on a regular basis.
ALWAYS REMOVE THE EXISTING FLOOR
MAT FROM THE VEHICLEbefore
installing any other floor mat. NEVER install
or stack an additional floor mat on top of an
existing floor mat.
ONLY install floor mats designed to fit
your vehicle. NEVER install a floor mat that
cannot be properly attached and secured to
your vehicle. If a floor mat needs to be
replaced, only use a FCA approved floor mat
for the specific make, model, and year of
your vehicle.
ONLY use the driver’s side floor mat on
the driver’s side floor area. To check for
interference, with the vehicle properly
parked with the engine off, fully depress the
accelerator, the brake, and the clutch pedal
(if present) to check for interference. If your
floor mat interferes with the operation of
any pedal, or is not secure to the floor,
remove the floor mat from the vehicle and
place the floor mat in your trunk.
ONLY use the passenger’s side floor mat
on the passenger’s side floor area.
ALWAYS make sure objects cannot fall or
slide into the driver’s side floor area when
the vehicle is moving. Objects can become
trapped under accelerator, brake, or clutch
pedals and could cause a loss of vehicle
control.
NEVER place any objects under the floor
mat (e.g., towels, keys, etc.). These objects
could change the position of the floor mat
and may cause interference with the
accelerator, brake, or clutch pedals.
If the vehicle carpet has been removed
and re-installed, always properly attach
carpet to the floor and check the floor mat
fasteners are secure to the vehicle carpet.
Fully depress each pedal to check for
interference with the accelerator, brake, or
clutch pedals then re-install the floor mats.
It is recommended to only use mild soap
and water to clean your floor mats. After
cleaning, always check your floor mat has
been properly installed and is secured to
your vehicle using the floor mat fasteners
by lightly pulling mat.
Periodic Safety Checks You Should
Make Outside The Vehicle
Tires
Examine tires for excessive tread wear
and uneven wear patterns. Check for
stones, nails, glass, or other objects
lodged in the tread or sidewall. Inspect
the tread for cuts and cracks. Inspect
sidewalls for cuts, cracks, and bulges.
Check the wheel nuts for tightness.
Check the tires (including spare) for
proper cold inflation pressure.
Lights
Have someone observe the operation of
brake lights and exterior lights while you
work the controls. Check turn signal and
high beam indicator lights on the
instrument panel.
Door Latches
Check for proper closing, latching, and
locking.
Fluid Leaks
Check area under the vehicle after
overnight parking for fuel, coolant, oil, or
other fluid leaks. Also, if gasoline fumes
are detected or if fuel, or brake fluid
leaks are suspected. The cause should be
located and corrected immediately.
143
Page 152 of 276
Note:Normally, the electric parking
brake is engaged automatically when the
engine is stopped. This function can be
deactivated/activated on the
Information and Entertainment system
by selecting the following items in
sequence on the main menu: "Settings",
"Driver Assistance" and "Automatic
Parking Brake".
In addition to engaging the electric park
brake, along with steering and positioning
chocks in front of the wheels (when on a
steep slope), you must always place the
vehicle in the PARK (P) mode before
leaving.
Should the vehicle battery be faulty, the
battery must be replaced in order to
unlock the electric park brake.
Engaging The Park Brake Manually
Briefly pull the switch located on the
center console to manually engage the
electric park brake when the vehicle is
stationary.
Noise may be heard from the rear of the
vehicle when engaging the electric
parking brake.
A slight movement of the brake pedal
may be detected when engaging the
electric parking brake with the brake
pedal pressed.
With the electric parking brake engaged,
the BRAKE warning light on the
instrument panel and the switch will
illuminate.
Caution!
With the Electronic Parking Brake failure
warning light on, some functions of the
electric parking brake are deactivated. In
this case the driver is responsible for brake
activation and vehicle parking in complete
safety conditions.
If, under exceptional circumstances, the
use of the brake is required with the
vehicle in motion, keep the switch on the
center console pulled as long as the brake
action is necessary.
The BRAKE warning light may turn on
with the hydraulic system temporarily
unavailable; in this case, braking is
controlled by the motors.
The brake lights will also automatically
turn on in the same way as normal braking
with the use of the brake pedal.
Release the switch on the center console
to stop the braking action with the
vehicle in motion.
If, through this procedure, the vehicle is
braked until a speed below 1.9 mph
(3 km/h) is reached and the switch is kept
pulled, the park brake will definitively
engage.
Note: Driving the vehicle with the
electric parking brake engaged, or using
it several times to slow down the vehicle,
may cause severe damage to the braking
system. Disengaging The Electric Park Brake
Manually
In order to manually release the park
brake, the ignition should be in the ON
mode. Press the brake pedal, and then
push the switch on the center console
briefly.
Noise may be heard from the rear of the
vehicle, and a slight movement of the
brake pedal may be detected during
disengagement.
After disengaging the electric parking
brake, the BRAKE warning light on the
instrument panel and the light on the
switch will turn off.
If the BRAKE warning light on the
instrument panel remains on with the
electric parking brake disengaged, this
indicates a fault: in this case, contact an
authorized dealer.
Warning!
Never leave children alone in a vehicle, or
with access to an unlocked vehicle.
Allowing children to be in a vehicle
unattended is dangerous for a number of
reasons. A child or others could be seriously
or fatally injured. Children should be warned
not to touch the park brake, brake pedal or
the gear selector.
150
STARTING AND OPERATING
Page 153 of 276
Do not leave the key fob in or near the
vehicle or in a location accessible to
children. A child could operate power
windows, other controls, or move the
vehicle.
Be sure the park brake is fully disengaged
before driving; failure to do so can lead to
brake failure and a collision.
Always fully apply the park brake when
leaving your vehicle, or it may roll and cause
damage or injury.
Note: Always engage the electric
parking brake when parking the vehicle to
prevent injury or damage caused by the
unexpected movement of the vehicle.
Electric Park Brake Operating Modes
The electric park brake may operate as
follows:
"Dynamic Operating Mode": this mode
is activated by pulling the switch
repeatedly while driving.
"Static Engagement and Release
Mode": with the vehicle stationary, the
electric park brake can be activated by
pulling the switch on the center console
once. Push the switch and the brake pedal
at the same time to disengage the brake.
"Drive Away Release" — if equipped:
the electric park brake will automatically
disengage with the driver side seat belt
fastened and the detection of an action performed by the driver to move the
vehicle (DRIVE [D] or REVERSE [R]).
"Safe Hold": if the vehicle speed is
lower than 1.9 mph (3 km/h), the gear
selector is not in PARK (P) position and
the driver's intention of leaving the
vehicle is detected, the electric park
brake will automatically engage to hold
the vehicle in safety conditions.
"Auto Park Brake": if the vehicle speed
is below 1.9 mph (3 km/h), the electric
park brake will automatically engage
when the gear selector is in PARK (P)
position. The light on the switch located
on the center console switches on
together with the BRAKE warning light on
the instrument panel when the park brake
is engaged and applied to the wheels.
Each automatic park brake engagement
can be cancelled by pressing the switch
on the center console and at the same
time moving the gear selector for the
transmission to position PARK (P).
Safe Hold
Safe Hold is a safety function that
automatically engages the electric park
brake in the event of a dangerous
condition for the vehicle. The electric park brake engages
automatically to prevent vehicle
movement if:
The vehicle speed is below 2 mph
(3 km/h).
The driver's seat belt is not fastened.
The driver side door is open.
No attempts to apply pressure on the
brake pedal have been detected.
The “Safe Hold” function can be
temporarily disabled by pressing the EPB
switch located on the center console and
the brake pedal at the same time, with
the vehicle stationary and the driver side
door open.
Once disabled, the function will activate
again when the vehicle speed reaches
12 mph (20 km/h) or the ignition is cycled
to STOP and then to ON.
151
Page 160 of 276
ALFA DNA PRO SELECTOR
Alfa DNA Pro System
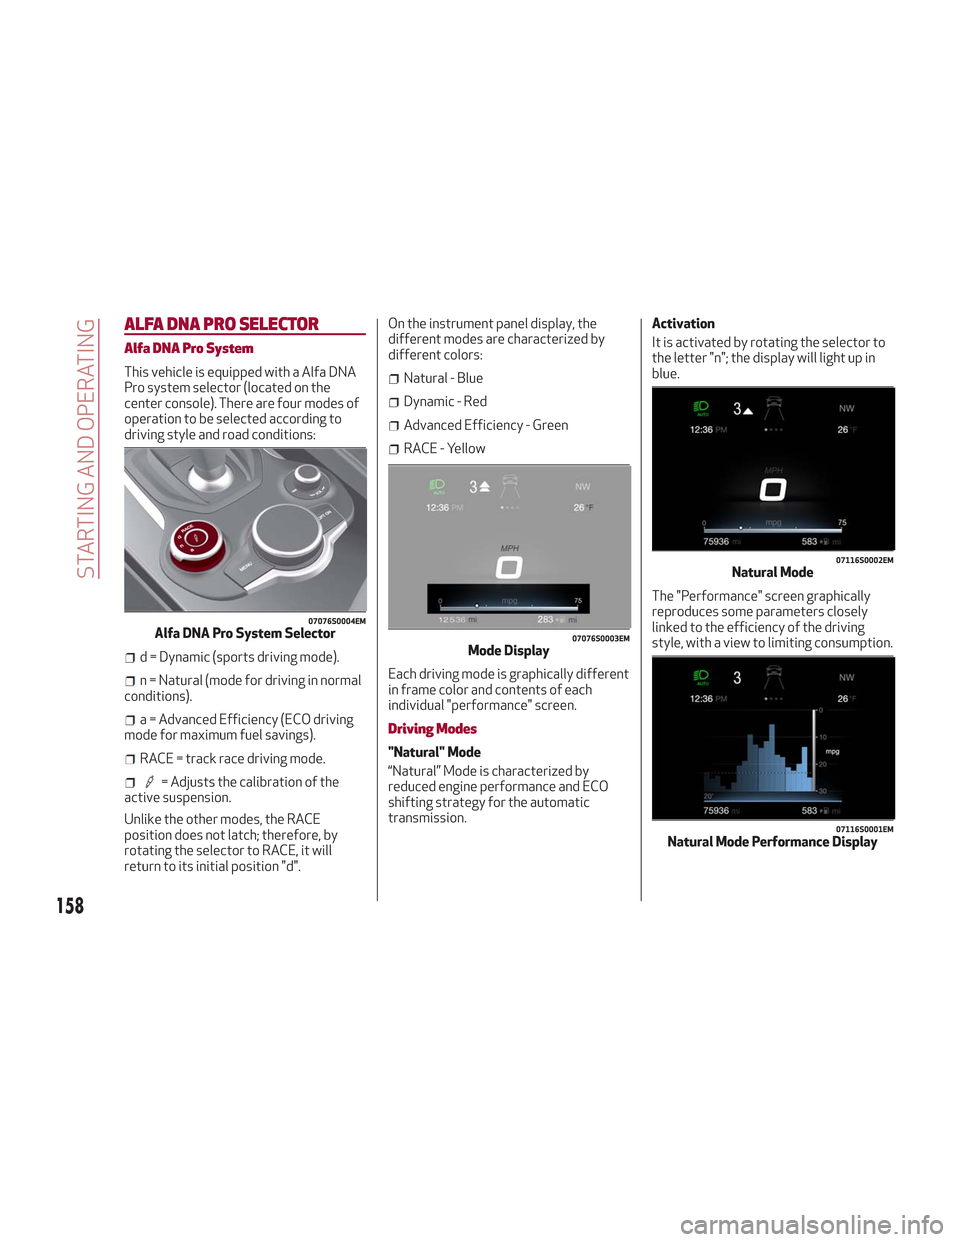
This vehicle is equipped with a Alfa DNA
Pro system selector (located on the
center console). There are four modes of
operation to be selected according to
driving style and road conditions:
d = Dynamic (sports driving mode).
n = Natural (mode for driving in normal
conditions).
a = Advanced Efficiency (ECO driving
mode for maximum fuel savings).
RACE = track race driving mode.
= Adjusts the calibration of the
active suspension.
Unlike the other modes, the RACE
position does not latch; therefore, by
rotating the selector to RACE, it will
return to its initial position "d". On the instrument panel display, the
different modes are characterized by
different colors:
Natural - Blue
Dynamic - Red
Advanced Efficiency - Green
RACE - Yellow
Each driving mode is graphically different
in frame color and contents of each
individual "performance" screen.
Driving Modes
"Natural" Mode
“Natural” Mode is characterized by
reduced engine performance and ECO
shifting strategy for the automatic
transmission. Activation
It is activated by rotating the selector to
the letter "n"; the display will light up in
blue.
The "Performance" screen graphically
reproduces some parameters closely
linked to the efficiency of the driving
style, with a view to limiting consumption.
07076S0004EMAlfa DNA Pro System Selector07076S0003EMMode Display
07116S0002EMNatural Mode
07116S0001EMNatural Mode Performance Display
158
STARTING AND OPERATING