2018 Alfa Romeo Stelvio fuel
[x] Cancel search: fuelPage 182 of 276
The table below shows the approximate
distances for each area:
AreaDistance From The
Rear Of The Vehicle
Red 0–11.8
inches
(0–30 cm)
Yellow 11.8 inches to 3.3 feet
(30cm–1m)
Green 3.3feetormore(1m
or more)
Messages On The Display
If the liftgate is opened, the camera will
not detect any obstacle behind the
vehicle. The display will show a dedicated
warning message.
Make sure the liftgate is closed by
pushing next to the lock until it clicks.
Important Notes
Ice, snow or mud on the surface of the
camera may reduce its sensitivity. It is
important to keep the camera surface
clean, and free from debris.
When parking, be aware of obstacles
that may be above or below the camera
range.
REFUELING THE VEHICLE
Refueling The Vehicle
Before refueling, make sure that the fuel
type is correct.
Also, stop the engine before refueling.
Note: An inefficient catalytic converter
leads to harmful exhaust emissions, thus
contributing to air pollution.
Caution!
Never introduce leaded fuel to the tank,
even in small amounts in an emergency, as
this would damage the catalytic converter
beyond repair.
Refueling Capacity
To ensure that you fill the tank
completely, top off twice after the first
click of the fuel nozzle.
Further top-off could cause faults in the
fuel feeding system.
Refueling Procedure
The fuel filler door is unlocked when the
central door locking system is unlocked.
It is automatically locked when the
central locking system is applied. Opening The Fuel Filler Door
To refuel proceed as follows:
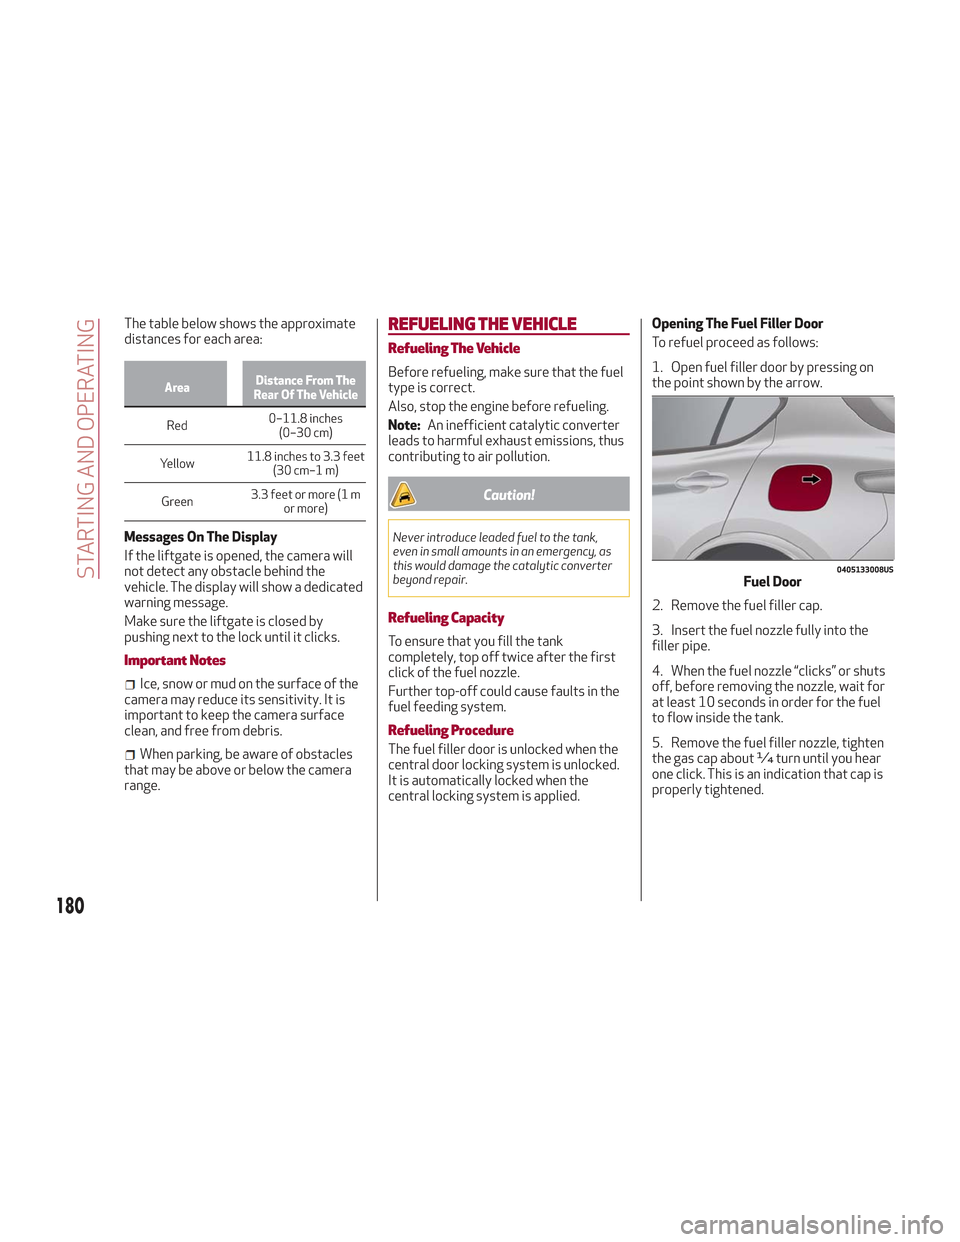
1. Open fuel filler door by pressing on
the point shown by the arrow.
2. Remove the fuel filler cap.
3. Insert the fuel nozzle fully into the
filler pipe.
4. When the fuel nozzle “clicks” or shuts
off, before removing the nozzle, wait for
at least 10 seconds in order for the fuel
to flow inside the tank.
5. Remove the fuel filler nozzle, tighten
the gas cap about ¼ turn until you hear
one click. This is an indication that cap is
properly tightened.
0405133008USFuel Door
180
STARTING AND OPERATING
Page 183 of 276

The label indicates the fuel type
(UNLEADED FUEL = gasoline).
Emergency Fuel Door Opening
In the event of an emergency, the fuel
filler door can be opened from inside the
liftgate.Proceed as follows:
Models Without Compact Spare Tire
1. Open the liftgate and lift up the load
floor.
2. Lift up the cover to reach the
emergency opening cable on the side of
the fuel door.3. Pull the cable to release the fuel door
lock.
4. Open the fuel door by pressing it.
0620132793USFuel Door Label
0604132234USLoad Floor
07226V0041EMCargo Box
1 — Cover
07226V0043EMCargo Box Opened
2 — Release Cable
181
Page 184 of 276
Warning!
Never have any smoking materials lit in or
near the vehicle when the fuel door is open
or the tank is being filled.
Never add fuel when the engine is running.
This is in violation of most state and federal
fire regulations and may cause the MIL to
turn on.
A fire may result if gasoline is pumped
into a portable container that is inside of a
vehicle. You could be burned. Always place
gas containers on the ground while filling.
Note: If the filler compartment is
washed with a pressure washer, keep it at
a distance of at least 8 inches (20 cm).
VEHICLE LOADING
Certification Label
As required by National Highway Traffic
Safety Administration regulations, your
vehicle has a certification label affixed to
the driver's side door or pillar.
This label contains the month and year of
manufacture, Gross Vehicle Weight
Rating (GVWR), Gross Axle Weight Rating
(GAWR) front and rear, and Vehicle
Identification Number (VIN). A
Month-Day-Hour (MDH) number is
included on this label and indicates the
Month, Day and Hour of manufacture. The
bar code that appears on the bottom of
the label is your VIN.
Gross Vehicle Weight Rating
(GVWR)
The GVWR is the total permissible
weight of your vehicle including driver,
passengers, vehicle, options and cargo.
The label also specifies maximum
capacities of front and rear axle systems
(GAWR). Total load must be limited so
GVWR and front and rear GAWR are not
exceeded.
Payload
The payload of a vehicle is defined as the
allowable load weight a truck can carry,
including the weight of the driver, all
passengers, options and cargo.
Gross Axle Weight Rating (GAWR)
The GAWR is the maximum permissible
load on the front and rear axles. The load
must be distributed in the cargo area so
that the GAWR of each axle is not
exceeded.
Each axle GAWR is determined by the
components in the system with the
lowest load carrying capacity (axle,
springs, tires or wheels). Heavier axles or
suspension components sometimes
specified by purchasers for increased
durability does not necessarily increase
the vehicle's GVWR.
Tire Size
The tire size on the Vehicle Certification
Label represents the actual tire size on
your vehicle. Replacement tires must be
equal to the load capacity of this tire size.
Rim Size
This is the rim size that is appropriate for
the tire size listed.
Inflation Pressure
This is the cold tire inflation pressure for
your vehicle for all loading conditions up
to full GAWR.
182
STARTING AND OPERATING
Page 185 of 276

Curb Weight
The curb weight of a vehicle is defined as
the total weight of the vehicle with all
fluids, including vehicle fuel, at full
capacity conditions, and with no
occupants or cargo loaded into the
vehicle. The front and rear curb weight
values are determined by weighing your
vehicle on a commercial scale before any
occupants or cargo are added.
Loading
The actual total weight and the weight of
the front and rear of your vehicle at the
ground can best be determined by
weighing it when it is loaded and ready
for operation.The entire vehicle should first be weighed
on a commercial scale to insure that the
GVWR has not been exceeded. The
weight on the front and rear of the
vehicle should then be determined
separately to be sure that the load is
properly distributed over the front and
rear axle. Weighing the vehicle may show
that the GAWR of either the front or rear
axles has been exceeded but the total
load is within the specified GVWR. If so,
weight must be shifted from front to rear
or rear to front as appropriate until the
specified weight limitations are met.
Store the heavier items down low and be
sure that the weight is distributed
equally. Stow all loose items securely
before driving.
Improper weight distributions can have
an adverse effect on the way your vehicle
steers and handles and the way the
brakes operate.
Caution!
Do not load your vehicle any heavier than the
GVWR or the maximum front and rear
GAWR. If you do, parts on your vehicle can
break, or it can change the way your vehicle
handles. This could cause you to lose control.
Also overloading can shorten the life of your
vehicle.
SUGGESTIONS FOR DRIVING
Saving Fuel
Below are some suggestions which may
help you save fuel and lower the amount
of harmful emissions released into the
atmosphere.
Vehicle Maintenance
Checks and operations should be carried
out in accordance with the Maintenance
Plan. Refer to "Scheduled Servicing" in
"Servicing And Maintenance" for further
information.
Tires
Check the tire pressures at least once
every four weeks: if the pressure is too
low, consumption levels increase as
resistance to rolling is higher.
Note:
Tire pressure that is too high can
cause premature tire wear, reduced
control, etc.
Unnecessary Loads
Do not travel with an overloaded liftgate.
The weight of the vehicle and its
arrangement greatly affect fuel
consumption and stability.
183
Page 186 of 276

Electric Devices
Use electrical systems only for the
amount of time needed. The rear window
defroster, additional headlights,
windshield wipers and heater blower fan
require a considerable amount of energy;
increasing the current uptake increases
fuel consumption (by up to +25% when
city driving).
Climate Control System
Using the climate control system will
increase consumption: use standard
ventilation when the temperature
outside permits.
Devices For Aerodynamic Control
The use of non-certified devices for
aerodynamic control may adversely
affect air drag and consumption levels.
Driving Style
Starting
Do not warm up the engine at low or high
revs when the vehicle is stationary; this
causes the engine to warm up more
slowly, thereby increasing fuel
consumption and emissions. It is
therefore advisable to drive off
immediately, slowly, avoiding high
speeds: by doing this the engine will
warm up more quickly.Unnecessary Actions
Avoid revving up when starting at traffic
lights or before stopping the engine. This
action is unnecessary and causes
increased fuel consumption and
pollution.
Gear Selection
Use a high gear when traffic and road
conditions allow it. Using a low gear for
faster acceleration will increase fuel
consumption. Improper use of a high gear
increases consumption, emissions and
engine wear.
Max. Speed
Fuel consumption considerably increases
as speed increases. Maintain a constant
speed, avoiding unnecessary braking and
acceleration, which cost in terms of both
fuel consumption and emissions.
Acceleration
Accelerating violently severely affects
consumption and emissions: acceleration
should be gradual and should not exceed
the maximum torque.
Conditions Of Use
Cold Starting
Short trips and frequent cold starts will
not allow the engine to reach optimum
operating temperature. This results in a
significant increase in consumption
levels (from +15 to +30% in city driving)
and emissions.Traffic And Road Conditions
High fuel consumption is caused by heavy
traffic, for instance when travelling in
traffic with frequent use of low gears or
in cities with many traffic lights. Winding
mountain roads and rough road surfaces
also adversely affect consumption.
Stops In Traffic
During prolonged stops (e.g. railway
crossings), turn off the engine.
Performance
This vehicle is equipped with an engine
capable of delivering exceptionally fast
acceleration and speed:
Peak power: 505 HP at 6500 rpm.
Peak torque: 443 ft-lbs at
2500–5000 rpm.
Top speed: 177 mph (285 km/h).
Acceleration from 0 to 60 mph (0 to
100 km/h): 3.9 seconds.
For safe driving, it is essential,
particularly during the first days of use,
to get to know the car by driving carefully
and gradually discovering its
performance.
184
STARTING AND OPERATING
Page 213 of 276
Heavy Usage Of The Vehicle
If the vehicle is used under one of the following conditions:
Dusty roads.
Short, repeated journeys less than 4 miles (7-8 km) at sub-zero outside temperatures.
Engine often idling or driving long distances at low speeds or long periods of inactivity.
In the event of a long period of inactivity.
The following checks must be carried out more often than indicated in the Scheduled Servicing Plan:
Check cleanliness of hood and liftgate locks, cleanliness and lubrication of linkage.
Visually inspect conditions of: engine, transmission, pipes and hoses (exhaust/fuel system/brakes) and rubber elements
(sleeves/bushes, etc.).
Check battery charge and battery fluid level (electrolyte).
Visually inspect conditions of the accessory drive belts.
Check and, if necessary, change engine oil and replace oil filter.
Check and, if necessary, replace cabin air filter.
Check and, if necessary, replace air cleaner.
Severe Duty All Models
Change Engine Oil at 4,000 miles (6,500 km) if the vehicle is operated in a dusty and off-road environment or is operated
predominately at idle or only very low engine RPM’s. This type of vehicle use is considered Severe Duty.
211
Page 214 of 276

Maintenance Plan (2.9L V6 Engine)
Thousands of miles10
20 30
40 50
60
70
80
90
100
110
120
130
140
150
Years123456789101112131415
Thousands of kilometers16
32 48
64 80
96
112
128
144
160
176
192
208
224
240
Check battery charge status with the proper instrument. ●●●●●●●●●●●●●●●
Check tire condition/wear and adjust pressure, if necessary.
Check the tire repair kit recharge condition and expiration
date. ●●●●●●●●●
●●●●●●
Check operation of lighting system (headlights, direction
indicators, hazard warning lights, trunk lid, passenger
compartment, glove compartment, instrument panel warning
lights, etc.). ●●●●●●●●●
●●●●●●
Check and, if necessary, top up fluid levels.
(1)●●●●●●●●● ●●●●●●
Check engine control system operation (via diagnostic tool). ●●●●●●●●●●●●●●●
Visually inspect conditions of: exterior bodywork, underbody
protection, pipes and hoses (exhaust, fuel system, brakes),
rubber elements (sleeves, bushes, etc.). ●●●●●●●
Check position/wear of front windshield wiper blade. ●●●●●●●●
Check operation of the windshield wiper/washer system and
adjust nozzles, if necessary. ●●●●●●●●
Check cleanliness of hood and luggage compartment locks,
cleanliness and lubrication of linkage. ●●●●●●●
(1) Top up using the fluids indicated in the “Fluids And Lubricants” section of the “Technical Specifications” chapter only after checking that the system is intact.
212
SERVICING AND MAINTENANCE
Page 215 of 276

Thousands of miles10
20 30
40 50
60
70
80
90
100
110
120
130
140
150
Years123456789101112131415
Thousands of kilometers16
32 48
64 80
96
112
128
144
160
176
192
208
224
240
Visually inspect conditions and wear of front/rear disc brake
pads and operation of pad wear indicators. ●●●●●●●●●
●●●●●●
Brake disc wear status check with diagnostic tool. ●●●●●●●●●●●●●●●
Visually inspect the brake discs surface and edge. ●●●●●●●●●●●●●●●
Brake pads/brake discs replacement.
(2)
Visually inspect the condition and tensioning of the
accessory drive belt(s). ●●● ●●● ●●● ●●●
Change engine coolant ●
Change engine oil and replace oil filter. ●●●●●●●●●●●●●●●
Replace transfer case oil (AWD models only) ●
Replace accessory drive belt/s.
(3)
Replace air cleaner cartridge(4)●●●●●●●
Replace the additional fuel filter (if equipped). ●●●●●●●●●●●●●●●
(2) The actual interval for changing the brake pads and the carbon ceramic brake discs depends on the vehicle usage conditions and is signaled by the warning light or
message on the instrument panel. It is advisable to check brake disc weight and thickness after each intensive use.
(3) Areas that are not dusty: recommended maximum mileage 36,000 miles (60,00 km). Regardless of the mileage, the belt must be replaced every 4 years. Dusty areas and/or demanding use of the vehicle (cold climates, town use, long periods of idling): advised maximum mileage 18,000 miles (30,000 km). Regardless of the mileage,
the belt must be replaced every 2 years.
(4) If the vehicle is used in dusty areas, this cleaner must be replaced every 10,000 miles (16,000 km).
213