2018 Alfa Romeo Stelvio ECU
[x] Cancel search: ECUPage 48 of 276

The sensor has an adjustment range that
varies progressively from wiper still (no
stroke) when the windshield is dry, to
wiper at continuous speed (fast
operation) with intense rain.
Activation
Rotating the wiper switch to position
oractivates the rain sensor.
The activation of the rain sensor system
is done by tapping the wiper stalk
upwards while the switch is in the
orposition.
The variation in sensitivity during rain
sensor operation is also signaled by a
stroke of the wiper (command acquired
and implemented). This stroke is also
executed with the windshield dry.
If the windshield washer is used with the
rain sensor activated, the normal washing
cycle is performed, after which the rain
sensor resumes its normal automatic
operation.
Note: Keep the glass in the sensor area
clean.
Deactivation
Use the wiper switch or cycle the ignition
to STOP mode.
In the event of malfunction of the rain
sensor while it is active, the windshield
wiper operates intermittently at a speed
consistent with the sensitivity setting of
the rain sensor, whether or not there is
rain on the glass for as long as the sensor
failure is indicated on the display. The sensor continues to operate and it is
possible to set the windshield wiper to
continuous mode
or. The failure
indication remains on for as long as the
sensor is active.
The rain sensor is able to recognize and
automatically adjust itself in the
presence of the following conditions:
Presence of dirt on the controlled
surface (e.g. salt, dirt, etc.).
Presence of streaks of water caused
by the worn window wiper blades.
Difference between day and night.
Rear Window Wiper/Washer
Shifting the vehicle into REVERSE with
the windshield wiper operating, activates
a single cycle of the rear window wiper.
Activation of the rear window
wiper/washer can be done by moving the
stalk to one of the following positions:
Pushing the stalk towards the
instrument panel activates the rear
window washer (a brief push activates
one washing cycle, keeping the stalk
pushed washes continuously until the
stalk is released).
Pushing the stalk downward
activates/deactivates continuous rear
wiper operation.
HEADLAMP WASHERS
The windshield wiper stalk operates the
headlight washers when the ignition is in
the ON position and the headlights are
turned on. The windshield wiper stalk is
located on the right side of the steering
column. To use the headlight washers, pull
the stalk toward you and release it. The
headlight washers will spray a timed
high-pressure spray of washer fluid onto
each headlight lens. In addition, the
windshield washers will spray the
windshield and the windshield wipers will
cycle.
46
GETTING TO KNOW YOUR VEHICLE
Page 56 of 276
POWER WINDOWS
Power Window Switches
The power window switches work with
the ignition in the ON position and for
three minutes after the ignition has been
placed in the STOP position. When one of
the front doors is opened, this operation
is disabled.
Driver Side Front Door Controls
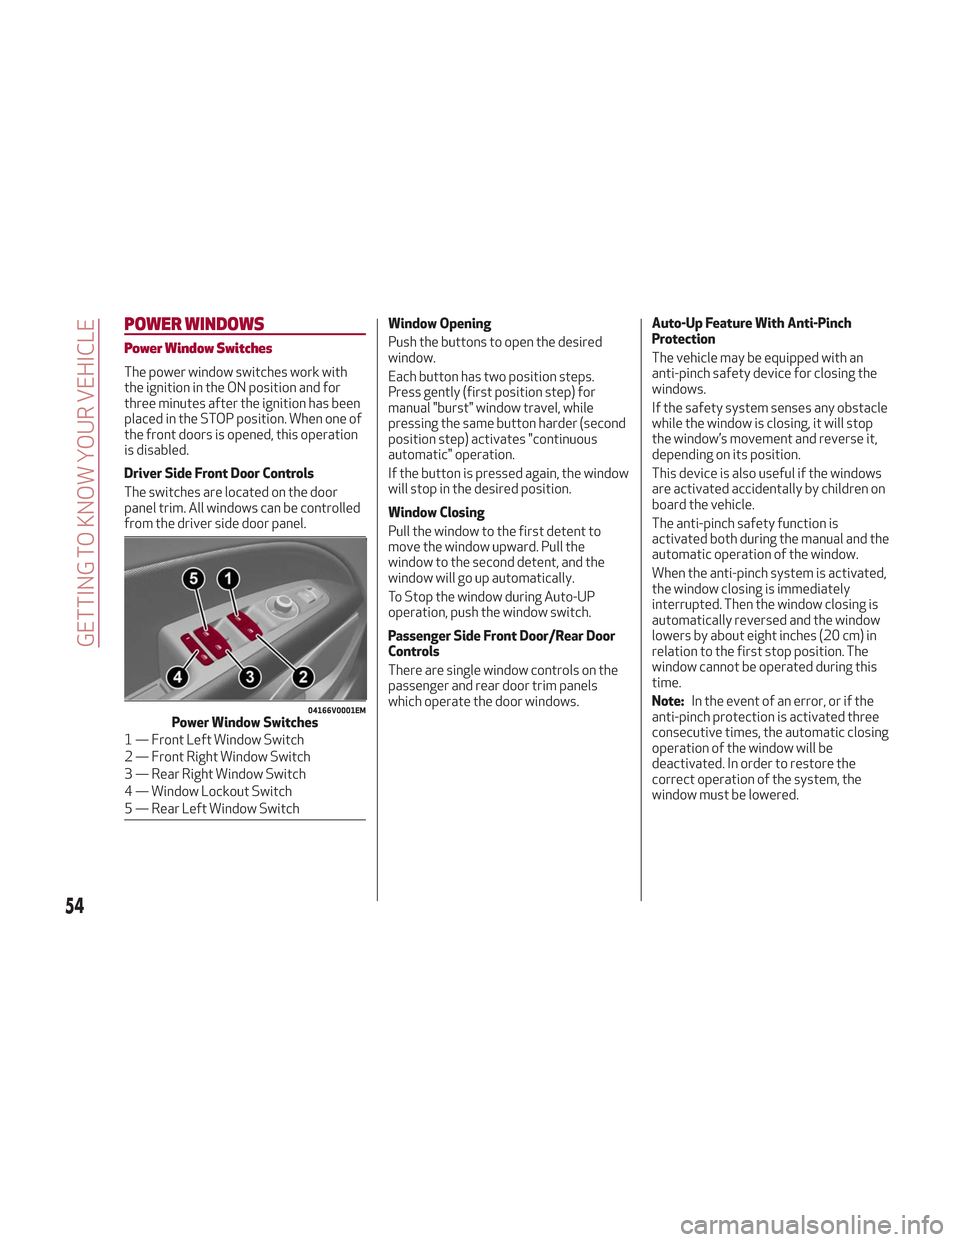
The switches are located on the door
panel trim. All windows can be controlled
from the driver side door panel.Window Opening
Push the buttons to open the desired
window.
Each button has two position steps.
Press gently (first position step) for
manual "burst" window travel, while
pressing the same button harder (second
position step) activates "continuous
automatic" operation.
If the button is pressed again, the window
will stop in the desired position.
Window Closing
Pull the window to the first detent to
move the window upward. Pull the
window to the second detent, and the
window will go up automatically.
To Stop the window during Auto-UP
operation, push the window switch.
Passenger Side Front Door/Rear Door
Controls
There are single window controls on the
passenger and rear door trim panels
which operate the door windows.Auto-Up Feature With Anti-Pinch
Protection
The vehicle may be equipped with an
anti-pinch safety device for closing the
windows.
If the safety system senses any obstacle
while the window is closing, it will stop
the window’s movement and reverse it,
depending on its position.
This device is also useful if the windows
are activated accidentally by children on
board the vehicle.
The anti-pinch safety function is
activated both during the manual and the
automatic operation of the window.
When the anti-pinch system is activated,
the window closing is immediately
interrupted. Then the window closing is
automatically reversed and the window
lowers by about eight inches (20 cm) in
relation to the first stop position. The
window cannot be operated during this
time.
Note:
In the event of an error, or if the
anti-pinch protection is activated three
consecutive times, the automatic closing
operation of the window will be
deactivated. In order to restore the
correct operation of the system, the
window must be lowered.
04166V0001EMPower Window Switches
1 — Front Left Window Switch
2 — Front Right Window Switch
3 — Rear Right Window Switch
4 — Window Lockout Switch
5 — Rear Left Window Switch
54
GETTING TO KNOW YOUR VEHICLE
Page 57 of 276
Power Window System Initialization
If power supply is interrupted, the
electric window automatic operation
must be re-initialized.
To perform the initialization procedure,
which must be done on each door with the
doors closed, manually fully close the
window to be initialized.
Warning!
Never leave children unattended in a vehicle,
and do not let children play with power
windows. Do not leave the key fob in or near
the vehicle, or in a location accessible to
children. Occupants, particularly unattended
children, can become entrapped by the
windows while operating the power window
switches. Such entrapment may result in
serious injury or death.
POWER SUNROOF — IF
EQUIPPED
Power Sunroof
The power sunroof consists of a single
glass panel and is fitted with a power
sunshade the full length of the panel.
Operation of the sunroof is only possible
with the ignition in ON mode. Refer to
“Ignition System” in this chapter for
further information.
The sunroof has three preset positions:
Fully closed.
Comfort (intermediate opening).
Fully open.
Note: You cannot have the sunshade
closed when the sunroof is open.
Warning!
Never leave children unattended in a
vehicle, or with access to an unlocked
vehicle. Never leave the key fob in or near
the vehicle, or in a location accessible to
children. Do not leave the ignition of a
vehicle equipped with keyless ignition in the
ON mode. Occupants, particularly
unattended children, can become entrapped
by the power sunroof while operating the
power sunroof switch. Such entrapment
may result in serious injury or death.
In a collision, there is a greater risk of
being thrown from a vehicle with an open
sunroof. You could also be seriously injured or killed. Always fasten your seat belt
properly and make sure all passengers are
also properly secured.
Do not allow small children to operate the
sunroof. Never allow your fingers, other
body parts, or any object, to project through
the sunroof opening. Injury may result.
Opening
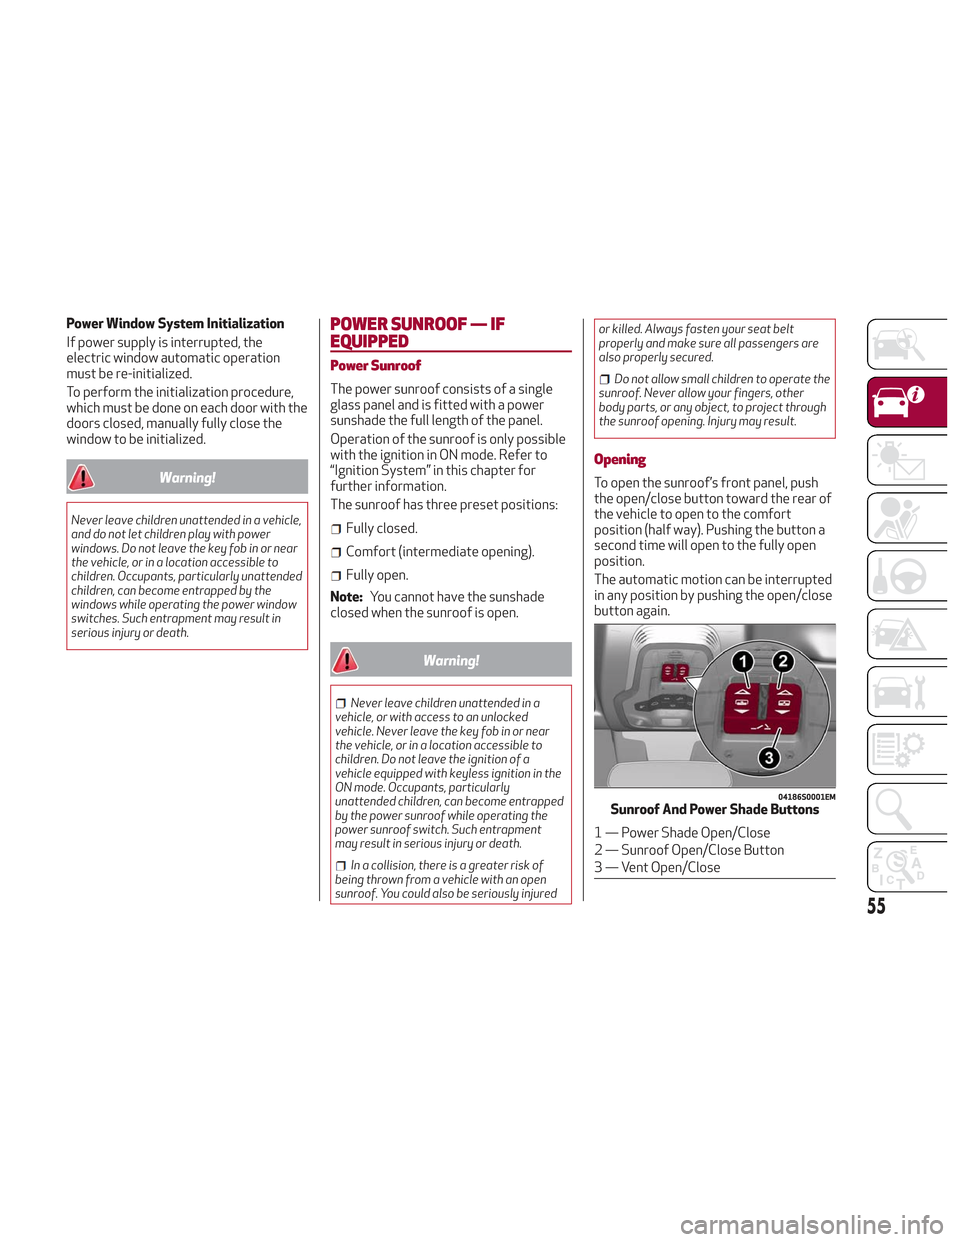
To open the sunroof’s front panel, push
the open/close button toward the rear of
the vehicle to open to the comfort
position (half way). Pushing the button a
second time will open to the fully open
position.
The automatic motion can be interrupted
in any position by pushing the open/close
button again.
04186S0001EMSunroof And Power Shade Buttons
1 — Power Shade Open/Close
2 — Sunroof Open/Close Button
3 — Vent Open/Close
55
Page 64 of 276
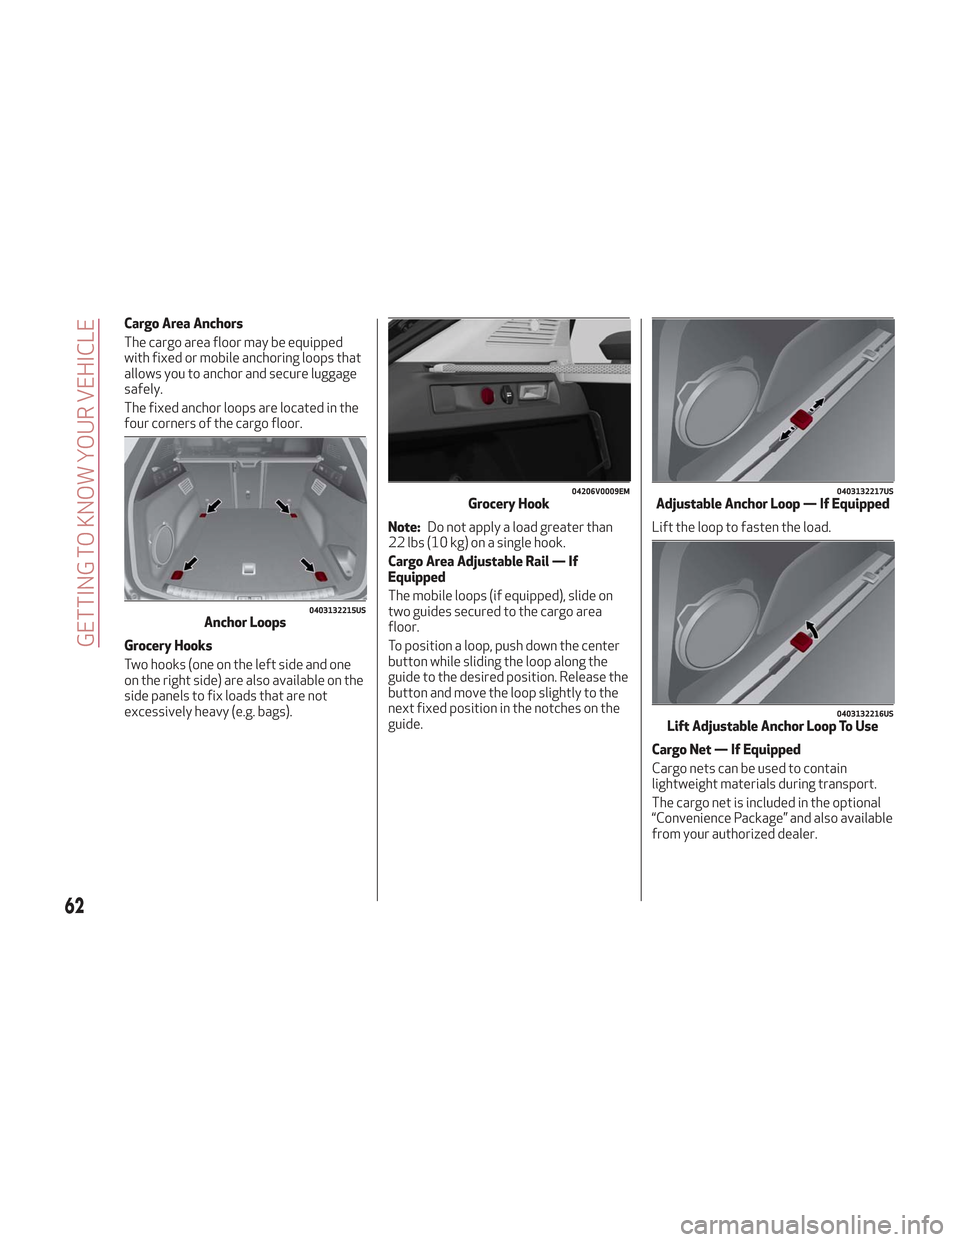
Cargo Area Anchors
The cargo area floor may be equipped
with fixed or mobile anchoring loops that
allows you to anchor and secure luggage
safely.
The fixed anchor loops are located in the
four corners of the cargo floor.
Grocery Hooks
Two hooks (one on the left side and one
on the right side) are also available on the
side panels to fix loads that are not
excessively heavy (e.g. bags).Note:
Do not apply a load greater than
22 lbs (10 kg) on a single hook.
Cargo Area Adjustable Rail — If
Equipped
The mobile loops (if equipped), slide on
two guides secured to the cargo area
floor.
To position a loop, push down the center
button while sliding the loop along the
guide to the desired position. Release the
button and move the loop slightly to the
next fixed position in the notches on the
guide. Lift the loop to fasten the load.
Cargo Net — If Equipped
Cargo nets can be used to contain
lightweight materials during transport.
The cargo net is included in the optional
“Convenience Package” and also available
from your authorized dealer.
0403132215USAnchor Loops
04206V0009EMGrocery Hook0403132217USAdjustable Anchor Loop — If Equipped
0403132216USLift Adjustable Anchor Loop To Use
62
GETTING TO KNOW YOUR VEHICLE
Page 97 of 276
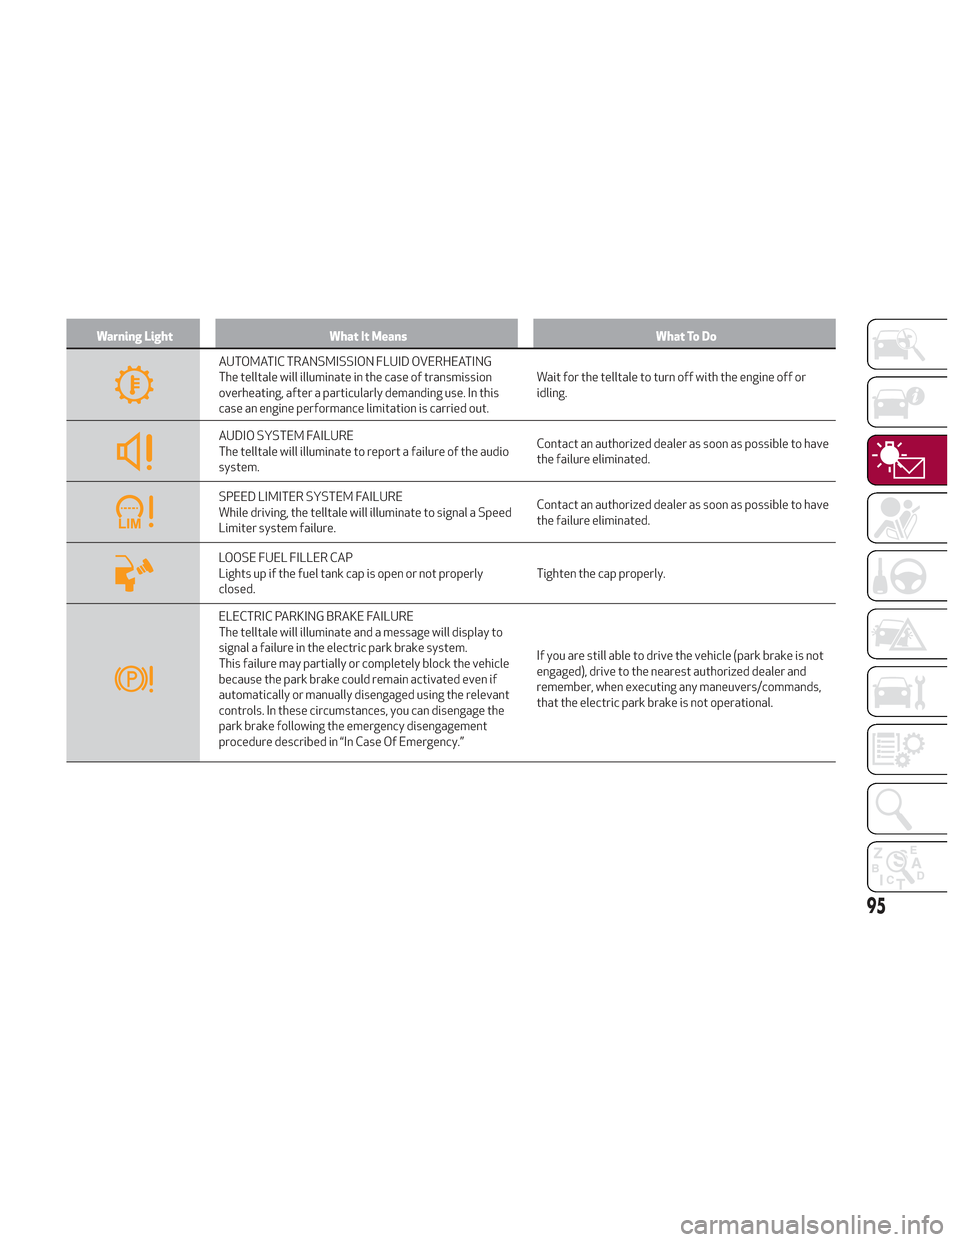
Warning LightWhat It Means What To Do
AUTOMATIC TRANSMISSION FLUID OVERHEATING
The telltale will illuminate in the case of transmission
overheating, after a particularly demanding use. In this
case an engine performance limitation is carried out.Wait for the telltale to turn off with the engine off or
idling.
AUDIO SYSTEM FAILURE
The telltale will illuminate to report a failure of the audio
system.
Contact an authorized dealer as soon as possible to have
the failure eliminated.
SPEED LIMITER SYSTEM FAILURE
While driving, the telltale will illuminate to signal a Speed
Limiter system failure.Contact an authorized dealer as soon as possible to have
the failure eliminated.
LOOSE FUEL FILLER CAP
Lights up if the fuel tank cap is open or not properly
closed.
Tighten the cap properly.
ELECTRIC PARKING BRAKE FAILURE
The telltale will illuminate and a message will display to
signal a failure in the electric park brake system.
This failure may partially or completely block the vehicle
because the park brake could remain activated even if
automatically or manually disengaged using the relevant
controls. In these circumstances, you can disengage the
park brake following the emergency disengagement
procedure described in “In Case Of Emergency.”If you are still able to drive the vehicle (park brake is not
engaged), drive to the nearest authorized dealer and
remember, when executing any maneuvers/commands,
that the electric park brake is not operational.
95
Page 103 of 276

ONBOARD DIAGNOSTIC
SYSTEM
Operation
The OBD (Onboard Diagnostic system)
carries out a continuous diagnosis of the
components of the vehicle related to
emissions.
It also alerts the driver of when these
components are no longer in peak
condition by switching on the
warning
light on the instrument panel (see
“Warning Lights And Messages”
paragraph in this chapter).
The aim of the OBD system (Onboard
Diagnostic) is to:
Monitor the efficiency of the system
Indicate an increase in emissions
Indicate the need to replace damaged
components
The vehicle also has a connector, which
can interface with appropriate tools, that
makes it possible to read the error codes
stored in the electronic control units
together with a series of specific
parameters for engine operation and
diagnosis. This check can be carried out
by your authorized dealer.
Note: After eliminating a fault, to check
the system completely, your authorized
dealer is obliged to run tests and, if
necessary certain road tests.
Onboard Diagnostic System (OBD II)
Cybersecurity
Your vehicle is required to have an
Onboard Diagnostic system (OBD II) and
a connection port to allow access to
information related to the performance
of your emissions controls. Authorized
service technicians may need to access
this information to assist with the
diagnosis and service of your vehicle and
emissions system.
Warning!
ONLY an authorized service technician
should connect equipment to the OBD II
connection port in order to diagnose or
service your vehicle.
If unauthorized equipment is connected to
the OBD II connection port, such as a
driver-behavior tracking device, it may:
Be possible that vehicle systems,
including safety related systems, could be
impaired or a loss of vehicle control could
occur that may result in an accident
involving serious injury or death.
Access, or allow others to access,
information stored in your vehicle systems,
including personal information.
EMISSIONS INSPECTION AND
MAINTENANCE PROGRAMS
In some localities, it may be a legal
requirement to pass an inspection of your
vehicle's emissions control system.
Failure to pass could prevent vehicle
registration.
For states that require
an Inspection and
Maintenance (I/M), this
check verifies the
“Malfunction Indicator
Light (MIL)” is functioning and is not on
when the engine is running, and that the
OBD II system is ready for testing.
Normally, the OBD II system will be ready.
The OBD II system may notbe ready if
your vehicle was recently serviced,
recently had a dead battery or a battery
replacement. If the OBD II system should
be determined not ready for the I/M test,
your vehicle may fail the test.
Your vehicle has a simple ignition
actuated test, which you can use prior to
going to the test station. To check if your
vehicle's OBD II system is ready, you
must do the following:
1. Cycle the ignition switch to the ON
position, but do not crank or start the
engine.
Note: If you crank or start the engine,
you will have to start this test over.
101
Page 119 of 276
OCCUPANT RESTRAINT
SYSTEMS
Some of the most important safety
features in your vehicle are the restraint
systems:
Occupant Restraint Systems Features
Seat Belt Systems
Supplemental Restraint Systems
(SRS) Air Bags
Child Restraints
Some of the safety features described in
this section may be standard equipment
on some models, or may be optional
equipment on others. If you are not sure,
ask your authorized dealer.
Important Safety Precautions
Please pay close attention to the
information in this section. It tells you
how to use your restraint system
properly, to keep you and your
passengers as safe as possible.
Here are some simple steps you can take
to minimize the risk of harm from a
deploying air bag:
1. Children 12 years old and under
should always ride buckled up in the rear
seat of a vehicle with a rear seat. 2. If a child from 2 to 12 years old (not in
a rear-facing child restraint) must ride in
the front passenger seat, move the seat
as far back as possible and use the
proper child restraint (refer to “Child
Restraints” in this section for further
information).
3. Children that are not big enough to
wear the vehicle seat belt properly (refer
to “Child Restraints” in this section for
further information) should be secured in
the rear seat of a vehicle with a rear seat
in child restraints or belt-positioning
booster seats. Older children who do not
use child restraints or belt-positioning
booster seats should ride properly
buckled up in the rear seat of a vehicle
with a rear seat.
4. Never allow children to slide the
shoulder belt behind them or under their
arm.
5. You should read the instructions
provided with your child restraint to
make sure that you are using it properly.
6. All occupants should always wear
their lap and shoulder belts properly.
7. The driver and front passenger seats
should be moved back as far as practical
to allow the front air bags room to inflate.
8. Do not lean against the door or
window. If your vehicle has side air bags,
and deployment occurs, the side air bags
will inflate forcefully into the space
between occupants and the door and
occupants could be injured.
9. If the air bag system in this vehicle
needs to be modified to accommodate a
disabled person, refer to the “Customer
Assistance” section for customer service
contact information.
Warning!
Never place a rear-facing child restraint in
front of an air bag. A deploying passenger
front air bag can cause death or serious
injury to a child 12 years or younger,
including a child in a rear-facing child
restraint.
Only use a rear-facing child restraint in
the rear seat of a vehicle with a rear seat.
117
Page 120 of 276
Seat Belt Systems
Buckle up even though you are an
excellent driver, even on short trips.
Someone on the road may be a poor
driver and could cause a collision that
includes you. This can happen far away
from home or on your own street.
Research has shown that seat belts save
lives, and they can reduce the
seriousness of injuries in a collision.
Some of the worst injuries happen when
people are thrown from the vehicle. Seat
belts reduce the possibility of ejection
and the risk of injury caused by striking
the inside of the vehicle. Everyone in a
motor vehicle should be belted at all
times.
Enhanced Seat Belt Use Reminder
System (BeltAlert)
Driver and Passenger BeltAlert (if
equipped)
BeltAlert is a feature intended to
remind the driver and outboard front
seat passenger (if equipped with
outboard front passenger seat BeltAlert)
to buckle their seat belts. The Belt Alert
feature is active whenever the ignition
switch is in the START or ON/RUN
position. Initial Indication
If the driver is unbuckled when the
ignition switch is first in the START or
ON/RUN position, a chime will signal for a
few seconds. If the driver or outboard
front seat passenger (if equipped with
outboard front passenger seat BeltAlert)
is unbuckled when the ignition switch is
first in the START or ON/RUN position
the Seat Belt Reminder Light will turn on
and remain on until both outboard front
seat belts are buckled. The outboard
front passenger seat BeltAlert is not
active when an outboard front passenger
seat is unoccupied.
BeltAlert Warning Sequence
The BeltAlert warning sequence is
activated when the vehicle is moving
above a specified vehicle speed range
and the driver or outboard front seat
passenger is unbuckled (if equipped with
outboard front passenger seat BeltAlert)
(the outboard front passenger seat
BeltAlert is not active when the outboard
front passenger seat is unoccupied). The
BeltAlert warning sequence starts by
blinking the Seat Belt Reminder Light and
sounding an intermittent chime. Once the
BeltAlert warning sequence has
completed, the Seat Belt Reminder Light
will remain on until the seat belts are
buckled. The BeltAlert warning sequence
may repeat based on vehicle speed until
the driver and occupied outboard front
seat passenger seat belts are buckled.The driver should instruct all occupants
to buckle their seat belts.
Change of Status
If the driver or outboard front seat
passenger (if equipped with outboard
front passenger seat BeltAlert)
unbuckles their seat belt while the
vehicle is traveling, the BeltAlert warning
sequence will begin until the seat belts
are buckled again.
The outboard front passenger seat
BeltAlert is not active when the outboard
front passenger seat is unoccupied.
BeltAlert may be triggered when an
animal or other items are placed on the
outboard front passenger seat or when
the seat is folded flat (if equipped). It is
recommended that pets be restrained in
the rear seat (if equipped) in pet
harnesses or pet carriers that are
secured by seat belts, and cargo is
properly stowed.Lap/Shoulder Belts
All seating positions in your vehicle are
equipped with lap/shoulder belts.
The seat belt webbing retractor will lock
only during very sudden stops or
collisions. This feature allows the
shoulder part of the seat belt to move
freely with you under normal conditions.
However, in a collision the seat belt will
lock and reduce your risk of striking the
inside of the vehicle or being thrown out
of the vehicle.
118
SAFETY