Page 177 of 241
Vehicle care175With power button
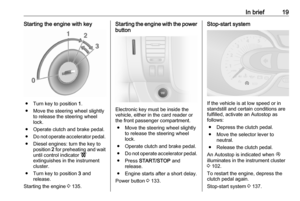
● Insert the electronic key in thecard reader.
● Press START/STOP without
pressing any of the pedals.
● Wait a few minutes before starting engine.
Power button 3 133.
If the engine fails to start, seek the
assistance of a workshop.
Starting the engine 3 135.
Wiper blade replacement
Wiper blades on the windscreen
Before replacing the wiper blades,
move the wiper lever to the
maintenance position (if equipped).
Windscreen wiper and washer 3 86.
Lift the wiper arm, press button to
disengage the wiper blade and
remove.
Attach new wiper blade slightly
angled to the wiper arm and push until
it engages.
Lower wiper arm carefully.
Wiper blade on the rear window
Lift wiper arm, press retaining lugs
together to disengage the wiper blade
and raise to remove.
Lower wiper arm carefully.
When attaching new wiper blade,
ensure it is engaged securely.
Page 178 of 241
176Vehicle careBulb replacement
Switch off the ignition and turn off the relevant switch or close the doors.
Only hold a new bulb at the base. Do
not touch the bulb glass with bare
hands.
Use only the same bulb type for
replacement.
Bulb check After a bulb replacement, switch on
the ignition, operate and check the
lights.
Headlights
Low beam and high beam Replace headlight bulbs from within
the engine compartment.
1. Remove protective cover by rotating it anticlockwise.
2. Detach wiring connector.
3. Release retaining clip (see illustration) and remove bulb.
4. Renew bulb and install retaining clip ensuring that bulb is in correct
orientation.
5. Reattach wiring connector and protective cover.
Sidelights / Daytime running lights
1. Remove protective cover byrotating it anticlockwise.
2. Release retaining clips and remove bulb holder from reflector
housing.
3. Renew bulb.
4. Install bulb holder in reflector housing and engage retaining
clips.
5. Install protective cover.
Page 179 of 241
Vehicle care177Daytime running light with LEDsDaytime running lights consist of
LEDs which cannot be changed.
Consult a workshop in case of a
defective LED.
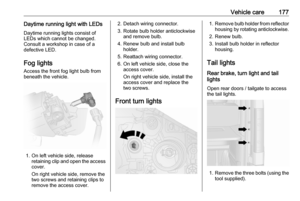
Fog lights
Access the front fog light bulb from
beneath the vehicle.
1. On left vehicle side, release retaining clip and open the accesscover.
On right vehicle side, remove the
two screws and retaining clips to
remove the access cover.
2. Detach wiring connector.
3. Rotate bulb holder anticlockwise and remove bulb.
4. Renew bulb and install bulb holder.
5. Reattach wiring connector.
6. On left vehicle side, close the access cover.
On right vehicle side, install the
access cover and replace the
two screws.
Front turn lights1. Remove bulb holder from reflector
housing by rotating anticlockwise.
2. Renew bulb.
3. Install bulb holder in reflector housing.
Tail lights
Rear brake, turn light and tail
lights
Open rear doors / tailgate to access
the tail lights.
1. Remove the three bolts (using the
tool supplied).
Page 180 of 241
178Vehicle care2.Carefully pull lamp assembly from
retaining pins on the outer side
and remove.
3. Detach wiring connector from lamp assembly.
4. Rotate bulb holder anticlockwise to separate from lamp.
5. Renew bulb.
6. Push to install the bulb holder into
the lamp, then rotate clockwise to secure.
7. Reattach wiring connector to lamp
assembly and check that it is
located correctly.
8. Replace lamp assembly into original position, ensuring that it isseated correctly on retaining pins.
9. Replace the three bolts.
Side turn lights
1. Release lamp assembly from fender by depressing clips using a
suitable tool and lift out lamp
assembly from aperture.
2. Remove bulb holder from lamp assembly by rotating
anticlockwise and renew bulb.
3. Install bulb holder in lamp assembly and install lamp
assembly into aperture.
Centre high-mounted brake
light
Rear doors 1. Open the rear doors.
2. Remove the two bolts from inside the rear doors.
Page 181 of 241
Vehicle care179
3. From outside the vehicle, removethe bulb holder by releasing the
clips with a flat blade screwdriver.
4. Renew bulb.
5. Install bulb holder and replace the
two bolts.
Tailgate 1. Open the tailgate.2. Remove the two bolts from the tailgate.
3. From outside the vehicle, remove the bulb holder by releasing the
clips with a flat blade screwdriver.
4. Renew bulb.
5. Install bulb holder and replace the
two bolts.
Reversing light
1. Remove the two bolts (using the tool supplied) and remove lamp
assembly.
2. Detach wiring connector from lamp assembly.
3. Rotate bulb housing anticlockwise
to separate from lamp assembly.
4. Renew lower bulb.
Page 182 of 241
180Vehicle care5.Push to install the bulb holder into
the lamp assembly, then rotate
clockwise to secure.
6. Reattach wiring connector to lamp
assembly.
7. Install lamp assembly with the two bolts.
Number plate light H1 roof height
1. Prise out lamp using a flat blade screwdriver.
2. Detach wiring connector.
3. Prise off lens to release the clips.
4. Renew bulb.
5. Install lens and reattach wiring connector.
6. Replace lamp in housing.
H2 roof height
1. Remove the two screws (using the tool supplied) to release lens.
2. Renew bulb.
3. Install lens in housing and replace
the two screws.
Fog tail light
1. Remove the two bolts (using the tool supplied) and remove lamp
assembly.
2. Detach wiring connector from lamp assembly.
3. Rotate bulb housing anticlockwise
to separate from lamp assembly.
4. Renew upper bulb.
5. Push to install the bulb holder into
the lamp assembly, then rotate
clockwise to secure.
Page 183 of 241
Vehicle care1816.Reattach wiring connector to lamp
assembly.
7. Install lamp assembly with the two bolts.
Interior lights
Front and rear courtesy lights
1. Release lens assembly from the clips and the locator using a flat
blade screwdriver.
2. Renew bulb.
3. Install lens assembly.
Rear seats lights
Have bulbs replaced by a workshop.
Load compartment light
1. Release lens assembly from the clips using a flat blade
screwdriver.
2. Remove rear cover on lamp assembly.
3. Renew bulb.
4. Install rear cover and lamp assembly.
Glovebox light
1. Remove lens assembly using a flat blade screwdriver.
2. Renew bulb.
3. Install lens assembly.
Page 184 of 241
182Vehicle careInstrument panel
illumination
Have bulbs replaced by a workshop.Electrical system
Fuses
Data on the replacement fuse must
match the data on the defective fuse.
There are two fuse boxes in the
vehicle:
● on the left-hand side of the instrument panel, behind the trim
panel
● in the engine compartment located next to the battery
Note
The engine compartment fuse box
should only be accessed by a
workshop.
Before replacing a fuse, turn off the
respective switch and the ignition.
There are different types of fuses inthe vehicle.
Depending on the type of fuse, a
blown fuse can be recognised by its
melted wire. Do not replace the fuse
until the cause of the fault has been
remedied.