Page 66 of 122
Operation and important rid ing points
5-5
5
If any en gine trou ble shoul d oc-
cur during the en gine break-in
period , imme diately have a
Yamaha dealer check the vehi-
cle.
EAU17214
Parkin g
When parking, stop the engine, and
then remove the key from the main
switch.
WARNING
EWA10312
Since the en gine an d exhaust
system can become very hot,
park in a place where ped estri-
ans or chil dren are not likely to
touch them and b e burne d.
Do not park on a slope or on soft
groun d, otherwise the vehicle
may overturn, increasin g the
risk of a fuel leak an d fire.
Do not park near g rass or other
flammab le materials which
mi ght catch fire.
UBP9E0E0.book Page 5 Wedne sday, February 8, 2017 8:34 AM
Page 69 of 122

Periodic maintenance an d a djustment
6-3
6
EAU71031
TIP
The annual checks must b e performed every year, except if a distance-
b ased maintenance is performed instead.
From 50000 km (30000 mi), repeat the maintenance intervals starting from
10000 km (6000 mi).
Items marked with an asterisk should be performed by a Yamaha dealer as
they require special tools, data and technical skills.
EAU71071
Perio dic maintenance chart for the emission control system
NO. ITEM
1 *Fuel line • Check fuel hoses for cracks or
damage.
• Replace if necessary. √√√√√
2 *Spark plu gs • Check condition.
• Adjust gap and clean.
√√
• Replace. √√
3 *Valve clearance • Check and adjust. Every 40000 km (24000 mi)
4 *Fuel injection • Check engine idle speed.
√√√√√√
• Check and adjust synchroniza- tion. √√√√√
5 *Exhaust system • Check for leakage.
• Tighten if necessary.
• Replace gaskets if necessary. √√√√√
6 *Evaporative emis-
sion control sys-
tem • Check control system for dam-
age.
• Replace if necessary. √√X 1000 km
CHECK OR
MAINTENANCE JOB
X 1000 mi
ODOMETER READINGS
ANNUAL CHECK
110203040
0.66121824
UBP9E0E0.book Page 3 Wedne sday, February 8, 2017 8:34 AM
Page 76 of 122

Periodic maintenance an d a djustment
6-10
6
EAU79401
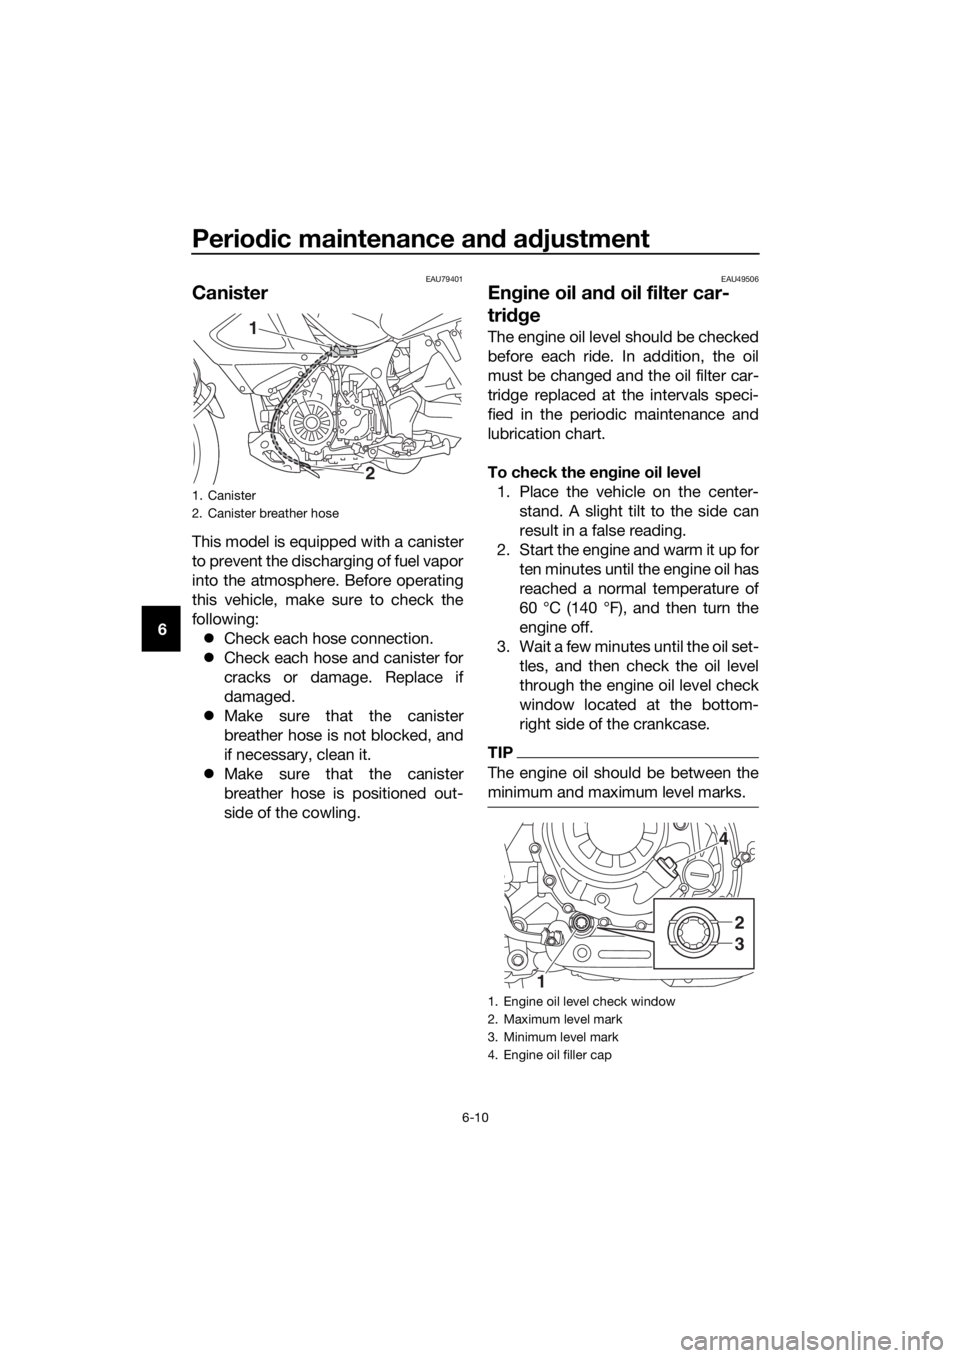
Canister
This model is equipped with a canister
to prevent the discharging of fuel vapor
into the atmosphere. Before operating
this vehicle, make sure to check the
following:
Check each hose connection.
Check each hose and canister for
cracks or damage. Replace if
damaged.
Make sure that the canister
breather hose is not blocked, and
if necessary, clean it.
Make sure that the canister
breather hose is positioned out-
side of the cowling.
EAU49506
Engine oil an d oil filter car-
tri dge
The engine oil level should be checked
before each ride. In addition, the oil
must be changed and the oil filter car-
tridge replaced at the intervals speci-
fied in the periodic maintenance and
lubrication chart.
To check the en gine oil level
1. Place the vehicle on the center- stand. A slight tilt to the side can
result in a false reading.
2. Start the engine and warm it up for ten minutes until the engine oil has
reached a normal temperature of
60 °C (140 °F), and then turn the
engine off.
3. Wait a few minutes until the oil set- tles, and then check the oil level
through the engine oil level check
window located at the bottom-
right side of the crankcase.
TIP
The engine oil should be between the
minimum and maximum level marks.
1. Canister
2. Canister breather hose
2
1
1. Engine oil level check window
2. Maximum level mark
3. Minimum level mark
4. Engine oil filler cap
4
2
3
1
UBP9E0E0.book Page 10 Wednesday, February 8, 2017 8:34 AM
Page 85 of 122

Periodic maintenance an d a djustment
6-19
6
EAU21402
Valve clearance
The valve clearance changes with use,
resulting in improper air-fuel mixture
and/or engine noise. To prevent this
from occurring, the valve clearance
must be adjusted by a Yamaha dealer
at the intervals specified in the periodic
maintenance and lubrication chart.
EAU64410
Tires
Tires are the only contact between the
vehicle and the road. Safety in all con-
ditions of riding depends on a relatively
small area of road contact. Therefore, it
is essential to maintain the tires in good
condition at all times and replace them
at the appropriate time with the speci-
fied tires.
Tire air pressure
The tire air pressure should be
checked and, if necessary, adjusted
before each ride.
WARNING
EWA10504
Operation of this vehicle with im-
proper tire pressure may cause se-
vere injury or d eath from loss of
control. The tire air pressure must b e
checked and a djuste d on col d
tires (i.e., when the temperature
of the tires equals the am bient
temperature).
The tire air pressure must b e
a d juste d in accor dance with the
ri din g speed and with the total
wei ght of ri der, passen ger, car-
g o, an d accessories approve d
for this mo del.
UBP9E0E0.book Page 19 Wednesday, February 8, 2017 8:34 AM
Page 98 of 122

Periodic maintenance an d a djustment
6-32
6
EAU58963
Replacin g the fuses
The fuse boxes and the ABS motor
fuse are located behind cowling A, and
the main fuse, the cruise control fuse
and the brake light fuse are located be-
hind cowling B. (See page 6-7.)
If a fuse is blown, replace it as follows.1. Turn the key to “OFF” and turn off the electrical circuit in question.
2. Remove the blown fuse, and then install a new fuse of the specified
amperage. WARNING! Do not
use a fuse of a hi gher ampera ge
ratin g than recommen ded to
avoi d causin g extensive dam-
a g e to the electrical system an d
possi bly a fire.
[EWA15132]
1. ABS motor fuse
2. ABS motor spare fuse
3. Main fuse
4. Spare fuse
5. Cruise control fuse
6. Brake light fuse
7. Fuse box
1
2
35
6
7
4
1. Headlight fuse
2. ABS solenoid fuse
3. Electronic throttle valve fuse
4. Fuel injection system fuse
5. Backup fuse (for clock and immobilizer sys-
tem)
6. Radiator fan motor fuse
7. Ignition fuse
8. Signaling system fuse
9. ABS control unit fuse
10.Terminal fuse 1 (for auxiliary DC jack)
11.Parking lighting fuse
12.O/P (option) fuse
13.Suspension fuse
14.Spare fuse
1
3
4
5
6
2789
10
14
13
11
1214
UBP9E0E0.book Page 32 Wednesday, February 8, 2017 8:34 AM
Page 99 of 122

Periodic maintenance an d a djustment
6-33
6
3. Turn the key to “ON” and turn on the electrical circuit in question to
check if the device operates.
4. If the fuse immediately blows again, have a Yamaha dealer
check the electrical system.
EAU39014
Replacin g a head light bul b
This model is equipped with halogen
bulb headlights. If a headlight bulb
burns out, replace it as follows.
NOTICE
ECA10651
Take care not to damag e the follow-
in g parts:
Hea dlig ht bul b
Do not touch the glass part of
the hea dlig ht bul b to keep it free
from oil, otherwise the transpar-
ency of the glass, the luminosity
of the b ulb, an d the b ulb life will
b e ad versely affected . Thor-
ou ghly clean off any d irt and fin-
g erprints on the head light bul b
usin g a cloth moistene d with al-
cohol or thinner.
Hea dlig ht lens
Do not affix any type of tinted
film or stickers to the head lig ht
lens.
Do not use a hea dlig ht bul b of a
watta ge hi gher than specifie d.
1. Remove the headlight bulb cover
by turning it counterclockwise.
Specified fuses:
Main fuse: 50.0 A
Terminal fuse 1:
3.0 A
Headlight fuse: 20.0 A
Brake light fuse: 1.0 A
Parking lighting fuse:
7.5 A
Signaling system fuse: 7.5 A
Ignition fuse: 20.0 A
Radiator fan motor fuse:
20.0 A
Backup fuse: 7.5 A
Electronic throttle valve fuse: 7.5 A
Fuel injection system fuse:
20.0 A
ABS solenoid fuse: 20.0 A
ABS control unit fuse: 7.5 A
ABS motor fuse:
30.0 A
Suspension fuse: 15.0 A
Cruise control fuse: 1.0 A
O/P (option) fuse:
20.0 A
1. Do not touch the glass part of the bulb.
UBP9E0E0.book Page 33 Wednesday, February 8, 2017 8:34 AM
Page 105 of 122

Periodic maintenance an d a djustment
6-39
6
EAU25872
Trou bleshootin g
Although Yamaha motorcycles receive
a thorough inspection before shipment
from the factory, trouble may occur
during operation. Any problem in the
fuel, compression, or ignition systems,
for example, can cause poor starting
and loss of power.
The following troubleshooting charts
represent quick and easy procedures
for checking these vital systems your-
self. However, should your motorcycle
require any repair, take it to a Yamaha
dealer, whose skilled technicians have
the necessary tools, experience, and
know-how to service the motorcycle
properly.
Use only genuine Yamaha replace-
ment parts. Imitation parts may look
like Yamaha parts, but they are often
inferior, have a shorter service life and
can lead to expensive repair bills.
WARNING
EWA15142
When checkin g the fuel system, d o
not smoke, an d make sure there are
no open flames or sparks in the ar-
ea, inclu din g pilot li ghts from water
heaters or furnaces. Gasoline or
g asoline vapors can i gnite or ex-
plo de, causin g severe injury or prop-
erty damag e.
UBP9E0E0.book Page 39 Wednesday, February 8, 2017 8:34 AM
Page 106 of 122

Periodic maintenance an d a djustment
6-40
6
EAU63470
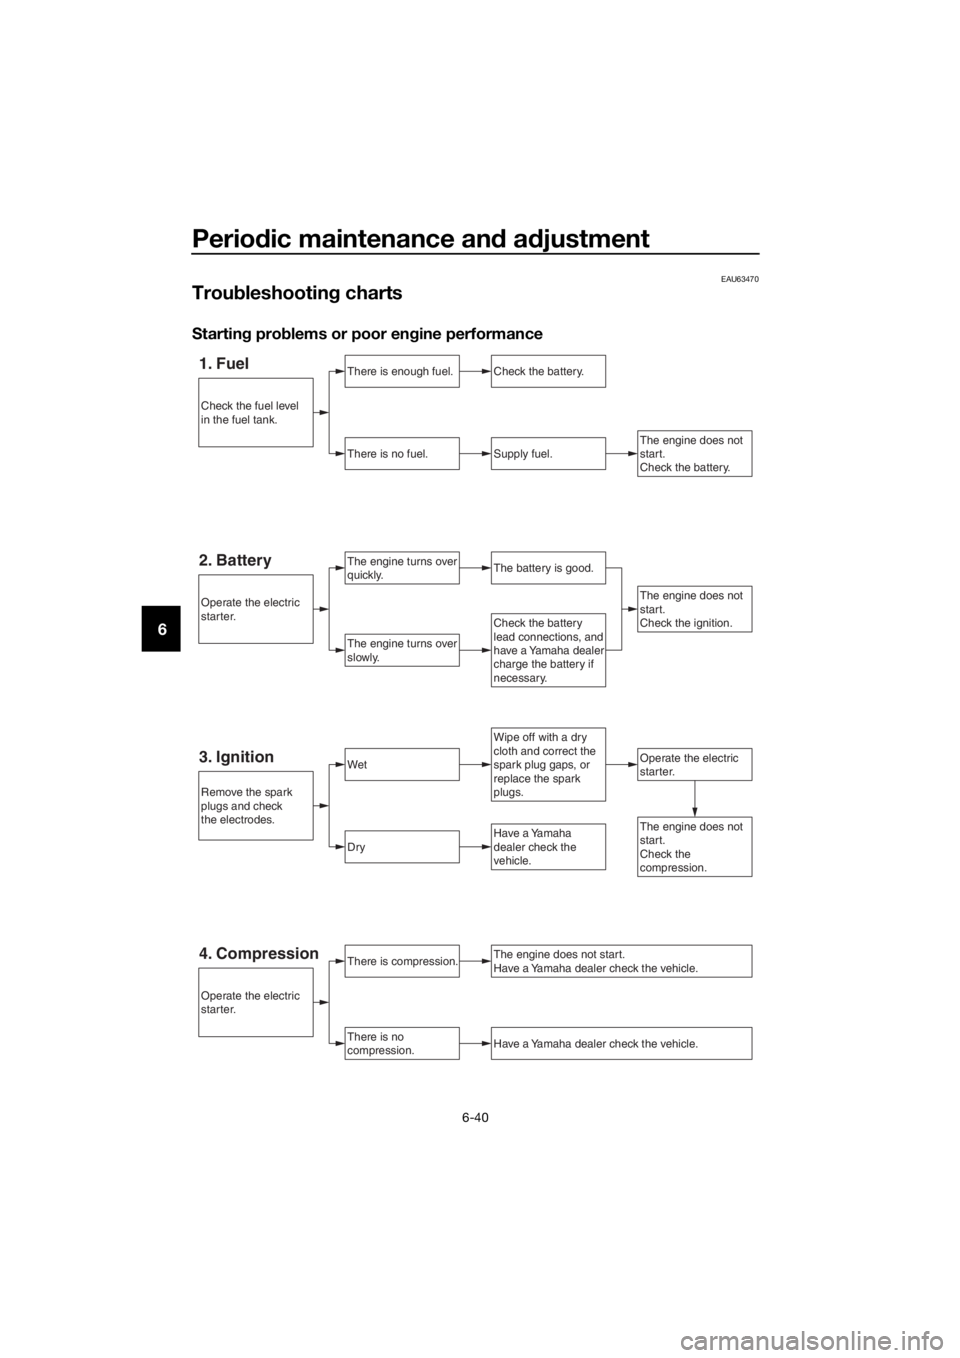
Trou bleshootin g charts
Startin g pro blems or poor en gine performance
1. FuelThere is enough fuel.
There is no fuel.
Check the battery.
Supply fuel.
The engine turns over
quickly.
The engine turns over
slowly.
The engine does not
start.
Check the battery.
Wipe off with a dry
cloth and correct the
spark plug gaps, or
replace the spark
plugs.
Check the battery
lead connections, and
have a Yamaha dealer
charge the battery if
necessary.
2. BatteryThe battery is good.
The engine does not
start.
Check the ignition.
3. IgnitionWetOperate the electric
starter.
Dry
There is compression.
There is no
compression.
The engine does not start.
Have a Yamaha dealer check the vehicle.
Have a Yamaha dealer check the vehicle.
The engine does not
start.
Check the
compression.Have a Yamaha
dealer check the
vehicle.
Remove the spark
plugs and check
the electrodes.
Operate the electric
starter.
Operate the electric
starter.
Check the fuel level
in the fuel tank.
4. Compression
UBP9E0E0.book Page 40 Wednesday, February 8, 2017 8:34 AM