Page 42 of 116

Instrument and control functions
4-16
4 When the vehicle is turned on, traction
control is automatically turned on.
To turn the traction control system off,
use the “INFO” switch to change the
information display to the traction con-
trol system display. Then push the “IN-
FO” switch for three seconds. The
display will show “TCSOFF” , and the
“TCS” indicator light will come on.
TIP
Turn the traction control system off to
help free the rear wheel if the vehicle
gets stuck in mud, sand, or other soft
surfaces.
NOTICE
ECA16801
Use only the specifie
d tires. (See
pa ge 7-19.) Usin g different sized
tires will prevent the traction control
system from controllin g tire rotation
accurately.
Resettin g the traction control sys-
tem
The traction control system will auto-
matically disable under certain condi-
tions; such as when a sensor fault is
detected, or when only one wheel is al-
lowed to rotate for more than a few seconds. Should this happen, the “ ”
indicator light will come on, and possi-
bly the “ ” warning light, too.
TIP
When the vehicle is on the centerstand,
do not rev the engine for an extended
period of time. Otherwise, the traction
control system will automatically dis-
able and need to be reset.
If the traction control system automat-
ically disables, try resetting it as fol-
lows.
1. Stop the vehicle and turn it off completely.
2. Wait a few seconds and then turn the vehicle power on.
3. The “ ” indicator light should turn off and the system be en-
abled.
TIP
If the “ ” indicator light remains on af-
ter resetting, the vehicle may still be
ridden; however, have a Yamaha deal-
er check the vehicle as soon as possi-
ble.
4. Have a Yamaha dealer check thevehicle and turn off the “ ”
warning light.
1. Traction control system indicator light “ ”
2. Traction control system display
12
1. Traction control system indicator light “ ”
2. Engine trouble warning light “ ”
21
UB74E0E0.book Page 16 Tuesday, May 2, 2017 1:04 PM
Page 43 of 116
Instrument and control functions
4-17
4
EAU78502
Fuel tank cap
To remove the fuel tank cap
1. Turn the main switch to “ ” to open the fuel tank cap lid.
2. Turn the fuel tank cap counter- clockwise until the release
mark “ ” aligns with “ ”, and
then pull the cap off.
To install the fuel tank cap 1. Insert the fuel tank cap onto the tank opening and turn it clockwise
until the install mark “ ” aligns
with “ ”. 2. Close the fuel tank cap lid.
WARNING
EWA11092
Make sure that the fuel tank cap is
properly close
d after fillin g fuel.
Leakin g fuel is a fire hazar d.
1. Fuel tank cap lid
1. Fuel tank cap
2. Release mark “ ”
1
1
2
1. Install mark “ ”
1
UB74E0E0.book Page 17 Tuesday, May 2, 2017 1:04 PM
Page 44 of 116

Instrument and control functions
4-18
4
EAU13213
Fuel
Make sure there is sufficient gasoline in
the tank.
WARNING
EWA10882
Gasoline an d g asoline vapors are
extremely flamma ble. To avoi d fires
an d explosions an d to re duce the
risk of injury when refuelin g, follow
these instructions.
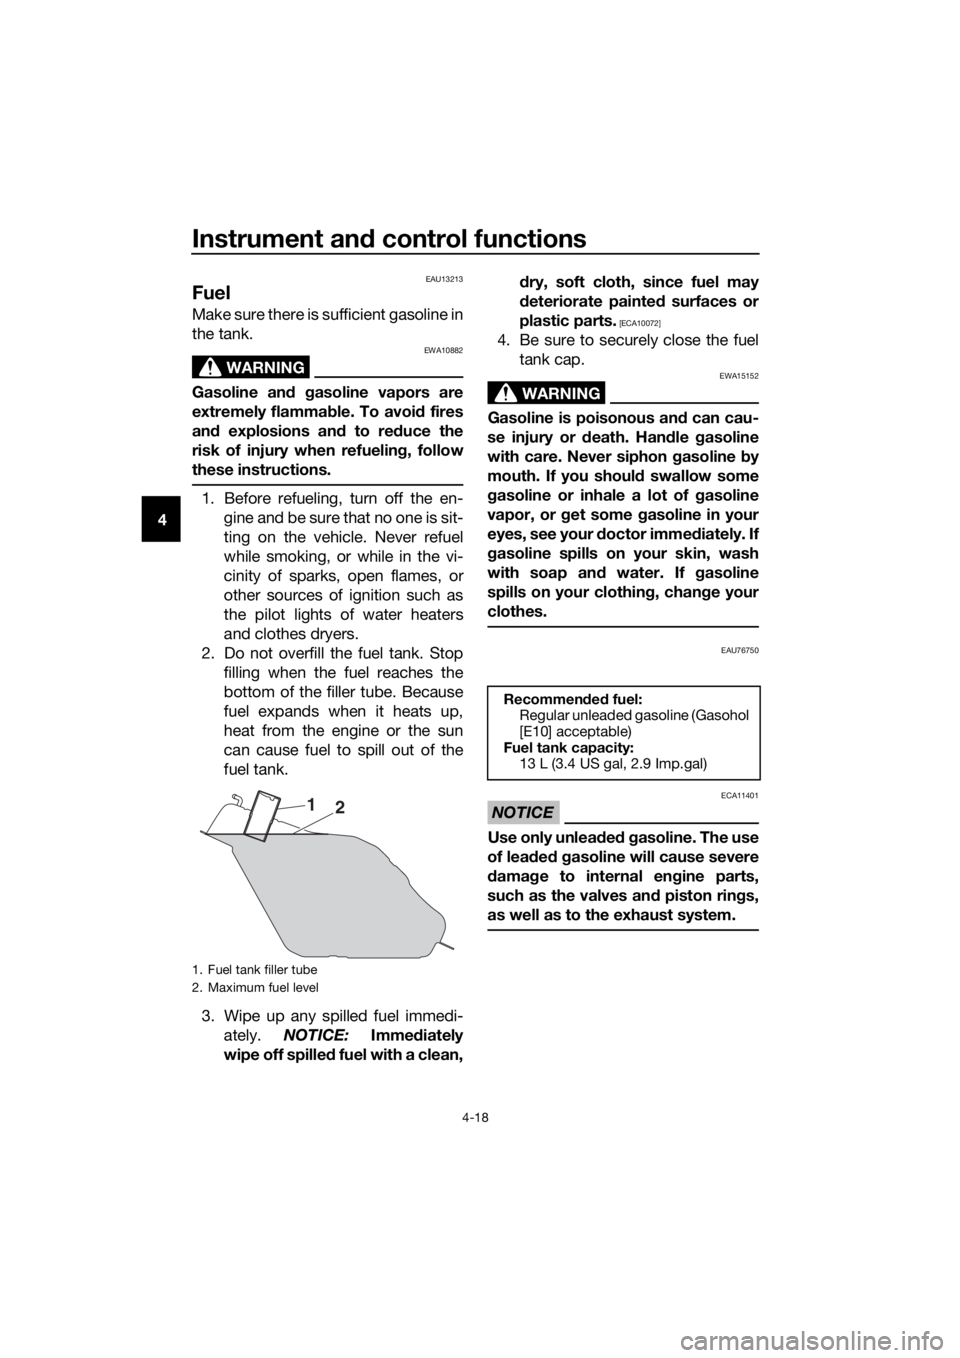
1. Before refueling, turn off the en- gine and be sure that no one is sit-
ting on the vehicle. Never refuel
while smoking, or while in the vi-
cinity of sparks, open flames, or
other sources of ignition such as
the pilot lights of water heaters
and clothes dryers.
2. Do not overfill the fuel tank. Stop filling when the fuel reaches the
bottom of the filler tube. Because
fuel expands when it heats up,
heat from the engine or the sun
can cause fuel to spill out of the
fuel tank.
3. Wipe up any spilled fuel immedi- ately. NOTICE: Immediately
wipe off spille d fuel with a clean, d
ry, soft cloth, since fuel may
d eteriorate painte d surfaces or
plastic parts.
[ECA10072]
4. Be sure to securely close the fuel tank cap.
WARNING
EWA15152
Gasoline is poisonous an d can cau-
se injury or death. Han dle gasoline
with care. Never siphon gasoline by
mouth. If you shoul d swallow some
g asoline or inhale a lot of gasoline
vapor, or get some g asoline in your
eyes, see your doctor imme diately. If
g asoline spills on your skin, wash
with soap an d water. If gasoline
spills on your clothin g, chan ge your
clothes.
EAU76750
NOTICE
ECA11401
Use only unlea ded g asoline. The use
of lead ed g asoline will cause severe
d amag e to internal en gine parts,
such as the valves an d piston rin gs,
as well as to the exhaust system.
1. Fuel tank filler tube
2. Maximum fuel level
1 2
Recommen ded fuel:
Regular unleaded gasoline (Gasohol
[E10] acceptable)
Fuel tank capacity: 13 L (3.4 US gal, 2.9 Imp.gal)
UB74E0E0.book Page 18 Tuesday, May 2, 2017 1:04 PM
Page 46 of 116

Instrument and control functions
4-20
4
EAU13447
Catalytic converters
This vehicle is equipped with catalytic
converters in the exhaust system.
WARNING
EWA10863
The exhaust system is hot after op-
eration. To prevent a fire hazar d or
b urns:
�z Do not park the vehicle near
possi ble fire hazard s such as
g rass or other materials that
easily burn.
�z Park the vehicle in a place
where pe destrians or chil dren
are not likely to touch the hot
exhaust system.
�z Make sure that the exhaust sys-
tem has coole d down before
d oin g any maintenance work.
�z Do not allow the en gine to id le
more than a few minutes. Lon g
i d lin g can cause a b uild-up of
heat.
NOTICE
ECA10702
Use only unlea ded g asoline. The use
of lead ed g asoline will cause unre-
pairab le dama ge to the catalytic
converter.
EAU78512
Stora ge compartments
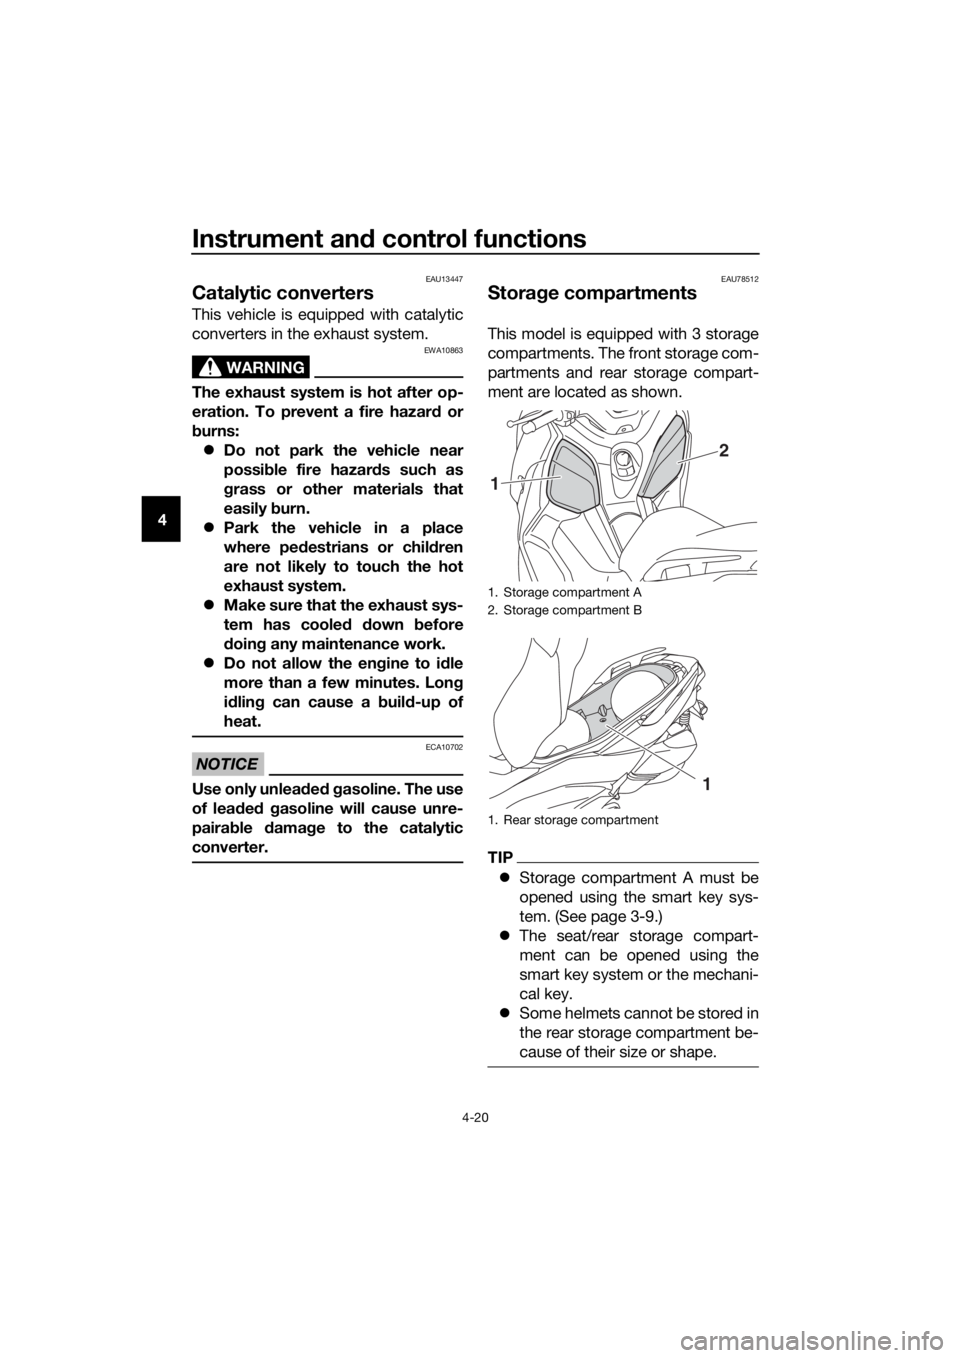
This model is equipped with 3 storage
compartments. The front storage com-
partments and rear storage compart-
ment are located as shown.
TIP
�z Storage compartment A must be
opened using the smart key sys-
tem. (See page 3-9.)
�z The seat/rear storage compart-
ment can be opened using the
smart key system or the mechani-
cal key.
�z Some helmets cannot be stored in
the rear storage compartment be-
cause of their size or shape.
1. Storage compartment A
2. Storage compartment B
1. Rear storage compartment
2
1
1
UB74E0E0.book Page 20 Tuesday, May 2, 2017 1:04 PM
Page 48 of 116

Instrument and control functions
4-22
4 �z
Since the storag e compartment
accumulates heat when ex-
posed to the sun an d/or the en-
g ine heat, d o not store anythin g
suscepti ble to heat, consum-
a b les or flamma ble items insi de
it.
�z To avoi d humi dity from sprea d-
in g throu gh the stora ge com-
partment, wrap wet articles in a
plastic bag b efore storin g them
in the compartment.
�z Since the storag e compartment
may get wet while the vehicle is
b ein g washed , wrap any articles
store d in the compartment in a
plastic bag .
�z Do not keep anythin g valua ble
or breakab le in the stora ge
compartment.
WARNING
EWA15401
Do not exceed the maximum loa d of
161 k g (355 l b) for the vehicle.
EAU78521
Win dshield
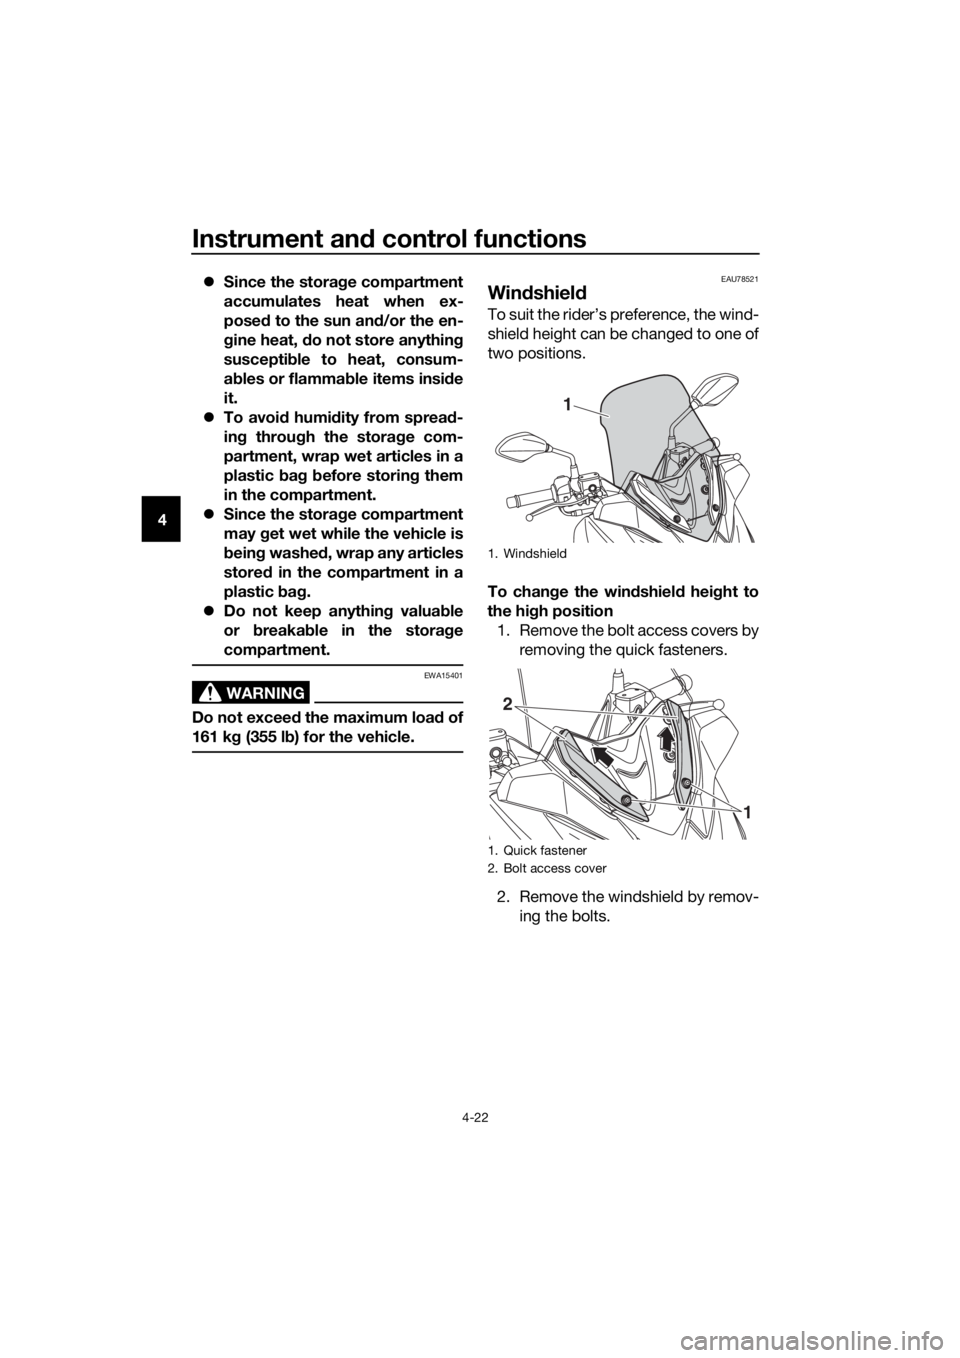
To suit the rider’s preference, the wind-
shield height can be changed to one of
two positions.
To chan ge the win dshiel d hei ght to
the hi gh position
1. Remove the bolt access covers by removing the quick fasteners.
2. Remove the windshield by remov- ing the bolts.
1. Windshield
1. Quick fastener
2. Bolt access cover
1
2
1
UB74E0E0.book Page 22 Tuesday, May 2, 2017 1:04 PM
Page 49 of 116
Instrument and control functions
4-23
4
3. Remove the bolts, and then install
the bolts in the desired position.
4. Install the windshield to the high position by installing the bolts, and
then tighten the bolts to the spec-
ified torque. WARNING! A loose
win dshiel d coul d cause an acci-
d ent. Be sure to ti ghten the
screws to the specified torque.
[EWA15511]
5. Place the bolt access covers, and
then install the quick fasteners.
To chan ge the win dshield height to
the low position 1. Remove the bolt access covers by removing the quick fasteners.
2. Remove the windshield by remov- ing the bolts.
3. Remove the bolts, and then install the bolts in the desired position.
1. Bolt
1. Bolt
1. Bolt
1
1
1
1
1
1
1. Bolt
Tightenin g torque:
Windshield bolt: 8 N·m (0.8 kgf·m, 5.8 lb·ft)
1. Bolt access cover
1
1
1
UB74E0E0.book Page 23 Tuesday, May 2, 2017 1:04 PM
Page 50 of 116
Instrument and control functions
4-24
4
4. Install the windshield to the lowposition by installing the bolts, and
then tighten the bolts to the spec-
ified torque. WARNING! A loose
win dshield could cause an acci-
d ent. Be sure to ti ghten the
screws to the specified torque.
[EWA15511]
5. Place the bolt access covers, and
then install the quick fasteners.
1. Bolt
1. Bolt
1. Bolt
1
1
1
1
1
1
Tightening torque:
Windshield bolt: 8 N·m (0.8 kgf·m, 5.8 lb·ft)
UB74E0E0.book Page 24 Tuesday, May 2, 2017 1:04 PM
Page 51 of 116

Instrument and control functions
4-25
4
EAU46833
Han dle bar position
The handlebar can be adjusted to one
of two positions to suit the rider’s pref-
erence. Have a Yamaha dealer adjust
the position of the handlebar.
EAU14893
A djustin g the shock a bsor ber
assem blies
WARNING
EWA10211
Always a djust both shock ab sorber
assem blies equally, otherwise poor
han dlin g an d loss of sta bility may re-
sult.
Each shock absorber assembly is
equipped with a spring preload adjust-
ing ring.
NOTICE
ECA10102
To avoi d d amag ing the mechanism,
d o not attempt to turn b eyond the
maximum or minimum settin gs.
Adjust the spring preload as follows.
To increase the spring preload and
thereby harden the suspension, turn
the adjusting ring on each shock ab-
sorber assembly in direction (a). To de-
crease the spring preload and thereby
soften the suspension, turn the adjust-
ing ring on each shock absorber as-
sembly in direction (b).
�z Align the appropriate notch in the
adjusting ring with the position in-
dicator on the shock absorber.
�z Use the spring preload adjusting
tool included in the owner’s tool
kit to make this adjustment.
1. Handlebar
1
UB74E0E0.book Page 25 Tuesday, May 2, 2017 1:04 PM