2017 YAMAHA WR 250F fuel pump
[x] Cancel search: fuel pumpPage 323 of 432

8
FUEL SYSTEM
FUEL TANK...................................................................................................... 8-1
REMOVING THE FUEL TANK ................................................................... 8-3
REMOVING THE FUEL PUMP .................................................................. 8-3
CHECKING THE FUEL PUMP BODY........................................................ 8-3
INSTALLING THE FUEL PUMP ................................................................. 8-3
REMOVING THE FUEL SENDER.............................................................. 8-4
CHECKING THE FUEL SENDER .............................................................. 8-4
INSTALLING THE FUEL SENDER ............................................................ 8-4
INSTALLING THE FUEL TANK.................................................................. 8-4
CHECKING THE FUEL PRESSURE ......................................................... 8-5
CHECKING THE DAMPER ........................................................................ 8-6
CHECKING AND REPLACING THE PROTECTOR .................................. 8-6
THROTTLE BODY............................................................................................ 8-7
CHECKING THE INJECTOR ................................................................... 8-10
CHECKING THE THROTTLE BODY ....................................................... 8-10
CHECKING THE THROTTLE BODY JOINT ............................................ 8-10
ADJUSTING THE THROTTLE POSITION SENSOR............................... 8-11
Page 324 of 432

FUEL TANK
8-1
EAS2GBB338
TIP
This section is intended for those who have basic knowledge and skill concerning the servicing of
Yamaha motorcycles (e.g., Yamaha dealers, service engineers, etc.). Those who have little knowl-
edge and skill concerning servicing are requested not to undertake inspection, adjustment, disas-
sembly, or reassembly only by reference to this manual. It may lead to servicing trouble and
mechanical damage.
EAS2GBB339
FUEL TANK
Removing the fuel tank
Order Part name Q’ty Remarks
Seat Refer to “GENERAL CHASSIS” on page 5-1.
Side cover (left/right)
Air scoop (left/right)
1 Fuel pump coupler 1 Disconnect.
2 Fuel hose 1 Disconnect.
3Fuel tank 1
4 Fuel pump bracket 1
5 Fuel pump 1
6 Fuel pump gasket 1
7 Fuel sender 1
4(6) (2)
(2) (2)(2)2
5
6
3
1
New
4.0 Nm (0.40 m kgf, 2.9 ft Ibf)T.R.
7 Nm (0.7 m kgf, 5.1 ft Ibf)T.R.
7 Nm (0.7 m kgf, 5.1 ft Ibf)T.R.
7 Nm (0.7 m kgf, 5.1 ft Ibf)T.R.
9 Nm (0.9 m kgf, 6.5 ft Ibf)T.R.
4.0 Nm (0.40 m kgf, 2.9 ft Ibf)T.R.
4.0 Nm (0.40 m kgf, 2.9 ft Ibf)T.R.
7
Page 326 of 432

FUEL TANK
8-3
EAS2GBB340REMOVING THE FUEL TANK
1. Extract the fuel in the fuel tank through the
fuel tank cap with a pump.
2. Remove:
• Fuel hose coupler
EWA
WARNING
Cover the fuel hose connection with a cloth
when disconnecting it. This is because re-
sidual pressure in the fuel hose could cause
fuel to spurt out when the hose is removed.
ECA
NOTICE
Make sure that the fuel hose is disconnect-
ed by hand. Do not forcefully disconnect the
hose with tools.
TIP
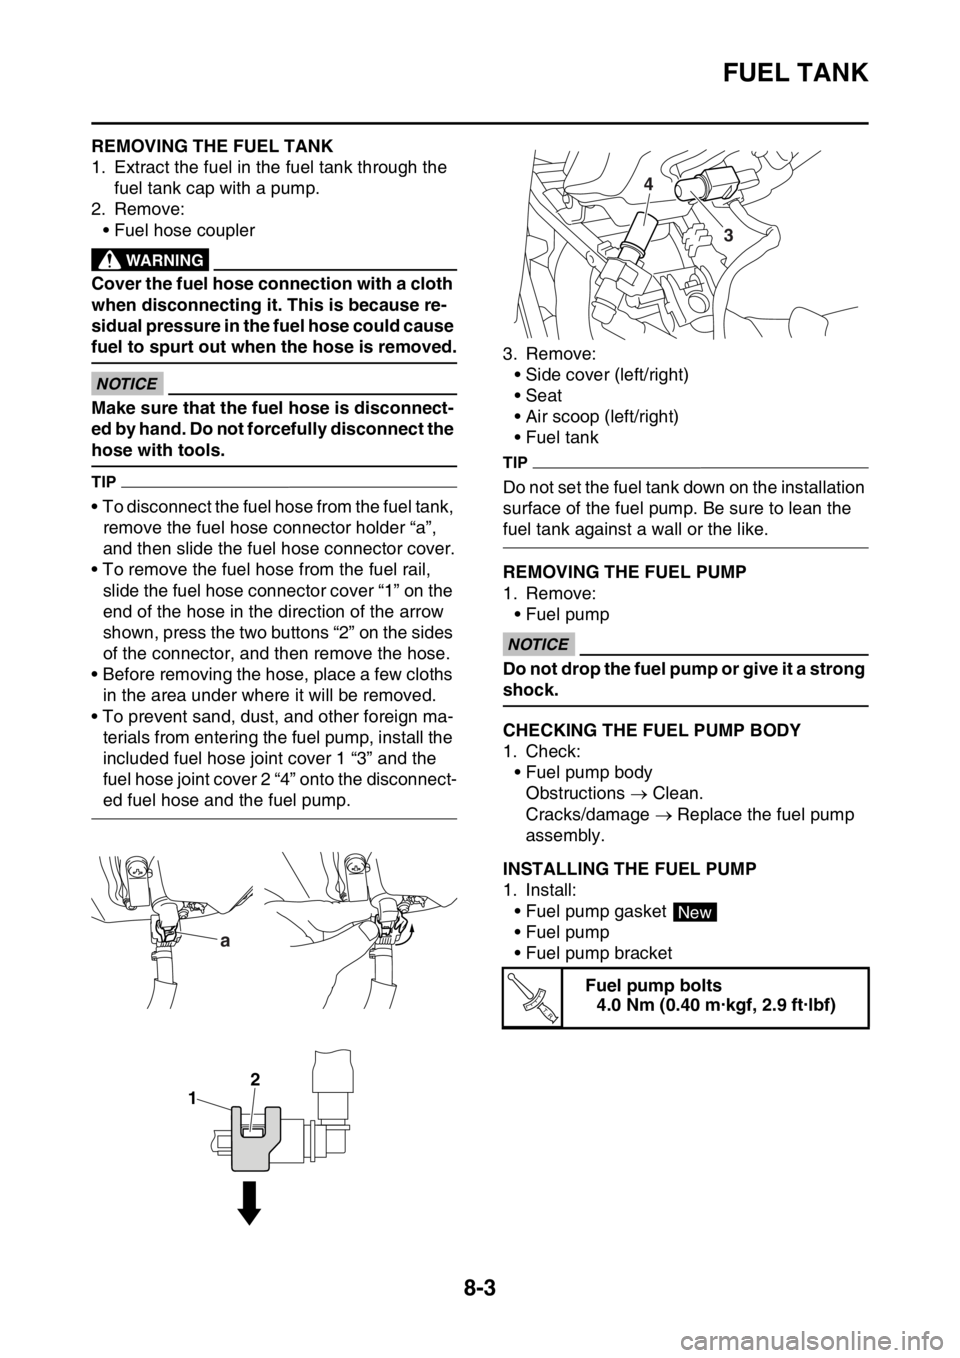
• To disconnect the fuel hose from the fuel tank,
remove the fuel hose connector holder “a”,
and then slide the fuel hose connector cover.
• To remove the fuel hose from the fuel rail,
slide the fuel hose connector cover “1” on the
end of the hose in the direction of the arrow
shown, press the two buttons “2” on the sides
of the connector, and then remove the hose.
• Before removing the hose, place a few cloths
in the area under where it will be removed.
• To prevent sand, dust, and other foreign ma-
terials from entering the fuel pump, install the
included fuel hose joint cover 1 “3” and the
fuel hose joint cover 2 “4” onto the disconnect-
ed fuel hose and the fuel pump.3. Remove:
• Side cover (left/right)
• Seat
• Air scoop (left/right)
• Fuel tank
TIP
Do not set the fuel tank down on the installation
surface of the fuel pump. Be sure to lean the
fuel tank against a wall or the like.
EAS2GBB341REMOVING THE FUEL PUMP
1. Remove:
• Fuel pump
ECA
NOTICE
Do not drop the fuel pump or give it a strong
shock.
EAS2GBB342CHECKING THE FUEL PUMP BODY
1. Check:
• Fuel pump body
Obstructions Clean.
Cracks/damage Replace the fuel pump
assembly.
EAS2GBB343INSTALLING THE FUEL PUMP
1. Install:
• Fuel pump gasket
• Fuel pump
• Fuel pump bracket
a
1
2
Fuel pump bolts
4.0 Nm (0.40 m·kgf, 2.9 ft·lbf)
3 4
New
T R..
Page 327 of 432

FUEL TANK
8-4
TIP
• Take care not to damage the installation sur-
faces of the fuel tank.
• Always use a new fuel pump gasket.
• Install the lip on the fuel pump gasket upward.
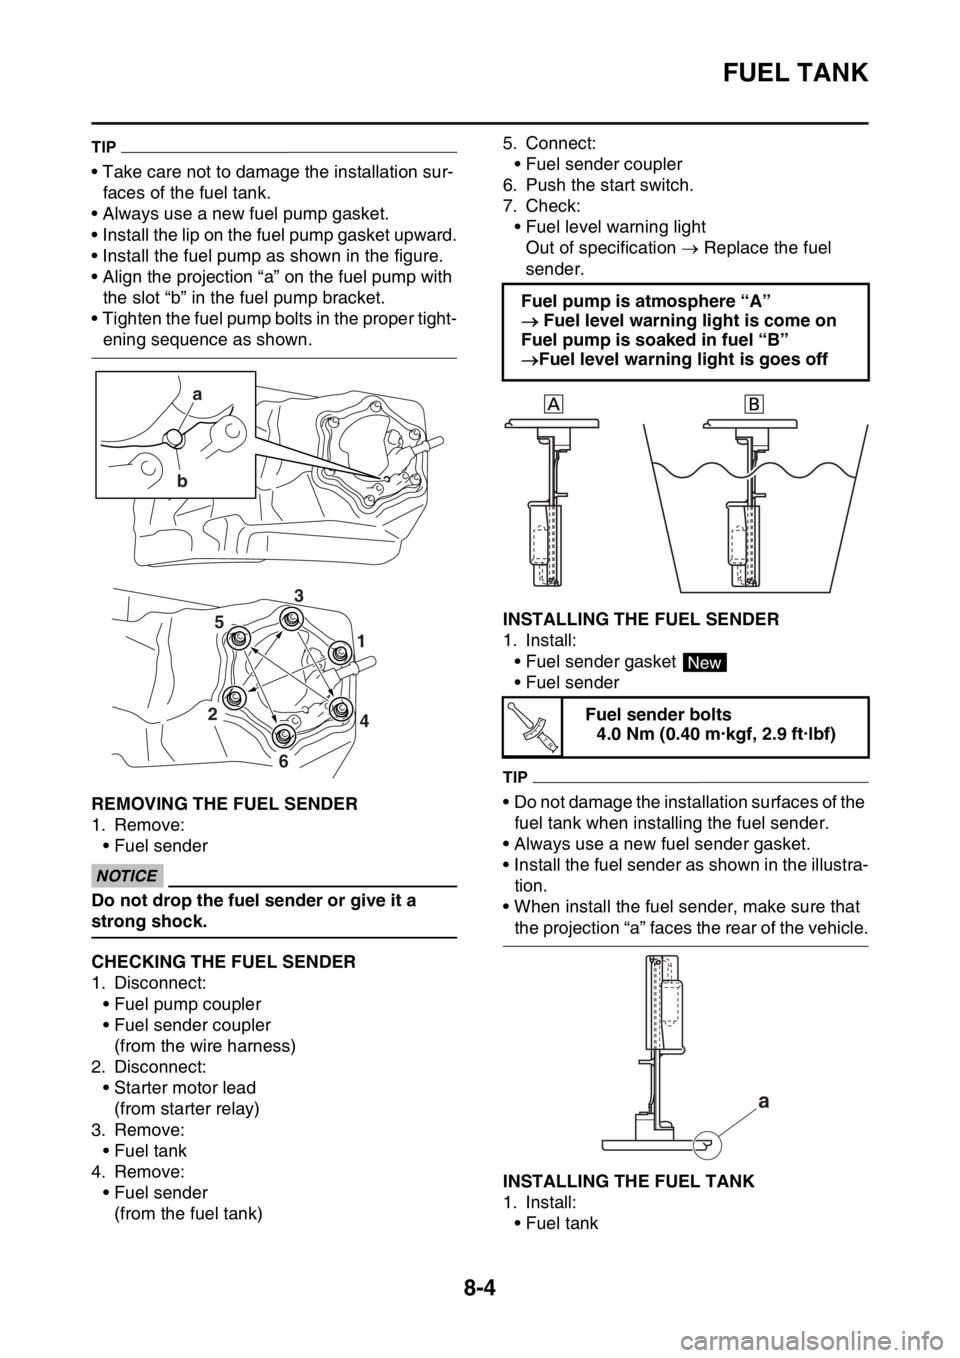
• Install the fuel pump as shown in the figure.
• Align the projection “a” on the fuel pump with
the slot “b” in the fuel pump bracket.
• Tighten the fuel pump bolts in the proper tight-
ening sequence as shown.
EAS2GBB344REMOVING THE FUEL SENDER
1. Remove:
• Fuel sender
ECA
NOTICE
Do not drop the fuel sender or give it a
strong shock.
EAS2GBB345CHECKING THE FUEL SENDER
1. Disconnect:
• Fuel pump coupler
• Fuel sender coupler
(from the wire harness)
2. Disconnect:
• Starter motor lead
(from starter relay)
3. Remove:
• Fuel tank
4. Remove:
• Fuel sender
(from the fuel tank)5. Connect:
• Fuel sender coupler
6. Push the start switch.
7. Check:
• Fuel level warning light
Out of specification Replace the fuel
sender.
EAS2GBB346INSTALLING THE FUEL SENDER
1. Install:
• Fuel sender gasket
• Fuel sender
TIP
• Do not damage the installation surfaces of the
fuel tank when installing the fuel sender.
• Always use a new fuel sender gasket.
• Install the fuel sender as shown in the illustra-
tion.
• When install the fuel sender, make sure that
the projection “a” faces the rear of the vehicle.
EAS2GBB347INSTALLING THE FUEL TANK
1. Install:
• Fuel tank
a
b
4 1
2
6
53
Fuel pump is atmosphere “A”
Fuel level warning light is come on
Fuel pump is soaked in fuel “B”
Fuel level warning light is goes off
Fuel sender bolts
4.0 Nm (0.40 m·kgf, 2.9 ft·lbf)
New
T R..
a
Page 328 of 432

FUEL TANK
8-5
2. Connect:
• Fuel hose
ECA
NOTICE
• Connect the fuel hose securely, and check
that the orientation of the installed fuel
hose holder is correct.
• Take care not to kink or pinch the fuel
hose.
TIP
• Insert the fuel hose into the fuel pipe securely
until you hear a “click”.
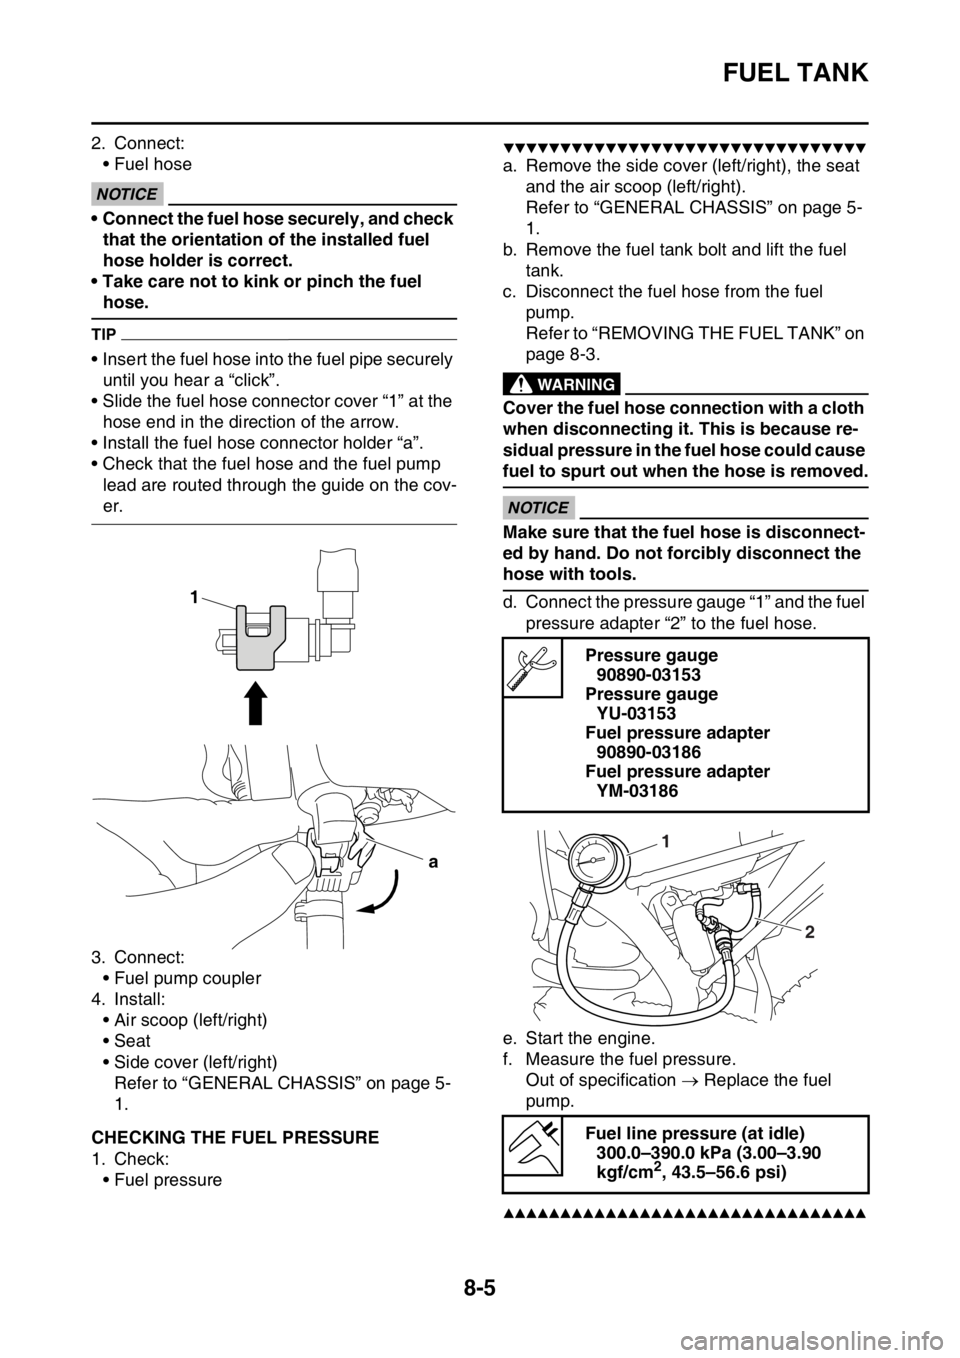
• Slide the fuel hose connector cover “1” at the
hose end in the direction of the arrow.
• Install the fuel hose connector holder “a”.
• Check that the fuel hose and the fuel pump
lead are routed through the guide on the cov-
er.
3. Connect:
• Fuel pump coupler
4. Install:
• Air scoop (left/right)
• Seat
• Side cover (left/right)
Refer to “GENERAL CHASSIS” on page 5-
1.
EAS2GBB348CHECKING THE FUEL PRESSURE
1. Check:
• Fuel pressure
▼▼▼▼▼▼▼▼▼▼▼▼▼▼▼▼▼▼▼▼▼▼▼▼▼▼▼▼▼▼▼▼
a. Remove the side cover (left/right), the seat
and the air scoop (left/right).
Refer to “GENERAL CHASSIS” on page 5-
1.
b. Remove the fuel tank bolt and lift the fuel
tank.
c. Disconnect the fuel hose from the fuel
pump.
Refer to “REMOVING THE FUEL TANK” on
page 8-3.
EWA
WARNING
Cover the fuel hose connection with a cloth
when disconnecting it. This is because re-
sidual pressure in the fuel hose could cause
fuel to spurt out when the hose is removed.
ECA
NOTICE
Make sure that the fuel hose is disconnect-
ed by hand. Do not forcibly disconnect the
hose with tools.
d. Connect the pressure gauge “1” and the fuel
pressure adapter “2” to the fuel hose.
e. Start the engine.
f. Measure the fuel pressure.
Out of specification Replace the fuel
pump.
▲▲▲▲▲▲▲▲▲▲▲▲▲▲▲▲▲▲▲▲▲▲▲▲▲▲▲▲▲▲▲▲
1
a
Pressure gauge
90890-03153
Pressure gauge
YU-03153
Fuel pressure adapter
90890-03186
Fuel pressure adapter
YM-03186
Fuel line pressure (at idle)
300.0–390.0 kPa (3.00–3.90
kgf/cm
2, 43.5–56.6 psi)
1
2
Page 333 of 432

THROTTLE BODY
8-10
EAS2GBB352CHECKING THE INJECTOR
1. Check:
• Injectors
Obstruction Replace, and check the fuel
pump and the fuel injection system.
Refer to “FUEL INJECTION SYSTEM” on
page 9-28.
Deposits Replace.
Damage Replace.
2. Check:
• Injector resistance
Refer to “CHECKING THE FUEL INJEC-
TOR” on page 9-81.
EAS2GBB353CHECKING THE THROTTLE BODY
1. Check:
• Throttle body
Cracks/damage Replace.
2. Check:
• Fuel passages
Obstructions Clean.
ECA
NOTICE
• Before removing the throttle body, clean
the area around the throttle body to pre-
vent dirt and other foreign material from
falling into the engine.
• If the throttle body is subject to strong
shocks or dropped during cleaning, re-
place it.
• Do not use any caustic carburetor clean-
ing solution.
• Do not directly push the throttle valves to
open them.
• Do not loosen the throttle valve stopper
screw “1”, throttle valve pulley nut “2”, or
throttle valve screw “3”. A loss of perfor-
mance may occur.
• Do not use compressed air to clean the
throttle body. Foreign materials may ad-
here to the intake air pressure sensor pas-
sage “a” and fuel injector “b” in the
throttle body.3. Check:
• Starter knob/idle screw passage “c”
Obstruction Blow out with compressed
air.
EAS2GBB354CHECKING THE THROTTLE BODY JOINT
1. Check:
• Throttle body joint “1”
Crack/damage Replace.
1 2
3
ba
c
1
Page 335 of 432

9
ELECTRICAL SYSTEM
IGNITION SYSTEM.......................................................................................... 9-2
CIRCUIT DIAGRAM ................................................................................... 9-2
TROUBLESHOOTING ............................................................................... 9-4
ELECTRIC STARTING SYSTEM..................................................................... 9-6
CIRCUIT DIAGRAM ................................................................................... 9-6
STARTING CIRCUIT CUT-OFF SYSTEM OPERATION ........................... 9-8
TROUBLESHOOTING ............................................................................. 9-10
CHARGING SYSTEM..................................................................................... 9-12
CIRCUIT DIAGRAM ................................................................................. 9-12
TROUBLESHOOTING ............................................................................. 9-14
LIGHTING SYSTEM....................................................................................... 9-16
CIRCUIT DIAGRAM ................................................................................. 9-16
TROUBLESHOOTING ............................................................................. 9-18
SIGNALING SYSTEM.................................................................................... 9-20
CIRCUIT DIAGRAM ................................................................................. 9-20
TROUBLESHOOTING ............................................................................. 9-22
COOLING SYSTEM........................................................................................ 9-24
CIRCUIT DIAGRAM ................................................................................. 9-24
TROUBLESHOOTING ............................................................................. 9-26
FUEL INJECTION SYSTEM........................................................................... 9-28
CIRCUIT DIAGRAM ................................................................................. 9-28
ECU SELF-DIAGNOSTIC FUNCTION ..................................................... 9-30
TROUBLESHOOTING METHOD ............................................................. 9-31
YAMAHA DIAGNOSTIC TOOL ................................................................ 9-32
TROUBLESHOOTING DETAILS ............................................................. 9-35
FUEL PUMP SYSTEM.................................................................................... 9-56
CIRCUIT DIAGRAM ................................................................................. 9-56
TROUBLESHOOTING ............................................................................. 9-58
Page 383 of 432

FUEL INJECTION SYSTEM
9-47
TIP
Disconnect the fuel pump coupler when this diagnostic tool is used.
Fault code No. 39
Item Injector: open or short circuit detected.
Fail-safe systemUnable to start engine
Unable to drive vehicle
Diagnostic code No.36
ActuationActuates injector five times at one-second intervals.
The engine trouble warning light and the “WARNING” on the
Yamaha diagnostic tool screen come on each time the injector is
actuated.
ProcedureCheck that injector is actuated five times by listening for the oper-
ating sound.
ItemProbable cause of malfunc-
tion and checkMaintenance jobConfirmation of service
completion
1 Connection of injector cou-
pler.
Check the locking condition
of the coupler.
Disconnect the coupler and
check the pins (bent or bro-
ken terminals and locking
condition of the pins).Improperly connected
Connect the coupler securely
or repair/replace the wire har-
ness.Execute the diagnostic mode
(Code No. 36).
No operating sound Go to
item 2.
Operating sound Go to
item 6.
2 Defective injector. Measure the fuel injector re-
sistance.
Replace if out of specifica-
tion.
Refer to “CHECKING THE
FUEL INJECTOR” on page 9-
81.Execute the diagnostic mode
(Code No. 36).
No operating sound Go to
item 3.
Operating sound Go to
item 6.
3 Connection of wire harness
ECU coupler.
Check the locking condition
of the coupler.
Disconnect the coupler and
check the pins (bent or bro-
ken terminals and locking
condition of the pins).Improperly connected
Connect the coupler securely
or repair/replace the wire har-
ness.Execute the diagnostic mode
(Code No. 36).
No operating sound Go to
item 4.
Operating sound Go to
item 6.
4 Wire harness continuity. Open or short circuit Re-
place the wire harness.
Between injector coupler and
ECU coupler.
red/black–red/black
red–red/blueExecute the diagnostic mode
(Code No. 36).
No operating sound Go to
item 5.
Operating sound Go to
item 6.
5 Malfunction in ECU. Replace the ECU. —
6 Delete the fault code. — Start the engine and let it idle
for approximately 5 seconds.
Check that the fault code
number is not displayed.