2017 YAMAHA GRIZZLY 350 oil change
[x] Cancel search: oil changePage 24 of 140

2-5
2ungrounded or broken wiring. Visually check
for broken wiring and leaking fuel. Leaking
fuel can be confirmed by the odor of gasoline.
4. Once immediate safety hazards are con- firmed not to exist, you may remove your hel-
met to more closely inspect your vehicle.
Check for external signs of wear, broken
parts, fluid leaks, cracks in the frame, sus-
pension damage, wheel damage, and so on.
Fuel, oil, and coolant usually give off a notice-
able odor.
5. If your vehicle will not restart or if it is unsafe to ride, then turn off all vehicle systems (en-
gine stop switch, main switch, and fuel cock),
and then signal or go for help.
Aftermarket Parts, Accessories, and Modifica-
tions
While you may find aftermarket products similar in
design and quality to genuine Yamaha accesso-
ries, recognize that some aftermarket accessories
or modifications are not suitable because of po-
tential safety hazards to you or others. Installing
aftermarket products or having other modifica-
tions performed to your vehicle that change any of
the vehicle’s design or operation characteristics
can put you and others at greater risk of serious injury or death. You are responsible for injuries re-
lated to changes in the vehicle. Keep the following
guidelines in mind, as well as those provided un-
der “Loading” when mounting accessories.
Never install accessories that would impair the
performance of your ATV. Carefully inspect the
accessory before using it to make sure that it
does not in any way reduce ground clearance,
limit suspension travel, steering travel or control
operation.
Accessories fitted to the ATV can create insta-
bility due to improper weight distribution.
Bulky or large accessories may seriously affect
the stability of the ATV.
Certain accessories can displace the operator
from his or her normal riding position. This im-
proper position limits the freedom of movement
of the operator and may limit control ability,
therefore, such accessories are not recom-
mended.
Use caution when adding electrical accesso-
ries. If electrical accessories exceed the capac-
ity of the ATV’s electrical system, an electric
failure could result, which could cause a dan-
gerous loss of lights or engine power.
UB1463E0.book Page 5 Thursday, August 4, 2016 2:12 PM
Page 85 of 140

8-6
8
4*Brake hoses • Check for cracks or other damage, and replace if
necessary. √√√√
• Replace. Every 4 years
5 *Brake fluid • Change. Every 2 years
6 *Wheels • Check runout and for damage, and replace if nec-
essary. √ √√√
7 *Tires • Check tread depth and for damage, and replace if
necessary.
• Check air pressure and balance, and correct if necessary. √ √√√
8 *Wheel hub bearings • Check for looseness or damage, and replace if
necessary. √ √√√
9 *Swingarm • Check for excessive play, and correct if neces-
sary. √√√
10 *V- b e l t • Check for wear, cracks or other damage, and re-
place if necessary. √ √√√
11 *Chassis fasteners • Make sure that all nuts, bolts, and screws are
properly tightened. √√√√√
12 *Shock absorber as-
semblies • Check operation and correct if necessary.
• Check for oil leakage and replace if necessary.
√√√
13 *Steering shaft • Lubricate with lithium-soap-based grease. √√√
NO. ITEM
CHECK OR MAINTENANCE
JOB INITIAL EVERY
Whichev- er comes first month136612
km (mi) 320
(200) 1300
(800) 2500
(1600) 2500
(1600) 5000
(3200)
hours 20 80 160 160 320
UB1463E0.book Page 6 Thursday, August 4, 2016 2:12 PM
Page 86 of 140

8-7
8
14*Steering system • Check operation and repair or replace if dam-
aged.
• Check toe-in and adjust if necessary. √√√√√
15 *Engine mount • Check for cracks or other damage, and replace if
necessary. √√√
16 Engine oil • Change.
• Check ATV for oil leakage, and correct if neces-
sary. √ √√√
17 Engine oil filter car-
tridge • Replace.
√√√
18 Final gear oil • Change.
• Check ATV for oil leakage, and correct if neces-
sary. √√
19 *Moving parts and
cables • Lubricate.
√√√√
20 *Drive select lever
safety system cable • Check operation and adjust or replace if neces-
sary. √√√
21 *Throttle lever • Check operation.
• Check throttle lever free play, and adjust if neces-
sary.
• Lubricate cable and lever housing. √√√√√
22 *Front and rear
brake switches • Check operation and correct if necessary.
√√√√√
NO. ITEM
CHECK OR MAINTENANCE
JOB INITIAL EVERY
Whichev-
er comes first month136612
km (mi) 320
(200) 1300
(800) 2500
(1600) 2500
(1600) 5000
(3200)
hours 20 80 160 160 320UB1463E0.book Page 7 Thursday, August 4, 2016 2:12 PM
Page 90 of 140

8-11
8
TIPIf a torque wrench is not available when installing
the spark plug, a good estimate of the correct
torque is 1/4–1/2 turn past finger tight. However,
the spark plug should be tightened to the speci-
fied torque as soon as possible. 3. Install the spark plug cap.EBU2331CEngine oil and oil filter cartridgeThe engine oil level should be checked before
each ride. In addition, the oil must be changed and
the oil filter cartridge replaced at the intervals
specified in the periodic maintenance and lubrica-
tion chart.
To check the engine oil level1. Place the ATV on a level surface.
2. Check the engine oil level on a cold engine.
TIPIf the engine was started before checking the oil
level, be sure to warm up the engine sufficiently,
and then wait at least ten minutes until the oil set-
tles for an accurate reading. 3. Remove the engine oil filler cap, and then wipe the engine oil dipstick off with a clean
rag.
4. Insert the dipstick into the filler hole (without screwing it in), and then remove it again to
check the oil level.
Tightening torque:
Spark plug:18 N·m (1.8 kgf·m, 13 lb·ft)1. Engine oil filler cap
UB1463E0.book Page 11 Thursday, August 4, 2016 2:12 PM
Page 91 of 140

8-12
8
TIPThe engine oil should be between the tip of the
dipstick and the maximum level mark. 5. If the engine oil is not between the tip of thedipstick and the maximum level mark, add
sufficient oil of the recommended type to
raise it to the correct level. NOTICE: Be sure
the engine oil is at the correct level, other-
wise engine damage may result.
[ECB00852]
6. Check the O-ring for damage, and replace it if necessary.
7. Insert the dipstick into the oil filler hole, and then tighten the engine oil filler cap.
To change the engine oil (with or without oil fil-
ter cartridge replacement) 1. Place the ATV on a level surface.
2. Start the engine, warm it up for several minu- tes, and then turn it off.
3. Place an oil pan under the engine to collect the used oil.
4. Remove the engine oil filler cap, and then re- move the engine oil drain bolt and its gasket
to drain the oil from the crankcase.
1. O-ring
2. Engine oil dipstick
3. Maximum level mark
4. Tip of the engine oil dipstick
1234
UB1463E0.book Page 12 Thursday, August 4, 2016 2:12 PM
Page 94 of 140

8-15
8
TIPBe sure to wipe off spilled oil on any parts after the
engine and exhaust system have cooled down. NOTICEECB00301In order to prevent clutch slippage (since the
engine oil also lubricates the clutch), do not
mix any chemical additives. Do not use oils
with a diesel specification of “CD” or oils of
a higher quality than specified. In addition,
do not use oils labeled “ENERGY CONSERV-
ING II” or higher.
Make sure that no foreign material enters the
crankcase. 10. Check the engine oil filler cap O-ring for dam-
age, and replace it if necessary. 11. Insert the dipstick into the oil filler hole, and
then tighten the engine oil filler cap.
12. Start the engine, and then let it idle for several minutes while checking it for oil leakage. If oil
is leaking, immediately turn the engine off and
check for the cause.
13. Turn the engine off, wait at least ten minutes, and then check the oil level and correct it if
necessary.
EBU23387Final gear oilThe final gear case must be checked for oil leak-
age before each ride. If any leakage is found, have
a Yamaha dealer check and repair the ATV. In ad-
dition, the final gear oil level must be checked and
the oil changed as follows at the intervals speci-
fied in the periodic maintenance and lubrication
chart.
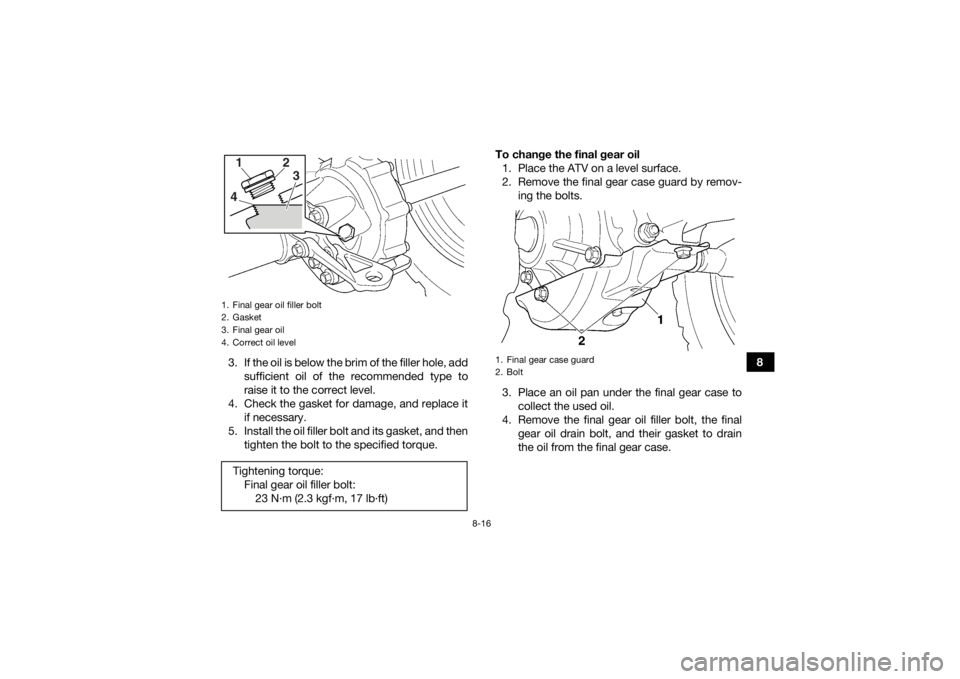
To check the final gear oil level1. Place the ATV on a level surface.
2. Remove the final gear oil filler bolt and its gas- ket, and then check the oil level in the final
gear case. The oil level should be at the brim
of the filler hole.
Recommended oil:
See page 10-1.
Oil quantity: Without oil filter cartridge replacement:2.20 L (2.33 US qt, 1.94 Imp.qt)
With oil filter cartridge replacement: 2.30 L (2.43 US qt, 2.02 Imp.qt)
UB1463E0.book Page 15 Thursday, August 4, 2016 2:12 PM
Page 95 of 140

8-16
8
3. If the oil is below the brim of the filler hole, add
sufficient oil of the recommended type to
raise it to the correct level.
4. Check the gasket for damage, and replace it if necessary.
5. Install the oil filler bolt and its gasket, and then tighten the bolt to the specified torque. To change the final gear oil
1. Place the ATV on a level surface.
2. Remove the final gear case guard by remov- ing the bolts.
3. Place an oil pan under the final gear case to collect the used oil.
4. Remove the final gear oil filler bolt, the final gear oil drain bolt, and their gasket to drain
the oil from the final gear case.
1. Final gear oil filler bolt
2. Gasket
3. Final gear oil
4. Correct oil levelTightening torque:Final gear oil filler bolt:23 N·m (2.3 kgf·m, 17 lb·ft)1
23
4
1. Final gear case guard
2. Bolt
UB1463E0.book Page 16 Thursday, August 4, 2016 2:12 PM
Page 108 of 140

8-29
8
EBU24283Changing the brake fluidHave a Yamaha dealer change the brake fluid at
the intervals specified in the periodic maintenance
and lubrication chart. In addition, have the oil seals
of the brake master cylinder and calipers as well
as the brake hoses replaced at the intervals listed
below or whenever they are damaged or leaking.
Oil seals: Replace every two years.
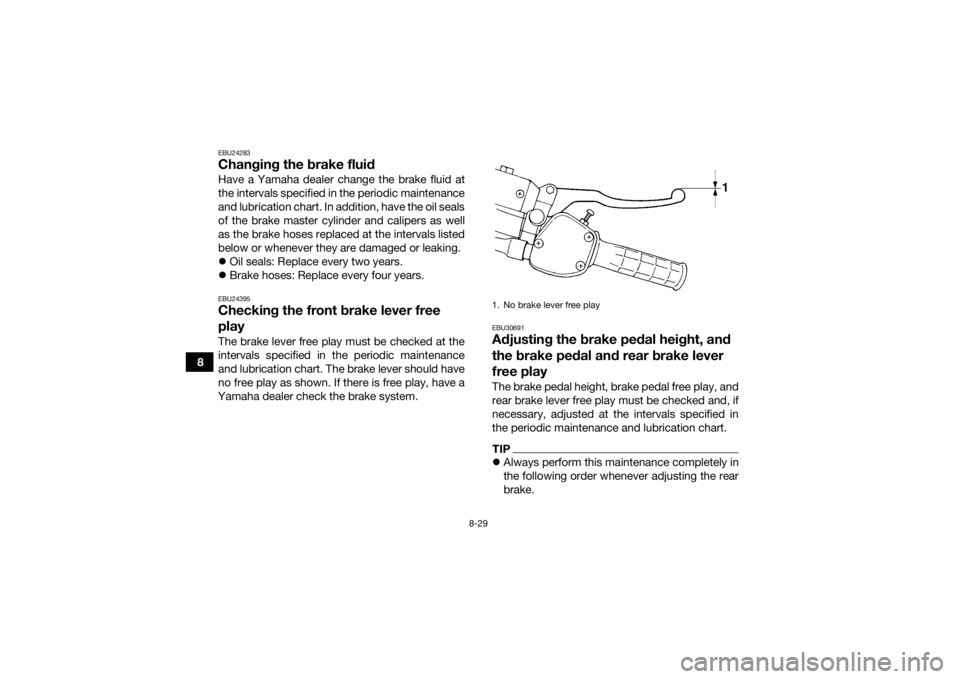
Brake hoses: Replace every four years.EBU24395Checking the front brake lever free
playThe brake lever free play must be checked at the
intervals specified in the periodic maintenance
and lubrication chart. The brake lever should have
no free play as shown. If there is free play, have a
Yamaha dealer check the brake system.
EBU30691Adjusting the brake pedal height, and
the brake pedal and rear brake lever
free playThe brake pedal height, brake pedal free play, and
rear brake lever free play must be checked and, if
necessary, adjusted at the intervals specified in
the periodic maintenance and lubrication chart.TIP Always perform this maintenance completely in
the following order whenever adjusting the rear
brake.1. No brake lever free play
UB1463E0.book Page 29 Thursday, August 4, 2016 2:12 PM