2017 YAMAHA GRIZZLY 350 fuel
[x] Cancel search: fuelPage 82 of 140

8-3
8
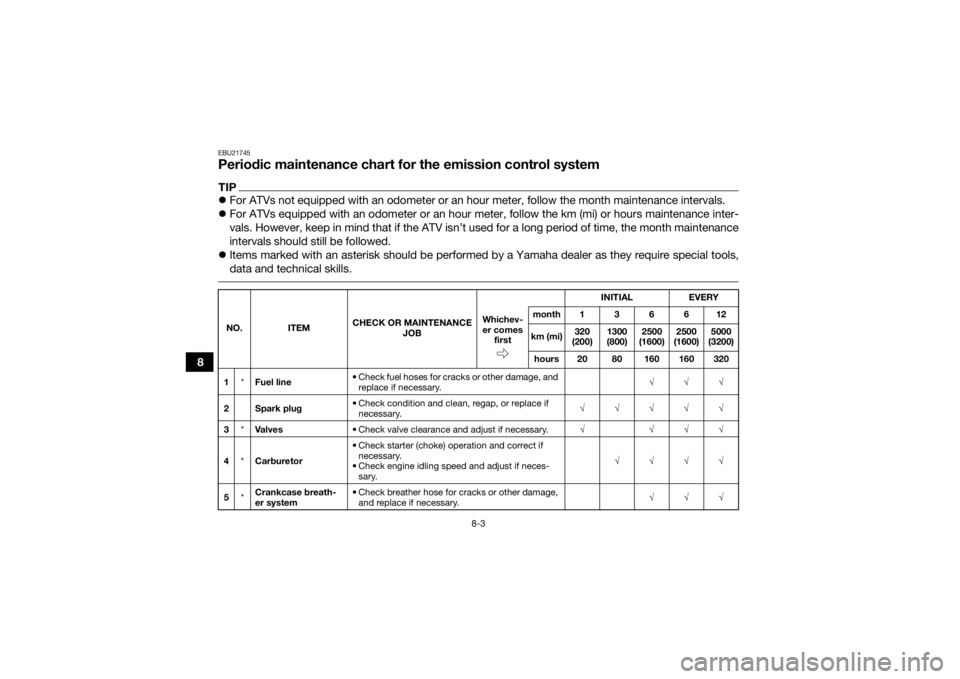
EBU21745Periodic maintenance chart for the emission control systemTIPFor ATVs not equipped with an odometer or an hour meter, follow the month maintenance intervals.
For ATVs equipped with an odometer or an hour meter, follow the km (mi) or hours maintenance inter-
vals. However, keep in mind that if the ATV isn’t used for a long period of time, the month maintenance
intervals should still be followed.
Items marked with an asterisk should be performed by a Yamaha dealer as they require special tools,
data and technical skills. NO. ITEM CHECK OR MAINTENANCE
JOB INITIAL
EVERY
Whichev-
er comes first month136612
km (mi) 320
(200) 1300
(800) 2500
(1600) 2500
(1600) 5000
(3200)
hours 20 80 160 160 320
1 *Fuel line • Check fuel hoses for cracks or other damage, and
replace if necessary. √√√
2 Spark plug • Check condition and clean, regap, or replace if
necessary. √√√√√
3 *Va l ve s • Check valve clearance and adjust if necessary. √ √√√
4 *Carburetor • Check starter (choke) operation and correct if
necessary.
• Check engine idling speed and adjust if neces- sary. √√√√
5 *Crankcase breath-
er system • Check breather hose for cracks or other damage,
and replace if necessary. √√√
UB1463E0.book Page 3 Thursday, August 4, 2016 2:12 PM
Page 104 of 140

8-25
8The throttle lever free play should measure 3.0–5.0
mm (0.12–0.20 in) as shown. Periodically check
the throttle lever free play and, if necessary, adjust
it as follows.
TIPThe engine idling speed must be checked, and
adjusted if necessary, before adjusting the throttle
lever free play. 1. Slide the rubber cover back.
2. Loosen the locknut.
3. To increase the throttle lever free play, turn
the throttle lever free play adjusting bolt in di-
rection (a). To decrease the throttle lever free
play, turn the adjusting bolt in direction (b). 4. Tighten the locknut.
5. Slide the rubber cover to its original position.
EBU24061Valve clearanceThe valve clearance changes with use, resulting in
improper air-fuel mixture and/or engine noise. To
prevent this from occurring, the valve clearance
must be adjusted by a Yamaha dealer at the inter-
vals specified in the periodic maintenance and lu-
brication chart.1. Rubber cover
2. Locknut
3. Throttle lever free play adjusting bolt
4. Throttle lever free play12
3 4
UB1463E0.book Page 25 Thursday, August 4, 2016 2:12 PM
Page 125 of 140

8-46
8
EBU25721TroubleshootingAlthough Yamaha ATVs receive a thorough in-
spection before shipment from the factory, trouble
may occur during operation. Any problem in the
fuel, compression, or ignition systems, for exam-
ple, can cause poor starting and loss of power.
The following troubleshooting chart represents a
quick and easy procedure for checking these vital
systems yourself. However, should your ATV re-
quire any repair, take it to a Yamaha dealer, whose
skilled technicians have the necessary tools, ex-
perience, and know-how to service the ATV prop-
erly.
Use only genuine Yamaha replacement parts. Im-
itation parts may look like Yamaha parts, but they
are often inferior, have a shorter service life and
can lead to expensive repair bills.
WARNING
EWB02281Do not smoke when checking the fuel system.
Fuel can ignite or explode, causing severe inju-
ry or property damage. Make sure there are no
open flames or sparks in the area, including pi-
lot lights from water heaters or furnaces. UB1463E0.book Page 46 Thursday, August 4, 2016 2:12 PM
Page 126 of 140

8-47
8
EBU25754Troubleshooting chart
Check the fuel level in
the fuel tank.1. Fuel
There is enough fuel.There is no fuel.
Check the battery.
Supply fuel.
The engine does not start.
Check the battery.
The engine does not start.
Check the ignition.
Operate the electric starter.4. Compression
There is compression.
There is no compression.
The engine does not start. Have a Yamaha dealer check the ATV.Have a Yamaha dealer check the ATV.
Remove the spark plug
and check the electrodes.3. Ignition
Wipe off with a dry cloth and correct the
spark plug gap, or replace the spark plug. Have a Yamaha dealer check the ATV.
The engine does not start.
Check the compression.
Operate the electric starter.2. Battery
The engine turns over
quickly.
The engine turns over
slowly.
The battery is good.Check the battery lead connections,
and have a Yamaha dealer charge
the battery if necessary.
DryWet
Open the throttle halfway and operate
the electric starter.
UB1463E0.book Page 47 Thursday, August 4, 2016 2:12 PM
Page 128 of 140

9-2
9
EBU25934StorageShort-term
Always store your ATV in a cool, dry place and, if
necessary, protect it against dust with a porous
cover. NOTICE: Storing the ATV in a poorly ven-
tilated room or covering it with a tarp while it is
still wet, will allow water and humidity to seep
in and cause rust. To prevent corrosion, avoid
damp cellars, stables (because of the presence
of ammonia) and areas where strong chemi-
cals are stored.
[ECB00722]
Long-term
Before storing your ATV for several months: 1. Follow all the instructions in the “Cleaning” section of this chapter.
2. Turn the fuel cock lever to “OFF”.
3. Drain the carburetor float chamber by loosen- ing the drain bolt; this will prevent fuel depos-
its from building up. Pour the drained fuel into
the fuel tank.
4. Fill up the fuel tank and add fuel stabilizer (if available) to prevent the fuel from deteriorat-
ing. 5. Perform the following steps to protect the cyl-
inder, piston rings, etc. from corrosion.a. Remove the spark plug cap and spark plug.
b. Pour a teaspoonful of engine oil into the spark plug bore.
c. Install the spark plug cap onto the spark plug, and then place the spark plug on the
cylinder head so that the electrodes are
grounded. (This will limit sparking during
the next step.)
d. Turn the engine over several times with the starter. (This will coat the cylinder wall
with oil.)
e. Remove the spark plug cap from the spark plug, and then install the spark plug and
the spark plug cap.
6. Lubricate all control cables and the pivoting points of all levers and pedals.
7. Check and, if necessary, correct the tire air pressure, and then block up the ATV so that
all of its wheels are off the ground. Alterna-
Specified amount:
7.5 ml of stabilizer to each liter of fuel (or 1
oz of stabilizer to each gallon of fuel)UB1463E0.book Page 2 Thursday, August 4, 2016 2:12 PM
Page 131 of 140

10-2
10
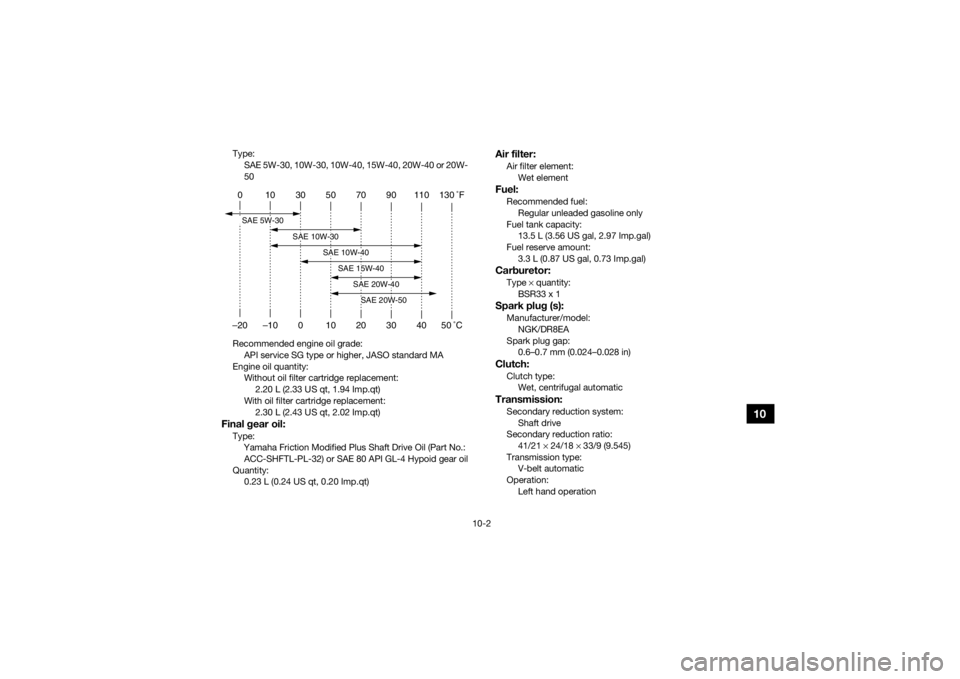
Type:SAE 5W-30, 10W-30, 10W-40, 15W-40, 20W-40 or 20W-
50
Recommended engine oil grade: API service SG type or higher, JASO standard MA
Engine oil quantity: Without oil filter cartridge replacement:2.20 L (2.33 US qt, 1.94 Imp.qt)
With oil filter cartridge replacement: 2.30 L (2.43 US qt, 2.02 Imp.qt)Final gear oil:Type:Yamaha Friction Modified Plus Shaft Drive Oil (Part No.:
ACC-SHFTL-PL-32) or SAE 80 API GL-4 Hypoid gear oil
Quantity: 0.23 L (0.24 US qt, 0.20 Imp.qt)
Air filter:Air filter element:Wet elementFuel:Recommended fuel:Regular unleaded gasoline only
Fuel tank capacity: 13.5 L (3.56 US gal, 2.97 Imp.gal)
Fuel reserve amount:
3.3 L (0.87 US gal, 0.73 Imp.gal)Carburetor:Type × quantity:
BSR33 x 1Spark plug (s):Manufacturer/model: NGK/DR8EA
Spark plug gap: 0.6–0.7 mm (0.024–0.028 in)Clutch:Clutch type:Wet, centrifugal automaticTransmission:Secondary reduction system:
Shaft drive
Secondary reduction ratio: 41/21 × 24/18 × 33/9 (9.545)
Transmission type: V-belt automatic
Operation:
Left hand operation
0 10 30 50 70 90 110 130 �F
–20 –10 0 10 20 30 40 50 �CSAE 5W-30
SAE 10W-30
SAE 10W-40
SAE 15W-40
SAE 20W-40SAE 20W-50
UB1463E0.book Page 2 Thursday, August 4, 2016 2:12 PM
Page 137 of 140

12-1
12
INDEX
AAccessories and loading ................................................ 6-6
Air filter element, cleaning ........................................... 8-18BBattery ......................................................................... 8-37
Brake fluid, changing ................................................... 8-29
Brake fluid level, checking ........................................... 8-27
Brake lever free play, checking the front ..................... 8-29
Brake lever, front ........................................................... 4-5
Brake levers, checking and lubricating ........................ 8-35
Brake light switches ..................................................... 8-34
Brake pads and shoes, checking ................................ 8-26
Brake pedal and rear brake lever ................................... 4-6
Brake pedal, checking and lubricating ........................ 8-36
Brakes .......................................................................... 8-26
Brakes, front and rear .................................................... 5-3CCables, checking and lubricating ................................ 8-35
Carburetor, adjusting ................................................... 8-23
Carrier, front ................................................................. 4-14
Carrier, rear .................................................................. 4-14
Chassis fasteners .......................................................... 5-6
Cleaning ......................................................................... 9-1DDrive select lever ........................................................... 4-7
Drive select lever and driving in reverse ........................ 6-3
Drive select lever safety system cable, adjusting ........ 8-26EEngine break-in .............................................................. 6-4Engine, cold start ........................................................... 6-1
Engine idling speed ..................................................... 8-23
Engine oil ....................................................................... 5-3
Engine oil and oil filter cartridge .................................. 8-11
Engine, starting a warm ................................................. 6-3
Engine stop switch ........................................................ 4-3
FFinal gear oil ......................................................... 5-3, 8-15
Fuel ......................................................................... 4-8, 5-3
Fuel cock ..................................................................... 4-10
Fuel tank cap ................................................................. 4-8
Fuses, replacing .......................................................... 8-40HHandlebar switches ....................................................... 4-3
Headlight beam, adjusting ........................................... 8-43
Headlight bulb, replacing ............................................. 8-42
Horn switch .................................................................... 4-4IIdentification numbers ................................................. 11-1
Indicator lights and warning light ................................... 4-2
Instruments, lights and switches ................................... 5-6LLabel locations ............................................................... 1-1
Light switch ................................................................... 4-4MMain switch .................................................................... 4-1
Maintenance and lubrication chart ................................ 8-5
Maintenance chart, emission control system ................ 8-3
Model label .................................................................. 11-1
UB1463E0.book Page 1 Thursday, August 4, 2016 2:12 PM