Page 161 of 548

INSTRUMENTS AND CONTROLS
}}
* Option/accessory.159
CAUTION
•Use ample washer fluid when washing the windshield. The windshield should bethoroughly wet when the wipers are inoperation.
• Avoid using the washers if the fluid reser-voir is frozen or empty to help avoid dam-age to the pump.
When the washing system is used, the length of time that the windshield washers operatedepends on the ambient temperature. In coldweather, the amount of washer fluid used willalso be increased automatically to help improvecleaning.
Heated washer nozzles
*The washer nozzles are heated automatically incold weather to help prevent the washer fluidfrom freezing.
High-pressure headlight washing *High-pressure headlight washing consumes alarge quantity of washer fluid. To save fluid, theheadlights are washed once for every five timesthe windshield is washed.
Reduced washingWhen approx. 1 US quart (1 liter) of washer fluidremains in the reservoir, the headlights will nolonger be washed to conserve fluid. A text message and the
symbol will be dis-
played in the instrument panel to remind the driver to fill the washer fluid reservoir.
Related information
• Refilling the windshield washer fluid reservoir(p. 510)
• Using the windshield wipers (p. 157)
Steering wheel The steering wheel has controls for the horn, certain optional driver support systems, menus/messages and paddles for manually shifting gears
*.
Page 162 of 548
||
INSTRUMENTS AND CONTROLS
* Option/accessory.
160
Steering wheel keypads and paddles *
Driver support system controls14
Paddles for manually shifting gears
*
Keypad for voice controls, adjusting the head-up display*accessing menus and mes-
sages, and handling phone calls
Horn
The horn is located in the steering wheel hub.
Related information
• Adjusting the steering wheel (p. 161)
• Turning steering wheel heating
* on and off
(p. 192)
• Cruise Control (CC) (p. 254)
• Speed limiter (SL)
* (p. 247)
• Adaptive Cruise Control (ACC)
* (p. 261)
• Distance Alert
* (p. 259)
• Pilot Assist
* (p. 275)
• Steering wheel paddles
* (p. 386)
• Voice control (p. 119)
• Head-up display (HUD)
* (p. 116) •
Using the instrument panel App menu (p. 156)
• Phone (p. 407)
14
Cruise control *, Speed limiter *, Adaptive cruise control *, Distance alert * and Pilot Assist *.
Page 163 of 548

INSTRUMENTS AND CONTROLS
* Option/accessory.161
Adjusting the steering wheel
The steering wheel can be adjusted to various positions.
WARNING
Never adjust the steering wheel while driving.
The steering wheel's height and reach can be adjusted
Adjusting the steering wheel
To adjust the steering wheel:
1. Push the lever downward/forward to release the steering wheel.
2. Adjust the steering wheel to a suitable posi- tion.
3. Pull back the lever to lock the steering wheel in place. If the lever is difficult to pull into place, press the steering wheel lightly at thesame time as you pull the lever.
Related information
• Steering wheel (p. 159)
• Adjustable steering force
* (p. 242)
Seats
The front seats can be adjusted electronically * or
manually. The rear seats are adjusted primarily manually.
The adjustment settings for the power front seats *, door mirrors and the head-up display can
be stored in memory buttons. Using the multi-function control *, comfort in the
front seats can be further enhance by e.g., adjust- ing the lumbar support or extending the length ofthe front seat cushion. The rear seats are split and can be folded down separately *.
Related information
• Adjusting power front seats
* (p. 163)
• Adjusting function settings in the multifunc-tional front seats
* (p. 166)
• Manually operated front seats (p. 162)
• Using the power seat memory function
*
(p. 164)
• Folding down the rear seat backrests
*
(p. 170)
Page 164 of 548

INSTRUMENTS AND CONTROLS
* Option/accessory.
162
Manually operated front seats
The front seats can be adjusted in a number of ways to help provide the most comfortable seat-ing position.
Raise/lower the front edge of seat cushion by pumping up/down
Change the length of the seat cushion by pulling up the lever and moving the cushionforward/rearward with your hand
Move the seat forward/rearward by pulling the bar upward and moving the seat.
Change lumbar support by pressing the but- ton *
Raise/lower the seat by moving the control up/down
Change backrest tilt by turning the wheel
WARNING
• Do not adjust the seat while driving. The seat should be adjusted so that the brakepedal can be depressed fully. In addition,position the seat as far rearward as com-fort and control allow.
• Check that the seat is securely lockedinto position after adjusting.
Related information
•
Turning seat heating
* on and off (p. 194)
• Power front seats
* (p. 162)
• Multifunctional front seats
* (p. 165)
• Seat belts (p. 60)
Power front seats
*
The power front seats offer a number of adjust- ment possibilities to help maximize comfort andergonomics.
The power seats have an overload protector that
activates if a seat is blocked by any object. If this occurs, put the ignition in mode I or 0 and wait
for a short period before operating the seat again. The power seat(s) can be adjusted for a short period after unlocking the door with the remotekey without switching the ignition on. Seat adjust-ment can always be made when the engine isrunning.
Related information
• Multifunctional front seats
* (p. 165)
• Adjusting power front seats
* (p. 163)
• Using the power seat memory function
*
(p. 164)
• Manually operated front seats (p. 162)
• Turning seat heating
* on and off (p. 194)
• Turning front seat ventilation
* on and off
(p. 195)
Page 165 of 548

INSTRUMENTS AND CONTROLS
}}
* Option/accessory.163
Adjusting power front seats *
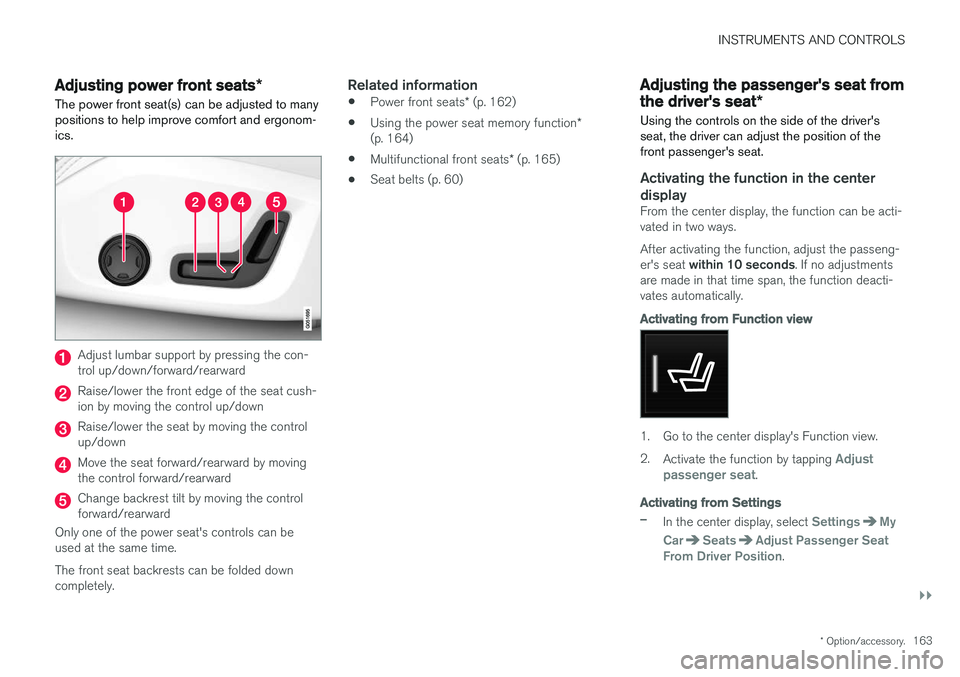
The power front seat(s) can be adjusted to many positions to help improve comfort and ergonom-ics.
Adjust lumbar support by pressing the con- trol up/down/forward/rearward
Raise/lower the front edge of the seat cush- ion by moving the control up/down
Raise/lower the seat by moving the control up/down
Move the seat forward/rearward by moving the control forward/rearward
Change backrest tilt by moving the control forward/rearward
Only one of the power seat's controls can beused at the same time. The front seat backrests can be folded down completely.
Related information
• Power front seats
* (p. 162)
• Using the power seat memory function
*
(p. 164)
• Multifunctional front seats
* (p. 165)
• Seat belts (p. 60)
Adjusting the passenger's seat from the driver's seat
*
Using the controls on the side of the driver's seat, the driver can adjust the position of thefront passenger's seat.
Activating the function in the center
display
From the center display, the function can be acti- vated in two ways. After activating the function, adjust the passeng- er's seat within 10 seconds . If no adjustments
are made in that time span, the function deacti- vates automatically.
Activating from Function view
1. Go to the center display's Function view. 2. Activate the function by tapping
Adjust
passenger seat.
Activating from Settings
–In the center display, select SettingsMy
Car
SeatsAdjust Passenger Seat
From Driver Position.
Page 166 of 548

||
INSTRUMENTS AND CONTROLS
* Option/accessory.
164
Power seat controls
Move the passenger's seat forward/rearward by moving the control forward/rearward.
Change the passenger seat's backrest tilt by moving the control forward/rearward.
Related information
• Power front seats
* (p. 162)
• Adjusting power front seats
* (p. 163)
• Seat belts (p. 60)
Using the power seat memory function
*
The memory function can be used to store the settings (positions) of the power front seats *,
door mirrors and the head-up display *.
Two different settings can be stored using this function. Memory controls are found on one or both of the front doors *.
M (memory) button
Button for storing a position
Storing a position1. Adjust the seat, door mirrors and head-up
display to the desired positions. 2.
Press and release the M button. The indica-
tor light in the button will illuminate.
3. Press button 1 or 2 within 3 seconds to
store the current position of the seat/ mirrors/head-up display in the selected but-ton.
> When the position has been stored in the selected button, an audible signal will sound and the indicator light in the M but-
ton will go out.
If none of the buttons (1 or 2) are pressed within3 seconds, the indicator light in the M button will
go out and the position will not be stored.
The seat/mirrors/head-up display must be moved before new settings can be stored.
Using a stored positionA stored position can be used when one of thefront doors is opened or closed:
Front door open
–Press one of the bottons ( 1 or 2) briefly. The
seat, door mirrors and head-up display will move to the positions stored in that button.
Page 167 of 548

INSTRUMENTS AND CONTROLS
* Option/accessory.165
Front door closed
–Press and hold one of the buttons ( 1 or 2)
until the seat, door mirrors and head-up dis- play have moved to the positions stored inthat button.
The seat, door mirrors and head-up display willstop automatically if the button is released beforethe they have reached the stored positions.
WARNING
• Because the driver's seat can be adjusted with the ignition off, children should neverbe left unattended in the vehicle.
• Movement of the seat can be STOPPEDat any time by pressing any button on thepower seat control panel.
• Do not adjust the seat while driving. Theseat should be adjusted so that the brakepedal can be depressed fully. In addition,position the seat as far rearward as com-fort and control allow.
• The seat rails on the floor must not beobstructed in any way when the seat is inmotion.
Related information
•
Adjusting power front seats
* (p. 163)
• Power front seats
* (p. 162)
Multifunctional front seats *
In addition to the adjustment settings offered by the power seat controls, the multifunction controlprovides additional possibilities for convenienceand comfort.
Multifunction control on the side of the seat
The multifunction control can be used to adjust lumbar support *, the backrest's side bolsters *, the
length of the seat cushion and the massagefunction *. The adjustment settings made with the
control are shown in the center display * and cer-
tain settings can be made directly from the cen- ter display.
Center displayThe adjustment settings for the driver and pas-senger seats made using the multifunction con-trol are shown in the center display. If only oneseat is adjusted, the settings are shown in the center of the display. If both seats are adjusted,the settings for the driver seat are shown on theupper half of the screen and the ones made forthe passenger seat are on the lower half. Press the Home button on the center console to exit the seat adjustment setting view.
Related information
•
Power front seats
* (p. 162)
• Adjusting function settings in the multifunc- tional front seats
* (p. 166)
• Turning seat heating
* on and off (p. 194)
Page 168 of 548

INSTRUMENTS AND CONTROLS
* Option/accessory.
166
Adjusting function settings in the multifunctional front seats *
The multifunction controls on the side of the seat as well as the center display can be used tomake seat adjustments. The adjustment settings are shown in the center display *.
Multifunction control on the side of the seat
Turn the control up or down to activate.
Front seat massage settings *The front seat backrests have a massage func- tion. Air-filled cushions provide the massagingaction and a number of settings are available. The massage function can only be used when the engine is running.
Massage view in the center display
1. Activate the multifunction control by turning
it up or down. Seat settings will be displayed in the center display.
2. Tap
Massage in the seat settings view. 3. Select massage settings by tapping the cen-
ter display or by moving the cursor up/down using the multifunction control's upper/lowerbuttons. Change a setting in the selectedfunction by tapping the arrows on the centerdisplay or by using the multifunction control'sfront/rear buttons.
Massage settings
The following massage settings are available:
•
On/Off.
•
Program 1-5: There are 5 preset massage
programs. Select Swell, Tread, Advanced,Lumbar or Shoulder.
•
Intensity: Select Low, Normal or High.
•
Speed: Select Slow, Normal or Fast.