Page 241 of 293
Vehicle care239
Install the wheel wrench ensuring
that it locates securely and loosen
each wheel nut by half a turn.
Variants 1b, 2 and 3 with foldable
wheel wrench:
Fold out the wheel wrench and
install ensuring that it locates
securely and loosen each wheel
nut by half a turn.
The wheels might be protected by
locking wheel nuts. To loosen
these specific nuts first attach the
adapter onto the head of the nut
before installing the wheel
wrench. The adapter is located in
the glovebox.
3. Ensure the jack is correctly positioned under the relevant
vehicle jacking point.
Some versions have sill
panellings with covered vehicle
jacking points: pull out the cover
at the respective jacking point
firstly.
4. 3-door hatchback and 4-door
saloon, jack variants 1a, 1b and 3
3 226:
Page 242 of 293

240Vehicle care
Set the jack to the necessary
height. Position it directly below
the jacking point in a manner that
prevents it from slipping.
Attach jack handle and with the
jack correctly aligned rotate
handle until wheel is clear of the ground.
5. Unscrew the wheel nuts.
6. Change the wheel. Spare wheel 3 241.
7. Screw on the wheel nuts.
8. Lower the vehicle and remove jack.
9. Install the wheel wrench ensuring that it locates securely and tighten
each nut in a crosswise
sequence. Tightening torque is
140 Nm.
10. Align the valve hole in the wheel cover with the tyre valve before
installing.
Install wheel nut caps.
Install centre cap on alloy wheels.
11. Install vehicle jacking point cover on versions with sill panelling.
12. Stow the replaced wheel 3 241,
the vehicle tools 3 226 and the
adapter for the locking wheel nuts 3 59.
13. Check the tyre pressure of the installed tyre and the wheel nut
torque as soon as possible.Have the defective tyre renewed or repaired as soon as possible.
Jacking position for lifting platform
Rear arm position of the lifting
platform centrically under the recess
of the sill.
Page 243 of 293

Vehicle care241
Front arm position of the lifting
platform at the underbody.
Spare wheel Some vehicles are equipped with a
tyre repair kit instead of a spare
wheel.
If mounting a spare wheel, which is
different from the other wheels, this
wheel might be classified as a
temporary spare wheel and the
corresponding speed limits apply,
even though no label indicates this.
Seek the assistance of a workshop to
check the applicable speed limit.
The spare wheel has always a steel
rim.Caution
The use of a spare wheel that is smaller than the other wheels or in combination with winter tyres
could affect driveability. Have the defective tyre replaced as soon as
possible.
The spare wheel is located in the load
compartment beneath the floor
covering. It is secured with a wing nut.
To remove: 1. Open the floor cover.
2. Only 3-door hatchback: remove rear storage by pressing both
buttons. Fold down cover and
extract storage upwards.
3. The spare wheel is secured with a
wing nut. Loosen nut, remove
conus (only 3-door hatchback) to
take out the spare wheel.
Under the spare wheel there is the box with vehicle tools.
4. When, after a wheel change, no wheel is placed in the spare wheel
well, secure the tool box by
tightening the wing nut and close
the floor cover.
Page 244 of 293

242Vehicle careStowing a damaged full size
wheel in the load compartment,
3-door hatchback
The spare wheel well is not designed for other tyre sizes than the spare
wheel. A damaged full size wheel
must be stowed in the load
compartment and secured with a
strap. Vehicle tools 3 226. To secure
the wheel:
1. Position the wheel facing upwards, close to one sidewall of
the load compartment.
2. Place the loop end of the strap through the front lashing eye on
the appropriate side.
3. Place the hook end of the strap through the loop and pull it until
the strap is fastened securely to
the lashing eye.
4. Insert the strap through the spokes of the wheel as shown in
the illustration.
5. Mount the hook to the rear lashing
eye.
6. Tighten the strap and secure it using the buckle.
9 Danger
Always drive with folded up and
engaged rear seat backrests when stowing a damaged full size wheel
in the load compartment.
Stowing a damaged full size
wheel in the spare wheel well,
4-door saloon
Vehicles equipped with a full size spare wheel:
A damaged full size wheel must be
stowed facing upwards in the spare
wheel well secured with the wing nut.
Page 245 of 293

Vehicle care243The floor cover can be placed on the
projecting wheel.Vehicles equipped with a temporary
spare wheel:
Secure a damaged full size wheel
facing upwards with the wing nut in the spare wheel well after exchanging
the thread bolt by an extension bolt,
placed in the tool bag 3 226. To
replace the bolt:
1. Install the hexagon key of the wheel wrench ensuring that it
locates securely on the bolt.
2. Turn the wheel wrench anticlockwise to loosen the bolt.
Remove the bolt.
3. Take the extension bolt from the tool bag 3 226 and screw it in
hand-tight using the hexagon key
of the wheel wrench.
4. Store the tool box and the damaged wheel outside up in the
spare wheel well and secure it by
turning the wing nut clockwise on the bolt.
The floor cover can be placed on the
projecting wheel.
Replace the extension bolt with the
short bolt before placing the
temporary spare wheel in the well
after renewing or repairing the
defective wheel.
Stowing the spare wheel back in
the well after replacing the
damaged wheel
1. Open the floor cover, loosen and remove wing nut.
Only 3-door hatchback: open floor
cover, remove rear storage,
loosen and remove wing nut and
conus.
2. Only 4-door saloon with temporary spare wheel: replace
the extension bolt with the short
bolt by using the hexagon key of
the wheel wrench.
3. Place the tools in the tool box or the tool bag 3 226.
4. Place spare wheel facing upwards, in the wheel well and
secure by tightening the wing nut.
Page 246 of 293

244Vehicle care
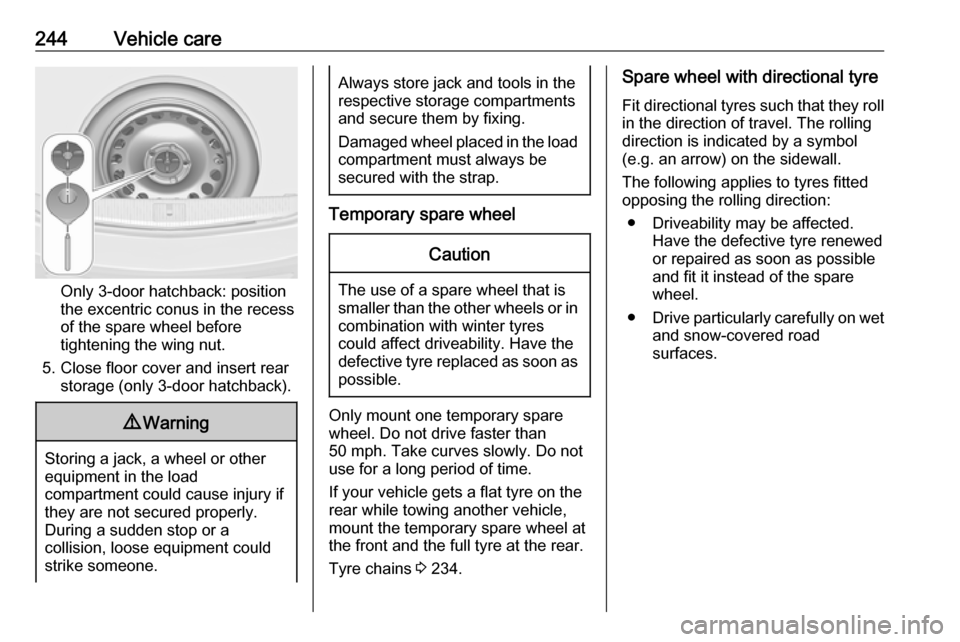
Only 3-door hatchback: position
the excentric conus in the recess
of the spare wheel before
tightening the wing nut.
5. Close floor cover and insert rear storage (only 3-door hatchback).
9 Warning
Storing a jack, a wheel or other
equipment in the load
compartment could cause injury if they are not secured properly.
During a sudden stop or a
collision, loose equipment could strike someone.
Always store jack and tools in the
respective storage compartments
and secure them by fixing.
Damaged wheel placed in the load compartment must always be
secured with the strap.
Temporary spare wheel
Caution
The use of a spare wheel that is smaller than the other wheels or in combination with winter tyres
could affect driveability. Have the defective tyre replaced as soon as
possible.
Only mount one temporary spare
wheel. Do not drive faster than
50 mph. Take curves slowly. Do not
use for a long period of time.
If your vehicle gets a flat tyre on the
rear while towing another vehicle,
mount the temporary spare wheel at
the front and the full tyre at the rear.
Tyre chains 3 234.
Spare wheel with directional tyre
Fit directional tyres such that they roll in the direction of travel. The rolling
direction is indicated by a symbol
(e.g. an arrow) on the sidewall.
The following applies to tyres fitted
opposing the rolling direction:
● Driveability may be affected. Have the defective tyre renewed
or repaired as soon as possible
and fit it instead of the spare
wheel.
● Drive particularly carefully on wet
and snow-covered road
surfaces.
Page 247 of 293

Vehicle care245Jump starting
Do not start with quick charger.
A vehicle with a discharged vehicle
battery can be started using jump
leads and the vehicle battery of
another vehicle.9 Warning
Be extremely careful when starting
with jump leads. Any deviation
from the following instructions can
lead to injuries or damage caused
by battery explosion or damage to the electrical systems of both
vehicles.
9 Warning
Avoid contact of the battery with
eyes, skin, fabrics and painted
surfaces. The fluid contains
sulphuric acid which can cause
injuries and damage in the event
of direct contact.
● Never expose the vehicle battery
to naked flames or sparks.
● A discharged vehicle battery can already freeze at a temperature
of 0 °C. Defrost the frozen vehicle
battery before connecting jump leads.
● Wear eye protection and protective clothing when
handling a vehicle battery.
● Use a booster vehicle battery with the same voltage ( 12 Volts).
Its capacity (Ah) must not be
much less than that of the
discharged vehicle battery.
● Use jump leads with insulated terminals and a cross section of
at least 16 mm 2
(25 mm 2
for
diesel engines).
● Do not disconnect the discharged
vehicle battery from the vehicle.
● Switch off all unnecessary electrical consumers.
● Do not lean over the vehicle battery during jump starting.
● Do not allow the terminals of one
lead to touch those of the other
lead.● The vehicles must not come into contact with each other during
the jump starting process.
● Apply the parking brake, transmission in neutral,
automatic transmission in P.
● Open the positive terminal protection caps of both vehicle
batteries.
Lead connection order:
1. Connect the red lead to the positive terminal of the booster
vehicle battery.
2. Connect the other end of the red lead to the positive terminal of the
discharged vehicle battery.
Page 248 of 293

246Vehicle care3. Connect the black lead to thenegative terminal of the booster
vehicle battery.
4. Connect the other end of the black
lead to a vehicle grounding point,
such as the engine block or an
engine mounting bolt. Connect as far away from the discharged
vehicle battery as possible,
however at least 60 cm.
Route the leads so that they cannot
catch on rotating parts in the engine
compartment.
To start the engine: 1. Start the engine of the vehicle providing the jump.
2. After five minutes, start the other engine. Start attempts should be
made for no longer than
15 seconds at an interval of one
minute.
3. Allow both engines to idle for approx. three minutes with the
leads connected.4. Switch on electrical consumers (e.g. headlights, heated rear
window) of the vehicle receiving
the jump start.
5. Reverse above sequence exactly when removing leads.Towing
Towing the vehicle
Insert a screwdriver in the slot at the
lower part of the cap. Release the cap
by carefully moving the screwdriver
downwards.
The towing eye is stowed with the
vehicle tools 3 226.