Page 298 of 396
2987-2. Steps to take in an emergency
Tighten down the towing eyelet
securely using a wheel nut
wrench or hard metal bar.
Securely attach cables or chains to the towing eyelet.
Take care not to damage the vehicle body.
Enter the vehicle being towed and start the engine.
If the engine does not start, turn the engine switch to the “ON” p\
osition.
Shift the shift lever to N and release the parking brake.
When the shift lever cannot be sh ifted (automatic transmission):
→ P. 1 4 0
■While towing
If the engine is not running, the power assist for the brakes and steering will
not function, making steering and braking more difficult.
■ Wheel nut wrench
Wheel nut wrench is installed in the luggage. ( →P. 313)
4
5
6
7
Page 299 of 396

2997-2. Steps to take in an emergency
7
When trouble arises
WARNING
Observe the following precautions.
Failure to do so may result in death or serious injury.
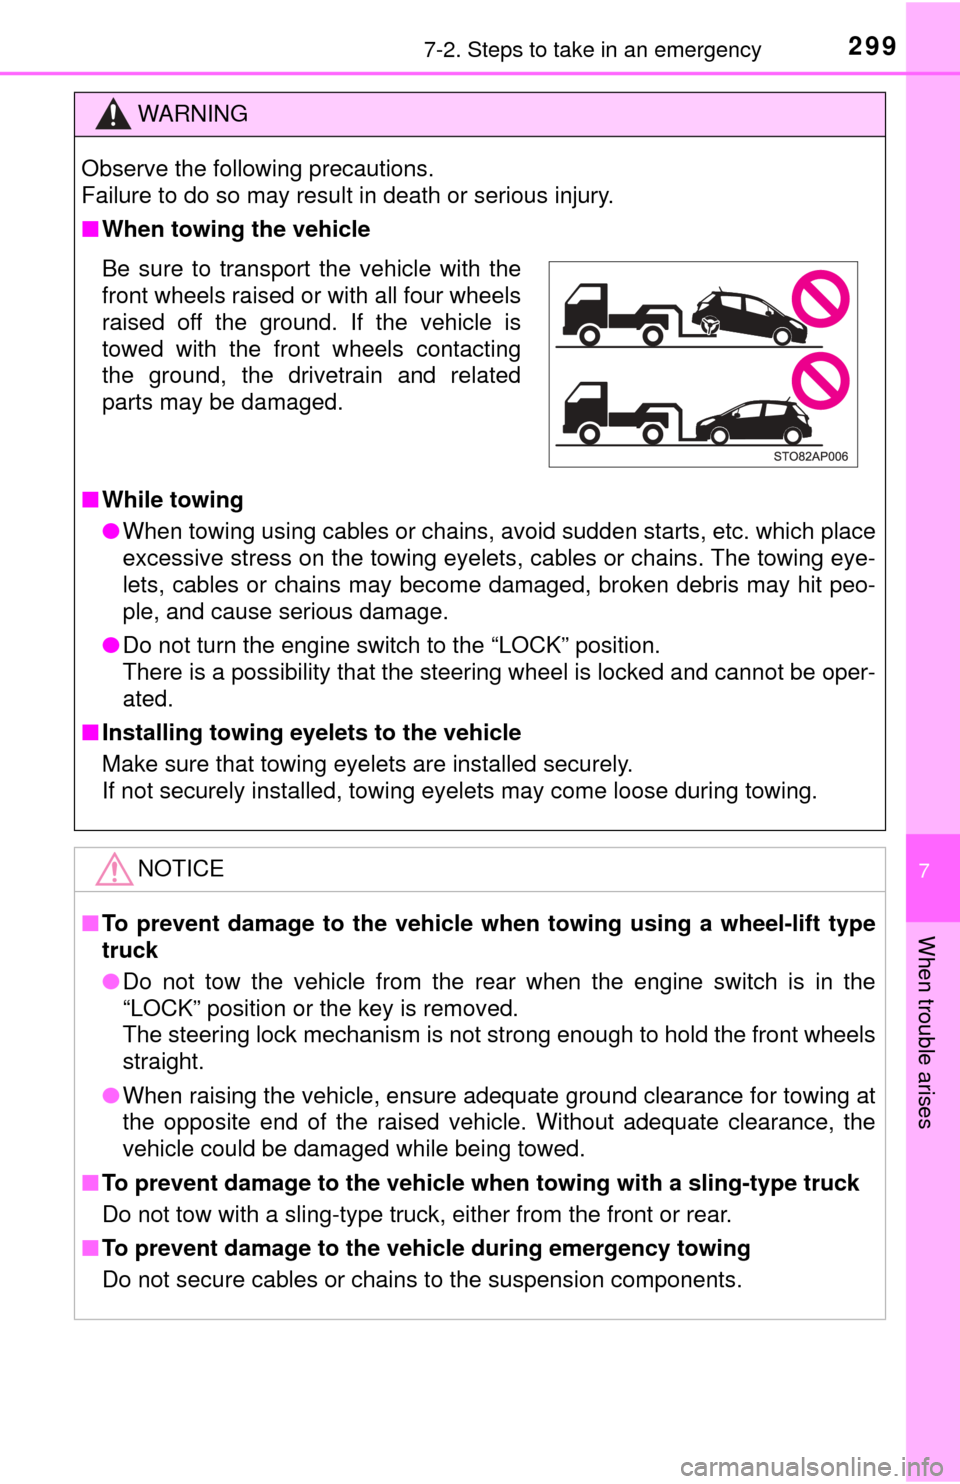
■When towing the vehicle
■ While towing
● When towing using cables or chains, avoid sudden starts, etc. which place
excessive stress on the towing eyelets, cables or chains. The towing eye-
lets, cables or chains may become damaged, broken debris may hit peo-
ple, and cause serious damage.
● Do not turn the engine switch to the “LOCK” position.
There is a possibility that the steering wheel is locked and cannot be oper-
ated.
■ Installing towing eyelets to the vehicle
Make sure that towing eyelets are installed securely.
If not securely installed, towing eyelets may come loose during towing.
NOTICE
■To prevent damage to the vehicle when towing using a wheel-lift type
truck
● Do not tow the vehicle from the rear when the engine switch is in the
“LOCK” position or the key is removed.
The steering lock mechanism is not strong enough to hold the front wheels
straight.
● When raising the vehicle, ensure adequate ground clearance for towing at
the opposite end of the raised vehicle. Without adequate clearance, the
vehicle could be damaged while being towed.
■ To prevent damage to the vehicle when towing with a sling-type truck
Do not tow with a sling-type truck, either from the front or rear.
■ To prevent damage to the vehic le during emergency towing
Do not secure cables or chains to the suspension components.
Be sure to transport the vehicle with the
front wheels raised or with all four wheels
raised off the ground. If the vehicle is
towed with the front wheels contacting
the ground, the drivetrain and related
parts may be damaged.
Page 307 of 396

3077-2. Steps to take in an emergency
7
When trouble arises
■SRS warning light
This warning light system monitors the airbag sensor assembly, front impact
sensors, side impact sensors, driver’s seat belt buckle switch, front passen-
ger occupant classification system (ECU and sensors), “AIR BAG ON” indica-
tor, “AIR BAG OFF” indicator, front passenger’s seat belt buckle switch, seat
belt pretensioner assemblies, airbags, interconnecting wiring and power
sources. ( →P. 34)
■ Front passenger detection sensor, passenger seat belt reminder and
warning buzzer
● If luggage is placed on the front passenger seat, the front passenger de\
tec-
tion sensor may cause the warning light to flash and the warning buzzer to
sound even if a passenger is not sitting in the seat.
● If a cushion is placed on the seat, the sensor may not detect a passenger,
and the warning light may not operate properly.
■ Electric power steering system warning light (warning buzzer)
When the battery charge becomes insufficient or the voltage temporarily
drops, the electric power steering system warning light may come on and \
the
warning buzzer may sounds.
■ If the malfunction indicator la mp comes on while driving
First check the following:
● Is the fuel tank empty?
If it is, fill the fuel tank immediately.
● Is the fuel tank cap loose?
If it is, tighten it securely.
The malfunction indicator lamp will go off after several driving trips.
If the malfunction indicator lamp does not go off even after several trips, con-
tact your Toyota dealer as soon as possible.
■
When the tire pressure warning light comes on (vehicles with a tire
pressure warning system)
Check the tire inflation pressure and adjust to the appropriate level. Push-
ing the tire pressure warning reset switch will not turn off the tire pressure
warning light.
Page 315 of 396
3157-2. Steps to take in an emergency
7
When trouble arises
Move the driver’s seat to the
front most position and remove
the cover.
Take out the jack.For tightening
For loosening
Lift the deck board and pull it toward you to remove it. ( →P. 219)
Remove the luggage floor
cover.
Loosen the center fastener that
secures the spare tire.
Taking out the jack
1
2
1
2
Taking out the spare tire
1
2
3
Page 321 of 396
3217-2. Steps to take in an emergency
7
When trouble arises
Lay the flat tire on the luggage
floor so that the outer side of
the tire wheel faces toward the
rear of the vehicle. Detach the
rear center head restraint from
the seat and release the belt.
Pass the belt through the center
hole of the flat tire wheel.
Put the center portion of the
belt onto the rear center head
restraint position and then
return the rear center head
restraint.
Hold the buckle and pull the
belt to secure the tire.
After stowing the flat tire, check
that the tire and belt are secured.
5
6
7
8
Page 323 of 396

3237-2. Steps to take in an emergency
7
When trouble arises
WARNING
■When using the compact spare tire
●Remember that the compact spare tire provided is specifically
designed for use with your vehicle. Do not use your compact spare tire
on another vehicle.
●Do not use more than one compact spare tire simultaneously.
●Replace the compact spare tire with a standard tire as soon as possi-
ble.
●Avoid sudden acceleration, abrupt steering, sudden braking and shift-
ing operations that cause sudden engine braking.
■When storing the compact spare tire
Be careful not to catch fingers or other body parts between the compact
spare tire and the body of the vehicle.
■After using the tools and jack
Before driving, make sure all the tools and jack are securely in place in
their storage location to reduce the po ssibility of personal injury during a
collision or sudden braking.
■When the compact spare tire is attached
The vehicle speed may not be correctly detected, and the following sys-
tems may not operate correctly:
●ABS
●Brake assist
●VSC
●TRAC
●PCS (Pre-Collision System) (if equipped)
●LDA (Lane Departure Alert) (if equipped)
●Automatic High Beam (if equipped)
●Cruise control (if equipped)
●EPS (Electric Power Steering)
■Speed limit when using the compact spare tire
Do not drive at speeds in excess of 50 mph (80 km/h) when a compact
spare tire is installed on the vehicle.
The compact spare tire is not designed for driving at high speeds. Fail-
ure to observe this precaution may lead to an accident causing death or
serious injury.
■When stowing the flat tire
●Make sure the rear seats are in their original position.
●Secure it using a tire tie-down belt. Otherwise, the flat tire may fly out
in case of the sudden braking or an accident, resulting in death or seri-
ous injury.
Page 361 of 396

3618-1. Specifications
8
Vehicle specifications
Snow tire
A tire that attains a traction index equal to or
greater than 110, compared to the ASTM E-
1136 Standard Reference Test Tire, when
using the snow traction test as described in
ASTM F-1805-00, Standard Test Method for
Single Wheel Driving Traction in a Straight
Line on Snow-and Ice-Covered Surfaces, and
which is marked with an Alpine Symbol ( )
on at least one sidewall
Test rim
The rim on which a tire is fitted for testing, and
may be any rim listed as appropriate for use
with that tire
TreadThat portion of a tire that comes into contact
with the road
Tread ribA tread section running circumferentially
around a tire
Tread separationPulling away of the tread from the tire carcass
Treadwear indicators
(TWI)The projections within the principal grooves
designed to give a visual indication of the
degrees of wear of the tread
Wheel-holding fixtureThe fixture used to hold the wheel and tire
assembly securely during testing
Tire related termMeaning
Page 369 of 396
369
9
For owners
Seat belt instructions for Canadian owners
(in French)
● Déroulez la sangle diagonale
de telle sorte qu’elle passe bien
sur l’épaule, sans pour autant
être en contact avec le cou ou
glisser de l’épaule.
● Placez la sangle abdominale le
plus bas possible sur les
hanches.
● Réglez la position du dossier de
siège. Asseyez-vous le dos le
plus droit possible et calez-
vous bien dans le siège.
● Ne pas vriller la ceinture de
sécurité.
■Ceintures de sécurité
Nettoyez avec un chiffon ou une éponge humectée d’eau savon-
neuse tiède. Par ailleurs, vérifiez régulièrement que les ceintures
ne sont pas effilochées, entaillées, ou ne paraissent pas exagéré-
ment usées.
The following is a French explan ation of seat belt instructions
extracted from the seat be lt section in this manual.
See the seat belt secti on for more detailed seat belt instructions in
English.
Utilisation correcte des ceintures de sécurité
Entretien et soin