Page 67 of 640
671-1. For safe use
1
For safety and security
WARNING
■When installing a child restraint system
● When a booster seat is installed, always ensure that the shoulder belt is
positioned across the center of the child’s shoulder. The belt should be
kept away from the child’s neck, but not so that it could fall off the child’s
shoulder. Failure to do so may result in death or serious injury in the event
of an accident or a sudden braking.
● Ensure that the belt and plate are securely locked and the seat belt is not
twisted.
● Shake the child restraint system left and right, and forward and backward
to ensure that it has been securely installed.
● After securing a child restraint system, never adjust the seat.
● Follow all installation instructions provided by the child restraint system
manufacturer.
● Double Cab models only: When securing some types of child restraint sys-
tems in rear seats, it may not be possible to properly use the seat belts in
positions next to the child restraint without interfering with it or affecting
seat belt effectiveness. Be sure your seat belt fits snugly across your
shoulder and low on your hips. If it does not, or if it interferes with the child
restraint, move to a different position. Failure to do so may result in death
or serious injury.
● Double Cab models only: When installing the child restraint system with
the head restraint being lowered, be sure to have the top tether strap p\
ass
over the top of the head restraint. If the belt passes below the head
restraint, it is possible that the child restraint system may not be securely
fixed.
■ Do not use a seat belt extender
If a seat belt extender is used when installing a child restraint system, the
seat belt will not securely hold the child restraint system, which could cause
death or serious injury to the child or other passengers in the event of a sud-
den braking, sudden swerving or an accident.
■ To correctly attach a child restra int system to the anchors (vehicles
with rear seats)
When using the LATCH anchors, be sure that there are no foreign objects
around the anchors and that the seat belt is not caught behind the child
restraint system. Make sure the child restraint system is securely attached,
or it may cause death or serious injury to the child or other passengers in
the event of a sudden braking or an accident.
Page 83 of 640
832. Instrument cluster
2
Instrument cluster
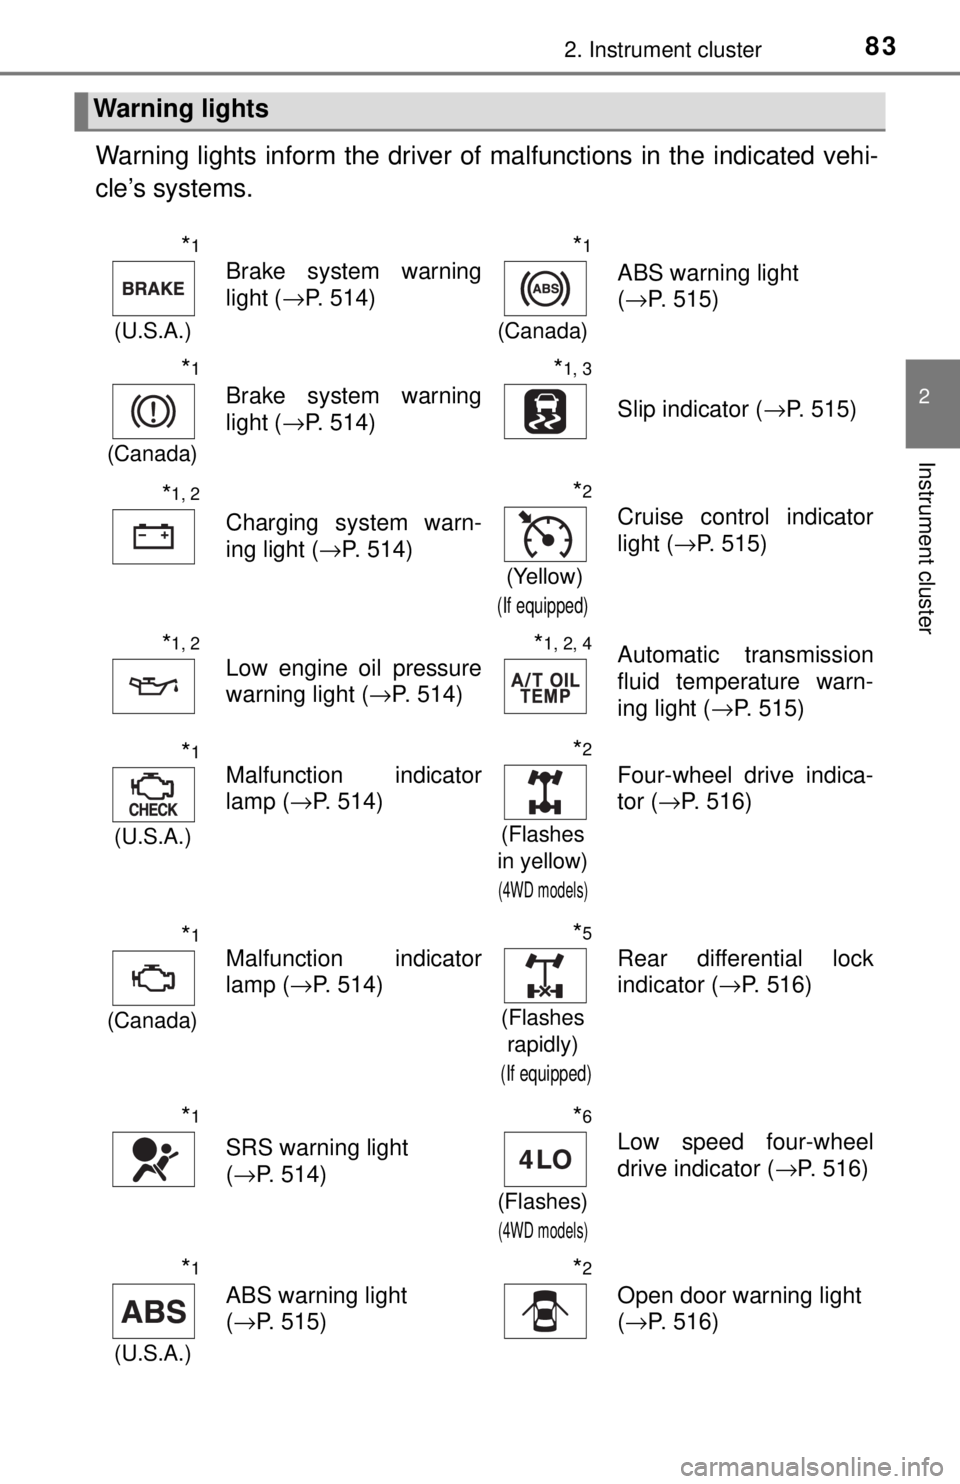
Warning lights inform the driver of malfunctions in the indicated vehi-
cle’s systems.
Warning lights
*1
(U.S.A.)
Brake system warning
light ( →P. 514)
*1
(Canada)
ABS warning light
(→P. 515)
*1
(Canada)
Brake system warning
light ( →P. 514)
*1, 3
Slip indicator ( →P. 515)
*1, 2
Charging system warn-
ing light (→P. 514)
*2
(Yellow)
(If equipped)
Cruise control indicator
light (→P. 515)
*1, 2
Low engine oil pressure
warning light ( →P. 514)*1, 2, 4Automatic transmission
fluid temperature warn-
ing light ( →P. 515)
*1
(U.S.A.)
Malfunction indicator
lamp (→P. 514)
*2
(Flashes
in yellow)
(4WD models)
Four-wheel drive indica-
tor ( →P. 516)
*1
(Canada)
Malfunction indicator
lamp ( →P. 514)
*5
(Flashes
rapidly)
(If equipped)
Rear differential lock
indicator ( →P. 516)
*1
SRS warning light
(→P. 514)
*6
(Flashes)
(4WD models)
Low speed four-wheel
drive indicator ( →P. 516)
*1
(U.S.A.)
ABS warning light
(→P. 515)
*2
Open door warning light
(→P. 516)
Page 85 of 640
852. Instrument cluster
2
Instrument cluster
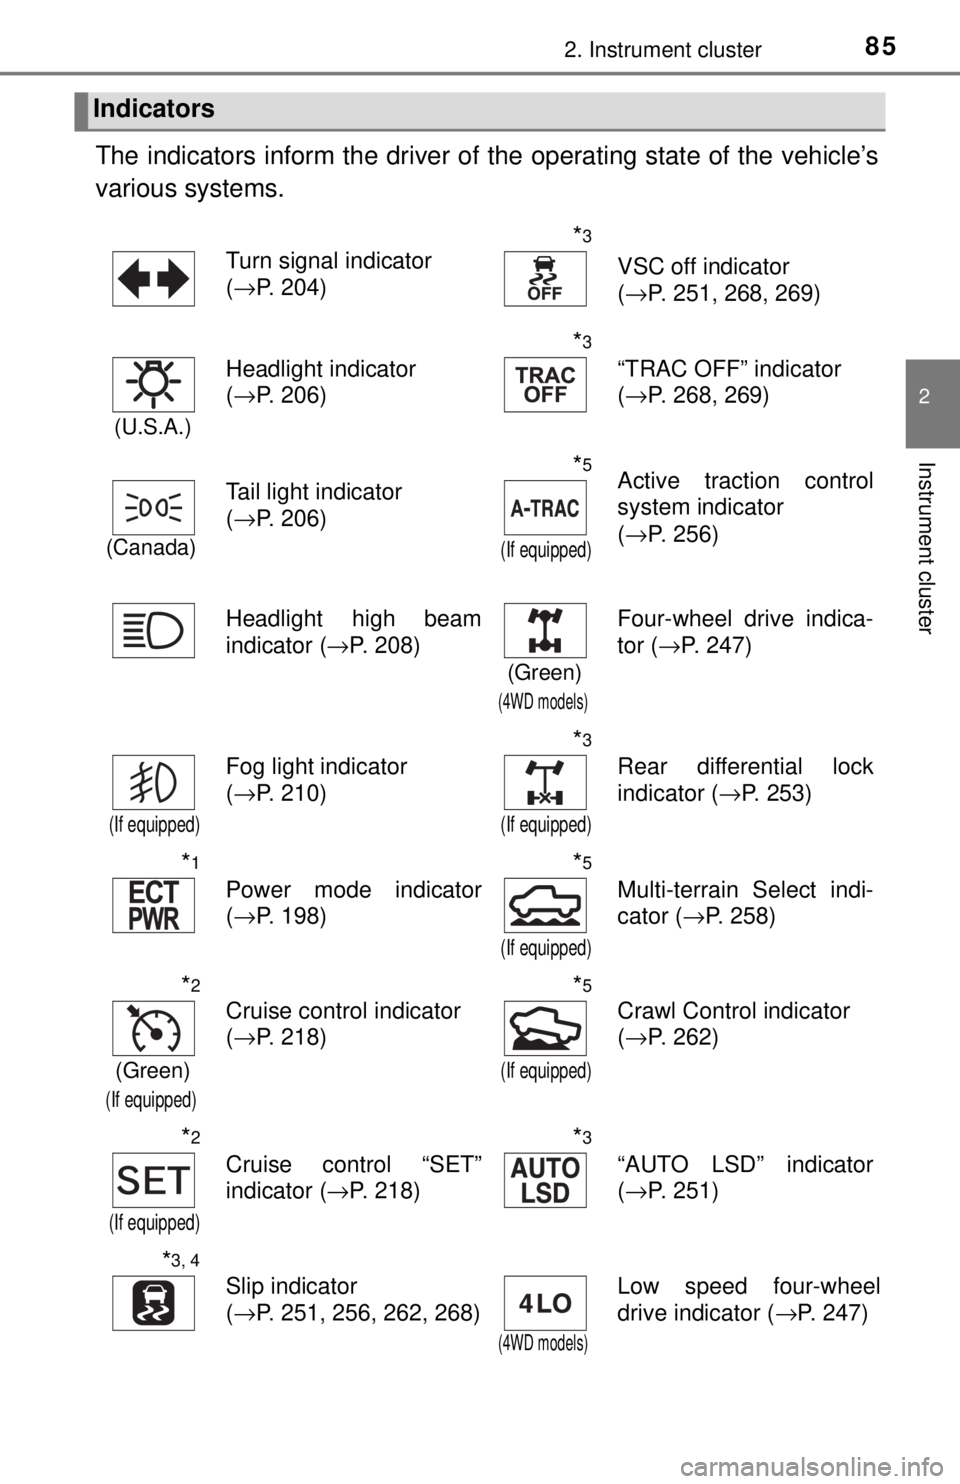
The indicators inform the driver of the operating state of the vehicle’s
various systems.
Indicators
Turn signal indicator
( →P. 204)*3
VSC off indicator
(→P. 251, 268, 269)
(U.S.A.)
Headlight indicator
(→P. 206)
*3
“TRAC OFF” indicator
(→P. 268, 269)
(Canada)
Tail light indicator
(→P. 206)
*5
(If equipped)
Active traction control
system indicator
(→P. 256)
Headlight high beam
indicator ( →P. 208)
(Green)
(4WD models)
Four-wheel drive indica-
tor (→P. 247)
(If equipped)
Fog light indicator
(→P. 210)
*3
(If equipped)
Rear differential lock
indicator ( →P. 253)
*1
Power mode indicator
(→P. 198)
*5
(If equipped)
Multi-terrain Select indi-
cator ( →P. 258)
*2
(Green)
(If equipped)
Cruise control indicator
(→P. 218)*5
(If equipped)
Crawl Control indicator
(→P. 262)
*2
(If equipped)
Cruise control “SET”
indicator ( →P. 218)
*3
“AUTO LSD” indicator
(→P. 251)
*3, 4
Slip indicator
(→P. 251, 256, 262, 268)
(4WD models)
Low speed four-wheel
drive indicator ( →P. 247)
Page 90 of 640
902. Instrument cluster
Vehicles without a multi-informa-
tion display:
Pressing the button switches
between trip meter A and trip
meter B.
Vehicles with a multi-information
display:
Pressing the button switches
between odometer and trip meter.
■Odometer
Displays the total distance the vehicle has been driven.
■Tr i p m e t e r A*/trip meter B*
Displays the distance the vehicle has been driven since the meter
was last reset. Trip meters A and B can be used to record and dis-
play different distances independently.
*: Press and hold the button to reset.
■
Blank displays
The brightness of the instrument pan el lights can be adjusted by turn-
ing the button.
Darker
Brighter
Changing the odometer and trip meter display
Instrument panel light control
1
2
Page 94 of 640
942. Instrument cluster
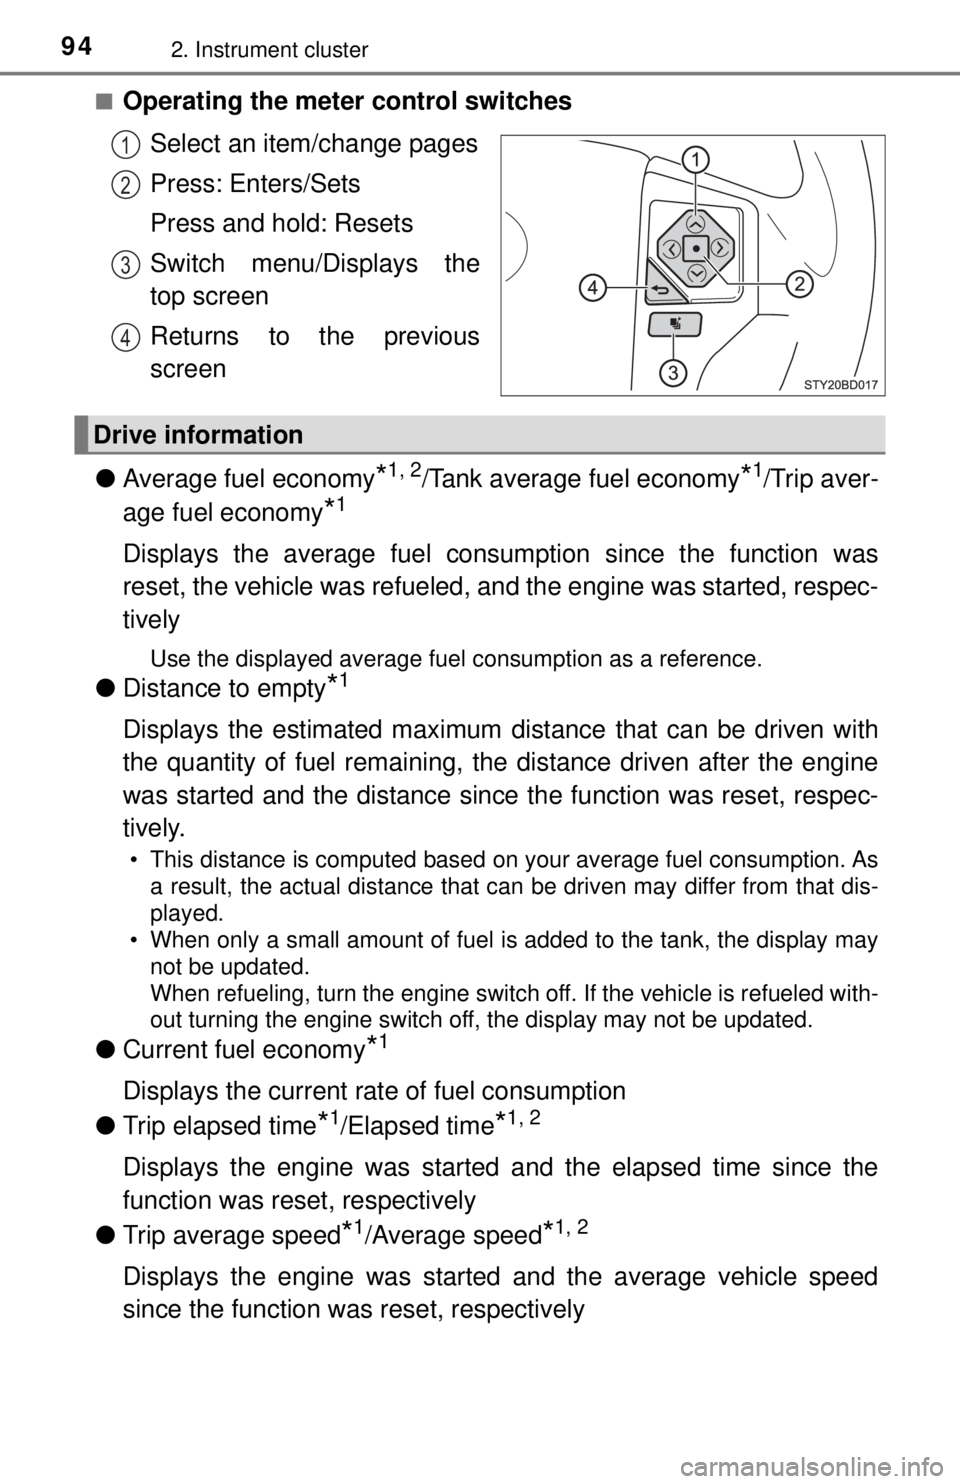
■Operating the meter control switchesSelect an item/change pages
Press: Enters/Sets
Press and hold: Resets
Switch menu/Displays the
top screen
Returns to the previous
screen
● Average fuel economy
*1, 2/Tank average fuel economy*1/Trip aver-
age fuel economy
*1
Displays the average fuel consum ption since the function was
reset, the vehicle was refueled, an d the engine was started, respec-
tively
Use the displayed average fuel consumption as a reference.
● Distance to empty*1
Displays the estimated maximum distance that can be driven with
the quantity of fuel remaining, t he distance driven after the engine
was started and the distance since the function was reset, respec-
tively.
• This distance is computed based on your average fuel consumption. As a result, the actual distance that can be driven may differ from that dis-
played.
• When only a small amount of fuel is added to the tank, the display may
not be updated.
When refueling, turn the engine switch off. If the vehicle is refueled with-
out turning the engine switch off, the display may not be updated.
● Current fuel economy*1
Displays the current rate of fuel consumption
● Trip elapsed time
*1/Elapsed time*1, 2
Displays the engine was started and the elapsed time since the
function was reset, respectively
● Trip average speed
*1/Average speed*1, 2
Displays the engine was started and the average vehicle speed
since the function wa s reset, respectively
1
2
3
4
Drive information
Page 97 of 640

972. Instrument cluster
2
Instrument cluster
■Setting display automatic cancelation
In the following situations, a setting display in which the settings can\
be
changed through the meter control switches will automatically be turned off.
●When a warning message appears while the setting display is displayed
● When the vehicle begins to move while the setting display is displayed
■ Tire inflation pressure (vehicles with tire pressure warning system)
●It may take a few minutes to display the tire inflation pressure after the
engine switch is turned to the “ON” position (vehicles without a smart key
system) or IGNITION ON mode (vehicles with a smart key system). It may
also take a few minutes to display the tire inflation pressure after inflation
pressure has been adjusted.
● “---” may be displayed if the tire position information cannot be determined
due to unfavorable radio wave conditions.
● Tire inflation pressure changes with temperature. The displayed values may
also be different from the values measured using a tire pressure gauge.
■ Liquid crystal display
→P. 9 1
WARNING
■The information display at low temperatures
→ P. 9 2
■ Cautions during setting up the display
As the engine needs to be running during setting up the display, ensure that
the vehicle is parked in a place with adequate ventilation. In a closed area
such as a garage, exhaust gases including harmful carbon monoxide (CO)
may collect and enter the vehicle. This may lead to death or a serious
health hazard.
NOTICE
■During setting up the display
To prevent battery discharge, ensure that the engine is running while setting
up the display features.
Page 99 of 640
992. Instrument cluster
2
Instrument cluster
■Past record
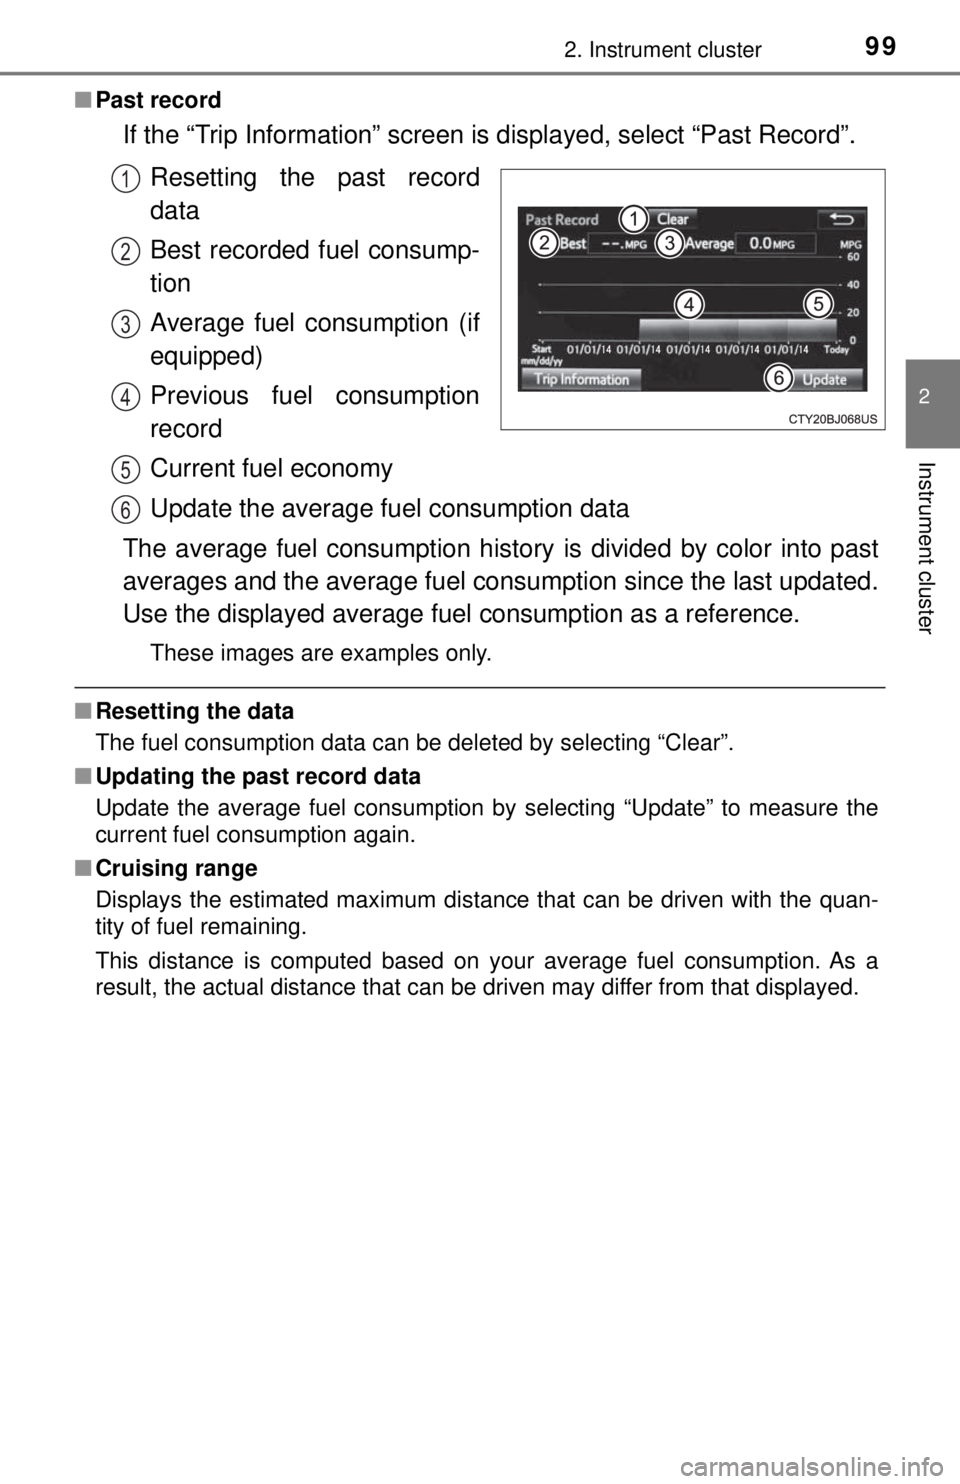
If the “Trip Information” screen is displayed, select “Past Record”.
Resetting the past record
data
Best recorded fuel consump-
tion
Average fuel consumption (if
equipped)
Previous fuel consumption
record
Current fuel economy
Update the average fu el consumption data
The average fuel consumption histor y is divided by color into past
averages and the average fuel cons umption since the last updated.
Use the displayed average fuel consumption as a reference.
These images are examples only.
■Resetting the data
The fuel consumption data can be deleted by selecting “Clear”.
■ Updating the past record data
Update the average fuel consumption by selecting “Update” to measure the
current fuel consumption again.
■ Cruising range
Displays the estimated maximum distance that can be driven with the quan-
tity of fuel remaining.
This distance is computed based on your average fuel consumption. As a
result, the actual distance that can be driven may differ from that displayed.
1
2
3
4
5
6
Page 155 of 640
155
4Driving
4-1. Before drivingDriving the vehicle ............. 156
Cargo and luggage ........... 165
Vehicle load limits ............. 169
Trailer towing..................... 170
Dinghy towing ................... 188
4-2. Driving procedures Engine (ignition) switch (vehicles without
a smart key system) ........ 189
Engine (ignition) switch (vehicles with a smart
key system) ..................... 192
Automatic transmission ..... 197
Manual transmission ......... 202
Turn signal lever................ 204
Parking brake .................... 205
4-3. Operating the lights and wipers
Headlight switch ................ 206
Fog light switch ................. 210
Windshield wipers and washer ............................ 211
4-4. Refueling Opening the fuel tank cap .................................. 214 4-5. Using the driving support
systems
Cruise control .................... 218
Intuitive parking assist....... 223
Rear view monitor system ............................ 229
BSM (Blind Spot Monitor) ........ 239
• The Blind Spot Monitor function ......................... 241
• The Rear Cross Traffic Alert function ................. 244
Four-wheel drive system ... 247
AUTO LSD system............ 251
Rear differential lock system ............................ 253
Active traction control system ............................ 256
Multi-terrain Select ............ 258
Crawl Control .................... 262
Clutch start cancel switch .............................. 266
Driving assist systems ...... 267
4-6. Driving tips Winter driving tips ............. 273
Off-road precautions ......... 277