Page 660 of 784

6608-2. Steps to take in an emergency
PRIUS PRIME_OM_OM47A88U_(U)■
If the tire pressure warning light frequently comes on after blinking
for 1 minute
If the tire pressure warning light
frequently comes on after blinking for
1 minute when the power switch is tu rned to ON mode, have it checked
by your Toyota dealer.
■ Warning buzzer
In some cases, the buzzer may not be heard due to being in a noisy location
or audio sound.
WARNING
■When the electric power steerin g system warning light comes on
When the light comes on yellow, the assist to the power steering is
restricted. When the light comes on red, the assist to the power steering is
lost and handling operations of the steering wheel become extremely
heavy. When steering wheel operations are heavier than usual, grip the
steering wheel firmly and operate it using more force than usual.
■
If the tire pressure warning light comes on
Be sure to observe the following precautions. Failure to do so could
cause a loss of vehicle control and result in death or serious injury.
●Stop your vehicle in a safe place as soon as possible. Adjust the tire
inflation pressure immediately.
●If the tire pressure warning light co mes on even after tire inflation pres-
sure adjustment, it is probable that you have a flat tire. Check the tires.
If a tire is flat, repair the flat tire by using emergency tire puncture
repair kit.
●Avoid abrupt maneuvering and braking. If the vehicle tires deteriorate,
you could lose control of the steering wheel or the brakes.
■If a blowout or sudden air leakage should occur
The tire pressure warning system may not activate immediately.
Page 661 of 784

6618-2. Steps to take in an emergency
PRIUS PRIME_OM_OM47A88U_(U)
8
When trouble arises
WARNING
■Maintenance of the tires
Each tire, including the spare (if provided), should be checked monthly
when cold and inflated to the inflation pressure recommended by the
vehicle manufacturer on the vehicle placard or tire inflation pressure
label (tire and load information label). (If your vehicle has tires of a dif-
ferent size than the size indicated on the vehicle placard or tire inflation
pressure label [tire and load information label], you should determine
the proper tire inflation pressure for those tires.)
As an added safety feature, your vehicle has been equipped with a tire
pressure monitoring system (TPMS-ti re pressure warning system) that
illuminates a low tire pre ssure telltale (tire pressure warning light) when
one or more of your tires is significantly under-inflated. Accordingly,
when the low tire pressure telltale (tire pressure warning light) illumi-
nates, you should stop and check your tires as soon as possible, and
inflate them to the proper pressure. Driving on a significantly under-
inflated tire causes the tire to overheat and can lead to tire failure.
Under-inflation also reduces fuel effi ciency and tire tread life, and may
affect the vehicle’s hand ling and stopping ability.
Please note that the TPMS (tire pressure warning system) is not a sub-
stitute for proper ti re maintenance, and it is the driver’s responsibility to
maintain correct tire pressure, even if under-inflation has not reached
the level to trigger illumination of the TPMS low tire pressure telltale (tire
pressure warning light).
Your vehicle has also been equipped with a TPMS (tire pressure warn-
ing system) malfunction indicator to indicate when the system is not
operating properly. The TPMS (tire pressure warning system) malfunc-
tion indicator is combined with the lo w tire pressure telltale (tire pressure
warning light). When the system detects a malfunction, the telltale will
flash for approximately one minute and then remain continuously illumi-
nated. This sequence w ill continue upon subsequ ent vehicle start-ups
as long as the malfunction exists. When the malfunction indicator is illu-
minated, the system may not be able to detect or signal low tire pres-
sure as intended.
TPMS (tire pressure warning system) malfunctions may occur for a vari-
ety of reasons, including the installation of replacement or alternate tires
or wheels on the vehicle that prevent the TPMS (tire pressure warning
system) from functioning properly. Always check the TPMS (tire pres-
sure warning system) malfunction te lltale after replacing one or more
tires or wheels on your vehicle to ensure that the replacement or alter-
nate tires and wheels allow the TPMS (tire pressure warning system) to
continue to function properly.
Page 671 of 784
671
PRIUS PRIME_OM_OM47A88U_(U)
8
When trouble arises
8-2. Steps to take in an emergency
If you have a flat tire
Your vehicle is not equipped with a spare tire, but instead is
equipped with an emergency tire puncture repair kit.
A puncture caused by a nail or screw passing through the tire
tread can be repaired temporarily using the emergency tire
puncture repair kit. (The kit contains a bottle of sealant. The
sealant can be used only once to temporarily repair one tire
without removing the nail or screw from the tire.) After temporar-
ily repairing the tire with the kit, have the tire repaired or
replaced by your Toyota dealer.
WARNING
■If you have a flat tire
Do not continue driving with a flat tire.
Driving even a short dist ance with a flat tire can damage the tire and the
wheel beyond repair, which could result in an accident.
Page 672 of 784

6728-2. Steps to take in an emergency
PRIUS PRIME_OM_OM47A88U_(U)
●Stop the vehicle in a safe pl ace on a hard, flat surface.
● Set the parking brake.
● Shift the shift position to P.
● Stop the hybrid system.
● Turn on the emergency flashers.
● Check the degree of the tire damage.
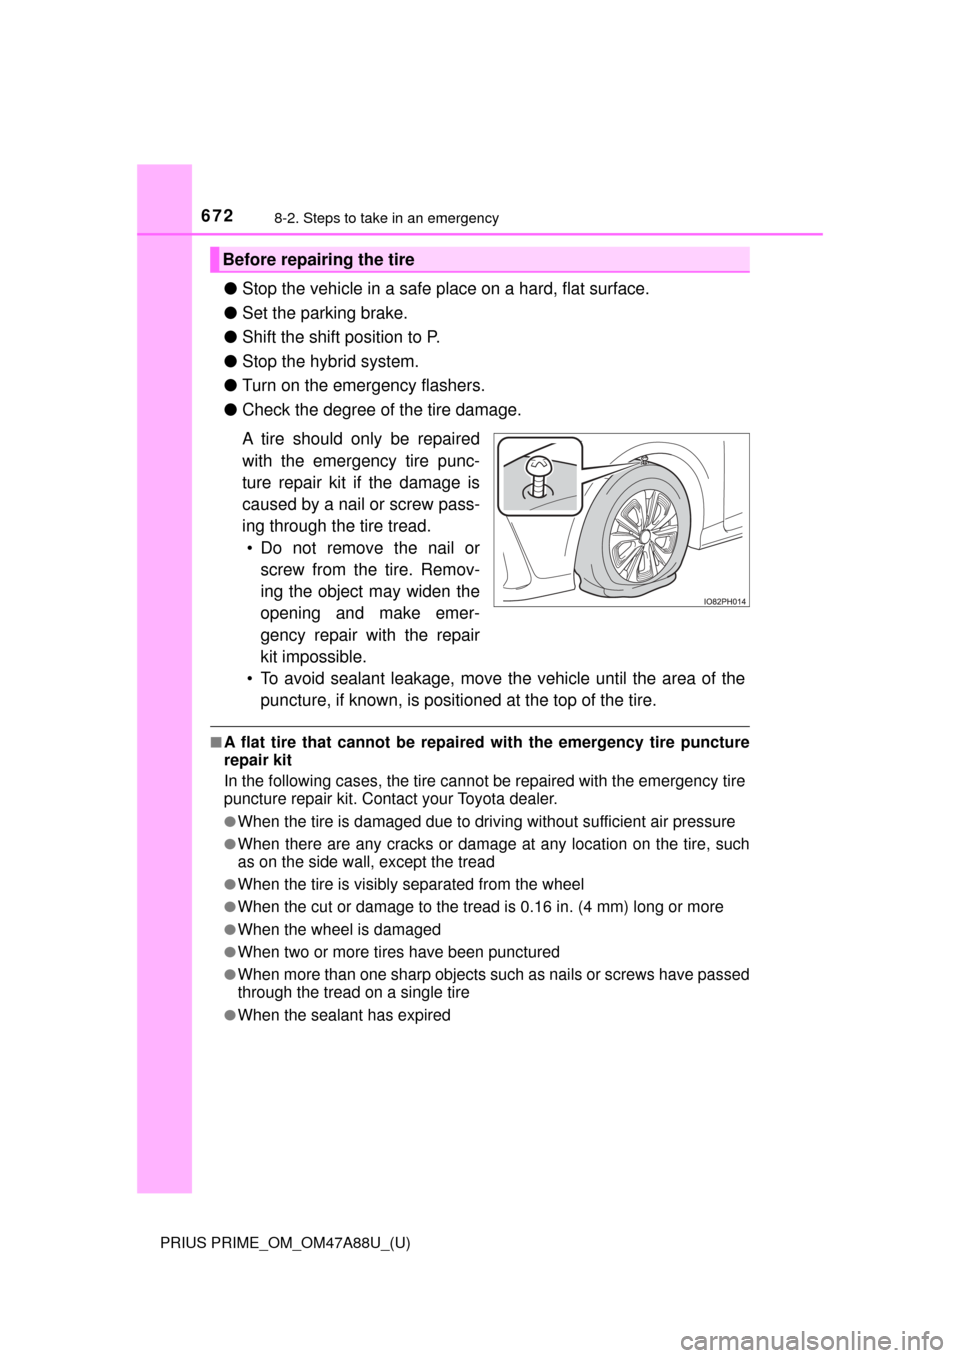
A tire should only be repaired
with the emergency tire punc-
ture repair kit if the damage is
caused by a nail or screw pass-
ing through the tire tread.
• Do not remove the nail or screw from the tire. Remov-
ing the object may widen the
opening and make emer-
gency repair with the repair
kit impossible.
• To avoid sealant leakage, move the vehicle until the area of the
puncture, if known, is positi oned at the top of the tire.
■A flat tire that cannot be repaired with the emergency tire puncture
repair kit
In the following cases, the tire cannot be repaired with the emergency tire
puncture repair kit. Contact your Toyota dealer.
●When the tire is damaged due to driv ing without sufficient air pressure
●When there are any cracks or damage at any location on the tire, such
as on the side wall, except the tread
●When the tire is visibly separated from the wheel
●When the cut or damage to the tread is 0.16 in. (4 mm) long or more
●When the wheel is damaged
●When two or more tires have been punctured
●When more than one sharp objects su ch as nails or screws have passed
through the tread on a single tire
●When the sealant has expired
Before repairing the tire
Page 678 of 784
6788-2. Steps to take in an emergency
PRIUS PRIME_OM_OM47A88U_(U)
Connect the bottle to the com-
pressor.
As shown in the illustration, insert
the bottle securely into the com-
pressor until the upper side of the
mark on the bottle is aligned with
the upper end of the notch.
Attach the sticker provided with
the tire puncture repair kit to a
position easily seen from the
driver’s seat.
Check the specified tire inflation
pressure.
Tire inflation pressure is specified
on the label on the driver’s side
pillar as shown. (→P. 716)
Start the hybrid system. ( →P. 324)
9
(U.S.A.)
(Canada)
10
11
12
Page 679 of 784

6798-2. Steps to take in an emergency
PRIUS PRIME_OM_OM47A88U_(U)
8
When trouble arises
To inject the sealant and inflate
the tire, turn the compressor
switch on.
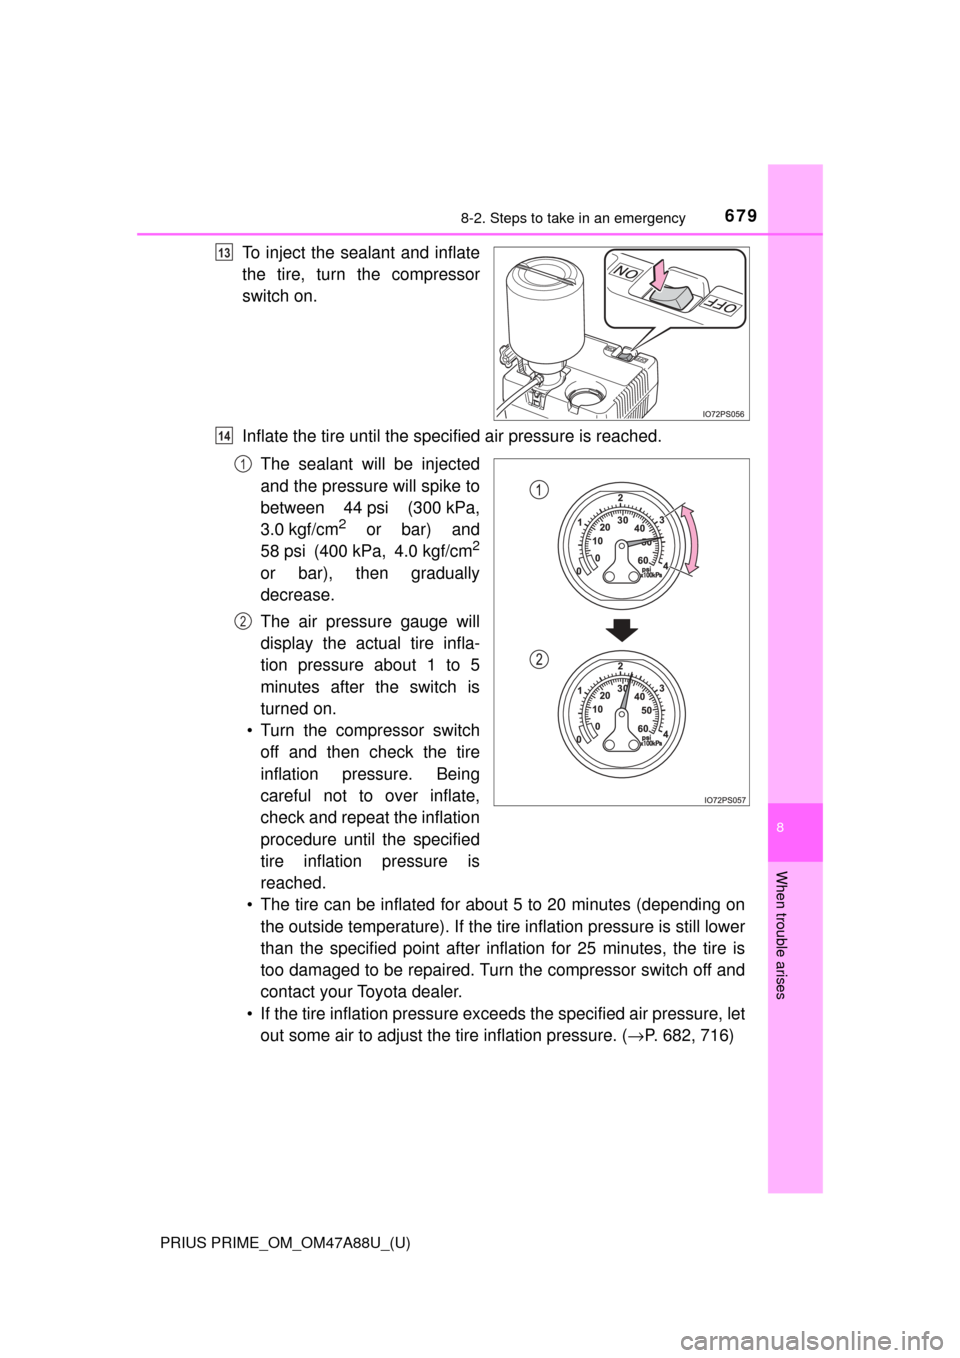
Inflate the tire until the specified air pressure is reached.The sealant will be injected
and the pressure will spike to
between 44 psi (300 kPa,
3.0 kgf/cm
2 or bar) and
58 psi (400 kPa, 4.0 kgf/cm2
or bar), then gradually
decrease.
The air pressure gauge will
display the actual tire infla-
tion pressure about 1 to 5
minutes after the switch is
turned on.
• Turn the compressor switch off and then check the tire
inflation pressure. Being
careful not to over inflate,
check and repeat the inflation
procedure until the specified
tire inflation pressure is
reached.
• The tire can be inflated for about 5 to 20 minutes (depending on the outside temperature). If the tire inflation pressure is still lower
than the specified point after infl ation for 25 minutes, the tire is
too damaged to be repaired. Turn the compressor switch off and
contact your Toyota dealer.
• If the tire inflation pressure exce eds the specified air pressure, let
out some air to adjust the tire inflation pressure. ( →P. 682, 716)
13
14
1
2
Page 680 of 784
6808-2. Steps to take in an emergency
PRIUS PRIME_OM_OM47A88U_(U)
With the compressor switch off, disconnect the hose from the valve
on the tire and then pull out the power plug from the power outlet
socket.
Some sealant may leak when the hose is removed.
Install the valve cap onto the valve of the emergency repaired tire.
Attach the air release cap to the
end of the hose.
If the air release cap is not
attached, the sealant may leak
and the vehicle may get dirty.
Temporarily store the bottle in the luggage compartment while it is
connected to the compressor.
To spread the liquid sealant evenly within the tire, immediately drive
safely for about 3 miles (5 km) below 50 mph (80 km/h).
After driving, stop your vehicle
in a safe place on a hard, flat
surface and reconnect the
repair kit.
Remove the air release cap from
the hose before reconnecting the
hose.
15
16
17
18
19
20
Page 681 of 784

6818-2. Steps to take in an emergency
PRIUS PRIME_OM_OM47A88U_(U)
8
When trouble arises
Turn the compressor switch on and wait for several seconds, then
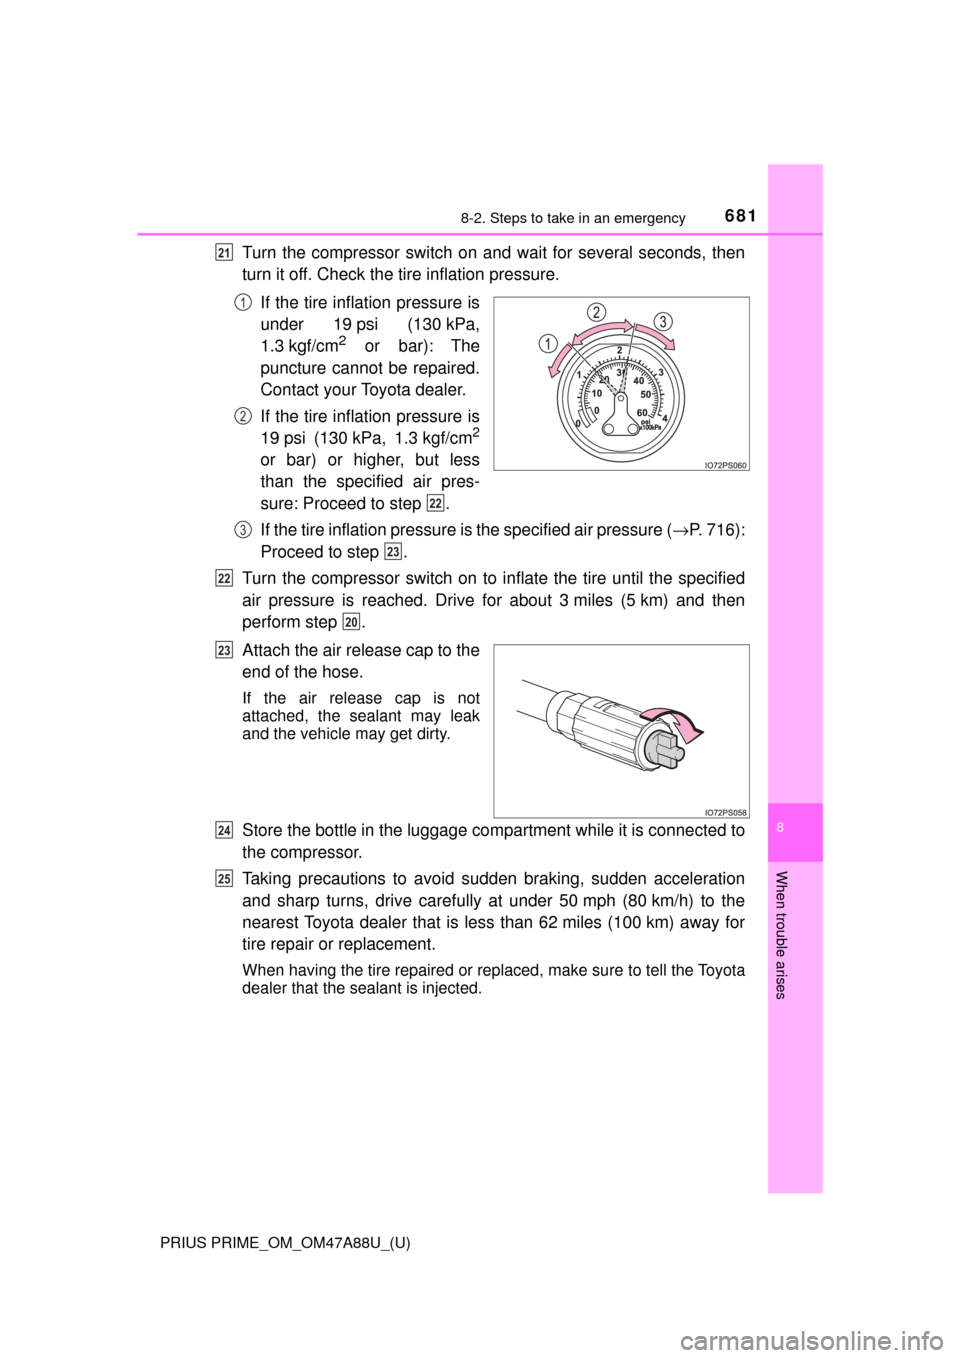
turn it off. Check the tire inflation pressure.If the tire inflation pressure is
under 19 psi (130 kPa,
1.3 kgf/cm
2 or bar): The
puncture cannot be repaired.
Contact your Toyota dealer.
If the tire inflation pressure is
19 psi (130 kPa, 1.3 kgf/cm
2
or bar) or higher, but less
than the specified air pres-
sure: Proceed to step .
If the tire inflation pressure is the specified air pressure ( →P. 716):
Proceed to step .
Turn the compressor switch on to in flate the tire until the specified
air pressure is reached. Drive for about 3 miles (5 km) and then
perform step .
Attach the air release cap to the
end of the hose.
If the air release cap is not
attached, the sealant may leak
and the vehicle may get dirty.
Store the bottle in the luggage co mpartment while it is connected to
the compressor.
Taking precautions to avoid su dden braking, sudden acceleration
and sharp turns, drive carefully at under 50 mph (80 km/h) to the
nearest Toyota dealer that is less than 62 miles (100 km) away for
tire repair or replacement.
When having the tire repaired or replaced, make sure to tell the Toyota
dealer that the sealant is injected.
21
1
2
22
3
23
22
20
23
24
25