2017 TOYOTA PRIUS PRIME inflation pressure
[x] Cancel search: inflation pressurePage 604 of 784
604
PRIUS PRIME_OM_OM47A88U_(U)
7-3. Do-it-yourself maintenance
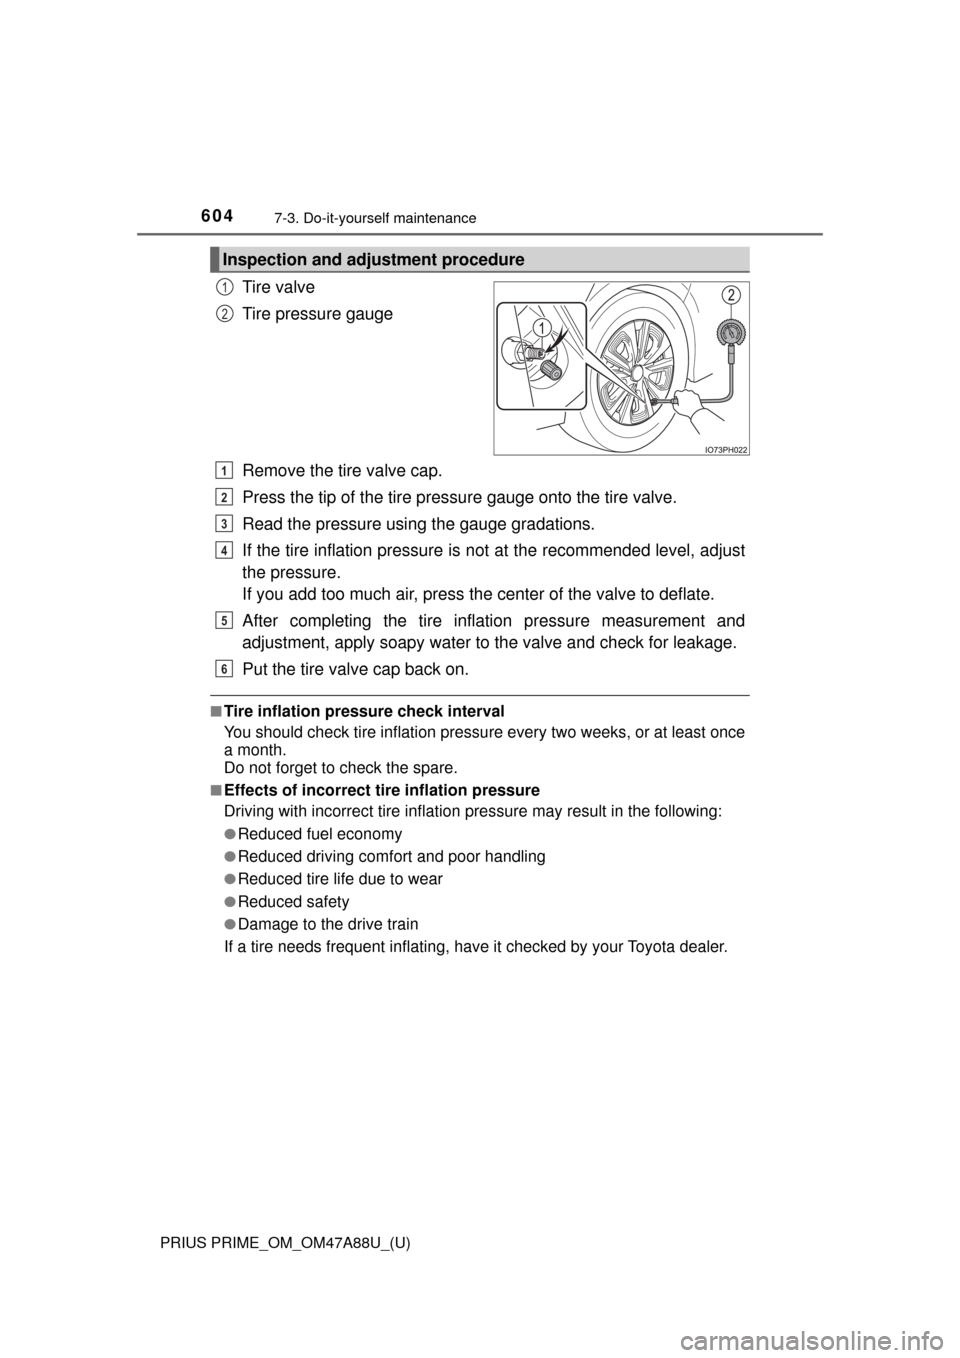
Tire valve
Tire pressure gauge
Remove the tire valve cap.
Press the tip of the tire pressure gauge onto the tire valve.
Read the pressure usi ng the gauge gradations.
If the tire inflation pressure is not at the recommended level, adjust
the pressure.
If you add too much air, press the center of the valve to deflate.
After completing the tire inflation pressure measurement and
adjustment, apply soapy water to the valve and check for leakage.
Put the tire valve cap back on.
■Tire inflation pressure check interval
You should check tire inflation pressure every two weeks, or at least once
a month.
Do not forget to check the spare.
■Effects of incorrect tire inflation pressure
Driving with incorrect tire inflation pressure may result in the following:
●Reduced fuel economy
●Reduced driving comfort and poor handling
●Reduced tire life due to wear
●Reduced safety
●Damage to the drive train
If a tire needs frequent inflating, have it checked by your Toyota dealer.
Inspection and adjustment procedure
1
2
1
2
3
4
5
6
Page 605 of 784
PRIUS PRIME_OM_OM47A88U_(U)
6057-3. Do-it-yourself maintenance
7
Maintenance and care
■Instructions for checking tire inflation pressure
When checking tire inflation pressure, observe the following:
●Check only when the tires are cold.
If your vehicle has been parked for at least 3 hours or has not been
driven for more than 1 mile or 1.5 km, you will get an accurate cold tire
inflation pressure reading.
●Always use a tire pressure gauge.
It is difficult to judge if a tire is properly inflated based only on its appear-
ance.
●It is normal for the tire inflation pressure to be higher after driving as
heat is generated in the tire. Do no t reduce tire inflation pressure after
driving.
●Never exceed the vehicle capacity weight.
Passengers and luggage weight should be placed so that the vehicle is
balanced.
WARNING
■Proper inflation is critical to save tire performance
Keep your tires properly inflated.
If the tires are not properly inflated, the following conditions may occur
which could lead to an accident resulting in death or serious injury:
●Excessive wear
●Uneven wear
●Poor handling
●Possibility of blowouts resu lting from overheated tires
●Air leaking from between tire and wheel
●Wheel deformation and/or tire damage
●Greater possibility of tire damage while driving (due to road hazards,
expansion joints, sharp edges in the road, etc.)
NOTICE
■When inspecting and adjusting tire inflation pressure
Be sure to put the tire valve caps back on.
If a valve cap is not installed, dirt or moisture may get into the valve and
cause an air leak, resulting in decreased tire inflation pressure.
Page 607 of 784
PRIUS PRIME_OM_OM47A88U_(U)
6077-3. Do-it-yourself maintenance
7
Maintenance and care
■When replacing wheels
The wheels of your vehicle are equipped with tire pressure warning
valves and transmitters that allow the tire pressure warning system to
provide advance warning in the event of a loss in tire inflation pressure.
Whenever wheels are replaced, tire pressure warning valves and trans-
mitters must be installed. ( →P. 595)
WARNING
■When replacing wheels
●Do not use wheels that are a different size from those recommended in
the Owner’s Manual, as this may result in a loss of handling control.
●Never use an inner tube in a leak ing wheel which is designed for a
tubeless tire. Doing so may result in an accident, causing death or seri-
ous injury.
■When installing the wheel nuts
●Never use oil or grease on the wheel bolts or wheel nuts.
Oil and grease may cause the wheel nuts to be excessively tightened,
leading to bolt or disc wheel damage. In addition, the oil or grease can
cause the wheel nuts to loosen and the wheel may fall off, causing an
accident and resulting in death or serious injury. Remove any oil or
grease from the wheel bolts or wheel nuts.
■Use of defective wheels prohibited
Do not use cracked or deformed wheels.
Doing so could cause the tire to leak air during driving, possibly causing
an accident.
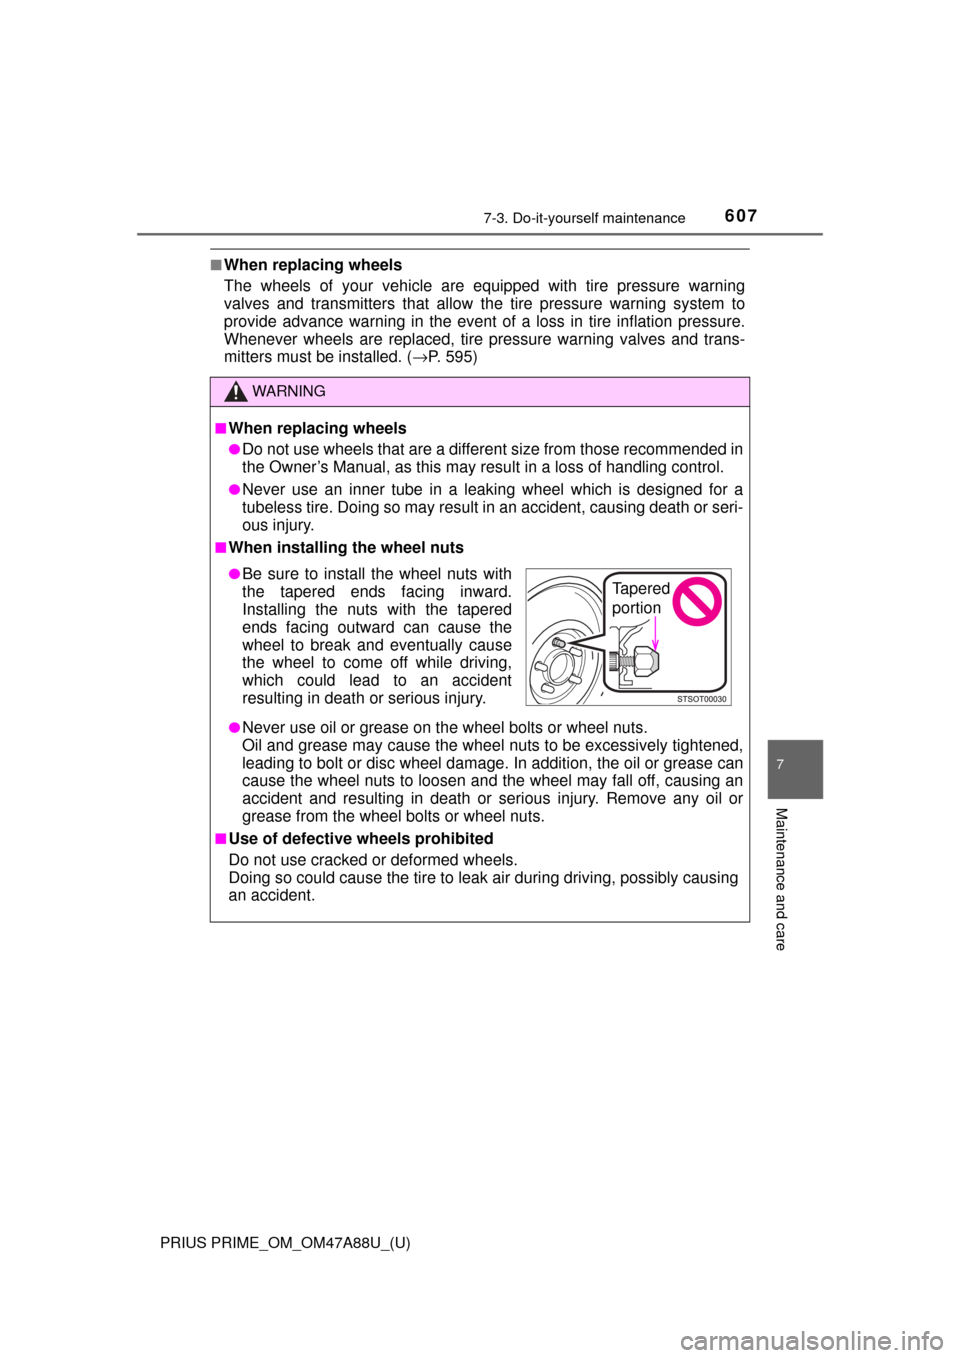
●Be sure to install the wheel nuts with
the tapered ends facing inward.
Installing the nuts with the tapered
ends facing outward can cause the
wheel to break and eventually cause
the wheel to come off while driving,
which could lead to an accident
resulting in death or serious injury.Tapered
portion
Page 656 of 784
6568-2. Steps to take in an emergency
PRIUS PRIME_OM_OM47A88U_(U)
Driver’s and front passenger’s seat belt reminder light
(warning buzzer)
*4, 5
Warns the driver and/or front passenger to fasten their
seat belts
→ Fasten the seat belt.
If the front passenger’s seat is occupied, the front
passenger’s seat belt also needs to be fastened to
make the warning light (war ning buzzer) turn off.
(U.S.A. only)
Rear passengers’ seat belt reminder light (warning
buzzer)
*6
Warns the rear passengers to fasten their seat belts
→ Fasten the seat belt.
Master warning light
A buzzer sounds and the warning light comes on and
flashes to indicate that the master warning system has
detected a malfunction.
→ P. 663
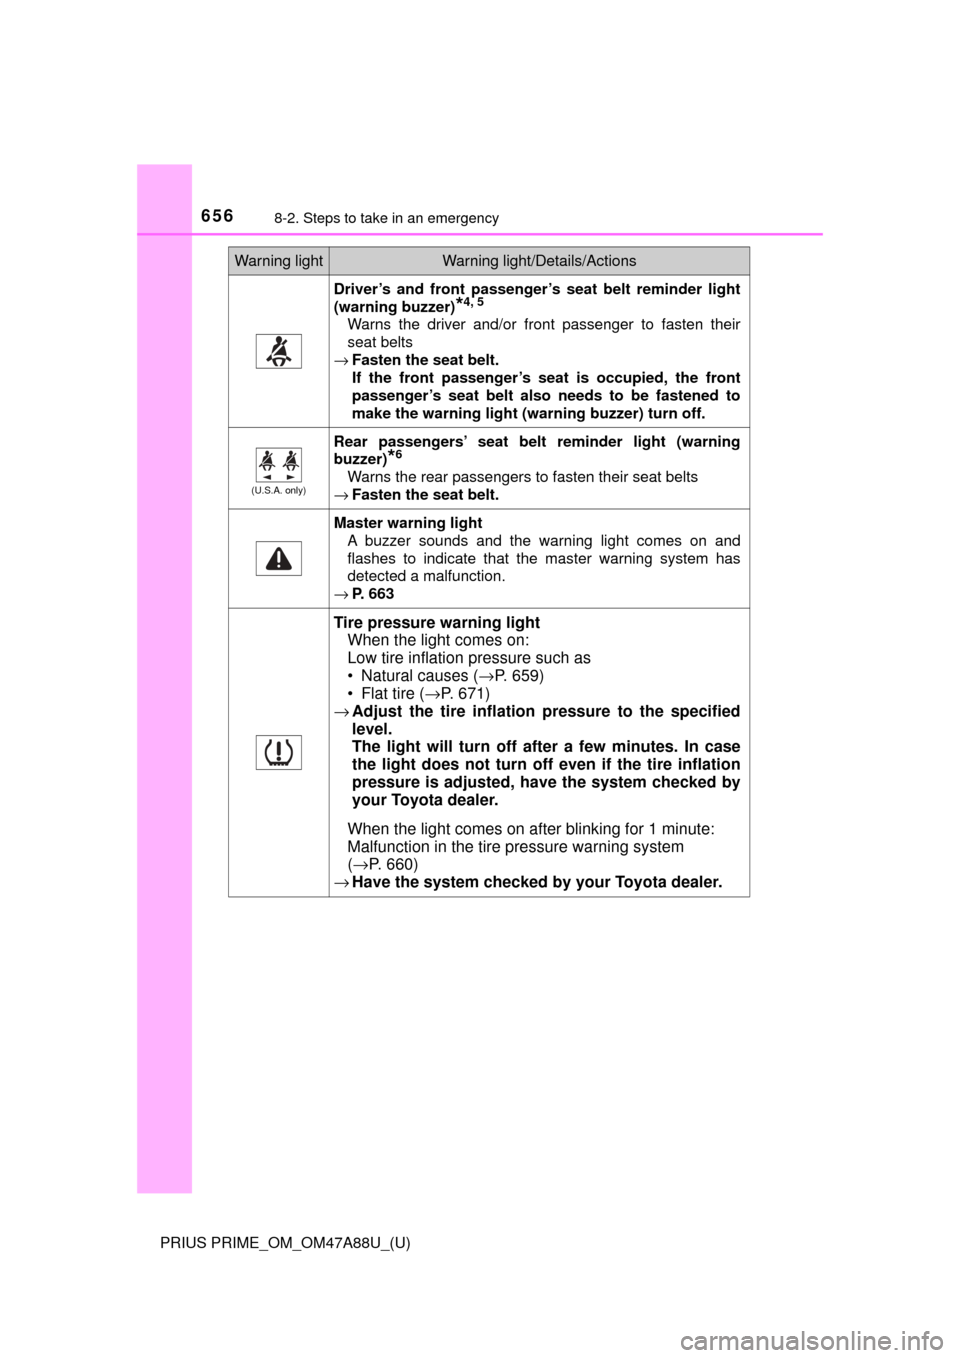
Tire pressure warning light
When the light comes on:
Low tire inflation pressure such as
• Natural causes ( →P. 659)
• Flat tire ( →P. 671)
→ Adjust the tire inflation pressure to the specified
level.
The light will turn off af ter a few minutes. In case
the light does not turn off even if the tire inflation
pressure is adjusted, have the system checked by
your Toyota dealer.
When the light comes on after blinking for 1 minute:
Malfunction in the tire pressure warning system
( → P. 660)
→ Have the system checked by your Toyota dealer.
Warning lightWarning light/Details/Actions
Page 659 of 784

6598-2. Steps to take in an emergency
PRIUS PRIME_OM_OM47A88U_(U)
8
When trouble arises
■SRS warning light
This warning light system monitors the airbag sensor assembly, front impact
sensors, side impact sensors (front), side impact sensors (front door\
), side
impact sensors (rear), driver’s seat belt buckle switch, front passenger occu-
pant classification system (ECU and sens ors), “AIR BAG ON” indicator light,
“AIR BAG OFF” indicator light, front passenger’s seat belt buckle switch, seat
belt pretensioner assemblies, airbags, interconnecting wiring and power
sources. ( →P. 36)
■ Front passenger detection sensor, seat belt reminder and warning
buzzer
● If luggage is placed on the front passenger seat, the front passenger de\
tec-
tion sensor may cause the warning light to flash and the warning buzzer to
sound even if a passenger is not sitting in the seat.
● If a cushion is placed on the seat, the sensor may not detect a passenger,
and the warning light may not operate properly.
■ Electric power steering system warning light (warning buzzer)
When the 12-volt battery charge becomes insufficient or the voltage tempo-
rarily drops, the electric power steer ing system warning light may come on
and the warning buzzer may sound.
■ If the malfunction indicator la mp comes on while driving
First check the following:
● Is the fuel tank empty?
If it is, fill the fuel tank immediately.
● Is the fuel tank cap loose?
If it is, tighten it securely.
The malfunction indicator lamp will go off after several driving trips.
If the malfunction indicator lamp does not go off even after several trips, con-
tact your Toyota dealer as soon as possible.
■
When the tire pressure warning light comes on
Inspect the appearance of the tire to check that the tire is not punctured.
If the tire is punctured: → P. 671
If the tire is not punctured:
Check the tire inflation pressure and adjust to the appropriate level. Initial-
izing the tire pressure warning syst em will not turn off the tire pressure
warning light.
■The tire pressure warning light may come on due to natural causes
The tire pressure warning light may come on due to natural causes such
as natural air leaks and tire inflat ion pressure changes caused by tem-
perature. In this case, adjusting the ti re inflation pressure will turn off the
warning light (afte r a few minutes).
■Conditions that the tire pressure warning system may not function
properly
→ P. 5 9 9
Page 660 of 784

6608-2. Steps to take in an emergency
PRIUS PRIME_OM_OM47A88U_(U)■
If the tire pressure warning light frequently comes on after blinking
for 1 minute
If the tire pressure warning light
frequently comes on after blinking for
1 minute when the power switch is tu rned to ON mode, have it checked
by your Toyota dealer.
■ Warning buzzer
In some cases, the buzzer may not be heard due to being in a noisy location
or audio sound.
WARNING
■When the electric power steerin g system warning light comes on
When the light comes on yellow, the assist to the power steering is
restricted. When the light comes on red, the assist to the power steering is
lost and handling operations of the steering wheel become extremely
heavy. When steering wheel operations are heavier than usual, grip the
steering wheel firmly and operate it using more force than usual.
■
If the tire pressure warning light comes on
Be sure to observe the following precautions. Failure to do so could
cause a loss of vehicle control and result in death or serious injury.
●Stop your vehicle in a safe place as soon as possible. Adjust the tire
inflation pressure immediately.
●If the tire pressure warning light co mes on even after tire inflation pres-
sure adjustment, it is probable that you have a flat tire. Check the tires.
If a tire is flat, repair the flat tire by using emergency tire puncture
repair kit.
●Avoid abrupt maneuvering and braking. If the vehicle tires deteriorate,
you could lose control of the steering wheel or the brakes.
■If a blowout or sudden air leakage should occur
The tire pressure warning system may not activate immediately.
Page 661 of 784

6618-2. Steps to take in an emergency
PRIUS PRIME_OM_OM47A88U_(U)
8
When trouble arises
WARNING
■Maintenance of the tires
Each tire, including the spare (if provided), should be checked monthly
when cold and inflated to the inflation pressure recommended by the
vehicle manufacturer on the vehicle placard or tire inflation pressure
label (tire and load information label). (If your vehicle has tires of a dif-
ferent size than the size indicated on the vehicle placard or tire inflation
pressure label [tire and load information label], you should determine
the proper tire inflation pressure for those tires.)
As an added safety feature, your vehicle has been equipped with a tire
pressure monitoring system (TPMS-ti re pressure warning system) that
illuminates a low tire pre ssure telltale (tire pressure warning light) when
one or more of your tires is significantly under-inflated. Accordingly,
when the low tire pressure telltale (tire pressure warning light) illumi-
nates, you should stop and check your tires as soon as possible, and
inflate them to the proper pressure. Driving on a significantly under-
inflated tire causes the tire to overheat and can lead to tire failure.
Under-inflation also reduces fuel effi ciency and tire tread life, and may
affect the vehicle’s hand ling and stopping ability.
Please note that the TPMS (tire pressure warning system) is not a sub-
stitute for proper ti re maintenance, and it is the driver’s responsibility to
maintain correct tire pressure, even if under-inflation has not reached
the level to trigger illumination of the TPMS low tire pressure telltale (tire
pressure warning light).
Your vehicle has also been equipped with a TPMS (tire pressure warn-
ing system) malfunction indicator to indicate when the system is not
operating properly. The TPMS (tire pressure warning system) malfunc-
tion indicator is combined with the lo w tire pressure telltale (tire pressure
warning light). When the system detects a malfunction, the telltale will
flash for approximately one minute and then remain continuously illumi-
nated. This sequence w ill continue upon subsequ ent vehicle start-ups
as long as the malfunction exists. When the malfunction indicator is illu-
minated, the system may not be able to detect or signal low tire pres-
sure as intended.
TPMS (tire pressure warning system) malfunctions may occur for a vari-
ety of reasons, including the installation of replacement or alternate tires
or wheels on the vehicle that prevent the TPMS (tire pressure warning
system) from functioning properly. Always check the TPMS (tire pres-
sure warning system) malfunction te lltale after replacing one or more
tires or wheels on your vehicle to ensure that the replacement or alter-
nate tires and wheels allow the TPMS (tire pressure warning system) to
continue to function properly.
Page 678 of 784
6788-2. Steps to take in an emergency
PRIUS PRIME_OM_OM47A88U_(U)
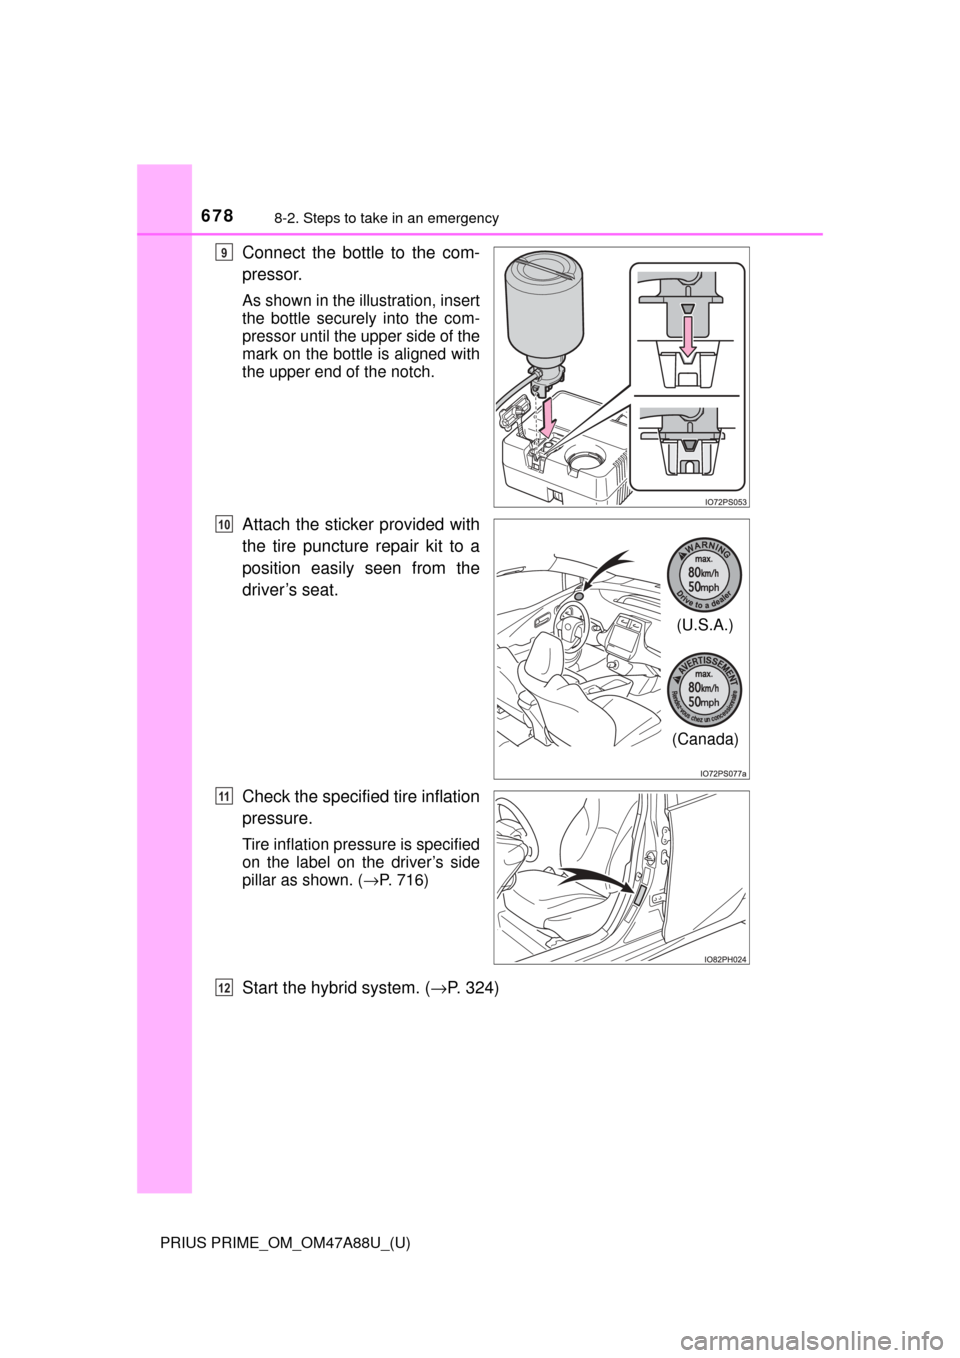
Connect the bottle to the com-
pressor.
As shown in the illustration, insert
the bottle securely into the com-
pressor until the upper side of the
mark on the bottle is aligned with
the upper end of the notch.
Attach the sticker provided with
the tire puncture repair kit to a
position easily seen from the
driver’s seat.
Check the specified tire inflation
pressure.
Tire inflation pressure is specified
on the label on the driver’s side
pillar as shown. (→P. 716)
Start the hybrid system. ( →P. 324)
9
(U.S.A.)
(Canada)
10
11
12