Page 99 of 464
993. Instrument cluster
3
Instrument cluster
MIRAI_OM_USA_OM62023U
Warning lights inform the driver of malfunctions in the indicated vehi-
cle’s systems.
Warning lights
*1
Hydrogen leak warning
light ( →P. 369)*1
Slip indicator ( →P. 370)
*1
Brake system warning
light (→P. 369)Parking brake warning
light (→P. 371)
*1
Charging system
warning light ( →P. 369)Open door warning light
(→P. 371)
*1High coolant
temperature warning
light ( →P. 369)Low fuel level warning
light (→P. 371)
*1
Brake system warning
light (→P. 369)Driver’s and front
passenger’s seat belt
reminder light ( →P. 3 7 1 )
*1
SRS warning light
(→P. 370)*1
Master warning light
(→P. 371)
*1
ABS warning light
(→P. 370)*1
Tire pressure warning
light ( →P. 371)
*1
(Red/
Ye l l o w )
Electric power steering
system warning light
( →P. 370)*3Brake Override System/
Drive-Start Control
warning light ( →P. 372)
*1, 2
PCS warning light
(→P. 370)
Page 100 of 464

1003. Instrument cluster
MIRAI_OM_USA_OM62023U
*1: These lights turn on when the power switch is turned to ON mode to indi-cate that a system check is being performed. They will turn off after the fuel
cell system is on, or after a few seconds. There may be a malfunction in a
system if the lights do not come on, or turn off. Have the vehicle inspected
by your Toyota dealer.
*2: The light flashes to indicate a malfunction.
*3: This light illuminates on the multi-information display.
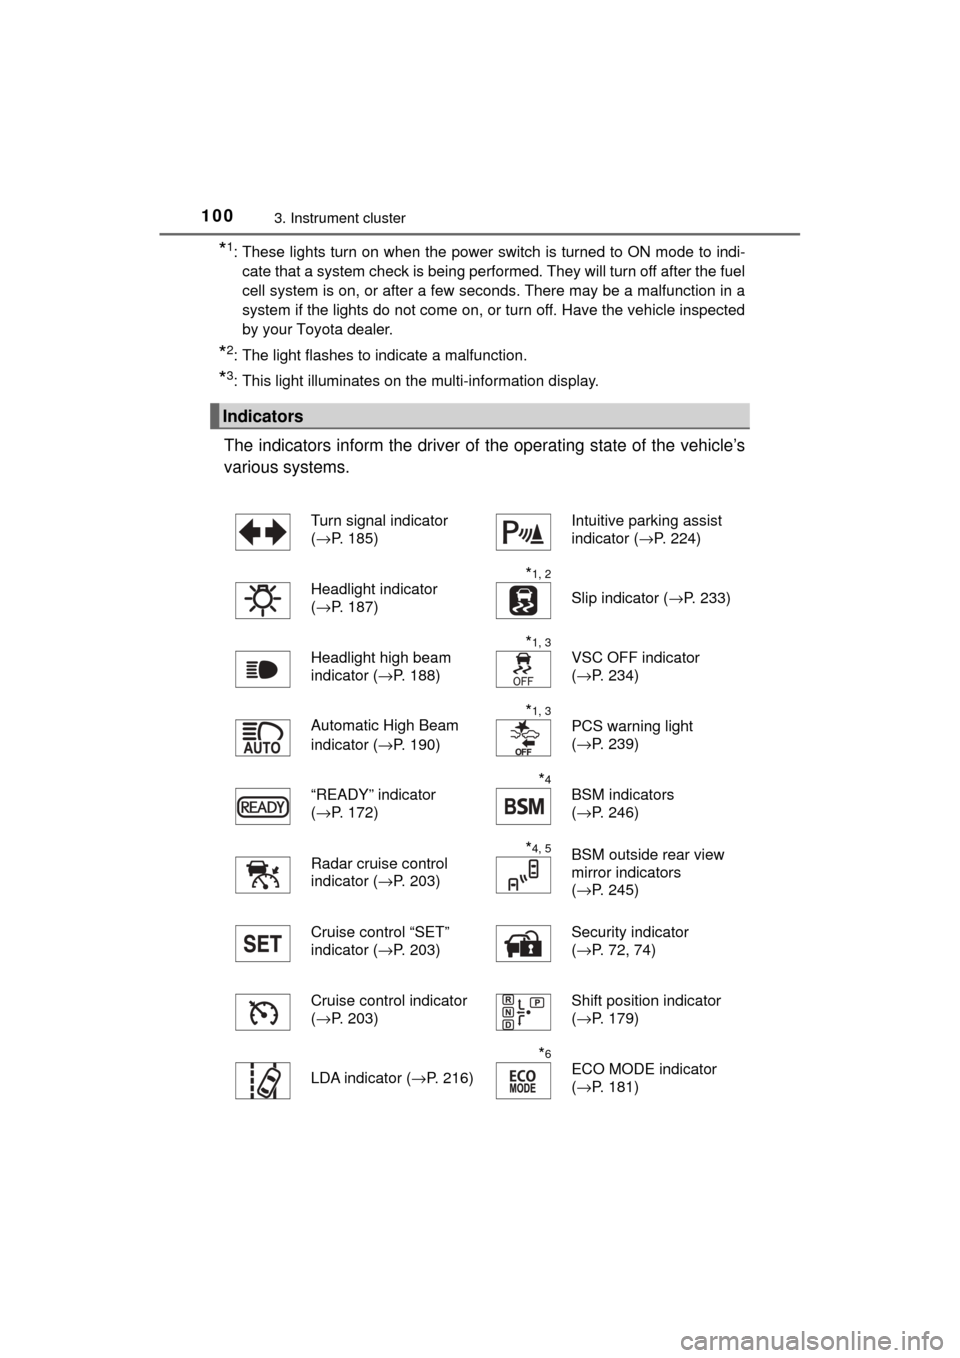
The indicators inform the driver of the operating state of the vehicle’s
various systems.
Indicators
Turn signal indicator
( →P. 185)Intuitive parking assist
indicator ( →P. 224)
Headlight indicator
( →P. 187)
*1, 2
Slip indicator ( →P. 233)
Headlight high beam
indicator ( →P. 188)
*1, 3
VSC OFF indicator
(→P. 234)
Automatic High Beam
indicator ( →P. 190)
*1, 3
PCS warning light
(→P. 239)
“READY” indicator
( →P. 172)
*4
BSM indicators
(→P. 246)
Radar cruise control
indicator ( →P. 203)
*4, 5BSM outside rear view
mirror indicators
(→P. 245)
Cruise control “SET”
indicator ( →P. 203) Security indicator
(
→P. 72, 74)
Cruise control indicator
( →P. 203)
Shift position indicator
(→P. 179)
LDA indicator ( →P. 216)
*6
ECO MODE indicator
(→P. 181)
Page 101 of 464

1013. Instrument cluster
3
Instrument cluster
MIRAI_OM_USA_OM62023U
*1: These lights turn on when the power switch is turned to ON mode to indi-cate that a system check is being performed. They will turn off after the fuel
cell system is on, or after a few seconds. There may be a malfunction in a
system if the lights do not come on, or turn off. Have the vehicle inspected
by your Toyota dealer.
*2: The light flashes to indicate that the system is operating.
*3: The light turns on when the system is off.
*4: In order to confirm operation, the BSM outside rear view mirror indicatorsilluminate in the following situations:
• When the power switch is turned to ON mode while the BSM settings are set to ON.
• When the BSM settings are set to ON while the power switch is in ON mode.
If the system is functioning correctly, the BSM outside rear view mirror indi-
cators will turn off after a few seconds.
If the BSM outside rear view mirror indicators do not illuminate or do not
turn off, there may be a malfunction in the system.
If this occurs, have the vehicle inspected by your Toyota dealer.
*5: This light illuminates on the outside rear view mirrors.
*6: This light illuminates on the main display.
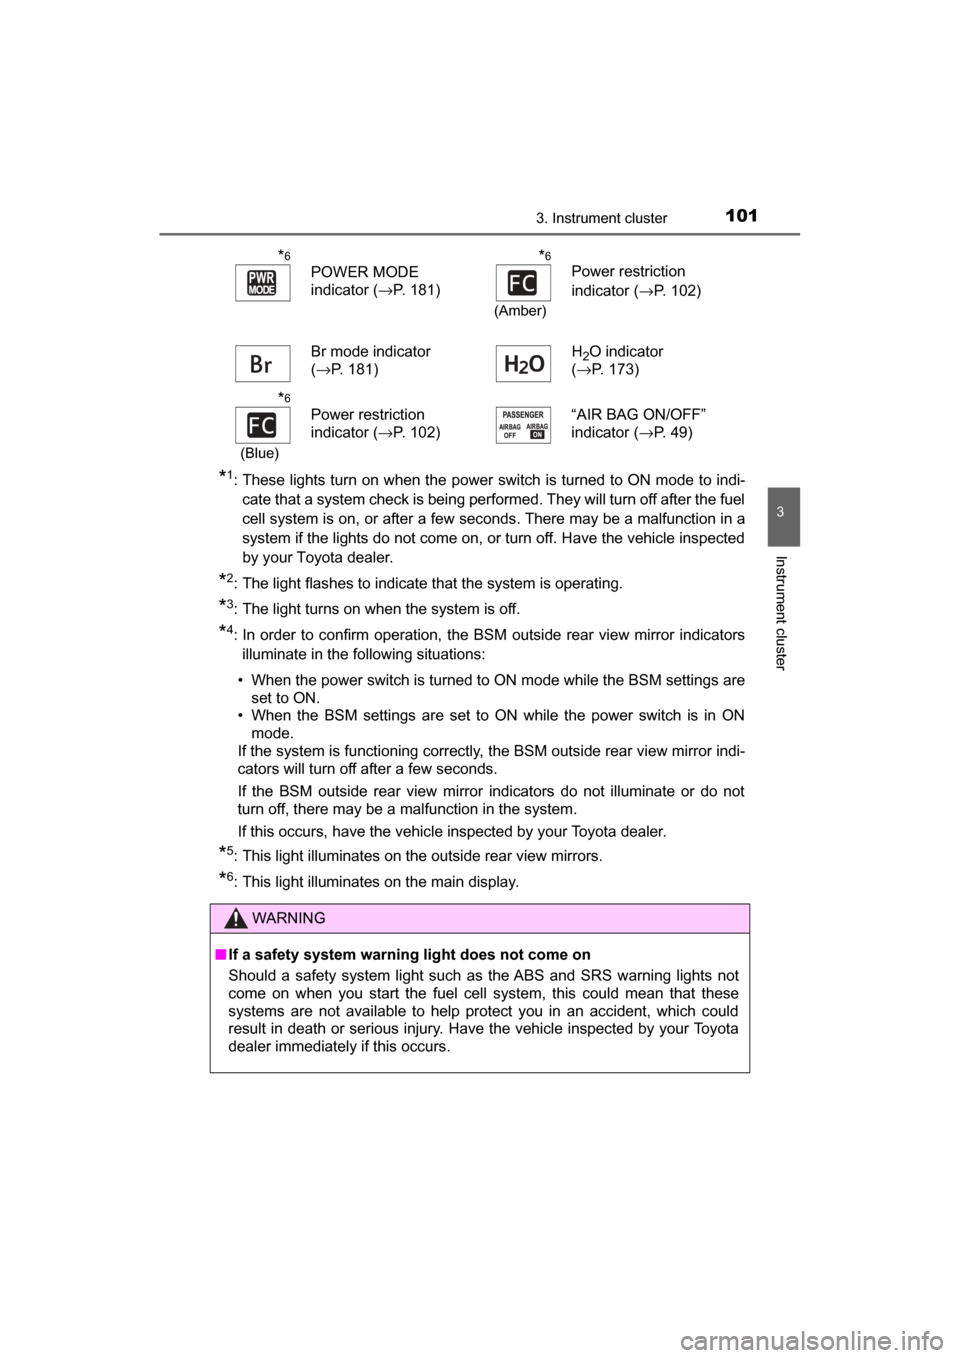
*6
POWER MODE
indicator ( →P. 181)*6
(Amber)
Power restriction
indicator (→P. 102)
Br mode indicator
( →P. 181) H
2O indicator
( →P. 173)
*6
(Blue)
Power restriction
indicator ( →P. 102) “AIR BAG ON/OFF”
indicator (
→P. 49)
WARNING
■If a safety system warning light does not come on
Should a safety system light such as the ABS and SRS warning lights not
come on when you start the fuel cell system, this could mean that these
systems are not available to help protect you in an accident, which could
result in death or serious injury. Have the vehicle inspected by your Toyota
dealer immediately if this occurs.
Page 104 of 464
1043. Instrument cluster
MIRAI_OM_USA_OM62023U
Switches between odometer and
trip meter displays. When the trip
meter is displayed, pressing and
holding the button will reset the
trip meter.
The brightness of the Instrument panel lights can be adjusted.
Brighter
Darker
The main display can be customized to split screen. ( →P. 439)
To toggle through the items, while in split screen, press or of
the meter control switches ( →P. 108), select on the main dis-
play, and press or . Fuel cell system indicator
Changing the display
Instrument panel light control
Setting split screen on the main display
Page 105 of 464
1053. Instrument cluster
3
Instrument cluster
MIRAI_OM_USA_OM62023U
Power meter
Current fuel consumption
Traction battery status
■The meters and display illuminate when
The power switch is in ON mode.
■ Instrument panel brightness adjustment
The instrument panel brightness levels when the tail lights are on and off can
be adjusted individually. However, when the surroundings are bright (daytime,
etc.), turning on the tail lights will not change the instrument panel brightness.
At this time, any adjustments made to the instrument panel brightness levels
will be applied to both settings at once.
Page 117 of 464

1174-1. Key information
4
Operation of each component
MIRAI_OM_USA_OM62023U
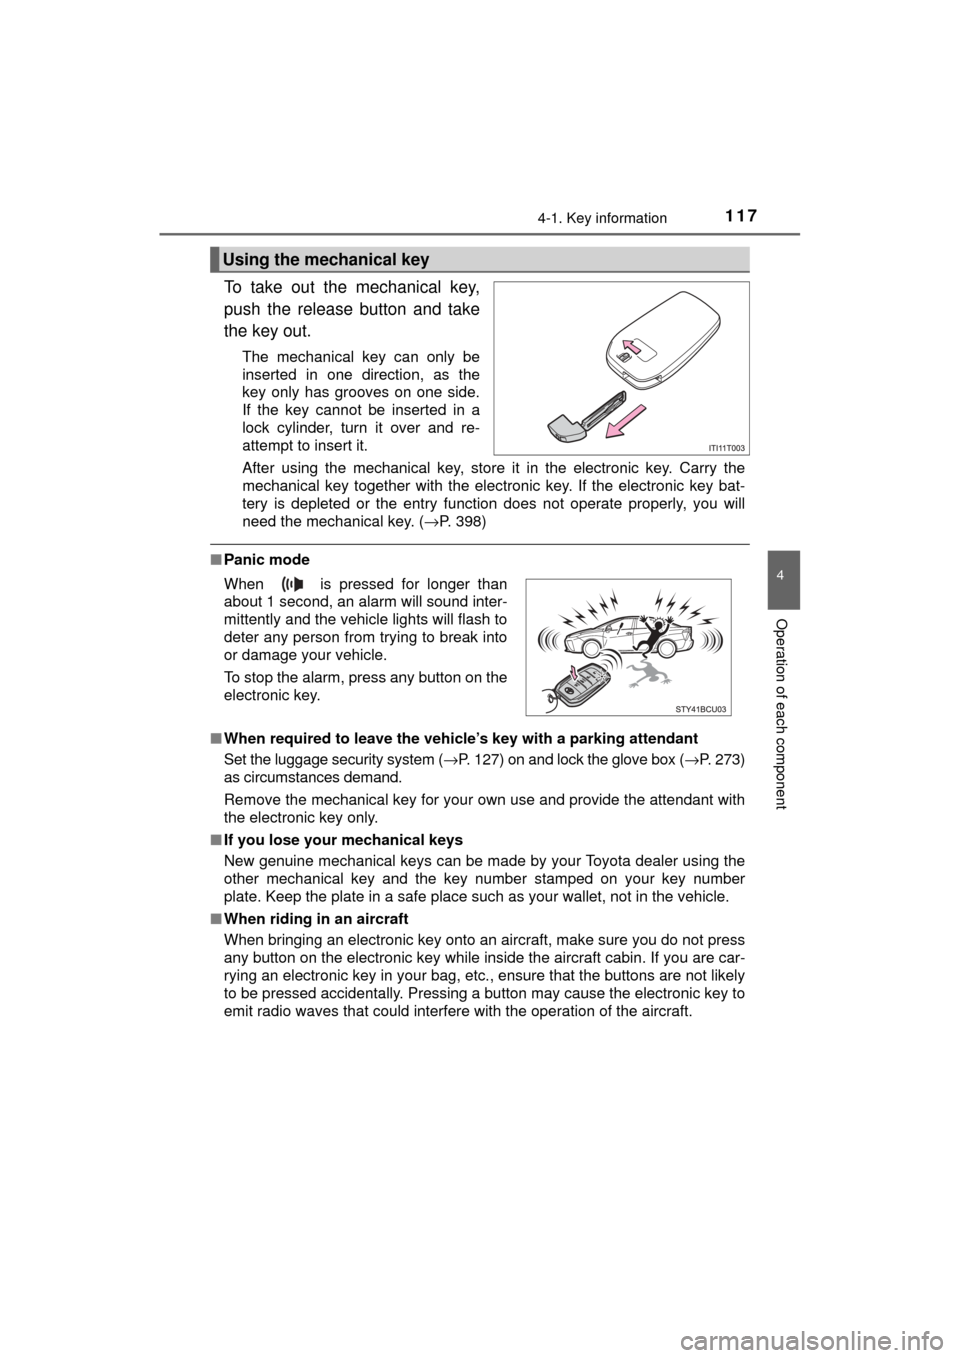
To take out the mechanical key,
push the release button and take
the key out.
The mechanical key can only be
inserted in one direction, as the
key only has grooves on one side.
If the key cannot be inserted in a
lock cylinder, turn it over and re-
attempt to insert it.
After using the mechanical key, store it in the electronic key. Carry the
mechanical key together with the electronic key. If the electronic key bat-
tery is depleted or the entry function does not operate properly, you will
need the mechanical key. (→P. 398)
■Panic mode
■ When required to leave the vehicle’s key with a parking attendant
Set the luggage security system ( →P. 127) on and lock the glove box ( →P. 273)
as circumstances demand.
Remove the mechanical key for your own use and provide the attendant with
the electronic key only.
■ If you lose your mechanical keys
New genuine mechanical keys can be made by your Toyota dealer using the
other mechanical key and the key number stamped on your key number
plate. Keep the plate in a safe place such as your wallet, not in the vehicle.
■ When riding in an aircraft
When bringing an electronic key onto an aircraft, make sure you do not press
any button on the electronic key while inside the aircraft cabin. If you are car-
rying an electronic key in your bag, etc., ensure that the buttons are not likely
to be pressed accidentally. Pressing a button may cause the electronic key to
emit radio waves that could interfere with the operation of the aircraft.
Using the mechanical key
When is pressed for longer than
about 1 second, an alarm will sound inter-
mittently and the vehicle lights will flash to
deter any person from trying to break into
or damage your vehicle.
To stop the alarm, press any button on the
electronic key.
Page 149 of 464
1494-4. Adjusting the steering wheel and mirrors
4
Operation of each component
MIRAI_OM_USA_OM62023U
Inside rear view mirror
The height of the rear view mirror can be adjusted to suit your driving
posture.
Adjust the height of the rear view
mirror by moving it up and down.
Responding to the level of brightne ss of the headlights of vehicles
behind, the reflected light is automatically reduced.
Changing automatic anti-glare
function mode
ON/OFF
When the automatic anti-glare
function is in ON mode, the indica-
tor illuminates.
The function will set to ON mode
each time the power switch is
turned to ON mode.
Pressing the button turns the function to OFF mode. (The indicator also
turns off.)
The rear view mirror’s position can be adjusted to enable suffi-
cient confirmation of the rear view.
Adjusting the height of rear view mirror
Anti-glare function
Indicator
Page 157 of 464

157
5Driving
MIRAI_OM_USA_OM62023U5-1. Before driving
Driving the vehicle ............. 158
Cargo and luggage ........... 166
Vehicle load limits ............. 169
Trailer towing..................... 170
Dinghy towing ................... 171
5-2. Driving procedures Power switch ..................... 172
Transmission ..................... 179
Turn signal lever................ 185
Parking brake .................... 186 5-3. Operating the lights
and wipers
Headlight switch ................ 187
Automatic High Beam ....... 190
Windshield wipers and washer ............................ 195
5-4. Refueling Opening the fuel door ....... 198
5-5. Using the driving support systems
Dynamic radar cruise control ............................. 203
LDA (Lane Departure Alert) ............................... 216
Intuitive parking assist....... 223
Driving assist systems ...... 232
PCS (Pre-Collision System)........................... 238
BSM (Blind Spot Monitor) ........ 245
5-6. Driving tips Winter driving tips ............. 253