Page 524 of 608
524
LC200_OM_OM60P24U_(U)
7-2. Steps to take in an emergency
If you have a flat tire
●Stop the vehicle in a safe place on a hard, flat surface.
● Set the parking brake.
● Shift the shift lever to P.
● Stop the engine.
● Turn on the emergency flashers. ( →P. 500)
Your vehicle is equipped with a spare tire. The flat tire can be
replaced with the spare tire.
For details about tires: →P. 4 6 3
WARNING
■
If you have a flat tire
Do not continue driving with a flat tire.
Driving even a short dist ance with a flat tire can damage the tire and the
wheel beyond repair, which could result in an accident.
Before jacking up the vehicle
Page 526 of 608

5267-2. Steps to take in an emergency
LC200_OM_OM60P24U_(U)
WARNING
■Using the tire jack
Improper use of the tire jack may cause the vehicle to suddenly fall off
the jack, leading to death or serious injury.
●Do not use the tire jack for any purpose other than replacing tires or
installing and removing tire chains.
●Only use the tire jack that comes with this vehicle for replacing a flat
tire.
Do not use it on other vehicles, and do not use other tire jacks for
replacing tires on this vehicle.
●Always check that the tire jack is securely set to the jack point.
●Do not put any part of your body under the vehicle while it is supported
by the jack.
●Do not start or run the engine while your vehicle is supported by the
jack.
●Do not raise the vehicle while someone is inside.
●When raising the vehicle, do not put an object on or under the jack.
●Do not raise the vehicle to a height greater than that required to
replace the tire.
●Use a jack stand if it is necessary to get under the vehicle.
Take particular care when lowering the vehicle to ensure that no one
working on or near the vehicle will be injured.
■Using the jack handle
Tighten all the jack handle bolts securely using a Phillips-head screw-
driver, to prevent the extension parts from coming apart unexpectedly.
Page 530 of 608
5307-2. Steps to take in an emergency
LC200_OM_OM60P24U_(U)
Chock the tires.
Slightly loosen the wheel nuts
(one turn).
Replacing a flat tire
1
Flat tireWheel chock position
FrontLeft-hand sideBehind the rear right-hand side tire
Right-hand sideBehind the rear left-hand side tire
RearLeft-hand sideIn front of the front right-hand side
tire
Right-hand sideIn front of the front left-hand side tire
2
Page 533 of 608

5337-2. Steps to take in an emergency
LC200_OM_OM60P24U_(U)
7
When trouble arises
WARNING
■Replacing a flat tire
●Observe the following precautions.
Failure to do so may result in serious injury:
• Lower the spare tire completely to the ground before removing it from under the vehicle.
• Do not try to remove the wheel ornament by hand. Take due care in
handling the ornament to avoid unexpected personal injury.
• Do not touch the disc wheels or the area around the brakes immedi-
ately after the vehicle has been driven.
After the vehicle has been driven the disc wheels and the area
around the brakes will be extremely hot. Touching these areas with
hands, feet or other body parts while changing a tire, etc. may result
in burns.
●Failure to follow these precautions could cause the wheel nuts to
loosen and the tire to fall off, resulting in death or serious injury.
• Have the wheel nuts tightened with a torque wrench to 97 ft•lbf(131 N•m, 13.4 kgf•m) as soon as possible after changing wheels.
• Do not attach a heavily damaged wheel ornament, as it may fly off
the wheel while the vehicle is moving.
• When installing a tire, only use w heel nuts that have been specifi-
cally designed for that wheel.
• If there are any cracks or deforma tions in the bolt screws, nut
threads or bolt holes of the wheel, have the vehicle inspected by
your Toyota dealer.
• When installing the wheel nuts, be sure to install them with the
tapered ends facing inward. ( →P. 476)
Page 535 of 608
5357-2. Steps to take in an emergency
LC200_OM_OM60P24U_(U)
7
When trouble arises
Reinstall the wheel ornament.
Remove the center wheel orna-
ment from the flat tire by pushing
from the reverse side, and rein-
stall it.
Lay down the tire with the valve
stem facing up, and install the
spare wheel cover.
5
WARNING
■
Stowing the flat tire
Failure to follow steps listed under st owing the tire may result in damage
to the spare tire carrier and loss of the tire, which could result in death or
serious injury.
Stowing the flat/spare tire, jack and tools
1
Page 537 of 608

5377-2. Steps to take in an emergency
LC200_OM_OM60P24U_(U)
7
When trouble arises
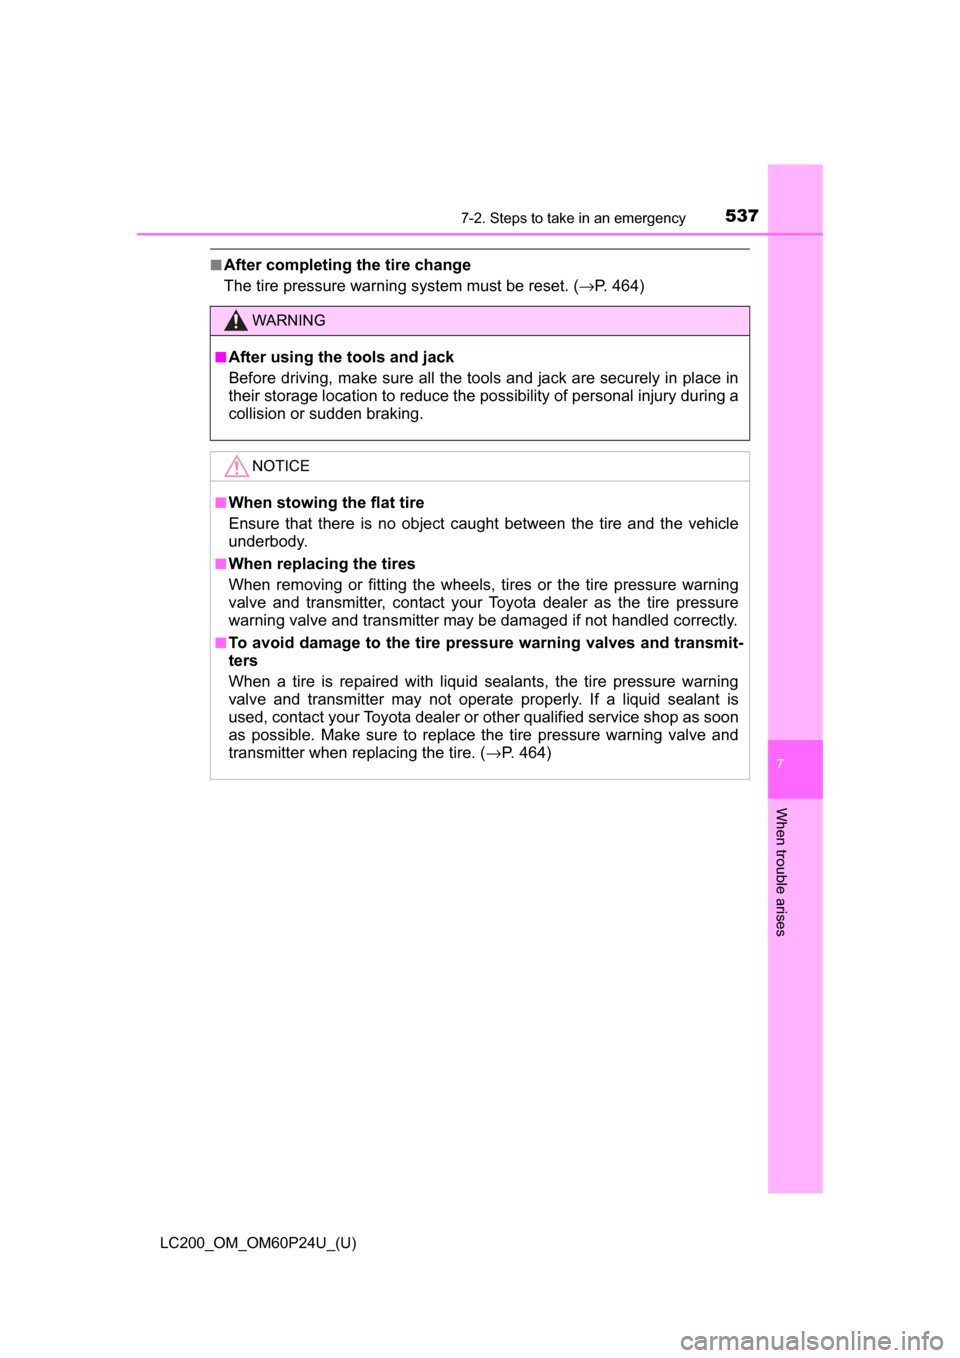
■After completing the tire change
The tire pressure warning system must be reset. ( →P. 464)
WARNING
■
After using the tools and jack
Before driving, make sure all the tools and jack are securely in place in
their storage location to reduce the po ssibility of personal injury during a
collision or sudden braking.
NOTICE
■When stowing the flat tire
Ensure that there is no object cau ght between the tire and the vehicle
underbody.
■When replacing the tires
When removing or fitting the wheels, tires or the tire pressure warning
valve and transmitter, contact your Toyota dealer as the tire pressure
warning valve and transmitter may be damaged if not handled correctly.
■To avoid damage to the tire pressure warning valves and transmit-
ters
When a tire is repaired with liquid sealants, the tire pressure warning
valve and transmitter may not operate properly. If a liquid sealant is
used, contact your Toyota dealer or other qualified service shop as soon
as possible. Make sure to replace the tire pressure warning valve and
transmitter when replacing the tire. ( →P. 464)
Page 558 of 608

558
LC200_OM_OM60P24U_(U)
8-1. Specifications
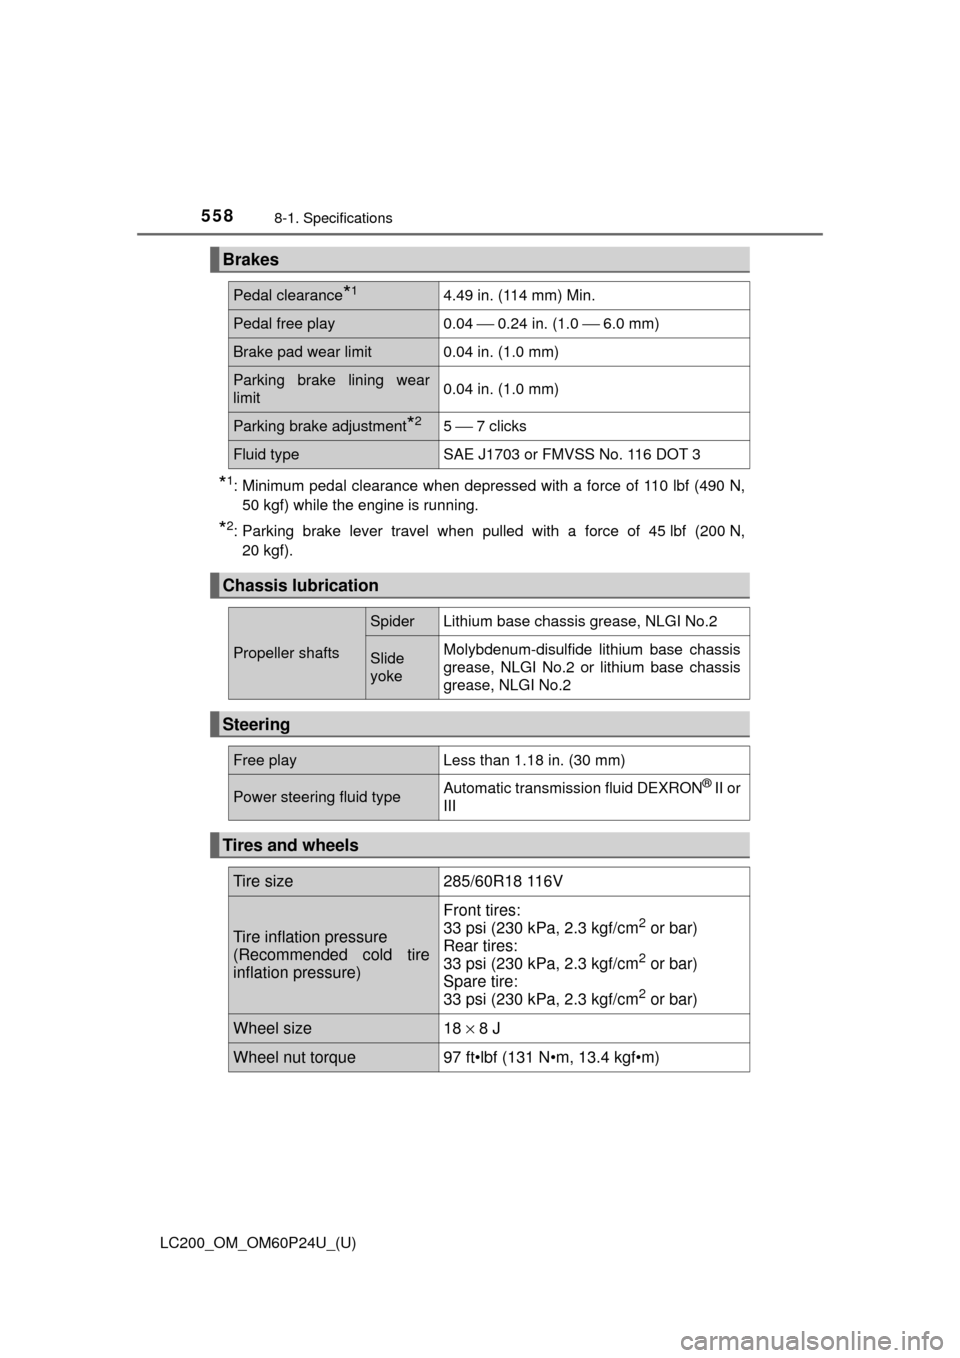
*1: Minimum pedal clearance when depressed with a force of 110 lbf (490 N,50 kgf) while the engine is running.
*2: Parking brake lever travel when pulled with a force of 45 lbf (200 N,20 kgf).
Brakes
Pedal clearance*14.49 in. (114 mm) Min.
Pedal free play0.04 ⎯ 0.24 in. (1.0 ⎯ 6.0 mm)
Brake pad wear limit0.04 in. (1.0 mm)
Parking brake lining wear
limit0.04 in. (1.0 mm)
Parking brake adjustment*25 ⎯ 7 clicks
Fluid typeSAE J1703 or FMVSS No. 116 DOT 3
Chassis lubrication
Propeller shafts
SpiderLithium base chassis grease, NLGI No.2
Slide
yokeMolybdenum-disulfide lithium base chassis
grease, NLGI No.2 or lithium base chassis
grease, NLGI No.2
Steering
Free playLess than 1.18 in. (30 mm)
Power steering fluid typeAutomatic transmission fluid DEXRON® II or
III
Tires and wheels
Tire size285/60R18 116V
Tire inflation pressure
(Recommended cold tire
inflation pressure)
Front tires:
33 psi (230 kPa, 2.3 kgf/cm2 or bar)
Rear tires:
33 psi (230 kPa, 2.3 kgf/cm
2 or bar)
Spare tire:
33 psi (230 kPa, 2.3 kgf/cm
2 or bar)
Wheel size18 × 8 J
Wheel nut torque97 ft•lbf (131 N•m, 13.4 kgf•m)
Page 563 of 608

563
LC200_OM_OM60P24U_(U)
8-1. Specifications
8
Vehicle specifications
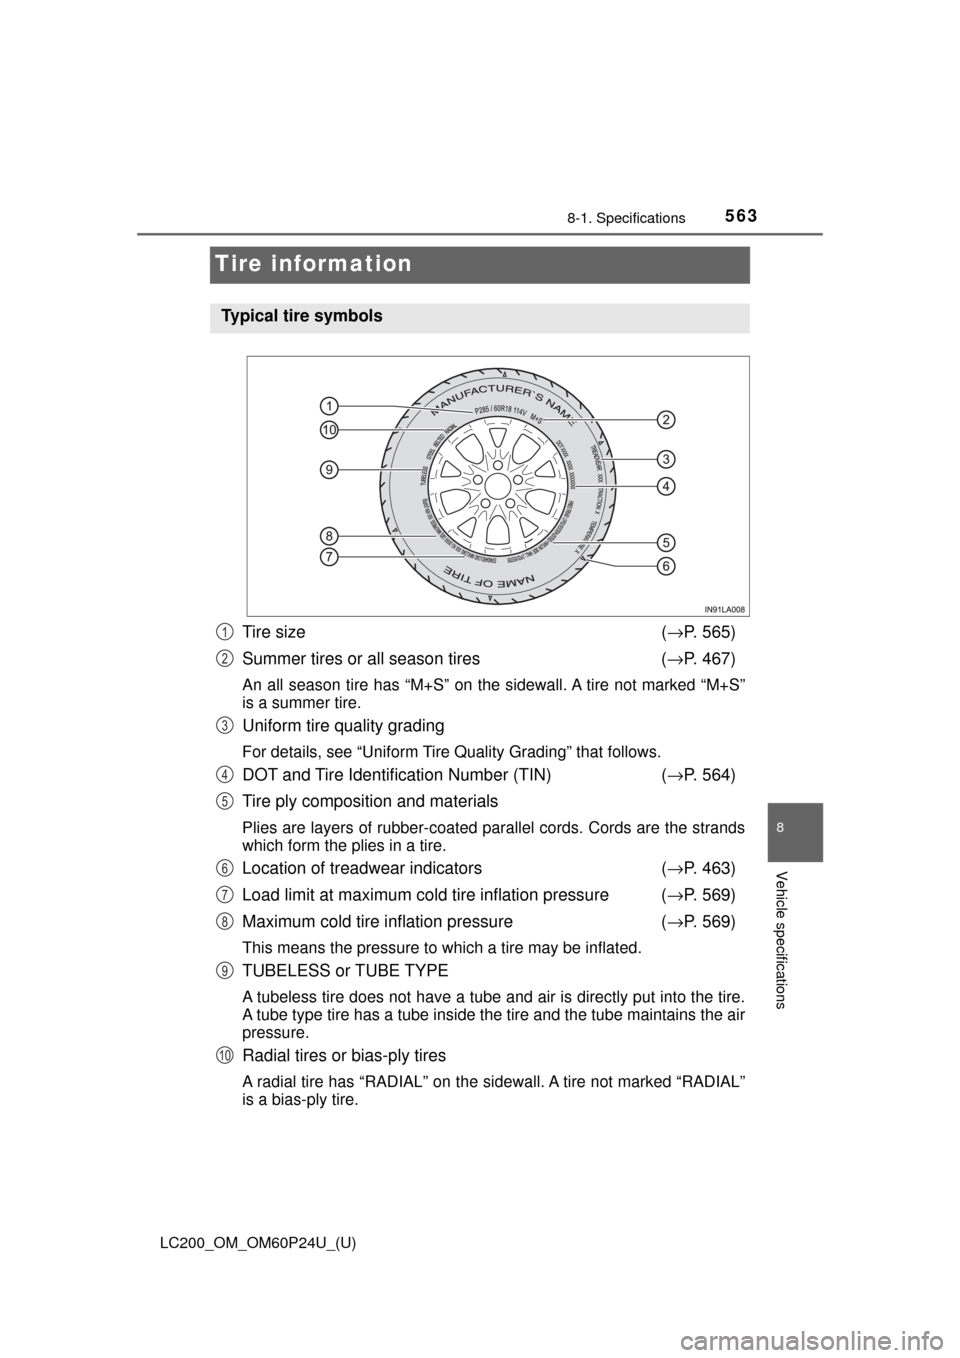
Tire information
Tire size (→ P. 565)
Summer tires or all season tires (→ P. 467)
An all season tire has “M+S” on the sidewall. A tire not marked “M+S”
is a summer tire.
Uniform tire quality grading
For details, see “Uniform Tire Quality Grading” that follows.
DOT and Tire Identification Number (TIN) (→ P. 564)
Tire ply composition and materials
Plies are layers of rubber-coated parallel cords. Cords are the strands
which form the plies in a tire.
Location of treadwear indicators (→ P. 463)
Load limit at maximum cold tire inflation pressure ( →P. 569)
Maximum cold tire inflation pressure (→ P. 569)
This means the pressure to which a tire may be inflated.
TUBELESS or TUBE TYPE
A tubeless tire does not have a tube and air is directly put into the tire.
A tube type tire has a tube inside the tire and the tube maintains the air
pressure.
Radial tires or bias-ply tires
A radial tire has “RADIAL” on the sidewall. A tire not marked “RADIAL”
is a bias-ply tire.
Typical tire symbols
1
2
3
4
5
6
7
8
9
10