Page 128 of 720

1282. Instrument cluster
HILUX_OM_OM0K322E_(EE)
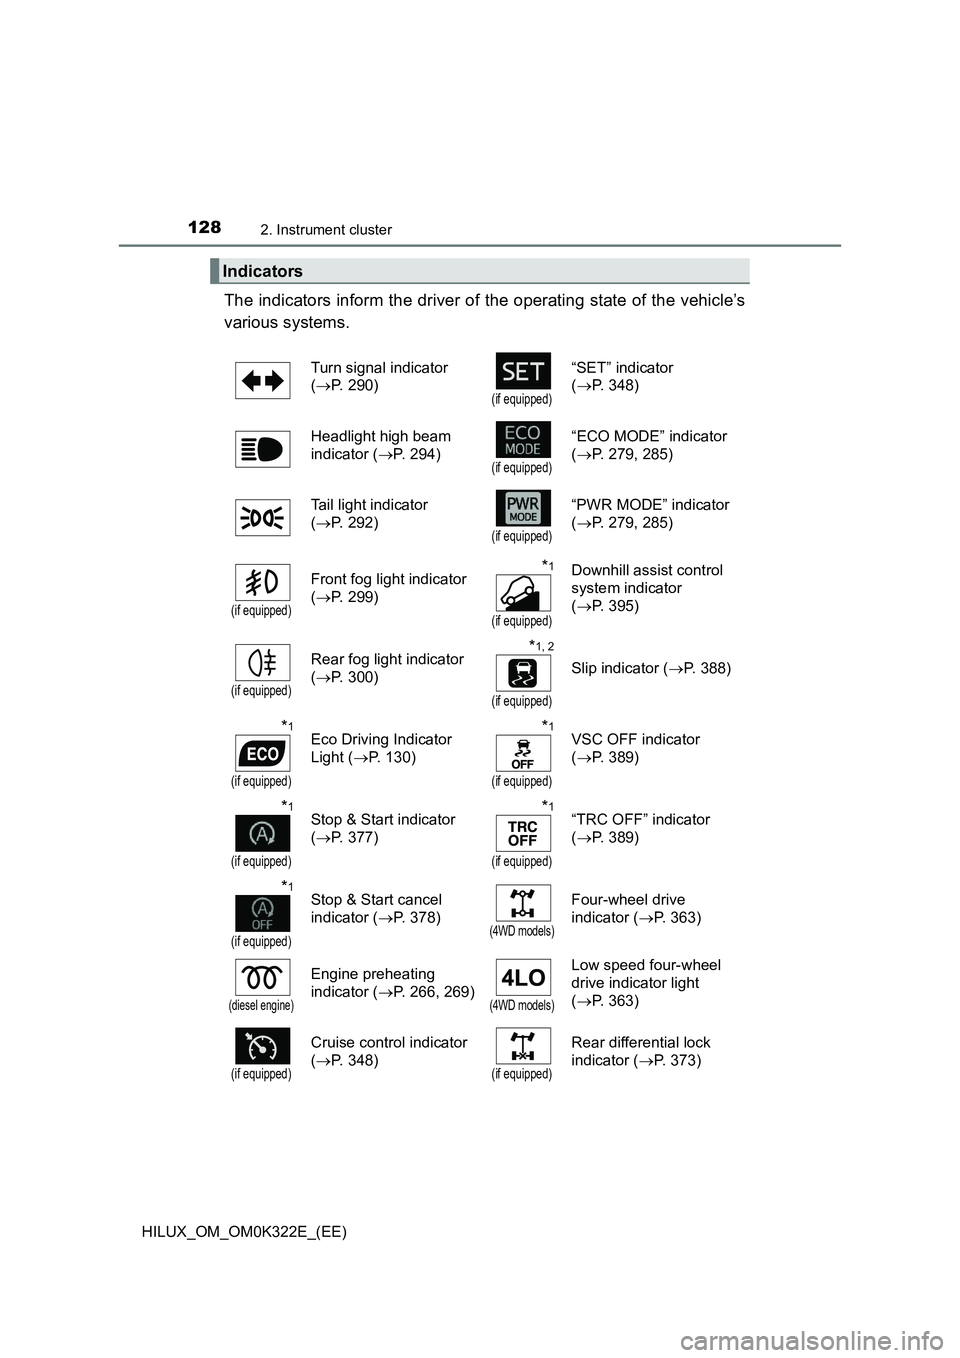
The indicators inform the driver of the operating state of the vehicle’s
various systems.
Indicators
Turn signal indicator
( P. 290)(if equipped)
“SET” indicator
( P. 348)
Headlight high beam
indicator ( P. 294)(if equipped)
“ECO MODE” indicator
( P. 279, 285)
Tail light indicator
( P. 292)(if equipped)
“PWR MODE” indicator
( P. 279, 285)
(if equipped)
Front fog light indicator
( P. 299)
*1
(if equipped)
Downhill assist control
system indicator
( P. 395)
(if equipped)
Rear fog light indicator
( P. 300)
*1, 2
(if equipped)
Slip indicator (P. 388)
*1
(if equipped)
Eco Driving Indicator
Light ( P. 130)
*1
(if equipped)
VSC OFF indicator
( P. 389)
*1
(if equipped)
Stop & Start indicator
( P. 377)
*1
(if equipped)
“TRC OFF” indicator
( P. 389)
*1
(if equipped)
Stop & Start cancel
indicator ( P. 378)(4WD models)
Four-wheel drive
indicator ( P. 363)
(diesel engine)
Engine preheating
indicator ( P. 266, 269)(4WD models)
Low speed four-wheel
drive indicator light
( P. 363)
(if equipped)
Cruise control indicator
( P. 348)(if equipped)
Rear differential lock
indicator ( P. 373)
Page 294 of 720
2944-3. Operating the lights and wipers
HILUX_OM_OM0K322E_(EE)
With the headlights on, push
the lever away from you to turn
on the high beams.
Pull the lever toward you to the
center position to turn the high
beams off.
Pull the lever toward you and
release it to flash the high
beams once.
You can flash the high beams wi th the headlights on or off.
The level of the headlights can be adjusted according to the number
of passengers and the loading condition of the vehicle.
Raises the level of the head-
lights
Lowers the level of the head-
lights
Turning on the high beam headlights
1
2
Manual headlight leveling dial (if equipped)
1
2
Page 340 of 720

3404-5. Using the driving support systems
HILUX_OM_OM0K322E_(EE)
■ Conditions in which functions may not operate properly
In the following situations, the camera sensor may not detect white (yellow)
lines and various functions may not operate normally.
● There are shadows on the road that run parallel with, or cover, the white
(yellow) lines.
● The vehicle is driven in an area without white (yellow) lines, such as in front
of a tollgate or checkpoint, or at an intersection, etc.
● The white (yellow) lines are cracked, or “Raised pavement marker” or
stones are present.
● The white (yellow) lines cannot be seen or are difficult to see due to sand,
etc.
● The vehicle is driven on a road surface that is wet due to rain, puddles, etc.
● The traffic lines are yellow (which may be more difficult to recognize than
lines that are white).
● The white (yellow) lines cross over a curb, etc.
● The vehicle is driven on a bright surface, such as concrete.
● The vehicle is driven on a surface that is bright due to reflected light, etc.
● The vehicle is driven in an area where the brightness changes suddenly,
such as at the entrances and exits of tunnels, etc.
● Light from the headlights of an oncoming vehicle, the sun, etc., enters the
camera.
● The vehicle is driven where the road diverges, merges, etc.
● The vehicle is driven on a slope.
● The vehicle is driven on a road which tilts left or right, or a winding road.
● The vehicle is driven on an unpaved or rough road.
● The vehicle is driven around a sharp curve.
● The traffic lane is excessively narrow or wide.
● The vehicle is extremely tilted due to carrying heavy luggage or having
improper tire pressure.
● The distance to the preceding vehicle is extremely short.
● The vehicle is moving up and down a large amount due to road conditions
during driving (poor r oads or road seams).
● The headlight lenses are dirty and emit a faint amount of light at night, or the
beam axis has deviated.
● The vehicle has just changed lanes or crossed an intersection.
Page 585 of 720
5857-3. Do-it-yourself maintenance
HILUX_OM_OM0K322E_(EE)
7
Maintenance and care
■Headlight high/low beams (vehicles with halogen headlights)
Unplug the connector and
remove the rubber cover.
Release the bulb retaining
spring.
Remove the bulb.
To install a new bulb, align the
tabs of the bulb with the cutouts
of the mounting hole.
When installing, reverse the steps listed.
Replacing light bulbs
1
2
3
4
Page 596 of 720

5967-3. Do-it-yourself maintenance
HILUX_OM_OM0K322E_(EE)
■Replacing the following bulbs
If any of the lights listed below has burnt out, have it replaced by
any authorized Toyota retailer or Toyota authorized repairer, or any
reliable repairer.
● Headlight low beams (vehicles with LED headlights)
● Front position lights/daytime running lights (vehicles with LED
headlights)
● Side turn signal lights
● LED front fog lights (if equipped)
● High mounted stoplight (if equipped)
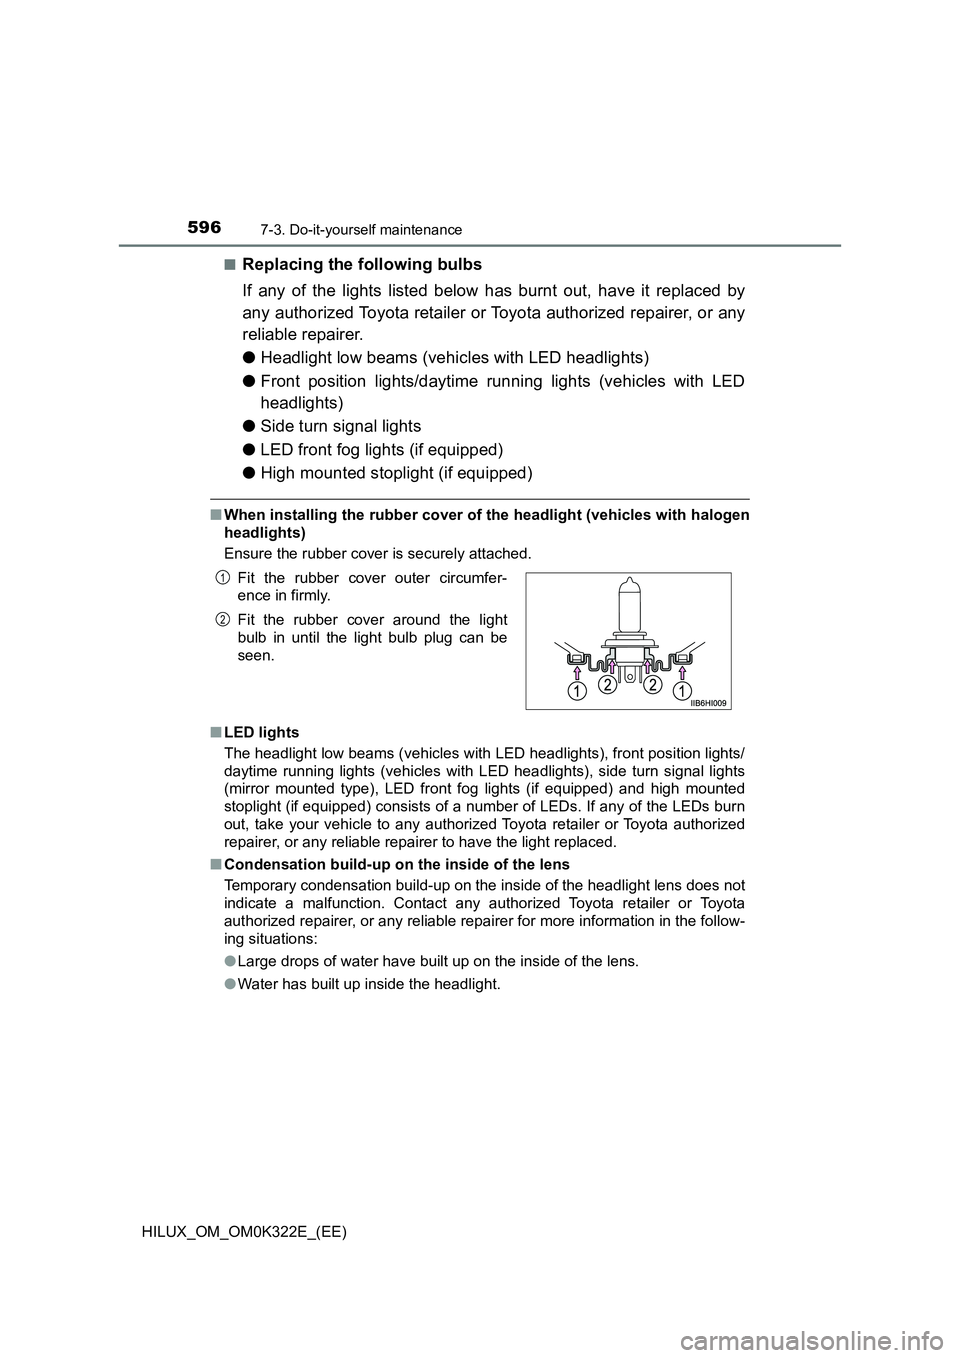
■When installing the rubber cover of the headlight (vehicles with halogen
headlights)
Ensure the rubber cover is securely attached.
■ LED lights
The headlight low beams (vehicles with LED headlights), front position lights/
daytime running lights (vehicles with LED headlights), side turn signal lights
(mirror mounted type), LED front fo g lights (if equipped) and high mounted
stoplight (if equipped) consists of a number of LEDs. If any of the LEDs burn
out, take your vehicle to any authorized Toyota retailer or Toyota authorized
repairer, or any reliable repairer to have the light replaced.
■ Condensation build-up on the inside of the lens
Temporary condensation build-up on the inside of the headlight lens does not
indicate a malfunction. Contact any authorized Toyota retailer or Toyota
authorized repairer, or any reliable repairer for more information in the follow-
ing situations:
● Large drops of water have built up on the inside of the lens.
● Water has built up inside the headlight.
Fit the rubber cover outer circumfer-
ence in firmly.
Fit the rubber cover around the light
bulb in until the light bulb plug can be
seen.
1
2
Page 684 of 720
6849-1. Specifications
HILUX_OM_OM0K322E_(EE)
Vehicles with maintenance type battery
Vehicles with maintenance-free type battery
Ignition system (gasoline engine)
Spark plug
MakeDENSO FK20HR-A8
Gap0.8 mm (0.031 in.)
NOTICE
■Iridium-tipped spark plugs
Use only iridium-tipped spark plugs. Do not adjust the spark plug gap.
Electrical system
Battery
Specific gravity reading
at 20 C (68F):
1.25 or higher
If the specific gravity is lower than the standard
value, charge the battery.
Charging rates
Quick charge
Slow charge
15 A max.
5 A max.
Battery
Open voltage at 20 C
(68 F):
12.3 V or higher
If the voltage is lower than the standard value,
charge the battery.
(Turn the engine switch to the “LOCK” position
[vehicles without smart entry & start system] or
off [vehicles with smart entry & start system],
turn on the high beam headlights for 30 sec-
onds, and turn the headlights off.)
Charging rates 5 A max.
Page 691 of 720
691
9
9-1. Specifications
Vehicle specifications
HILUX_OM_OM0K322E_(EE)
*1: If equipped
*2: The wattage differs depending on the specification. When replacing, use a
light bulb with the same wattage as the original bulb.
Light bulbs
Light bulbsWTyp e
Exterior
Headlights
High/low beams (halogen headlights)
High beams (LED headlights)
60/55
60
A
B
Halogen front fog lights*119 C
Front position lights (halogen headlights)
Without daytime running lights
With daytime running lights
5
21/5
D
D
Front turn signal lights
Halogen headlights
LED headlights
21
21
E
F
Rear turn signal lights 21 E
Back-up lights 21 G
Rear fog light*121 G
License plate light 5 D
Stop/tail lights 21/5 G
Interior Interior light*18H
Personal/interior lights 5 or 8*2D
A: H4 halogen bulbs
B: HB3 halogen bulbs
C: H16 halogen bulbs
D: Wedge base bulbs (clear)
E: Single end bulbs (amber)
F: Wedge base bulbs (amber)
G: Single end bulbs (clear)
H: Double end bulbs