Page 89 of 720

891-2. Child safety
1
HILUX_OM_OM0K322E_(EE)
For safety and security
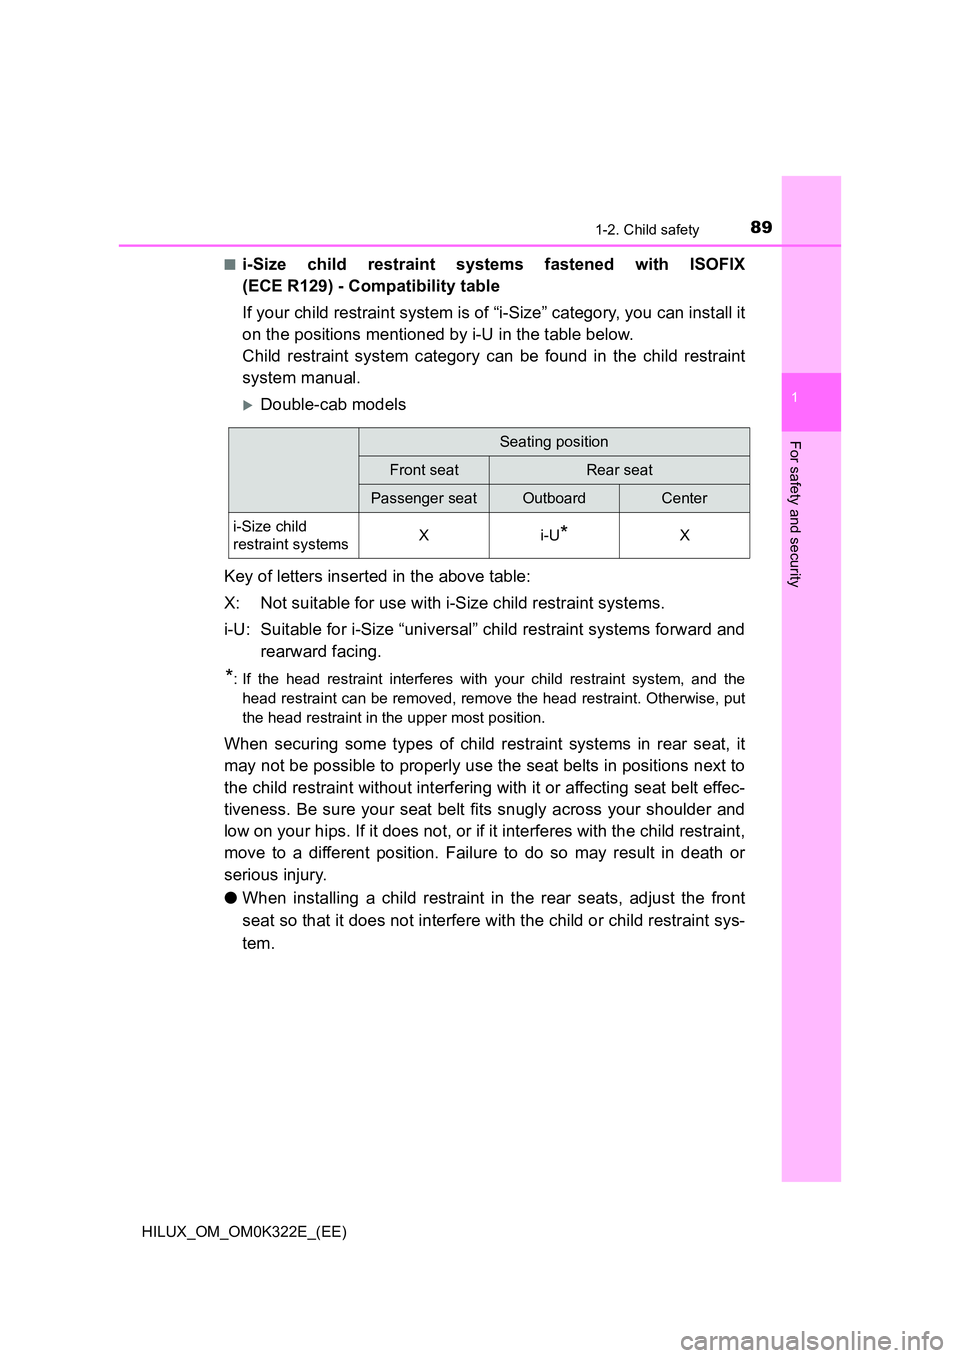
■i-Size child restraint systems fastened with ISOFIX
(ECE R129) - Compatibility table
If your child restraint system is of “i-Size” category, you can install it
on the positions mentioned by i-U in the table below.
Child restraint system category can be found in the child restraint
system manual.
Double-cab models
Key of letters inserted in the above table:
X: Not suitable for use with i-Size child restraint systems.
i-U: Suitable for i-Size “universal” child restraint systems forward and
rearward facing.
*: If the head restraint interferes with your child restraint system, and the
head restraint can be removed, remove the head restraint. Otherwise, put
the head restraint in the upper most position.
When securing some types of child restraint systems in rear seat, it
may not be possible to properly use the seat belts in positions next to
the child restraint without interfering with it or affecting seat belt effec-
tiveness. Be sure your seat belt fits snugly across your shoulder and
low on your hips. If it does not, or if it interferes with the child restraint,
move to a different position. Failure to do so may result in death or
serious injury.
● When installing a child restraint in the rear seats, adjust the front
seat so that it does not interfere with the child or child restraint sys-
tem.
Seating position
Front seatRear seat
Passenger seatOutboardCenter
i-Size child
restraint systemsXi-U*X
Page 151 of 720
151
3
Operation of
each component
HILUX_OM_OM0K322E_(EE)
3-1. Key information
Keys ................................... 152
3-2. Opening, closing and
locking the doors
Side doors.......................... 174
Access panels (smart-cab
models only) .................... 180
Tailgate .............................. 181
Smart entry & start
system ............................. 184
3-3. Adjusting the seats
Front seats ......................... 218
Rear seats ......................... 220
Head restraints .................. 223
3-4. Adjusting the steering
wheel and mirrors
Steering wheel ................... 226
Inside rear view mirror ....... 228
Outside rear view
mirrors ............................. 229
3-5. Opening and closing
the windows
Power windows .................. 232
Quarter windows
(smart-cab models).......... 236
Page 179 of 720

1793-2. Opening, closing and locking the doors
3
Operation of each component
HILUX_OM_OM0K322E_(EE)
■Impact detection door lock release system (if equipped)
In the event that the vehicle is subject to a strong impact, all the doors are
unlocked. Depending on the force of the impact or the type of accident, how-
ever, the system may not operate.
■ Conditions affecting operation
Vehicles without smart entry & start system
The wireless remote control function may not operate normally in the follow-
ing situations:
● Near a TV tower, radio station, electric power plant, airport or other facility
that generates strong radio waves
● When carrying a portable radio, cellular phone or other wireless communi-
cation device
● When multiple wireless keys are in the vicinity
● When the wireless key is in contact with, or is covered by a metallic object
● When a wireless key (that emits radio waves) is being used nearby
● When the wireless key has been left near an electrical appliance such as a
personal computer
Vehicles with smart entry & start system
P. 187
WARNING
■To prevent an accident
Observe the following precautions while driving the vehicle.
Failing to do so may result in a door opening and an occupant falling out,
resulting in death or serious injury.
● Ensure that all doors are properly closed and locked.
● Do not pull the inside handle of the doors while driving.
Be especially careful for the driver’s door, as the door may be opened
even if the inside lock button is in locked position.
● Set the rear door child-protector locks when children are seated in the rear
seats.
Page 218 of 720
2183-3. Adjusting the seats
HILUX_OM_OM0K322E_(EE)
Front seats
Manual seat (separated type)
Seat position adjustment lever
Seatback angle adjustment
lever
Vertical height adjustment lever
(if equipped for driver’s seat
only)
Manual seat (bench type)
Seat position adjustment lever
(driver’s seat only)
Seatback angle adjustment
lever
Adjustment procedure
1
2
3
1
2
Page 219 of 720

2193-3. Adjusting the seats
3
Operation of each component
HILUX_OM_OM0K322E_(EE)
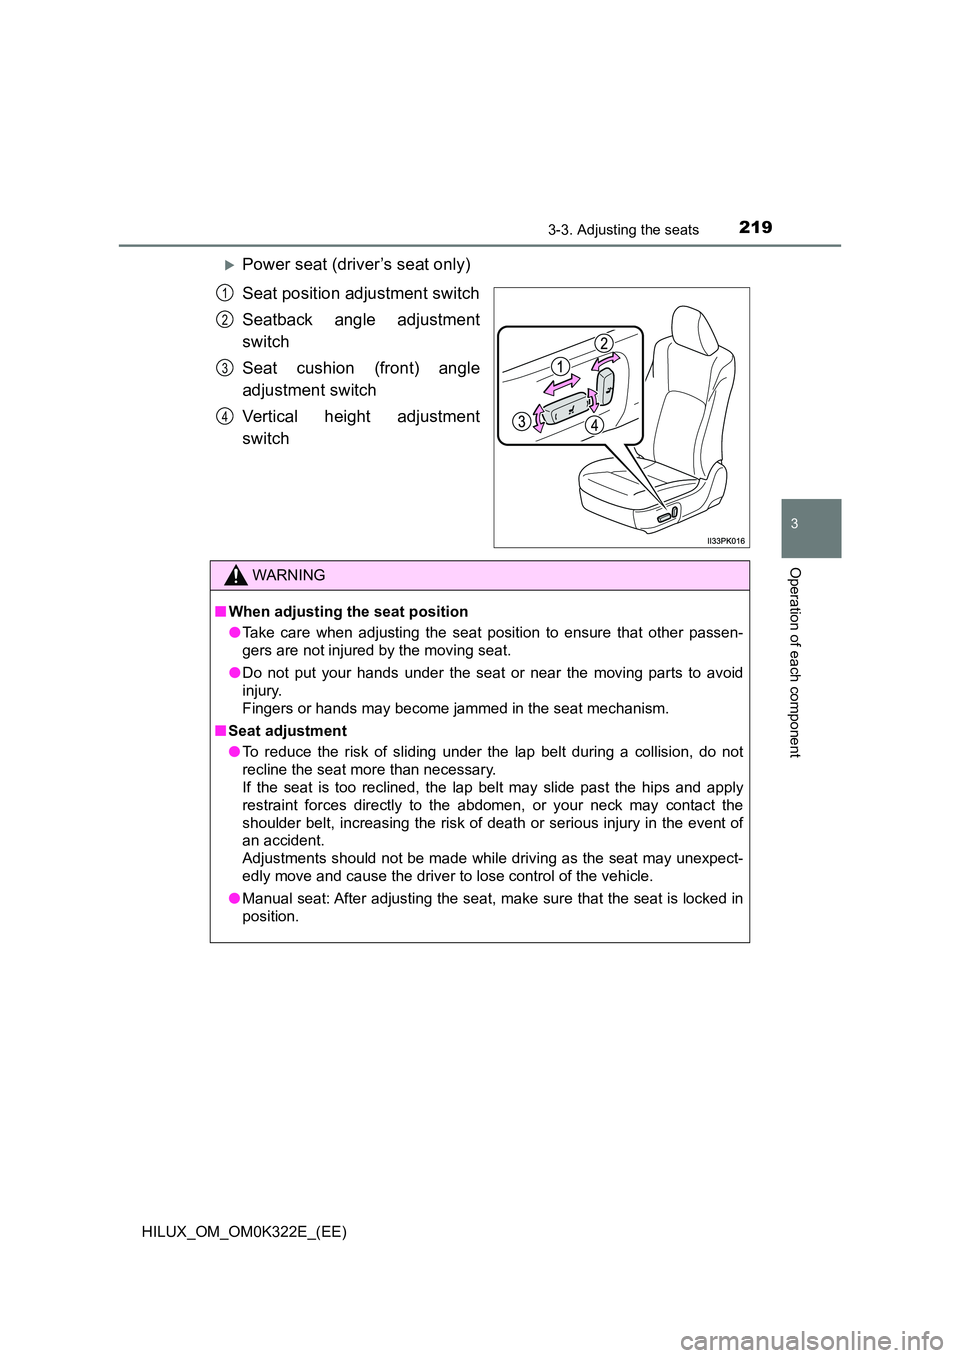
Power seat (driver’s seat only)
Seat position adjustment switch
Seatback angle adjustment
switch
Seat cushion (front) angle
adjustment switch
Vertical height adjustment
switch
1
2
3
4
WARNING
■ When adjusting the seat position
● Take care when adjusting the seat position to ensure that other passen-
gers are not injured by the moving seat.
● Do not put your hands under the seat or near the moving parts to avoid
injury.
Fingers or hands may become jammed in the seat mechanism.
■ Seat adjustment
● To reduce the risk of sliding under the lap belt during a collision, do not
recline the seat more than necessary.
If the seat is too reclined, the lap belt may slide past the hips and apply
restraint forces directly to the abdomen, or your neck may contact the
shoulder belt, increasing the risk of death or serious injury in the event of
an accident.
Adjustments should not be made while driving as the seat may unexpect-
edly move and cause the driver to lose control of the vehicle.
● Manual seat: After adjusting the seat, make sure that the seat is locked in
position.
Page 220 of 720
2203-3. Adjusting the seats
HILUX_OM_OM0K322E_(EE)
Rear seats
Unhook the lock release lever.
Pull the seat cushions up and
then pull toward the front of
vehicle.
The seat cushions can be removed
separately.
Ty pe A
Pull the head restraint up.
Pull the strap and raise the bot-
tom cushion.
The latch under the bottom cush-
ion will release allowing the bottom
cushion to be raised.
: If equipped
Removing the rear seat cushions (if equipped for smart-cab
models)
1
2
Raising the bottom cushion (double-cab models)
1
2
Page 221 of 720
2213-3. Adjusting the seats
3
Operation of each component
HILUX_OM_OM0K322E_(EE)
Anchor the strap to the head
restraint.
Vehicles without the rear center
seat head restraint: Anchor the
strap to the rear outboard seat
head restraint.
Ty pe B
Pull the head restraints up.
Pull the straps and raise the
bottom cushions.
The latch under the bottom cush-
ions will release allowing the bot-
tom cushions to be raised.
3
1
2
Page 222 of 720

2223-3. Adjusting the seats
HILUX_OM_OM0K322E_(EE)
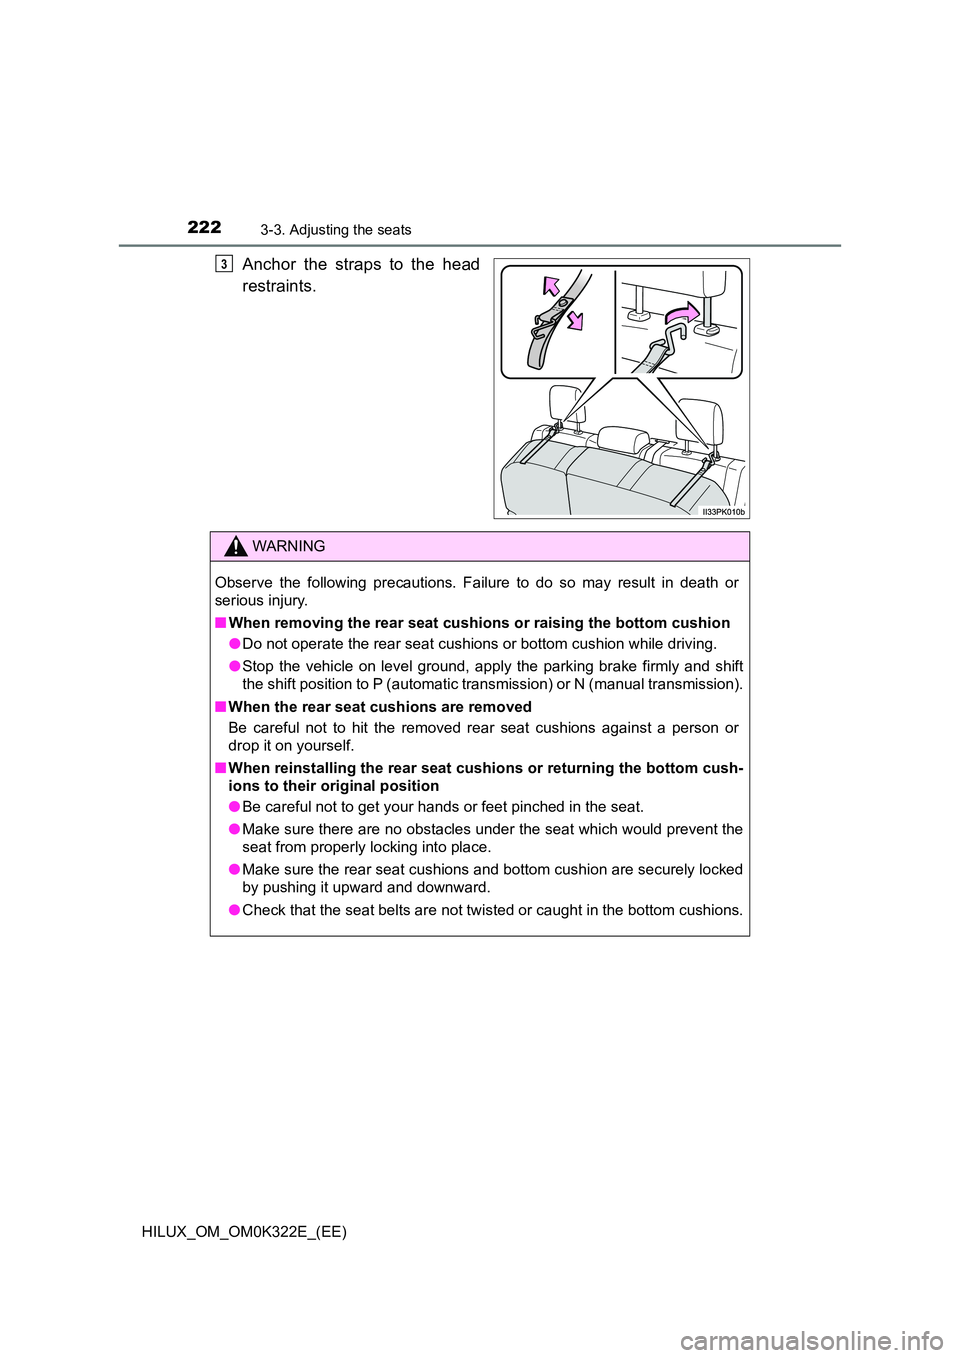
Anchor the straps to the head
restraints.
3
WARNING
Observe the following precautions. Failure to do so may result in death or
serious injury.
■ When removing the rear seat cushions or raising the bottom cushion
● Do not operate the rear seat cushions or bottom cushion while driving.
● Stop the vehicle on level ground, apply the parking brake firmly and shift
the shift position to P (automatic tr ansmission) or N (manual transmission).
■ When the rear seat cushions are removed
Be careful not to hit the removed rear seat cushions against a person or
drop it on yourself.
■ When reinstalling the rear seat cushions or returning the bottom cush-
ions to their original position
● Be careful not to get your hands or feet pinched in the seat.
● Make sure there are no obstacles under the seat which would prevent the
seat from properly locking into place.
● Make sure the rear seat cushions and bottom cushion are securely locked
by pushing it upward and downward.
● Check that the seat belts are not twisted or caught in the bottom cushions.