Page 310 of 716

3104-5. Using the driving support systems
HIGHLANDER_HV_U (OM48F12U)■
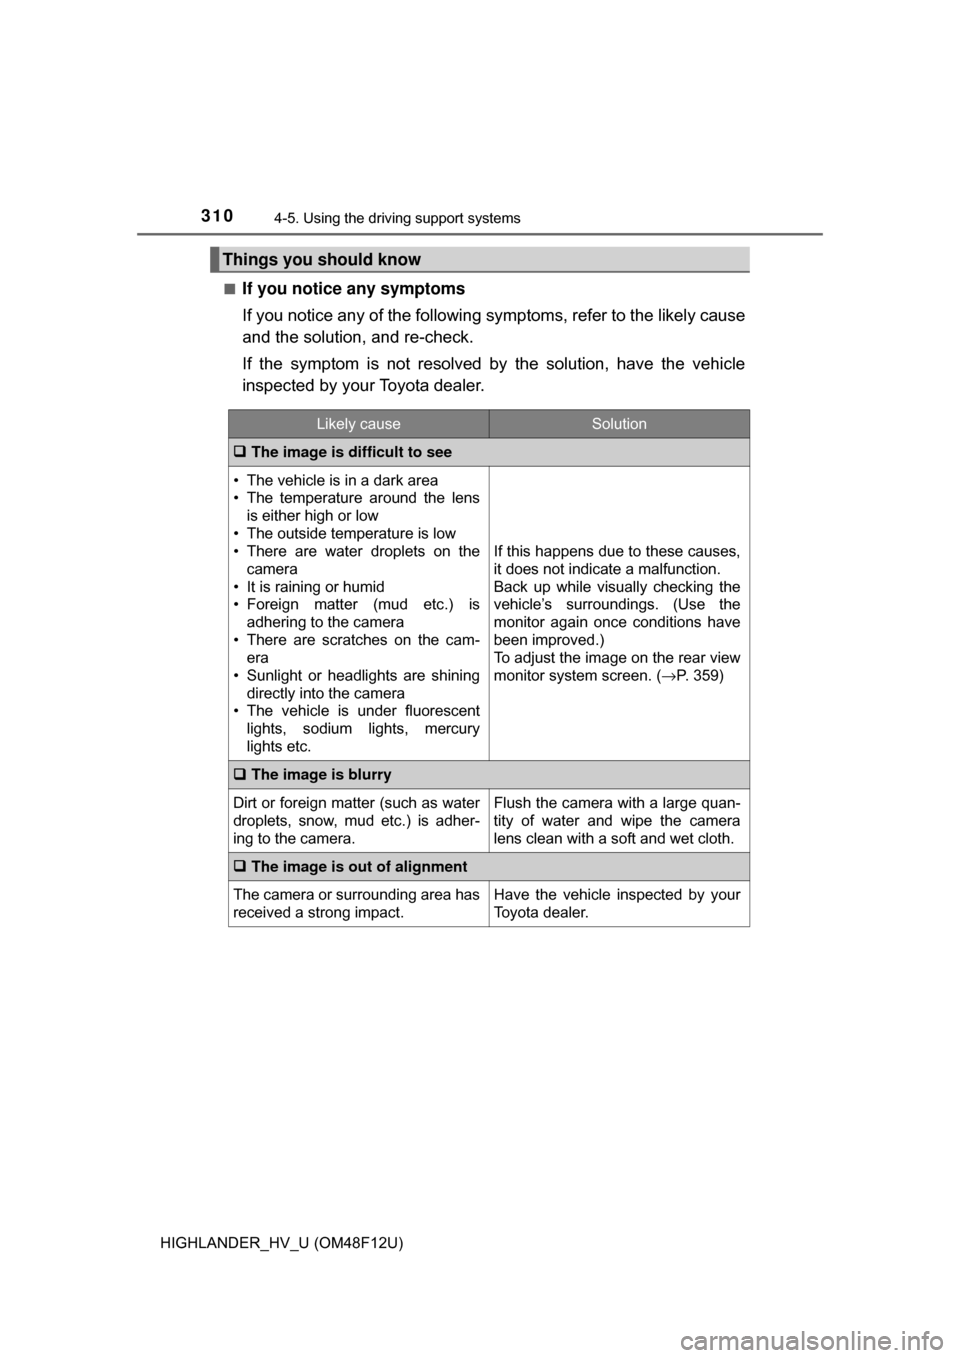
If you notice any symptoms
If you notice any of the following symptoms, refer to the likely cause
and the solution, and re-check.
If the symptom is not resolved by
the solution, have the vehicle
inspected by your Toyota dealer.
Things you should know
Likely causeSolution
The image is difficult to see
• The vehicle is in a dark area
• The temperature around the lens
is either high or low
• The outside temperature is low
• There are water droplets on the camera
• It is raining or humid
• Foreign matter (mud etc.) is adhering to the camera
• There are scratches on the cam- era
• Sunlight or headlights are shining
directly into the camera
• The vehicle is under fluorescent
lights, sodium lights, mercury
lights etc.
If this happens due to these causes,
it does not indicate a malfunction.
Back up while visually checking the
vehicle’s surroundings. (Use the
monitor again once conditions have
been improved.)
To adjust the image on the rear view
monitor system screen. ( →P. 359)
The image is blurry
Dirt or foreign matter (such as water
droplets, snow, mud etc.) is adher-
ing to the camera.Flush the camera with a large quan-
tity of water and wipe the camera
lens clean with a soft and wet cloth.
The image is out of alignment
The camera or surrounding area has
received a strong impact.Have the vehicle inspected by your
Toyota dealer.
Page 359 of 716
3595-2. Setup
5
Audio system
HIGHLANDER_U (OM48F09U)
Press the “SETUP” button.
Select “Display” on the “Setup” screen.Adjust screen contrast/bright-
ness
Adjust screen contrast/bright-
ness of the rear view monitor
camera
Changes to day mode.
Select “General” or “Camera” on the “Display Settings” screen.
Adjust the display as desired by selecting “+” or “-”.
When the headlights are tur ned on, the screen dims.
However, the screen can be switch ed to day mode by selecting “Day
Mode”.
The screen will stay in day mode when the headlights are turned on until
“Day Mode” is selected again.
Display settings
Settings are available for adjusting the contrast and brightness
of the screen.
Screen for display settings
1
2
1
2
3
Adjusting the screen contrast/brightness
Day mode
1
2
Page 549 of 716
5497-3. Do-it-yourself maintenance
7
Maintenance and care
HIGHLANDER_HV_U (OM48F12U)■
Headlight high beams/daytim
e running lights (if equipped)
Turn the bulb base counter-
clockwise.
Unplug the connector while
pressing the lock release.
Replace the light bulb, and
install the bulb base.
Align the 3 tabs on the light bulb
with the mounting, and insert.
Turn and secure the bulb
base.
Shake the bulb base gently to
check that it is not loose, turn
the headlights on once and visu-
ally confirm that no light is leak-
ing through the mounting.
1
2
3
4
Page 558 of 716

5587-3. Do-it-yourself maintenance
HIGHLANDER_HV_U (OM48F12U)■
Replacing the following bulbs
If any of the lights listed below
has burnt out, have it replaced by
your Toyota dealer.
● Side turn signal lights
● Daytime running lights/parking lights (LED type)
● Stop lights
● Rear side marker lights
● Stop/tail lights
● High mounted stoplight
● Outer foot lights (if equipped)
■LED light bulbs
The side turn signal lights, daytime running lights/parking lights (LED type),
stop lights, rear side marker lights, stop/tail lights, high mounted stoplight and
outer foot lights (if equipped) consist of a number of LEDs. If any of the LEDs
burns out, take your vehicle to your Toyota dealer to have the light replaced.
■ Condensation build-up on the inside of the lens
Temporary condensation build-up on the inside of the headlight lens does not
indicate a malfunction.
Contact your Toyota dealer for more information in the following situations:
●Large drops of water have built up on the inside of the lens.
● Water has built up inside the headlight.
■ When replacing light bulbs
→P. 544
WARNING
■Replacing light bulbs
● Turn off the lights. Do not attempt to replace the bulb immediately after
turning off the lights.
The bulbs become very hot and may cause burns.
● Do not touch the glass portion of the light bulb with bare hands. When it is
unavoidable to hold the glass portion, use and hold with a clean dry cloth
to avoid getting moisture and oils on the bulb.
Also, if the bulb is scratched or dropped, it may blow out or crack.
● Fully install light bulbs and any parts used to secure them. Failure to do so
may result in heat damage, fire, or water entering the headlight unit. This
may damage the headlights or cause condensation to build up on the lens.
■ To prevent damage or fire
Make sure bulbs are fully seated and locked.
Page 587 of 716

5878-2. Steps to take in an emergency
8
When trouble arises
HIGHLANDER_HV_U (OM48F12U)
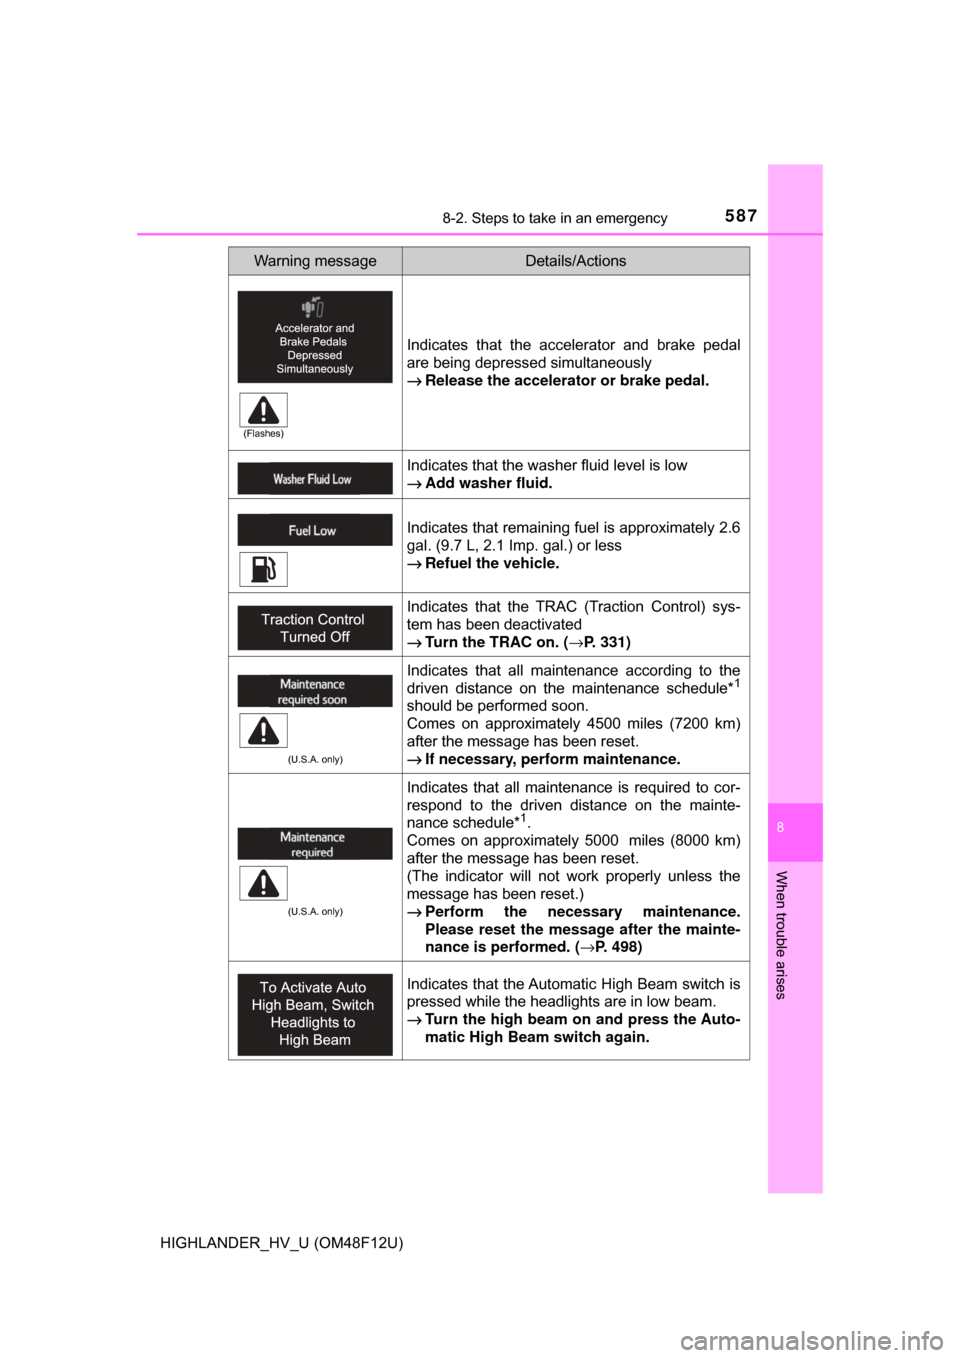
Indicates that the accelerator and brake pedal
are being depressed simultaneously
→Release the accelerator or brake pedal.
Indicates that the washer fluid level is low
→Add washer fluid.
Indicates that remaining fuel is approximately 2.6
gal. (9.7 L, 2.1 Imp. gal.) or less
→Refuel the vehicle.
Indicates that the TRAC (Traction Control) sys-
tem has been deactivated
→Turn the TRAC on. ( →P. 331)
(U.S.A. only)
Indicates that all maintenance according to the
driven distance on the maintenance schedule*1
should be performed soon.
Comes on approximately 4500 miles (7200 km)
after the message has been reset.
→If necessary, perform maintenance.
(U.S.A. only)
Indicates that all maintenance is required to cor-
respond to the driven distance on the mainte-
nance schedule*
1.
Comes on approximately 5000 miles (8000 km)
after the message has been reset.
(The indicator will not work properly unless the
message has been reset.)
→ Perform the necessary maintenance.
Please reset the message after the mainte-
nance is performed. ( →P. 498)
Indicates that the Automatic High Beam switch is
pressed while the headlights are in low beam.
→Turn the high beam on and press the Auto-
matic High Beam switch again.
Warning messageDetails/Actions
(Flashes)
Page 621 of 716

6218-2. Steps to take in an emergency
8
When trouble arises
HIGHLANDER_HV_U (OM48F12U)
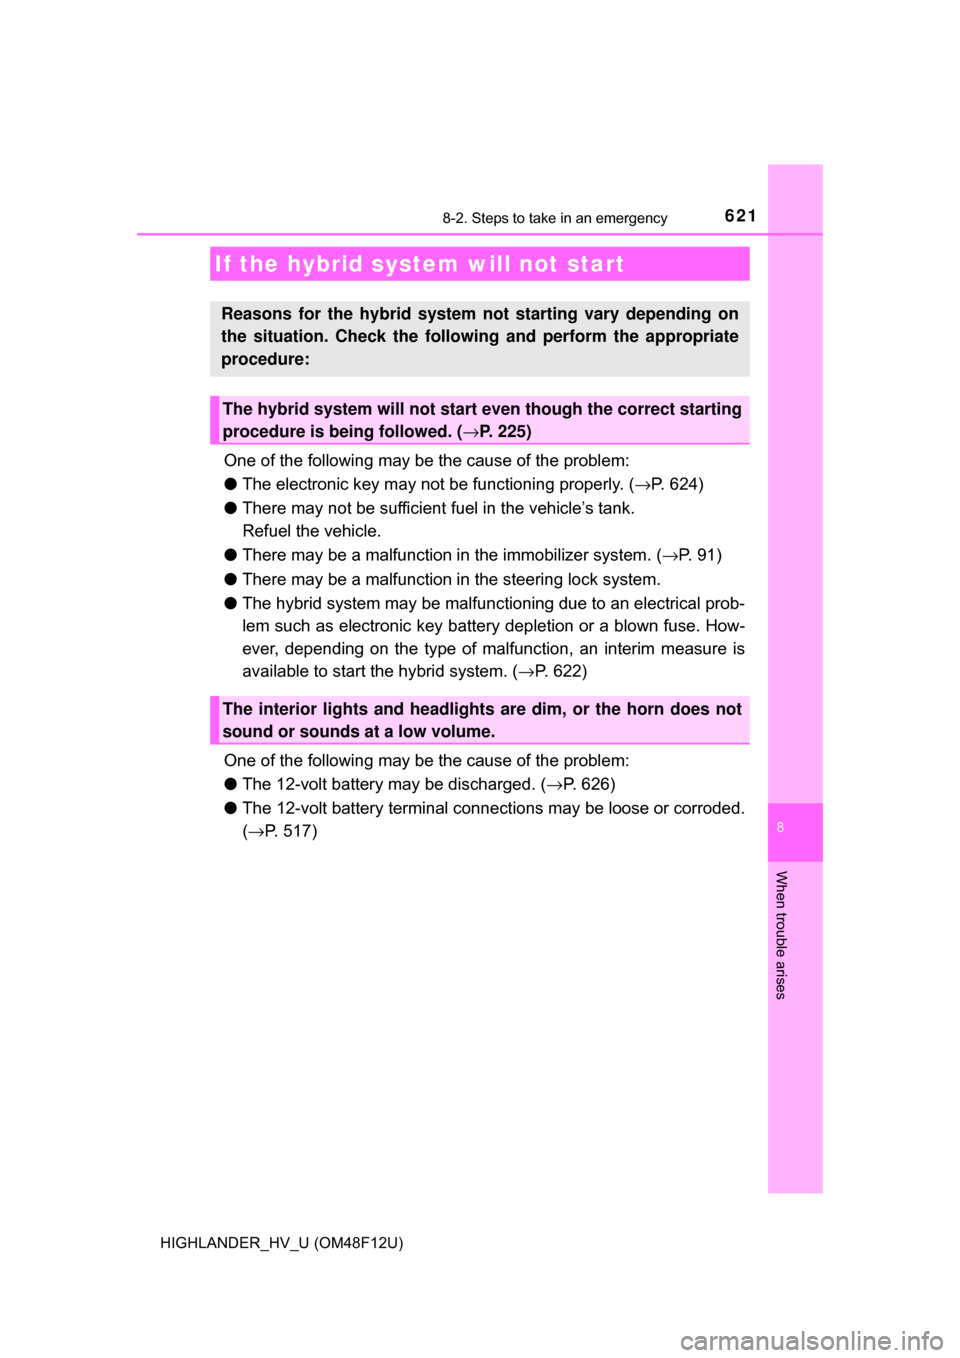
One of the following may be the cause of the problem:
●The electronic key may not be functioning properly. ( →P. 624)
● There may not be sufficient fuel in the vehicle’s tank.
Refuel the vehicle.
● There may be a malfunction in the immobilizer system. (→P. 9 1 )
● There may be a malfunction in the steering lock system.
● The hybrid system may be malfunctioning due to an electrical prob-
lem such as electronic key battery depletion or a blown fuse. How-
ever, depending on the type of malfunction, an interim measure is
available to start the hybrid system. (→ P. 622)
One of the following may be the cause of the problem:
● The 12-volt battery may be discharged. ( →P. 626)
● The 12-volt battery terminal connections may be loose or corroded.
(→ P. 517)
If the hybrid system will not start
Reasons for the hybrid system not starting vary depending on
the situation. Check the follo wing and perform the appropriate
procedure:
The hybrid system will not start even though the correct starting
procedure is being followed. ( →P. 225)
The interior lights and headlights are dim, or the horn does not
sound or sounds at a low volume.
Page 628 of 716

6288-2. Steps to take in an emergency
HIGHLANDER_HV_U (OM48F12U)
Open and close any of the doors of your vehicle with the power
switch off.
Maintain the engine speed of t he second vehicle and start the
hybrid system of your vehicle by turning the power switch to ON
mode.
Make sure the “READY” indicato r comes on. If the indicator does
not come on, contact your Toyota dealer.
Once the hybrid system has start ed, remove the jumper cables in
the exact reverse order from which they were connected.
Close the exclusive jump starting terminal cover, and reinstall the
fuse box cover to its original position.
When installing, first hook the fuse box cover onto the two rear tabs.
Once the hybrid system starts, ha ve the vehicle inspected at your
Toyota dealer as soon as possible.
■ Starting the hybrid system when the 12-volt battery is discharged
The hybrid system cannot be started by push-starting.
■ To prevent 12-volt battery discharge
●Turn off the headlights and the audio system while the hybrid system is off.
● Turn off any unnecessary electrical components when the vehicle is running
at a low speed for an extended period, such as in heavy traffic.
■ When recharging or repl acing the 12-volt battery
● In some cases, it may not be possible to unlock the doors using the smart
key system when the 12-volt battery is discharged. Use the wireless remote
control or the mechanical key to lock or unlock the doors.
● The hybrid system may not start on the first attempt after the 12-volt battery
has recharged but will start normally after the second attempt. This is not a
malfunction.
● The power switch mode is memorized by the vehicle. When the 12-volt bat-
tery is reconnected, the system will return to the mode it was in before the
12-volt battery was discharged. Before disconnecting the 12-volt battery,
turn the power switch off.
If you are unsure what mode the power switch was in before the 12-volt bat-
tery discharged, be especially careful when reconnecting the 12-volt battery.
● Vehicle with power back door: The power back door must be initialized.
(→P. 677)
■ Charging the 12-volt battery
The electricity stored in the 12-volt battery will discharge gradually even when
the vehicle is not in use, due to natural discharge and the draining effects of
certain electrical appliances. If the vehicle is left for a long time, the 12-volt
battery may discharge, and the hybrid system may be unable to start. (The
12-volt battery recharges automatically while the hybrid system is operating.)
7
8
9
10
11
Page 649 of 716
6499-1. Specifications
9
Vehicle specifications
HIGHLANDER_HV_U (OM48F12U)
*1: Light bulbs not listed in this table are LED bulbs.
*2: If equipped
Light bulbs*1
Light bulbsBulb No.WTy p e
ExteriorHeadlights
High beam
Low beam 9005
⎯ 60
55 A
B
Parking and front turn signal
lights 7444NA 28/8 C
Front side maker lights ⎯5D
Front fog lights
*2⎯ 19 E
Rear turn signal lights ⎯21 C
Back-up lights ⎯16 D
License plate lights ⎯5D
Interior Vanity lights
⎯1.26 D
Front interior/front personal
lights ⎯
5D
Rear interior/rear personal
lights ⎯
8D
Front door courtesy lights 168 5 D
Luggage compartment light Type A
Type B ⎯
5D
F
A: HB3 halogen bulbs
C: Wedge base bulbs (amber)
E: H16 halogen bulbs B: H11 halogen bulbs
D: Wedge base bulbs (clear)
F: Double end bulbs