Page 216 of 505
216
2-2. Instrument cluster
86_EE (OM18071E)
Using the multi-information display
■ Using the content display area
The content display area is operated using the meter control
switches.
: Select menu icons
: Change displayedcontent, scroll up/
down the screen
and move the cursor
: Enter
: Return to the previ- ous screen
For information pertaining to the content of each menu icon, refer to
the explanation of each item under the heading of the relevant menu
icon.
■ Using the odometer/trip meter display area
Items in this area are operated using the “ODO/TRIP” switch.
Press: Change displayed item
Each time the switch is pressed,
the displayed item changes in the
order of odometer → trip meter A
→ trip meter B.
Press and hold: Reset
Display the desired trip meter and
press and hold the switch to reset
the trip meter.
Page 223 of 505
223
2-2. Instrument cluster
2
When driving
86_EE (OM18071E)
■
Stopwatch
Measures and displays current lap time and previous lap times
Fastest lap time (top screen)
When the timer is reset, “ − −’− − ”− − ” will be displayed.
Fastest lap time (measurement screen)
Current lap time
Total lap time
Past lap times
Records of the 50 most recent lap times will be displayed.
Meter control switch operation guide
● Changing between the stopwatch screens
To change to the measurement screen: Press .
To change to the top screen: Press .
Top screen Measurement screen
Page 229 of 505

229
2-2. Instrument cluster
2
When driving
86_EE (OM18071E)
■
G-force display
●Depending on the vehicle usage conditions, the brake fluid pressure dis-
play may not reach its maximum reading even though the brake pedal is
fully depressed.
● If a battery terminal is disconnected and reconnected, the steering
amount display may be disabled temporarily. After driving the vehicle for
a while, the display will be enabled.
■ Suspension of the settings display
●The settings cannot be changed while driving. When changing settings,
park the vehicle in a safe place.
● If a warning message is displayed, operation of the settings display will
be suspended.
■ Using the stopwatch
If the engine is stopped while the stopwatch is operating, the stopwatch will
stop and the time up to that point will be recorded.
■ Outside temperature display
●In the following situations, the correct outside temperature may not be
displayed.
• When the vehicle is very hot, such as when under the sun.
• When the vehicle is idling or being driven at low speeds such as in a
traffic jam or when the engine is stopped and then restarted immedi-
ately afterward.
• When the actual outside temperature is outside of the indicator range.
● If “ − − ” is displayed for approximately 1 minute or more or if the outside
temperature is not displayed, the system may be malfunctioning.Have
the vehicle inspected by any authorized Toyota dealer or repairer, or
another duly qualified and equipped professional.
Page 242 of 505
242
2-4. Using other driving systems
86_EE (OM18071E)
■
Adjusting the set speed
To change the set speed, operate the lever until the desired set
speed is obtained.
Increases the speed
Decreases the speed
Fine adjustment: Momentarily
move the lever in the desired
direction.
Large adjustment: Hold the
lever in the desired direction.
The set speed will be increased or decreased as follows:
Fine adjustment (vehicles with a km/h odometer display): By approxi-
mately 1 km/h (0.6 mph) each time the lever is operated.
Fine adjustment (vehicles with an mph odometer display): By approxi-
mately 1.6 km/h (1 mph) each time the lever is operated.
Large adjustment: The set speed can be increased or decreased con-
tinually until the lever is released.
Page 276 of 505

276
3-1. Using the air conditioning system and defogger
86_EE (OM18071E)
To adjust the temperature settings, turn the temperature con-
trol dial clockwise (warm) or counter-clock wise (cool).
To adjust the temperature control dial clockwise (warm) or counter-
clockwise (cool) on the passenger side to separately adjust the tem-
perature for the passenger and driver sides (dual mode).
Press (the indicator on turns off) to return the driver
and passenger side temperatures to the same setting (simultaneous
mode).
The air conditioning system switches between dual and simulta-
neous modes each time is pressed.
To change the air outlets, press .
The air outlets used are switched each time either side of the button
is pressed.
Defogging the windshield
Press .
The dehumidification function
operates and fan speed
increases.
Set the outside/recirculated air
mode button to outside air mode
if the recirculated air mode is
used. (It may switch automati-
cally.)
To defog the windshield and the
side windows early, turn the air
flow and temperature up.
To return to the previous mode,
press
again when the
windshield is defogged.
STEP 2
STEP 3
Page 287 of 505

287
3-3. Using the interior lights
3
Interior features
86_EE (OM18071E)
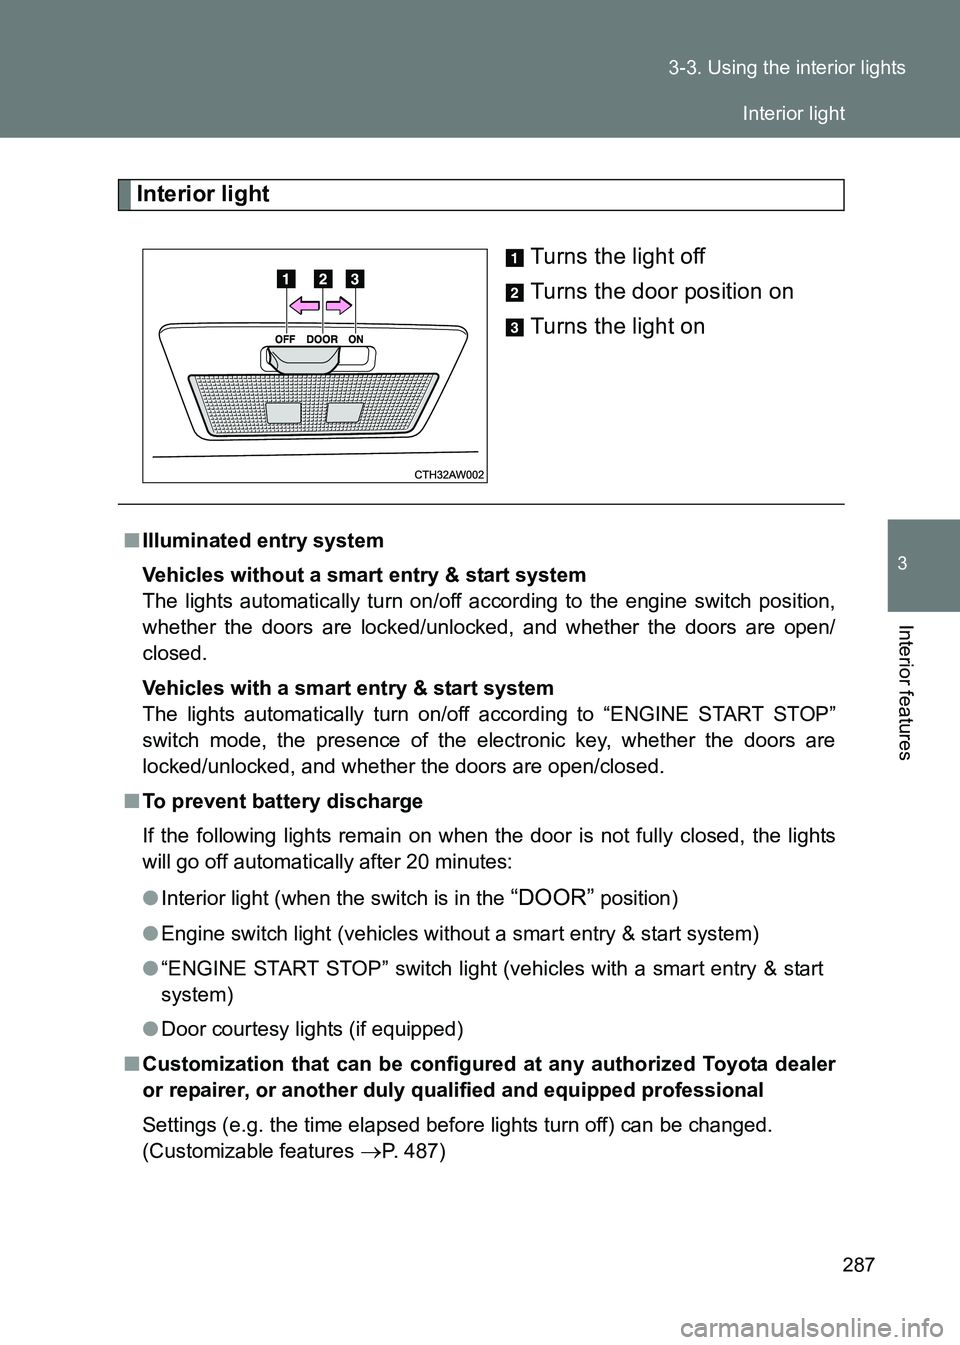
Interior light
Turns the light off
Turns the door position on
Turns the light on
■Illuminated entry system
Vehicles without a smart entry & start system
The lights automatically turn on/off according to the engine switch position,
whether the doors are locked/unlocked, and whether the doors are open/
closed.
Vehicles with a smart entry & start system
The lights automatically turn on/off according to “ENGINE START STOP”
switch mode, the presence of the electronic key, whether the doors are
locked/unlocked, and whether the doors are open/closed.
■ To prevent battery discharge
If the following lights remain on when the door is not fully closed, the lights
will go off automatically after 20 minutes:
●Interior light (when the switch is in the
“DOOR” position)
● Engine switch light (vehicles without a smart entry & start system)
● “ENGINE START STOP” switch light (vehicles with a smart entry & start
system)
● Door courtesy lights (if equipped)
■ Customization that can be configured at any authorized Toyota dealer
or repairer, or another duly qualified and equipped professional
Settings (e.g. the time elapsed before lights turn off) can be changed.
(Customizable features
→P. 487)
Interior light
Page 458 of 505

458
5-2. Steps to take in an emergency
86_EE (OM18071E)
■
Stopping the engine
Vehicles with an automatic transmission: Shift the shift lever to P and press
the “ENGINE START STOP” switch as you normally do when stopping the
engine.
Vehicles with a manual transmission: Sh ift the shift lever to N and press the
“ENGINE START STOP” switch as you normally do when stopping the
engine.
■ Replacing the key battery
As the above procedure is a temporary measure, it is recommended that the
electronic key battery be replaced immediately when the battery depletes.
( → P. 360)
■ Changing “ENGINE START STOP” switch modes
Vehicles with an automatic transmission
Release the brake pedal and press the “ENGINE START STOP” switch in
above.The engine does not start and modes will be changed each
time the switch is pressed. ( →P. 177)
Vehicles with a manual transmission
Release the clutch pedal and press the “ENGINE START STOP” switch in above.The engine does not start and modes will be changed each
time the switch is pressed. ( →P. 177)
■ If the doors cannot be locked or unlocked by the smart entry & start
system
Lock and unlock the doors by the mechanical key or wireless remote control.
STEP 3
STEP 3
Page 487 of 505

487
6
Vehicle specifications
86_EE (OM18071E)
6-2. Customization
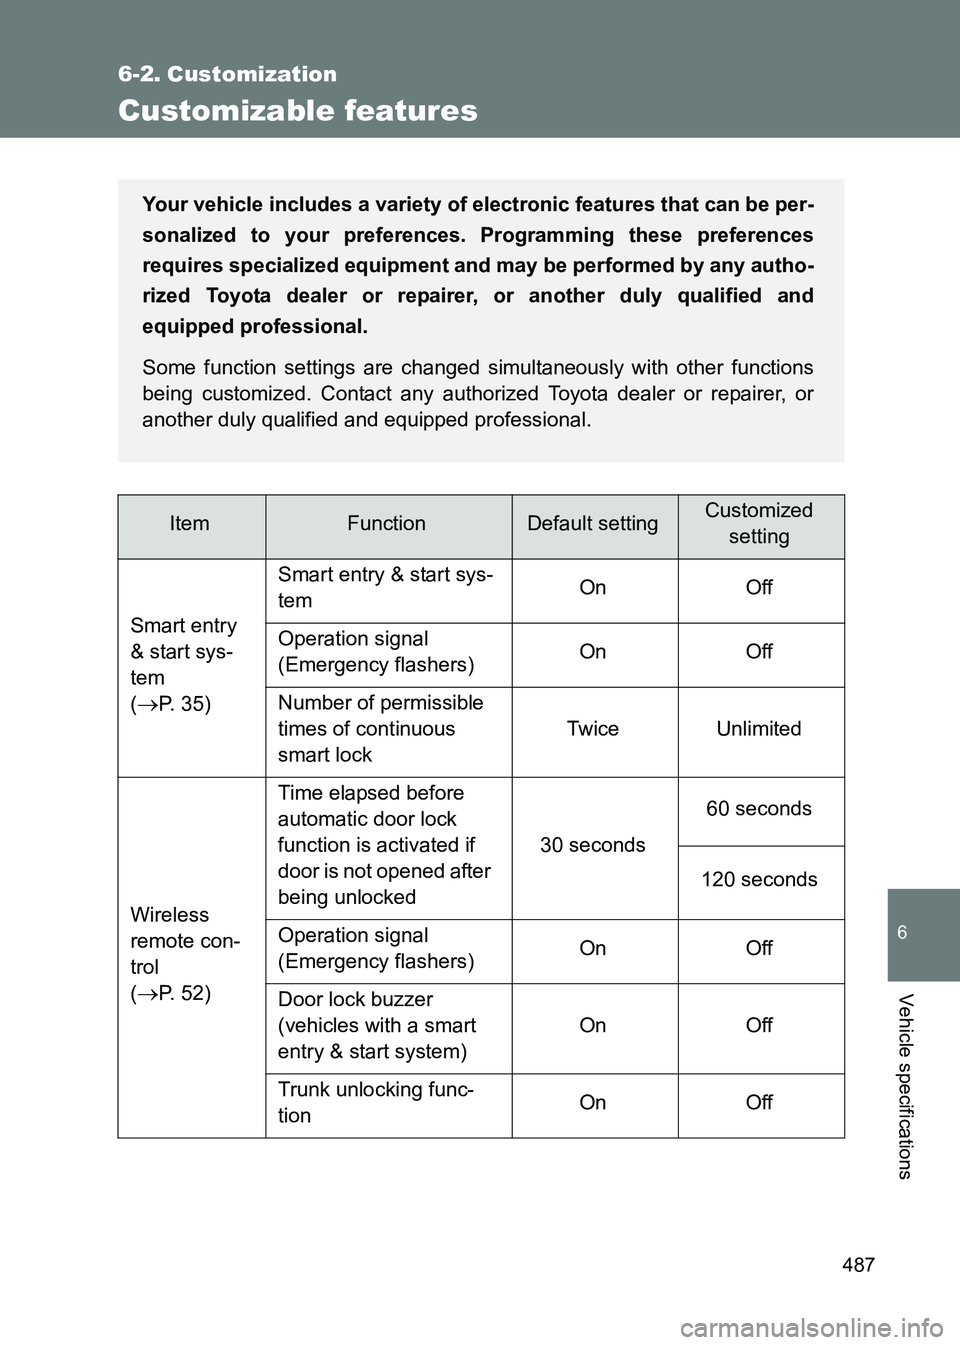
Customizable features
ItemFunctionDefault settingCustomizedsetting
Smart entry
& start sys-
tem
(
→P. 35) Smart entry & start sys-
tem
On Off
Operation signal
(Emergency flashers) On Off
Number of permissible
times of continuous
smart lock Twice Unlimited
Wireless
remote con-
trol
(
→P. 52) Time elapsed before
automatic door lock
function is activated if
door is not opened after
being unlocked
30 seconds
60 seconds
120 seconds
Operation signal
(Emergency flashers) On Off
Door lock buzzer
(vehicles with a smart
entry & start system) On Off
Trunk unlocking func-
tion On Off
Your vehicle includes a variety of
electronic features that can be per-
sonalized to your preferences. Programming these preferences
requires specialized equipment and may be performed by any autho-
rized Toyota dealer or repairer, or another duly qualified and
equipped professional.
Some function settings are changed simultaneously with other functions
being customized. Contact any authorized Toyota dealer or repairer, or
another duly qualified and equipped professional.