2017 TOYOTA CAMRY brake
[x] Cancel search: brakePage 2 of 23

OVERVIEW
FEATURES/OPERATIONS
SAFETY AND EMERGENCY FEATURES
Engine maintenance 9
Fuel tank door release and cap 7
Hood release 8
Indicator symbols 4-5
Instrument cluster 4
Instrument panel 2-3
Keyless entry
1,2 6
Light control-Instrument panel 8
Smart Key system (and remote entry)
1,2 7
Air Conditioning/heating 18-19
Audio 22
Auto lock/unlock
1,2 10
Automatic Transmission 10
Bottle holders/Cup holders 24
Blind Spot Monitor (BSM) 20
Clock 14
Cruise control 16
Dynamic Radar Cruise Control
(DRCC) 17
Garage door opener (HomeLink
®)3 16
Lights1 & turn signals 15
Lane Departure Alert (LDA) 25
Moon roof 12
Multi-Information Display (MID)
1 24
Parking brake 11
Power outlets-12V DC 14
Pre-Collision System (PCS) 25
Rear view monitor system 20
Seat adjustments-Front 13
Seat adjustments-Rear 13
Seats-Head restraints 12
1
INDEX
1 Visit your Toyota dealer for information on customizing this feature.2 Programmable by customer. Refer to the Owner’s Manual for instructions\
and more information.3 HomeLink® is a registered trademark of Gentex Corporation.
OVERVIEW
FEATURES & OPERATIONS FEATURES & OPERATIONS (continued)
SAFETY & EMERGENCY FEATURES
CAMRY 2017
This Quick Reference Guide is a summary of basic vehicle
operations. It contains brief descriptions of fundamental
operations so you can locate and use the vehicle’s main
equipment quickly and easily.
The Quick Reference Guide is not intended as a substitute for
the Owner’s Manual located in your vehicle’s glove box. We
strongly encourage you to review the Owner’s Manual and
supplementary manuals so you will have a better understanding
of your vehicle’s capabilities and limitations.
Your dealership and the entire staff of Toyota Motor Sales,
U.S.A., Inc. wish you many years of satisfied driving in your new
Camry.
A word about safe vehicle operations
This Quick Reference Guide is not a full description of Camry operations\
.
Every Camry owner should review the Owner’s Manual that accompanies t\
his
vehicle.
Pay special attention to the boxed
information highlighted in color throughout
the Owner’s Manual. Each box contains safe operating instructions to \
help you
avoid injury or equipment malfunction.
All information in this Quick Reference Guide is current at the time of \
printing.
Toyota reserves the right to make changes at any time without notice.
Steering lock release 11
Steering wheel controls
(Audio & telephone: Bluetooth
®) 21
Tilt and telescopic steering wheel 11
USB/AUX port 23
Windows-Power 12
Windshield wipers & washers 14
Wireless charging 23
Door locks 26
Doors-Child safety locks 26
Floor mat installation 30
Safety Connect 27
Seat belts 26
Seat belts-Shoulder belt anchor 27
Spare tire & tools 28
Star Safety System
™ 29-30
Trunk internal release 27
BLUETOOTH® DEVICE
PAIRING SECTION 32-41
Page 4 of 23

FEATURES/OPERATIONS
45
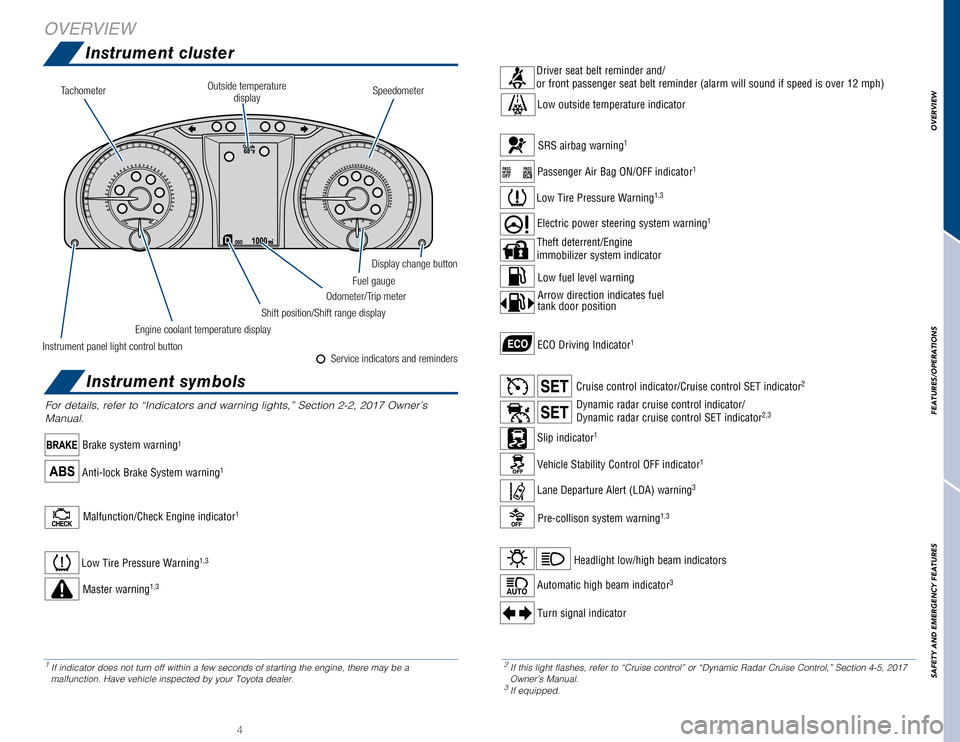
For details, refer to “Indicators and warning lights,” Section 2-2\
, 2017 Owner’s
Manual.
Anti-lock Brake System warning1
Brake system warning1
ECO Driving Indicator1
Instrument cluster
2 If this light flashes, refer to “Cruise control” or “Dynamic Ra\
dar Cruise Control,” Section 4-5, 2017
Owner’s Manual.
3 If equipped.
1 If indicator does not turn off within a few seconds of starting the engi\
ne, there may be a
malfunction. Have vehicle inspected by your Toyota dealer.
Master warning1,3
Low Tire Pressure Warning1,3
Driver seat belt reminder and/
or front passenger seat belt reminder (alarm will sound if speed is ove\
r 12 mph)
Low outside temperature indicator
Turn signal indicator
Headlight low/high beam indicators
Automatic high beam indicator3
Slip indicator1
Cruise control indicator/Cruise control SET indicator2
Dynamic radar cruise control indicator/
Dynamic radar cruise control SET indicator2,3
Vehicle Stability Control OFF indicator1
Pre-collison system warning1,3
Lane Departure Alert (LDA) warning3
Malfunction/Check Engine indicator1
Passenger Air Bag ON/OFF indicator1
Low Tire Pressure Warning1,3
Low fuel level warning
Theft deterrent/Engine
immobilizer system indicator
SRS airbag warning1
Electric power steering system warning1
Arrow direction indicates fuel
tank door position
OVERVIEW
Instrument symbols
Fuel gauge
Display change button
Odometer/Trip meter
SpeedometerTachometer
Engine coolant temperature display
Shift position/Shift range display
Instrument panel light control button
Outside temperature display
Service indicators and reminders
OVERVIEW
SAFETY AND EMERGENCY FEATURES
Page 5 of 23

6
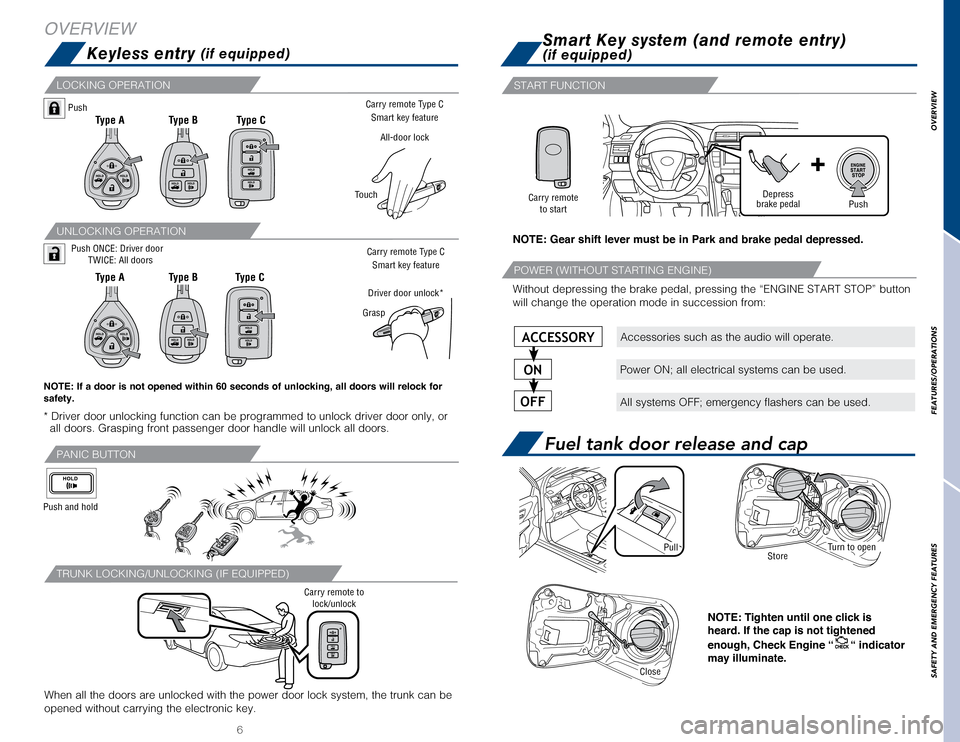
LOCKING OPERATION
When all the doors are unlocked with the power door lock system, the tru\
nk can be
opened without carrying the electronic key.
Carry remote to lock/unlock
TRUNK LOCKING/UNLOCKING (IF EQUIPPED)
UNLOCKING OPERATION
NOTE: If a door is not opened within 60 seconds of unlocking, all doors will relock for
safety.
* Driver door unlocking function can be programmed to unlock driver door\
only, or all doors. Grasping front passenger door handle will unlock all doors.
7
Without depressing the brake pedal, pressing the “ENGINE START STOP”\
button
will change the operation mode in succession from:
START FUNCTION
POWER (WITHOUT STARTING ENGINE)
Fuel tank door release and cap
Turn to open
StorePull
Keyless entry (if equipped)
Smart Key system (and remote entry)
(if equipped)
Push ONCE: Driver door
TWICE: All doors
Push
Close
NOTE: Tighten until one click is
heard. If the cap is not tightened
enough, Check Engine “
“ indicator
may illuminate.
Type A
OVERVIEW
Type B Type B
Type CType C
Type A
NOTE: Gear shift lever must be in Park and brake pedal depressed.
Depress
brake pedalPushCarry remote
to start
PANIC BUTTON
Push and hold
Accessories such as the audio will operate.
Power ON; all electrical systems can be used.
All systems OFF; emergency flashers can be used.
ACCESSORY
ON
OFF
Carry remote Type C
Smart key feature
All-door lock
Touch
Carry remote Type CSmart key feature
Grasp
Driver door unlock*
OVERVIEW
FEATURES/OPERATIONS
SAFETY AND EMERGENCY FEATURES
Page 7 of 23

1011
* The “ENGINE START STOP”/ignition switch must be “ON” and t\
he brake pedal
depressed to shift from Park.
Auto lock/unlockSteering lock release
Tilt and telescopic steering wheel
Parking brake
Automatic door locks can be programmed to operate in four different mode\
s, or
turned OFF.
-Doors lock when shifting from Park.
-Doors lock when the vehicle speed goes above approximately 12 mph.
-Doors unlock when shifting into Park.
Vehicles without Smart Key system
-Doors unlock when the ignition switch is set from “ON” to “ACC\
” or “LOCK” and
driver’s door is opened.
Vehicles with Smart Key system
-Doors unlock when the “ENGINE START STOP” switch is set to OFF an\
d driver’s
door is opened.
Refer to the Owner’s Manual for more details.
Park*
Reverse
Neutral
Drive
N
“S” mode
+ (“S” mode)
- (“S” mode)
- (“S” mode)+ (“S” mode)
Paddle shift switches
(if equipped)Shift lever
Automatic transmission
FEATURES/OPERATIONS
“S” SEQUENTIAL MODE
Shift the shift lever to “S” position from “D” position.
+ : Upshifting
- : Downshifting
Downshifting increases power going uphill, or provides engine braking do\
wnhill. For
best fuel economy during normal driving conditions, always drive with th\
e shift lever
in the “D” position.
Turn
Smart Key system Without Smart Key system
Push
Set: Depress
Release: Depress again
NOTE: Do not attempt to adjust while the vehicle is in motion. Hold wheel, push lever down, set angle and length, and return lever.
Lock release
lever Angle
Length
Turn
OVERVIEW
FEATURES/OPERATIONS
SAFETY AND EMERGENCY FEATURES
Page 10 of 23

1617
Garage door opener (Homelink®*)(if equipped)
Cruise control
DISTANCE CONTROL MODE
FEATURES/OPERATIONS
3-5.
Other interior feature s
Garage door openers manufactured under license from HomeLink®* can be
programmed to operate garage doors, estate gates, security lighting, etc\
.
Refer to “Garage door opener,” Section 6-4 in the Owner’s Manua\
l for more
details.
For programming assistance, contact HomeLink
® at 1-800-355-3515, or visit
http://www.homelink.com.
* HomeLink
® is a registered trademark of Gentex Corporation.
To set, cancel and resume a speed Refer to “Summary of Functions” in the Cruise
Control section, and your Owner’s Manual for more details.
NOTE: Once vehicle speed is set, pushing lever up toward “+ RES” will
increase speed to the nearest 5 mph, and then in 5 mph increments. Pushing
lever down toward “- SET” will reduce speed in the same way.
The distance control mode will cruise at a set speed, decelerate to main\
tain a
selected distance from a slower vehicle traveling in front of you, and a\
ccelerate
back up to the selected speed if the vehicle in front changes lanes or s\
peeds up.
To change the vehicle-to-vehicle distance
Push the distance button to cycle through the settings, which will chang\
e
progressively from LONG to MIDDLE to SHORT.
To set, cancel and resume a speed Refer to “Summary of Functions” in the Cruise
Control section, and to the Owner’s Manual for more details.
(1) Push
System ON/OFF
Refer to the Owner’s Manual for more details and complete safety prec\
autions
before attempting to use “Dynamic Radar Cruise Control.”
Push
System ON/OFF
Indicator
Indicator(2) Push and hold
Push
Preceding
vehicle mark
Preceding vehicle mark
LONG
MIDDLE
SHORT
1 The set speed may also be cancelled by depressing the brake pedal.2 The set speed may be resumed once vehicle speed reaches 25 mph.
System ON/OFF
Resume2/Increase speed
Set/Decrease speed
Cancel1
Indicator
TURNING SYSTEM ON/OFF
FUNCTIONS
SWITCH TO FIXED SPEED MODE
Dynamic Radar Cruise Control (DRCC)(if equipped)
OVERVIEW
FEATURES/OPERATIONS
SAFETY AND EMERGENCY FEATURES
Page 14 of 23

2425
Bottle holders/Cup holdersPre-Collision System (PCS) (if equipped)
Lane Departure Alert (LDA) (if equipped)
Multi-Information Display (MID)
FrontRear
* If equipped
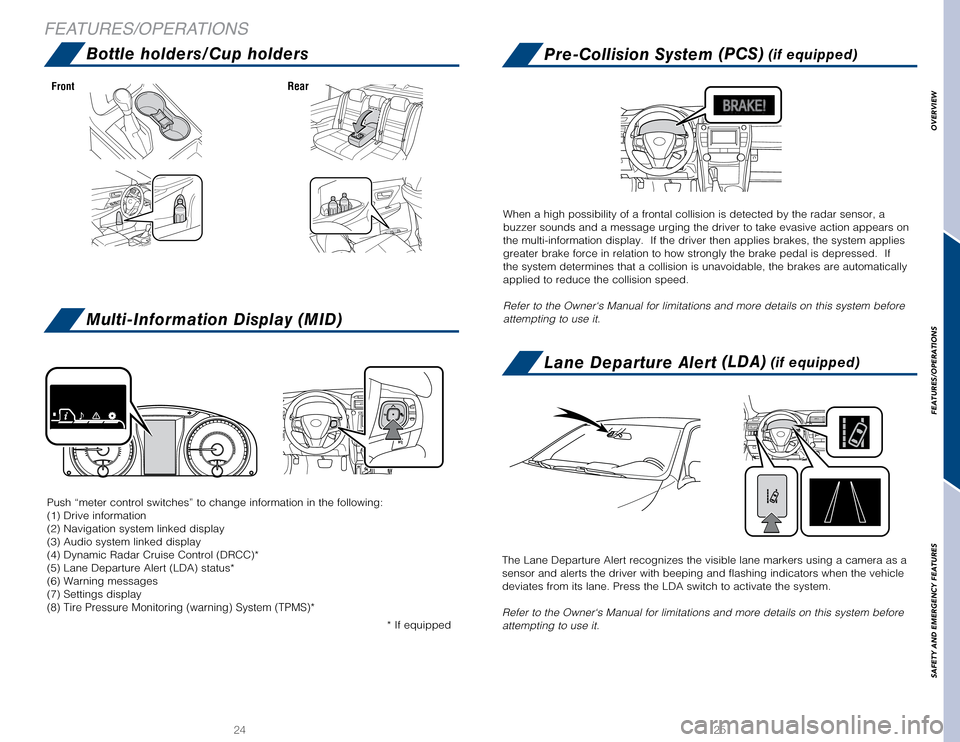
Push “meter control switches” to change information in the followi\
ng:
(1) Drive information
(2) Navigation system linked display
(3) Audio system linked display
(4) Dynamic Radar Cruise Control (DRCC)*
(5) Lane Departure Alert (LDA) status*
(6) Warning messages
(7) Settings display
(8) Tire Pressure Monitoring (warning) System (TPMS)*
When a high possibility of a frontal collision is detected by the radar \
sensor, a
buzzer sounds and a message urging the driver to take evasive action app\
ears on
the multi-information display. If the driver then applies brakes, the s\
ystem applies
greater brake force in relation to how strongly the brake pedal is depre\
ssed. If
the system determines that a collision is unavoidable, the brakes are au\
tomatically
applied to reduce the collision speed.
Refer to the Owner‘s Manual for limitations and more details on this \
system before
attempting to use it.
The Lane Departure Alert recognizes the visible lane markers using a cam\
era as a
sensor and alerts the driver with beeping and flashing indicators when t\
he vehicle
deviates from its lane. Press the LDA switch to activate the system.
Refer to the Owner‘s Manual for limitations and more details on this \
system before
attempting to use it.
FEATURES/OPERATIONS
OVERVIEW
FEATURES/OPERATIONS
SAFETY AND EMERGENCY FEATURES
Page 16 of 23

2829
Spare tire & toolsStar Safety System™
TOOL LOCATION
VEHICLE STABILITY CONTROL (VSC)
TRACTION CONTROL (TRAC)
ANTI-LOCK BRAKE SYSTEM (ABS)
ELECTRONIC BRAKE FORCE DISTRIBUTION (EBD)
BRAKE ASSIST (BA)
REMOVING THE SPARE TIRE
SAFETY AND EMERGENCY FEATURES
Jack
Jack handle
Luggage floor cover
Wheel nut wrench
Spare tire
(1) Remove the tool tray.
Refer to the Owner’s Manual for tire changing and jack positioning
procedures.
(2) Loosen the center fastener that secures
the spare tire.
VSC helps prevent loss of traction during cornering by reducing engine p\
ower and
applying brake force to selected wheels.
Toyota’s VSC monitors steering angle and the direction your vehicle i\
s traveling.
When it senses that the front or rear wheels begin to lose traction, VSC\
reduces
engine power and applies braking to selected wheels. This helps restore \
traction
and vehicle control.
ABS helps prevent brakes from locking up by “pulsing” brake pressu\
re to each
wheel. This limits brake lockup and helps provide directional control fo\
r the current
road conditions.
Toyota’s ABS sensors detect which wheels are locking up and limits wh\
eel lockup
by “pulsing” each wheel’s brakes independently. Pulsing release\
s brake pressure
repeatedly for fractions of a second. This helps the tires attain the tr\
action that
current road conditions will allow, helping you to stay in directional c\
ontrol.
Brake Assist is designed to detect sudden or “panic” braking, and \
then add braking
pressure to help decrease the vehicle’s stopping distance. When there\
’s only a split
second to react, Brake Assist can add additional brake pressure more qui\
ckly than
just the driver alone can. VSC helps prevent loss of traction during cornering by reducing engine p\
ower, and
Traction Control helps maintain traction on loose gravel and wet, icy, o\
r uneven
surfaces by applying brake force to the spinning wheel(s).
Toyota’s TRAC sensors are activated when one of the drive wheels star\
ts to slip.
TRAC limits engine output and applies the brakes to the spinning wheel. \
This
transfers power to the wheels that still have traction to help keep you \
on track.
Toyota’s ABS technology has Electronic Brake-force Distribution (EBD\
) to help
maintain control and balance when braking. Abrupt stops can cause a vehi\
cle to tilt
forward, reducing the braking power of the rear wheels. EBD responds to \
sudden
stops by redistributing brake force to enhance the braking effectiveness\
of all four
wheels. All new Toyota vehicles come standard with the Star Safety SystemTM, whi\
ch
combines Vehicle Stability Control (VSC), Traction Control (TRAC), A\
nti-lock Braking
System (ABS), Electronic Brake-force Distribution (EBD), Brake Assis\
t (BA) and
Smart Stop Technology (SST).
Refer to the Owner’s Manual for more details and important informatio\
n on
limitations to these systems.
OVERVIEW
FEATURES/OPERATIONS
SAFETY AND EMERGENCY FEATURES
Page 17 of 23

3130
SAFETY AND EMERGENCY FEATURESFloor mat installation
SMART STOP TECHNOLOGY (SST)
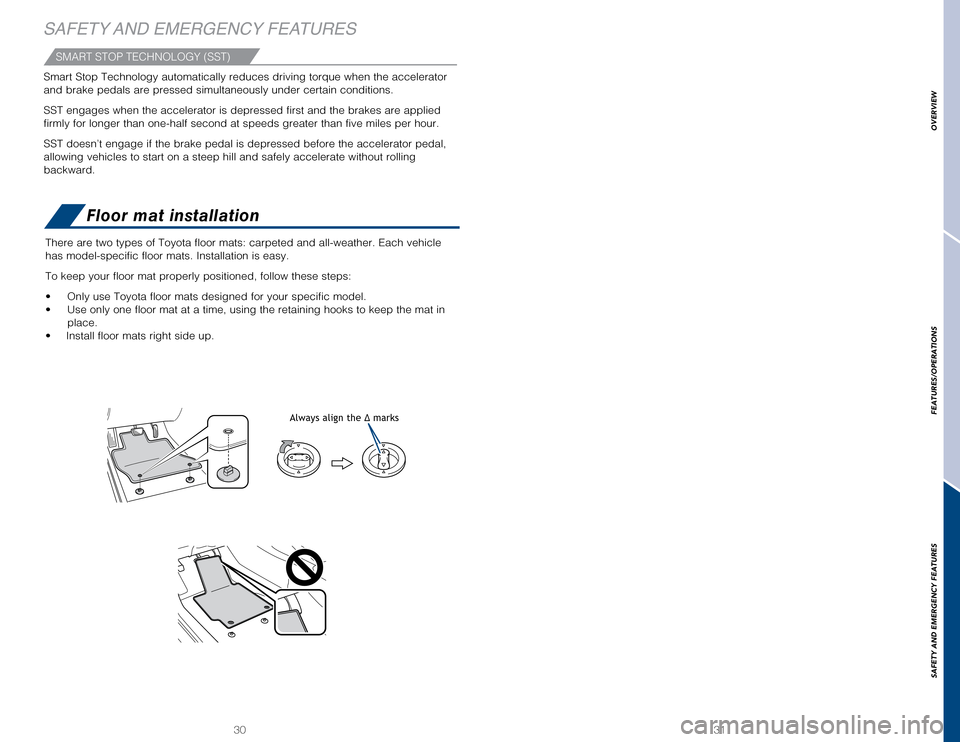
Always align the Δ marks
There are two types of Toyota floor mats: carpeted and all-weather. Each\
vehicle
has model-specific floor mats. Installation is easy.
To keep your floor mat properly positioned, follow these steps:
• Only use Toyota floor mats designed for your specific model.
• Use only one floor mat at a time, using the retaining hooks to keep the mat in
place.
• Install floor mats right side up.
Smart Stop Technology automatically reduces driving torque when the acce\
lerator
and brake pedals are pressed simultaneously under certain conditions.
SST engages when the accelerator is depressed first and the brakes are a\
pplied
firmly for longer than one-half second at speeds greater than five miles\
per hour.
SST doesn’t engage if the brake pedal is depressed before the acceler\
ator pedal,
allowing vehicles to start on a steep hill and safely accelerate without\
rolling
backward.
OVERVIEW
FEATURES/OPERATIONS
SAFETY AND EMERGENCY FEATURES