2017 TESLA MODEL X battery
[x] Cancel search: batteryPage 7 of 202

2. Remove the battery by sliding it out at anangle.
3. Insert the new battery (type CR2354) withthe
Page 61 of 202

Regenerative Braking
Whenever Model X is moving and your foot is
off the accelerator, regenerative braking slows
down Model X and feeds any surplus energy
back to the Battery.
By anticipating your stops and simply
removing pressure from the accelerator to slow down, you can take advantage ofregenerative braking to increase driving range.
Of course, this is no substitute for regular braking when needed for safety.
Note: If regenerative braking is aggressively
slowing Model X, such as on a steep descent,
brake lights turn on to alert other road usersthat you are slowing down.
The Energy app displays real-time feedback on the amount of energy being gained by
regenerative braking. You can also display the
power meter on either side of the instrument panel by choosing Energy using the scroll
button on the steering wheel (see Steering
Wheel on page 42).
The amount of energy fed back to the Battery using regenerative braking can depend on the
current state of the Battery and the charge level setting that you are using. If regenerative
braking is limited, a dashed yellow line
displays on the power meter. For example,
regenerative braking may be limited if the Battery is already fully charged or if the
ambient temperature is low.
To Set the Regenerative Braking Level
You can use the touchscreen to change the
level of regenerative braking:
1. Touch Controls > Driving > Regenerative Braking.
2. Choose from two levels:
Page 116 of 202

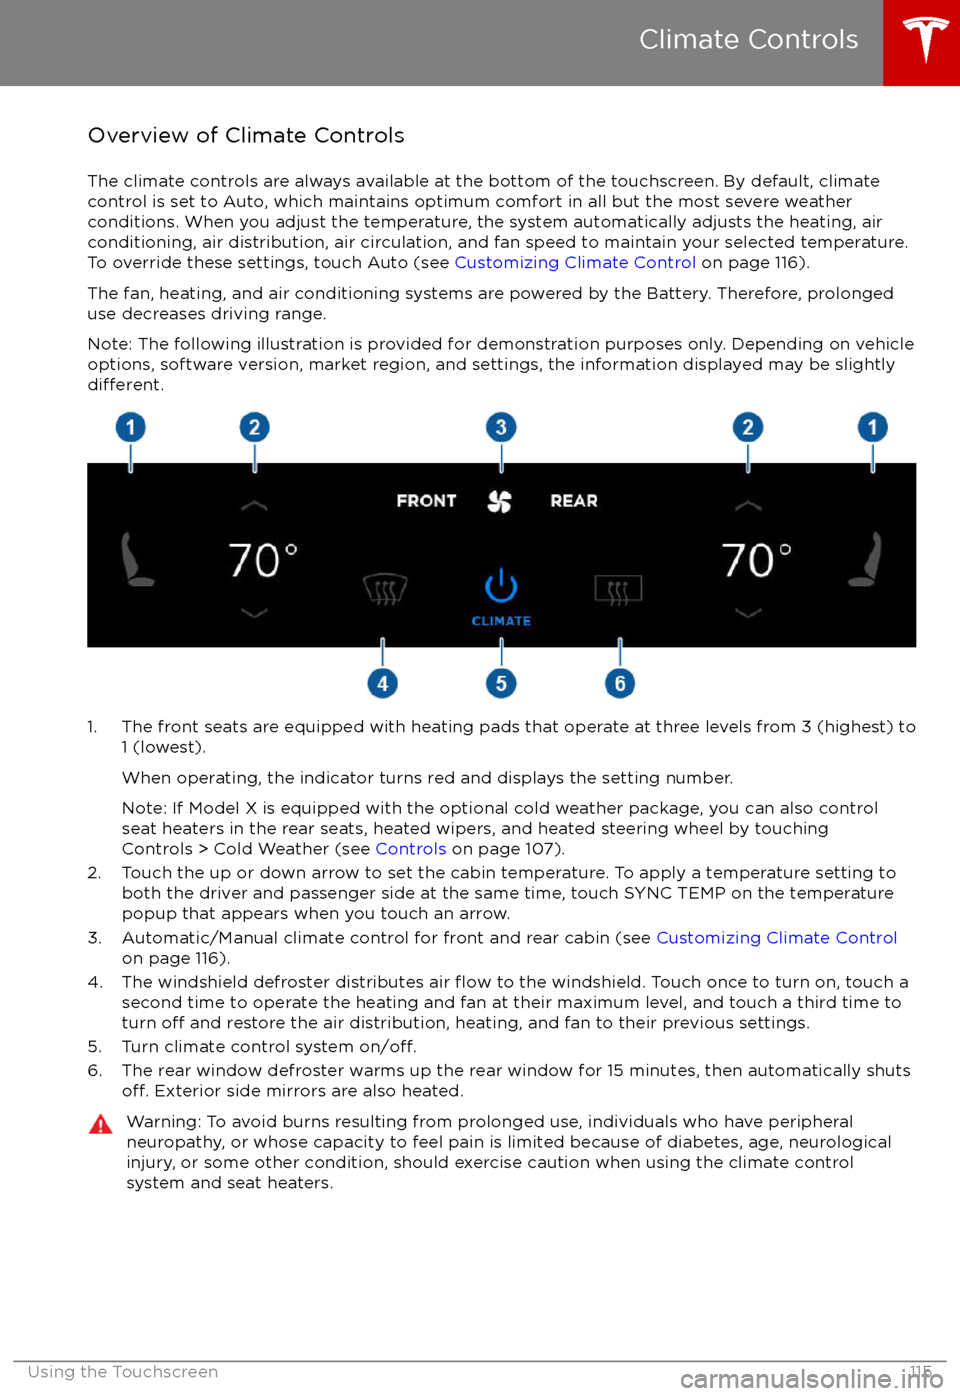
Overview of Climate Controls
The climate controls are always available at the bottom of the touchscreen. By default, climate control is set to Auto, which maintains optimum comfort in all but the most severe weather conditions. When you adjust the temperature, the system automatically adjusts the heating, air
conditioning, air distribution, air circulation, and fan speed to maintain your selected temperature. To override these settings, touch Auto (see Customizing Climate Control on page 116).
The fan, heating, and air conditioning systems are powered by the Battery. Therefore, prolonged
use decreases driving range.
Note: The following illustration is provided for demonstration purposes only. Depending on vehicle
options, software version, market region, and settings, the information displayed may be slightly
different.
1. The front seats are equipped with heating pads that operate at three levels from 3 (highest) to 1 (lowest).
When operating, the indicator turns red and displays the setting number.
Note: If Model X is equipped with the optional cold weather package, you can also control seat heaters in the rear seats, heated wipers, and heated steering wheel by touchingControls > Cold Weather (see Controls on page 107).
2. Touch the up or down arrow to set the cabin temperature. To apply a temperature setting to both the driver and passenger side at the same time, touch SYNC TEMP on the temperaturepopup that appears when you touch an arrow.
3. Automatic/Manual climate control for front and rear cabin (see Customizing Climate Control
on page 116).
4. The windshield defroster distributes air
flow to the windshield. Touch once to turn on, touch a
second time to operate the heating and fan at their maximum level, and touch a third time to
turn
off and restore the air distribution, heating, and fan to their previous settings.
5. Turn climate control system on/off.6. The rear window defroster warms up the rear window for 15 minutes, then automatically shutsoff. Exterior side mirrors are also heated.
Warning: To avoid burns resulting from prolonged use, individuals who have peripheral neuropathy, or whose capacity to feel pain is limited because of diabetes, age, neurologicalinjury, or some other condition, should exercise caution when using the climate control
system and seat heaters.
Climate Controls
Using the Touchscreen115
Page 127 of 202

USB Connections
Your Model X has two USB connections
located on the front of the center console that
you can use to connect USB devices. To play
audio
files stored on a USB drive connected to
these ports, see Playing Media from Devices
on page 124. You can also use these
connections to charge USB devices.
In addition, Model X has two charge-only USB
connections located at the rear of the center
console, and another charge-only connection located between the third row seats.
Note: You can charge four devices
simultaneously using the two ports at the
front of the center console and the two at the
rear of the console.
12V Power Socket
Your Model X has a power socket located onthe front of the center console. An additional
12V power socket is located in the rear trunk.
Power is available whenever the instrument
panel and touchscreen are on.
The 12V power sockets are suitable for
accessories requiring up to 11A continuous
draw (15A peak) or a maximum of 150
continuous watts (180 watts peak).
Note: In situations where Model X is unable to detect the key (low battery, interference, etc.),
place it immediately below the 12V power
socket in the center console where Model X
can best detect it.
Warning: The power socket and an
accessory
Page 137 of 202

About the Security System
If Model X does not detect a key nearby and a
locked door or trunk is opened, an alarm sounds and headlights and turn signals
flash.To deactivate the alarm, press any button on the key.
To manually enable or disable the alarm system, touch Controls > Settings > Safety &
Security > Alarm. When set to on, Model X activates its alarm one minute after the doors
lock and a recognized key is no longer
detected nearby.
If Model X is equipped with the optional security package, it includes a battery-backed
siren that sounds instead of the horn in
situations where a locked door or trunk is
opened and Model X does not detect a key
nearby. If the Tilt/Intrusion setting is on, the
siren also sounds if Model X detects motion inside the cabin, a window is broken, or if it is
moved or tilted (for example, with a tow truck or jack). To turn the tilt/ intrusion detectionsystems on or
off, touch Controls > Settings >
Safety & Security > Tilt/Intrusion.
Note: If you plan to leave something that
moves, such as a dog, inside your locked
Model X, remember to turn
off the tilt/
intrusion system. Any type of motion detected inside Model X activates the siren.
Note: To turn on Tilt/Intrusion, the Alarm must
be ON.
Security Settings
136Model X Owner
Page 143 of 202

High Voltage Components
1. Front Motor
2. AC Compressor
3. Forward Junction Box
4. High Voltage Cabling
5. Battery Coolant Heater
6. DC-DC Converter
7. Cabin Heater
8. Battery
9. On-board Charger
10. Charge Port
11. Rear Motor
12. HV cable to Rear HVAC Assembly
Warning: The high voltage system has no user serviceable parts. Do not disassemble, remove or replace high voltage components, cables or connectors. High voltage cables are coloredorange for easy
identification.
Warning: Read and follow all instructions provided on the labels that are attached to Model X.
These labels are there for your safety.Warning: In the unlikely event that a fire occurs, immediately contact your local fireemergency responders.
Electric Vehicle Components
142Model X Owner
Page 145 of 202

About the Battery
Model X has one of the most sophisticated
battery systems in the world. The most
important way to preserve the Battery is to LEAVE YOUR Model X PLUGGED IN when you
are not using it. This is particularly important if you are not planning to drive Model X for
several weeks. When plugged in, Model X wakes up when needed to automatically
maintain a charge level that maximizes the
lifetime of the Battery.
There is no advantage to waiting until the
Battery
Page 149 of 202

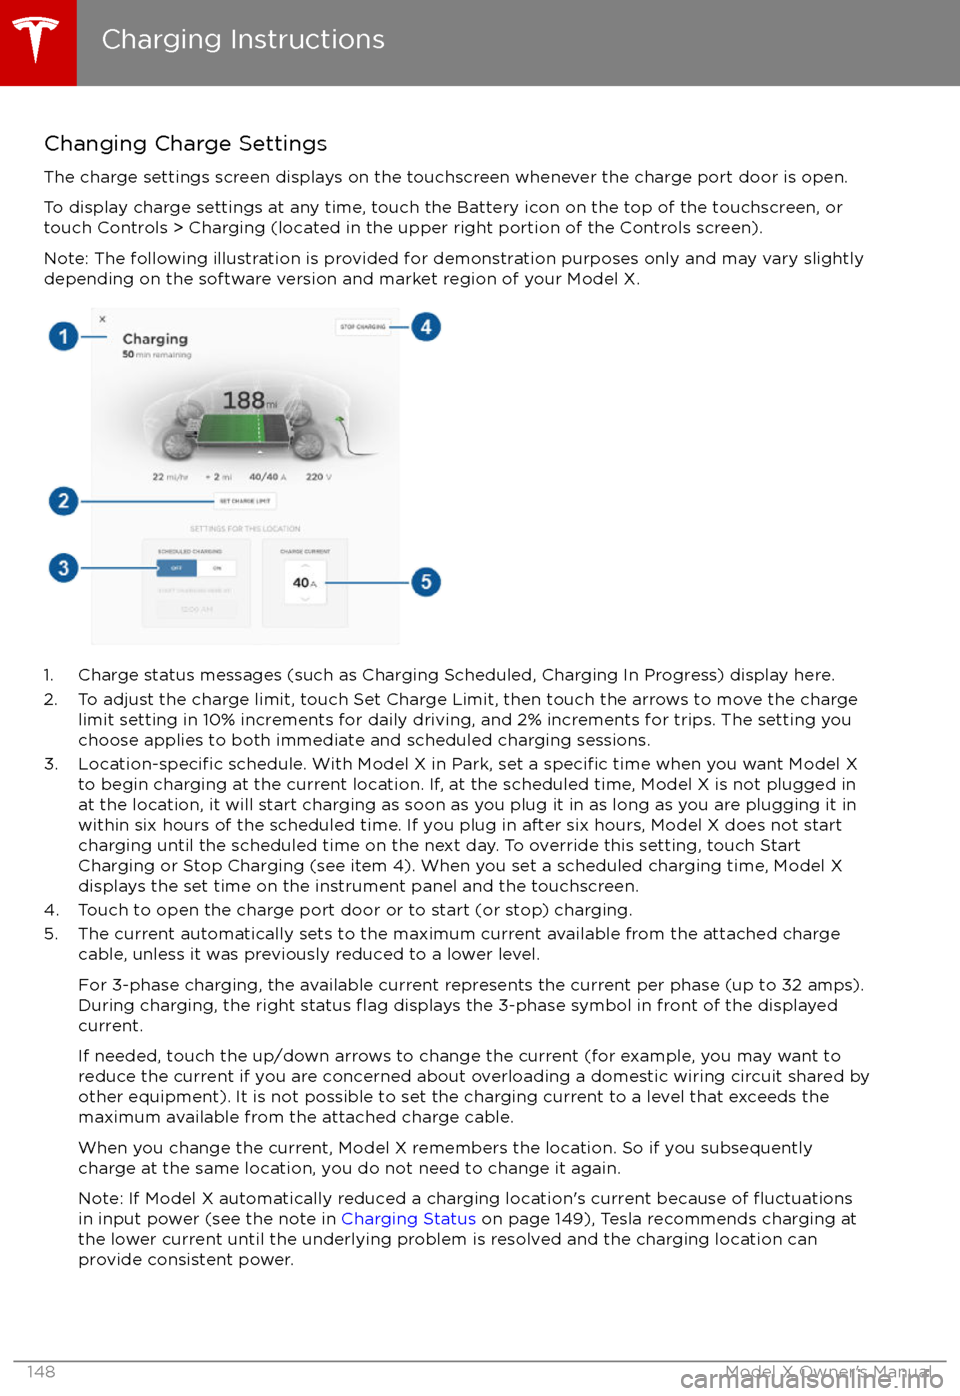
Changing Charge SettingsThe charge settings screen displays on the touchscreen whenever the charge port door is open.
To display charge settings at any time, touch the Battery icon on the top of the touchscreen, or touch Controls > Charging (located in the upper right portion of the Controls screen).
Note: The following illustration is provided for demonstration purposes only and may vary slightly
depending on the software version and market region of your Model X.
1. Charge status messages (such as Charging Scheduled, Charging In Progress) display here.
2. To adjust the charge limit, touch Set Charge Limit, then touch the arrows to move the charge limit setting in 10% increments for daily driving, and 2% increments for trips. The setting youchoose applies to both immediate and scheduled charging sessions.
3.
Location-specific schedule. With Model X in Park, set a specific time when you want Model X
to begin charging at the current location. If, at the scheduled time, Model X is not plugged in
at the location, it will start charging as soon as you plug it in as long as you are plugging it in
within six hours of the scheduled time. If you plug in after six hours, Model X does not start charging until the scheduled time on the next day. To override this setting, touch Start
Charging or Stop Charging (see item 4). When you set a scheduled charging time, Model X displays the set time on the instrument panel and the touchscreen.
4. Touch to open the charge port door or to start (or stop) charging.
5. The current automatically sets to the maximum current available from the attached charge cable, unless it was previously reduced to a lower level.
For 3-phase charging, the available current represents the current per phase (up to 32 amps).
During charging, the right status
flag displays the 3-phase symbol in front of the displayed
current.
If needed, touch the up/down arrows to change the current (for example, you may want to
reduce the current if you are concerned about overloading a domestic wiring circuit shared by other equipment). It is not possible to set the charging current to a level that exceeds themaximum available from the attached charge cable.
When you change the current, Model X remembers the location. So if you subsequently charge at the same location, you do not need to change it again.
Note: If Model X automatically reduced a charging location