2017 SUZUKI CELERIO ECO mode
[x] Cancel search: ECO modePage 114 of 201
5-18
OTHER CONTROLS AND EQUIPMENT
76MH1-74E
76MH1-74E
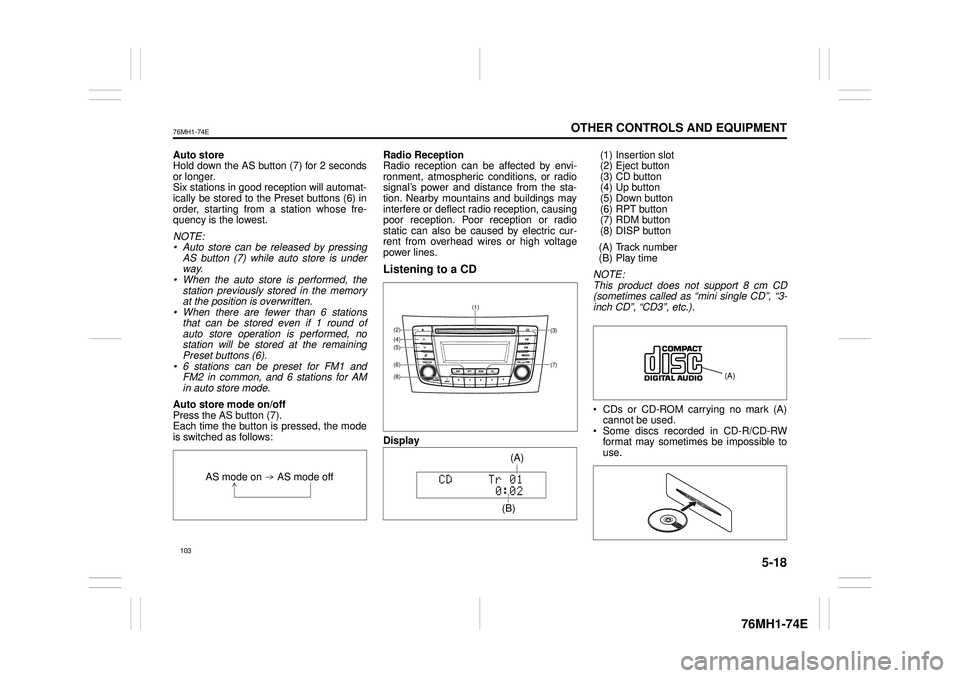
Auto store Hold down the AS button (7) for 2 seconds or longer.Six stations in good reception will automat- ically be stored to the Preset buttons (6) in order, starting from a station whose fre-quency is the lowest.
NOTE: • Auto store can be released by pressing AS button (7) while auto store is under way.• When the auto store is performed, the station previously stored in the memory at the position is overwritten.• When there are fewer than 6 stations that can be stored even if 1 round of auto store operation is performed, nostation will be stored at the remaining Preset buttons (6). • 6 stations can be preset for FM1 andFM2 in common, and 6 stations for AM in auto store mode.
Auto store mode on/off Press the AS button (7). Each time the button is pressed, the modeis switched as follows:
Radio Reception Radio reception can be affected by envi- ronment, atmospheric conditions, or radiosignal’s power and distance from the sta- tion. Nearby mountains and buildings may interfere or deflect radio reception, causingpoor reception. Poor reception or radio static can also be caused by electric cur- rent from overhead wires or high voltagepower lines.
Listening to a CD
Display
(1) Insertion slot (2) Eject button (3) CD button(4) Up button (5) Down button (6) RPT button(7) RDM button (8) DISP button
(A) Track number (B) Play time
NOTE: This product does not support 8 cm CD (sometimes called as “mini single CD”, “3-inch CD”, “CD3”, etc.).
CDs or CD-ROM carrying no mark (A) cannot be used. Some discs recorded in CD-R/CD-RWformat may sometimes be impossible to use.
AS mode on AS mode off
(7)
(3)
(8)
(6)
(5)(4)(2)
(1)
(B)
(A)
Page 115 of 201
5-19
OTHER CONTROLS AND EQUIPMENT
76MH1-74E
76MH1-74E
A CD is to be inserted with its label side up. When there is a CD already in the unit, it is impossible to insert another CD with- out ejecting the CD in the unit. Do notuse force to insert a CD into the CD insertion slot.
Loading a CD Insert a CD in the Insertion slot (1). When a CD is loaded, play starts.
Ejecting a CD Press the Eject button (2).When the ignition switch is in “LOCK” posi- tion, the CD remained ejected for around 15 seconds or longer will automatically bedrawn inside the unit. (Auto reload func- tion) The backup eject function:This function allows you to eject a CD by pressing the Eject button (2) even when the ignition switch is in “LOCK” position.
Listening to a CD When a CD is inserted, playback will auto- matically start. When a CD is already inside the unit,press the CD button (3) to start playback.
Selecting a track Press the Up button (4) to listen to the next track. Press the Down button (5) twice to listento the previous track. When the Down button (5) is pressed once, the track currently being playedwill start from the beginning again.
Fast forwarding/Rewinding a track Hold down the Up button (4) to fast for- ward the track. Hold down the Down button (5) to fastrewind the track.
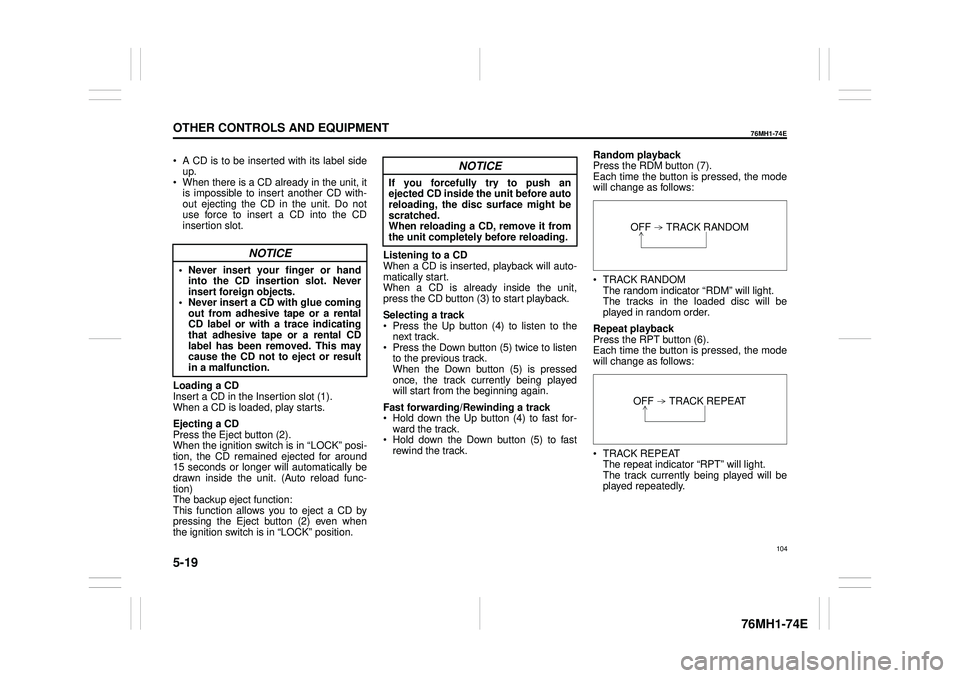
Random playback Press the RDM button (7). Each time the button is pressed, the modewill change as follows:
TRACK RANDOM The random indicator “RDM” will light.The tracks in the loaded disc will be played in random order.
Repeat playback Press the RPT button (6). Each time the button is pressed, the mode will change as follows:
TRACK REPEAT The repeat indicator “RPT” will light. The track currently being played will be played repeatedly.
NOTICE
• Never insert your finger or handinto the CD insertion slot. Neverinsert foreign objects. • Never insert a CD with glue coming out from adhesive tape or a rentalCD label or with a trace indicating that adhesive tape or a rental CD label has been removed. This maycause the CD not to eject or result in a malfunction.
NOTICE
If you forcefully try to push an ejected CD inside the unit before autoreloading, the disc surface might be scratched. When reloading a CD, remove it fromthe unit completely before reloading.OFF TRACK RANDOM
OFF TRACK REPEAT
104
Page 116 of 201
5-20
OTHER CONTROLS AND EQUIPMENT
76MH1-74E
76MH1-74E
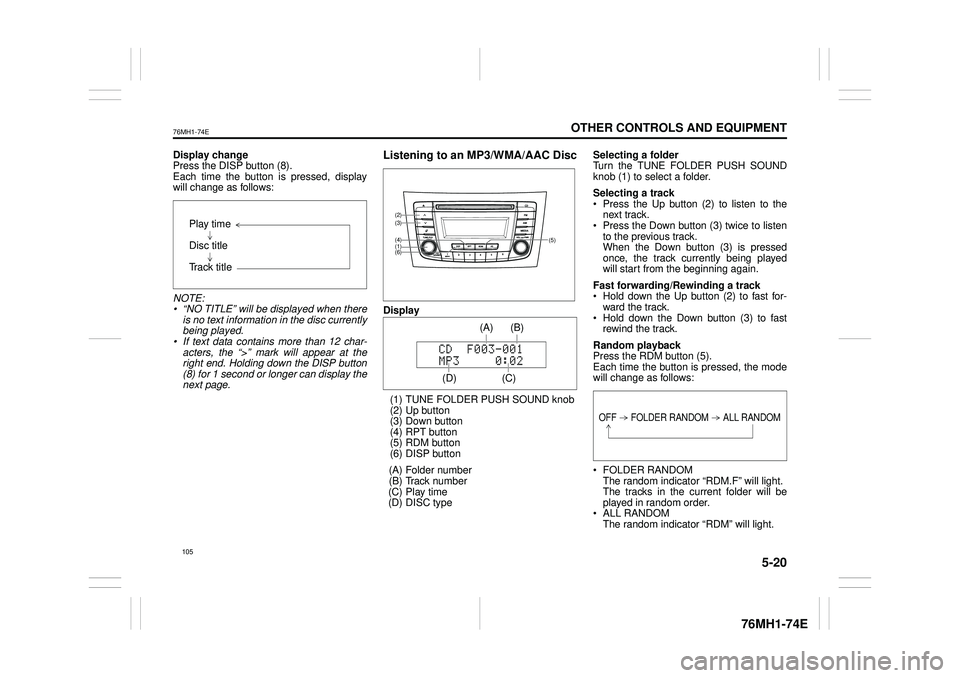
Display change Press the DISP button (8). Each time the button is pressed, displaywill change as follows:
NOTE: • “NO TITLE” will be displayed when there is no text information in the disc currently being played. • If text data contains more than 12 char- acters, the “>” mark will appear at theright end. Holding down the DISP button (8) for 1 second or longer can display the next page.
Listening to an MP3/WMA/AAC Disc
Display
(1) TUNE FOLDER PUSH SOUND knob (2) Up button (3) Down button (4) RPT button(5) RDM button (6) DISP button
(A) Folder number (B) Track number (C) Play time(D) DISC type
Selecting a folder Turn the TUNE FOLDER PUSH SOUND knob (1) to select a folder.
Selecting a track Press the Up button (2) to listen to thenext track. Press the Down button (3) twice to listen to the previous track.When the Down button (3) is pressed once, the track currently being played will start from the beginning again.
Fast forwarding/Rewinding a track Hold down the Up button (2) to fast for-ward the track. Hold down the Down button (3) to fast rewind the track.
Random playback Press the RDM button (5).Each time the button is pressed, the mode will change as follows:
FOLDER RANDOM The random indicator “RDM.F” will light. The tracks in the current folder will beplayed in random order. ALL RANDOM The random indicator “RDM” will light.
Play time
Disc title
Track title
(5)
(6)
(4)
(3)
(1)
(2)
(C)
(B) (A)
(D)
105
Page 117 of 201
5-21
OTHER CONTROLS AND EQUIPMENT
76MH1-74E
76MH1-74E
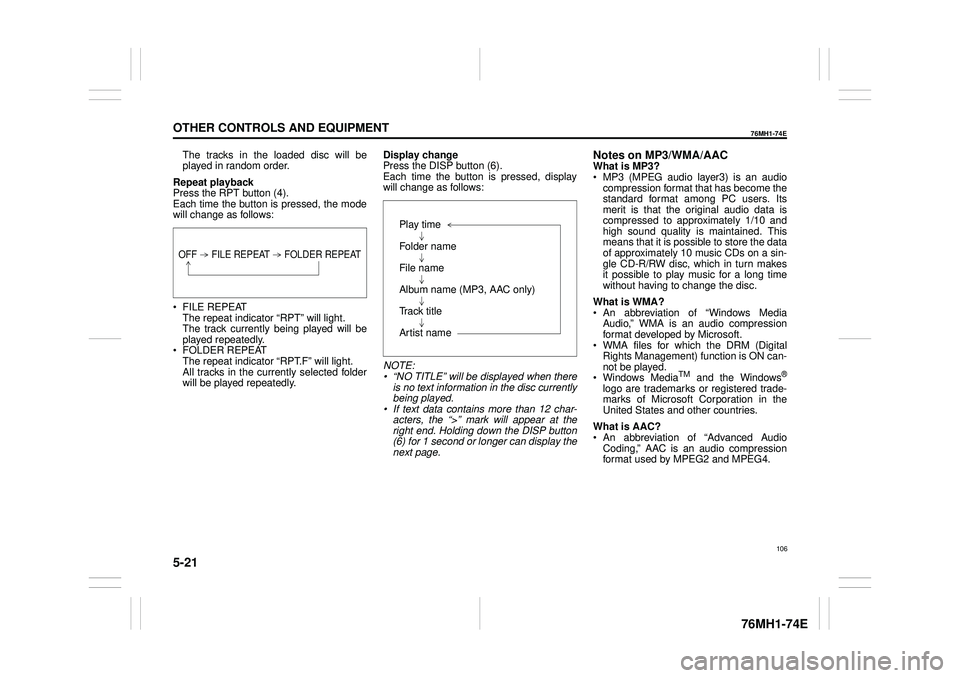
The tracks in the loaded disc will be played in random order.
Repeat playback Press the RPT button (4). Each time the button is pressed, the modewill change as follows:
FILE REPEAT The repeat indicator “RPT” will light.The track currently being played will be played repeatedly. FOLDER REPEAT The repeat indicator “RPT.F” will light. All tracks in the currently selected folderwill be played repeatedly.
Display change Press the DISP button (6). Each time the button is pressed, displaywill change as follows:
NOTE: • “NO TITLE” will be displayed when there is no text information in the disc currently being played.• If text data contains more than 12 char- acters, the “>” mark will appear at the right end. Holding down the DISP button(6) for 1 second or longer can display the next page.
Notes on MP3/WMA/AACWhat is MP3? MP3 (MPEG audio layer3) is an audio compression format that has become the standard format among PC users. Itsmerit is that the original audio data is compressed to approximately 1/10 and high sound quality is maintained. Thismeans that it is possible to store the data of approximately 10 music CDs on a sin- gle CD-R/RW disc, which in turn makesit possible to play music for a long time without having to change the disc.
What is WMA? An abbreviation of “Windows Media Audio,” WMA is an audio compressionformat developed by Microsoft. WMA files for which the DRM (Digital Rights Management) function is ON can-not be played. Windows MediaTM and the Windows®
logo are trademarks or registered trade- marks of Microsoft Corporation in the United States and other countries.
What is AAC? An abbreviation of “Advanced Audio Coding,” AAC is an audio compressionformat used by MPEG2 and MPEG4.
OFF FILE REPEAT FOLDER REPEAT
Play time
Folder name
File name
Album name (MP3, AAC only)
Track title
Artist name
106
Page 118 of 201
5-22
OTHER CONTROLS AND EQUIPMENT
76MH1-74E
76MH1-74E
Points to remember when making MP3/ WMA/AAC files Common High bit rate and high sampling fre- quency are recommended for high qual- ity sounds. Selecting VBR (Variable Bit Rate) is not recommended. Selecting VBR may cause display of in correct playing time and jumpiness of playback. Playback sound quality varies depending on the encoding environment. Fordetails, refer to the user manual of the encoding software and the writing soft- ware in use.
Recording MP3/WMA/ AAC files on a CD media It is recommended not to write both CD- DA files and MP3/WMA/AAC files on adisc. If both CD-DA files and MP3/WMA/AAC files are on the same disc, tracks maynot be played in the correct order or some tracks may not be played at all.
When storing both MP3 data and WMA data on the same disc, sort and place them in different folders. Do not write files other than MP3/WMA/ AAC files and unnecessary folders on a disc. MP3/WMA/AAC files should be named to meet the standards and the file sys- tem specifications as shown below. The file extension “.mp3”, “.wma” or “.m4a” should be assigned to files based on their format independently. You may encounter a trouble in playing MP3/WMA/AAC files or displaying infor- mation of MP3/WMA/AAC files depend-ing on the writing software or CD recorder in use. This unit does not have a play list func-tion. It is recommended to write discs in Disc- at-Once mode even though Multi-ses-sion mode is supported.
Compression formats MP3 Bit rate: MPEG1 Audio Layer III: 32 k - 320 kbpsMPEG2 Audio Layer III: 8 k - 160 kbps MPEG2.5 Audio Layer III: 8 k - 160 kbps Sampling frequency: MPEG1 Audio Layer III: 32 k/44.1 k/ 48 kHz MPEG2 Audio Layer III: 16 k/22.05 k/24 kHz MPEG2.5 Audio Layer III: 8 k/11.025 k/ 12 kHz
WMA (Ver. 7, Ver. 8, Ver. 9*) Bit rate: CBR 32 k - 320 kbps Sampling frequency: 32 k/44.1 k/48 kHz* WMA 9 Professional/LossLess/Voice are not supported.
AAC* Bit rate: ABR 16k - 320 kbbs Sampling frequency: 32 k/44.1 k/48 kHz* Apple Lossless is not supported.
Supported file systems ISO 9660 Level 1/Level 2, Joliet, Romeo
Maximum number of files/folders Maximum number of files: 512 Maximum number of files in a folder: 255 Maximum depth of tree structure: 8 Maximum number of folders: 255 (Root folder is included.)
NOTICE
Never assign the “.mp3”, “.wma”, or “.m4a” file name extension to a file ifit is not in th e MP3/WMA/AAC format file. Failure to observe this may result in damage to the speaker due tonoise production.
107
Page 122 of 201

5-26
OTHER CONTROLS AND EQUIPMENT
76MH1-74E
76MH1-74E
Display change Press the DISP button (7). Each time the button is pressed, displaywill change as follows:
NOTE: If text data contains more than 12 charac- ters, the “>” mark will appear at the right end. Holding down the DISP button (7) for1 second or longer can display the next page.
Playing Mode selection 1) Press the button numbered [6] of the Preset buttons (8) for 1 second or lon-ger. 2) Turn the TUNE FOLDER PUSH SOUND knob (2).Each time the knob is turned, the mode will change as follows:
3) Press the TUNE FOLDER PUSH SOUND knob (2) to select the desired mode.
NOTE: • When the button numbered [6] of thePreset buttons (8) is pressed, the previ- ous mode will be displayed.
Notes on iPod®
Supported iPod®
® touch (5th generation)® touch (4rd generation) ® touch (3rd generation)® touch (2nd generation) ® touch (1st generation) ® classic® nano (7th generation) ® nano (6th generation) ® nano (5th generation)® nano (4th generation) ® nano (3rd generation) ® nano (2nd generation)® nano (1st generation) ® (5th generation) iPhone® 5 iPhone® 4S iPhone® 4 iPhone® 3GS iPhone® 3G iPhone®
* Some functions may not be available depending on the model of iPod®. *iPod® is a trademark of Apple Inc., regis- tered in the U.S. and other countries.* iPhone® is a trademark of Apple Inc., registered in the U.S. and other coun- tries.* Apple is not responsible for the operation of this device or its compliance with safety and regulatory standards.
Playlist name /Track title (Playlist mode only)
Artist name / Track title
Album name / Track title
Track title / Play time
PLAYLIST
ARTIST
ALBUM
SONGS
GENRE
111
Page 123 of 201

5-27
OTHER CONTROLS AND EQUIPMENT
76MH1-74E
76MH1-74E
iPod® connection Make sure to detach the iPod® after pressing the engine switch to change theignition switch is in “LOCK” position. The iPod® may not be shut down when it is being connected and may result in bat-tery depletion. Please do not connect iPod® accesso- ries such as an iPod® remote control orheadphones while connecting the iPod®
with the unit. The unit may not operatecorrectly.
AUX Function
(1) MEDIA button
AUX connection To listen to auxiliary audio sources (sold separately) through the unit, follow theinstruction below. 1) Connect the auxiliary audio source to the AUX/USB socket (separatelyattached) with an AUX cable.
2) Press the MEDIA button (1). Each time the button is pressed, the mode will change as follows:
NOTE: • Please consult your place of purchasefor details about whether a given auxil- iary audio source can be connected and the proper auxiliary cord to use.• The volume and tone controls of the auxiliary audio source can be adjusted on the unit.• In AUX mode, the volume setting is dif- ferent from another mode.
Bluetooth® Hands-Free (if
equipped)
(1) TUNE FOLDER PUSH SOUND knob (2) VOL PUSH POWER knob(3) Preset buttons
Steering switch
(1)
CAUTION
• Before connection, mute the unit, and also keep the volume of the auxiliary audio source within arange that will not cause distortion. • When the audio source is turned off, noise may be emitted. Be sureto turn off the unit or switch to another mode before turning off the audio source.
USB (iPod®) (if equipped)
Bluetooth® audio (if equipped)
AUX (if equipped)(2)(1)
(3)
(4)
(5)
(6)
112
Page 133 of 201

5-37
OTHER CONTROLS AND EQUIPMENT
76MH1-74E
76MH1-74E
NOTE: When selecting “Go Back”, the previous menu will be displayed.
Deletion of audio device information (Delete Audio)Follow the instructions below to delete the registered information of audio device. 1) Press the Bluetooth® setup button (6). The Bluetooth® setup menu will be dis- played. 2) Turn the TUNE FOLDER PUSHSOUND knob (2) to select “Setup Blue- tooth”, and press the knob (2) to deter- mine the selection.3) Turn the TUNE FOLDER PUSH SOUND knob (2) to select “List Audio”, and press the knob (2) to determine theselection. 4) Turn the TUNE FOLDER PUSH SOUND knob (2) to select an audiodevice to be deleted, and press the knob (2) to determine the selection. 5) Turn the TUNE FOLDER PUSHSOUND knob (2) to select “Delete”, and press the knob (2) to determine the selection.6) Turn the TUNE FOLDER PUSH SOUND knob (2) to select “Delete?”, and press the knob (2) to determine theselection. 7) Turn the TUNE FOLDER PUSH SOUND knob (2) to select “Confirm”,and press the knob (2) to complete the deletion.
NOTE: When selecting “Go Back”, the previous menu will be displayed.
Disclaimer for Bluetooth® function Depending on the mobile phone models, some phones may not be compatible fully or partially (some function may berestricted). Connectivity or voice quality may get affected depending on circumstances. After the ignition switch is turned to the “ON” position, the audio system takes few seconds to detect and connect to theBluetooth® device (if already paired). Make sure that you are aware of all applicable local laws and accordinglyuse Bluetooth device.
Remote Audio Controls
(if equipped)Controlling of basic functions of the audio system is available us ing the switches on the steering wheel.
Adjusting the volume To increase the volume, hold down “+” of the VOL switch (1). The volume will keepon being increased until the switch is released. To decrease the volume, hold down “-” ofthe VOL switch (1). The volume will keep on being decreased until the switch is released. To mute the sound, press the switch (2).
Selecting the mode Press the switch (3). Each time the button is pressed, the mode will change as follows:
It is possible to turn on the audio system by pressing the switch (3).
(2)(3)
(1) (4)
FM1 (Radio)
FM2 (Radio)
CD
Bluetooth® audio (if equipped)
AUX (if equipped)
USB (iPod®) (if equipped)
AM (Radio)
122