2017 SUBARU LEGACY wheel
[x] Cancel search: wheelPage 179 of 610

Instruments and controls/Warning and indicator lights
.The steering wheel remains in the
fully turned position for a long period
of time.
At this time, there will be more resis-
tance when steering. However this is
not a malfunction. Normal steering
force will be restored after the steering
wheel is not operated for a while and
the power steering control system has
an opportunity to cool down. However,
if the power steering is operated in a
non-standard way which causes power
assist limitation to occur too fre-
quently, that may result in a malfunc-
tion of the power steering control
system.
&Vehicle Dynamics
Control warning light/
Vehicle Dynamics Con-
trol operation indicator
light
! Vehicle Dynamics Control warning
light
CAUTION
The Vehicle Dynamics Control sys-
tem provides its ABS control
through the electrical circuit of the ABS. Accordingly, if the ABS is
inoperative, the Vehicle Dynamics
Control system becomes unable to
provide ABS control. As a result, the
Vehicle Dynamics Control system
becomes inoperative, causing the
warning light to illuminate. Although
both the Vehicle Dynamics Control
and ABS are inoperative in this
case, the ordinary functions of the
brake system are still available. You
will be safe while driving in this
condition, but drive carefully and
have your vehicle checked at a
SUBARU dealer as soon as possi-
ble.
NOTE
.
If the electrical circuit of the Vehicle
Dynamics Control system itself mal-
functions, the warning light only illumi-
nates. At this time, the ABS (Anti-lock
Brake System) remains fully opera-
tional.
. The warning light illuminates when
the electronic control system of the
ABS/Vehicle Dynamics Control system
malfunctions.
The Vehicle Dynamics Control system is
probably inoperative under any of the
following conditions. Have your vehicle checked at a SUBARU dealer immedi-
ately.
.
The warning light does not illuminate
when the ignition switch is turned to the
“ON ”position.
. The warning light illuminates while the
vehicle is running.
NOTE
If the warning light behavior is as
described in the following examples,
the Vehicle Dynamics Control system
may be considered normal.
. The warning light illuminates right
after the engine is started but turns off
immediately and remains off.
. The warning light illuminates after
the engine has started and turns off
while the vehicle is subsequently being
driven.
. The warning light illuminates during
driving, but turns off immediately and
remains off.
! Vehicle Dynamics Control opera-
tion indicator light
The indicator light flashes during activa-
tion of the skid suppression function and
during activation of the traction control
function.
3-24
Page 180 of 610

NOTE
.The light may remain illuminated for
a short period of time after the engine
has been started, especially in cold
weather. This does not indicate the
existence of a problem. The light
should turn off as soon as the engine
has warmed up.
. The indicator light illuminates when
the engine has developed a problem
and the CHECK ENGINE warning light/
malfunction indicator light is on.
The Vehicle Dynamics Control system is
probably malfunctioning under the follow-
ing condition. Have your vehicle checked
at a SUBARU dealer as soon as possible.
. The light does not turn off even after
the lapse of several minutes (the engine
has warmed up) after the engine has
started.
&Vehicle Dynamics
Control OFF indicator
light
The light illuminates when the Vehicle
Dynamics Control OFF switch is pressed
to deactivate the Vehicle Dynamics Con-
trol system.
The Vehicle Dynamics Control system is
probably malfunctioning under any of the
following conditions. Have your vehicle checked at a SUBARU dealer immedi-
ately.
.
The light does not illuminate when the
ignition switch is turned to the “ON ”
position.
. The light does not turn off even after a
period of approximately 2 seconds after
the ignition switch has been turned to the
“ON ”position.
& Warning chimes and warning
indicator of the keyless ac-
cess with push-button start
system (if equipped)
Access key warning indicator
The keyless access with push-button start
system is equipped with a warning chime
and the access key warning indicator in order to minimize improper operations and
help protect your vehicle from theft.
When the warning chime sounds and/or
the warning indicator appears, take the
appropriate action.
You cannot turn the warning chimes off.
However, the volume setting of the outside
warning chime can be changed by a
SUBARU dealer. Consult your SUBARU
dealer for details.
WARNING
Never drive the vehicle if the indi-
cator on the push-button ignition
switch is flashing in green when
starting the engine. This indicates
the status that the steering wheel is
not released and could result in an
accident involving serious injury or
death.
CAUTION
.
When starting the engine again
after the operation indicator on
the push-button ignition switch
flashes in green, if the operation
indicator is still flashing in green,
there could be a steering lock
malfunction. Contact your
Instruments and controls/Warning and indicator lights
–CONTINUED –3-25
Page 184 of 610
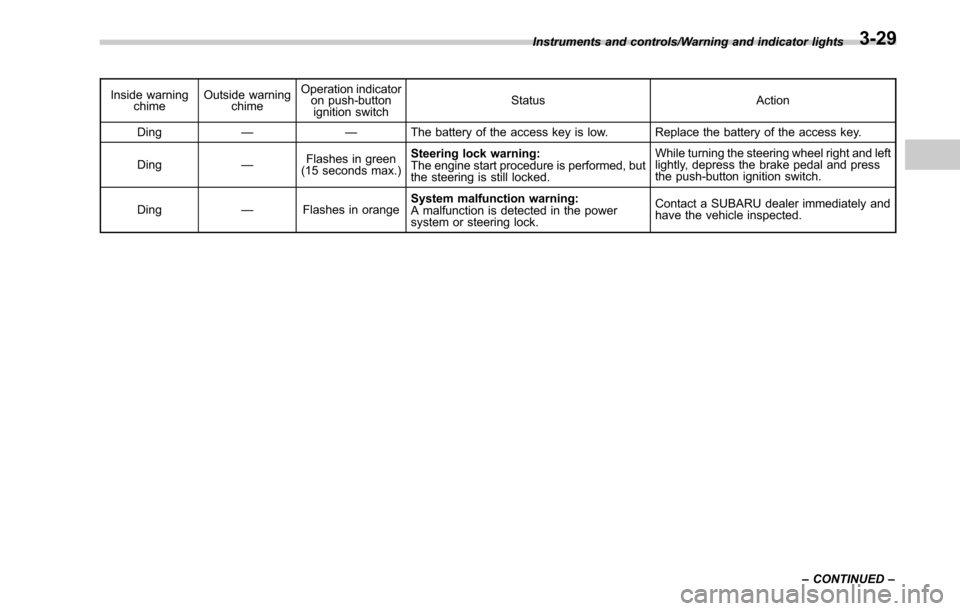
Inside warningchime Outside warning
chime Operation indicator
on push-button
ignition switch Status Action
Ding —— The battery of the access key is low. Replace the battery of the access key.
Ding —Flashes in green
(15 seconds max.) Steering lock warning:
The engine start procedure is performed, but
the steering is still locked. While turning the steering wheel right and left
lightly, depress the brake pedal and press
the push-button ignition switch.
Ding —Flashes in orange System malfunction warning:
A malfunction is detected in the power
system or steering lock. Contact a SUBARU dealer immediately and
have the vehicle inspected.
Instruments and controls/Warning and indicator lights
–CONTINUED –
3-29
Page 192 of 610
as vehicle information, warning informa-
tion, etc., they will interrupt the current
screen, and appear on the display accom-
panied by a beep. If such a screen is
displayed, take proper action according to
the message shown on the screen.
The warning screen will return to the
original screen after a few seconds. While
the“
”information reminder is shown on
the display, it may be possible to display
the warning screen again. To recall the
message marked with “
”on the display,
pull the “/SET”switch on the steering
wheel toward you.
& Welcome screen and Good-
bye screen
When the driver ’s door is opened and
closed after unlocking the door, the
welcome screen will appear on the multi
information display for approximately 20
seconds.
When the ignition switch is turned to the
“LOCK”/ “OFF ”position, the multi informa-
tion display gradually turns off (Good-bye
screen).
NOTE
. The basic screen will be shown
when the ignition switch is turned to
the “ON ”position while the welcome screen is displayed.
.
Once the welcome screen appears,
it takes a certain period of time to
display it again.
. If the ignition switch is operated
after unlocking the driver ’s door, the
welcome screen will not appear even
when the driver ’s door is opened and
closed.
. The welcome screen will disappear
when you lock the driver ’s door by
using the remote keyless entry system
(all models) or the keyless access
function (if equipped) while the wel-
come screen is displayed.
. If any of the doors (including the
rear gate) is opened while the welcome
screen is displayed, the door ajar
warning will appear.
. The welcome screen can be set to
on or off. For details, refer to “Welcome
Screen ”F 3-44.
. The Good-bye screen can be set to
on or off. For details, refer to “Good-
bye Screen ”F 3-44.
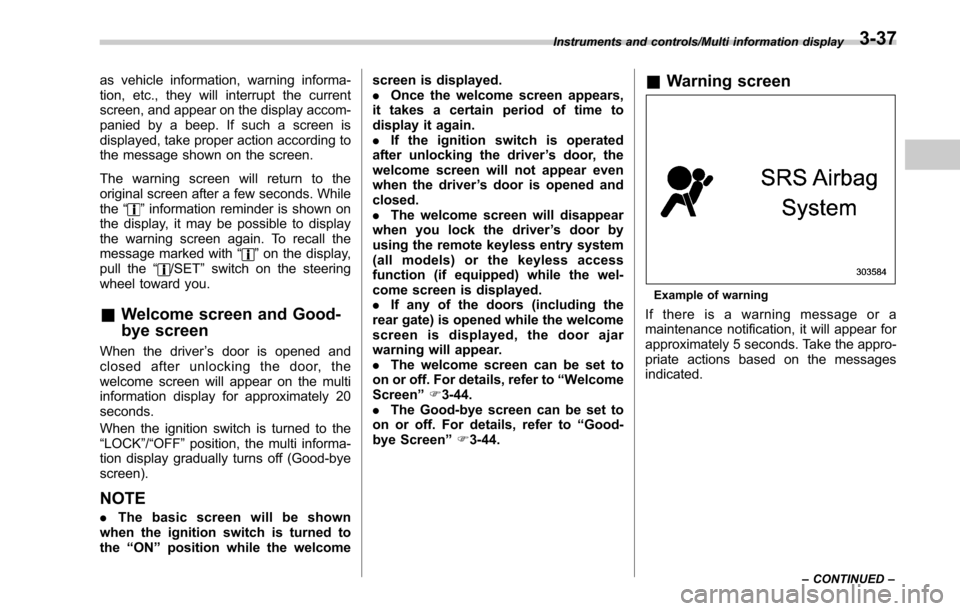
& Warning screen
Example of warning
If there is a warning message or a
maintenance notification, it will appear for
approximately 5 seconds. Take the appro-
priate actions based on the messages
indicated.
Instruments and controls/Multi information display
–CONTINUED –3-37
Page 193 of 610
Instruments and controls/Multi information display
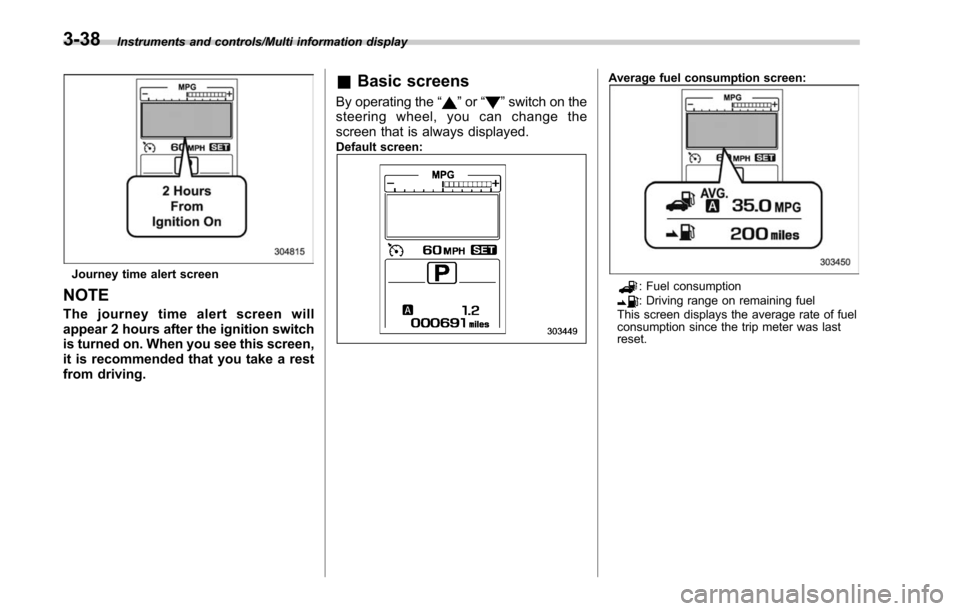
Journey time alert screen
NOTE
The journey time alert screen will
appear 2 hours after the ignition switch
is turned on. When you see this screen,
it is recommended that you take a rest
from driving.
&Basic screens
By operating the “”or “”switch on the
steering wheel, you can change the
screen that is always displayed.
Default screen:
Average fuel consumption screen:
: Fuel consumption: Driving range on remaining fuel
This screen displays the average rate of fuel
consumption since the trip meter was last
reset.
3-38
Page 196 of 610
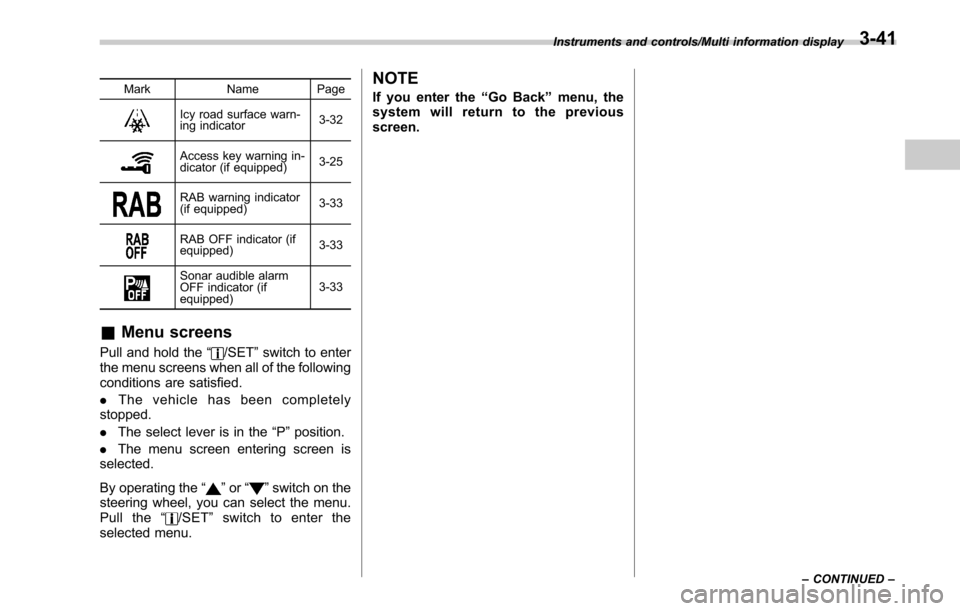
MarkName Page
Icy road surface warn-
ing indicator 3-32
Access key warning in-
dicator (if equipped)3-25
RAB warning indicator
(if equipped)
3-33
RAB OFF indicator (if
equipped)3-33
Sonar audible alarm
OFF indicator (if
equipped)3-33
&
Menu screens
Pull and hold the “/SET”switch to enter
the menu screens when all of the following
conditions are satisfied.
. The vehicle has been completely
stopped.
. The select lever is in the “P”position.
. The menu screen entering screen is
selected.
By operating the “
”or “”switch on the
steering wheel, you can select the menu.
Pull the “
/SET”switch to enter the
selected menu.
NOTE
If you enter the “Go Back ”menu, the
system will return to the previous
screen.
Instruments and controls/Multi information display
–CONTINUED –3-41
Page 199 of 610

Instruments and controls/Multi information display
!Screen Settings
After entering the “Screen Settings”menu,
select one of the following menus.
!Welcome Screen
The welcome screen can be activated or
deactivated. Select “On (with Sound)”to
activate the screen and sound. Select “On
(without Sound) ”to activate the screen
and deactivate the sound. Select “Off”to
deactivate the screen.
!Good-bye Screen
The Good-bye screen can be activated or
deactivated. Select “On”to activate the
screen. Select “Off ”to deactivate the
screen.
!Gauge Initial Movement
The movement of the meter needles and
gauge needles that occurs when the
ignition switch is turned to the “ON ”
position can be activated or deactivated.
Select “On”to activate. Select “Off”to
deactivate.
!Gear Position Indicator Settings
(MT models)
The gear position indicator light can be
activated or deactivated. Select “On”to
activate. Select “Off”to deactivate. !
Units
You can select the displayed units of the
distance, vehicle speed and volume.
Operate the “
”or “”switch on the
steering wheel to display the preferred
units. Then pull the “
/SET”switch to
select the displayed units.
!Languages
Operate the “
”or “”switch on the
steering wheel to display the preferred
language. Then pull the “
/SET”switch to
select the displayed language.
! Combination Meter Illumination (if
equipped)
After entering the “Combination Meter
Illumination ”menu, select the following
menu.
!Meter Ring Illumination
The illumination of the combination meter
rings can be activated or deactivated.
Select “On ”to activate the illumination.
Select “Off”to deactivate the illumination.
! EyeSight (models with EyeSight
system)
NOTE
For models with the EyeSight system,
refer to the Owner ’s Manual supple-
ment for the EyeSight system. After entering the
“EyeSight ”menu, select
one of the following menus.
!Warning Volume
The volume of the warning buzzer that
sounds when the EyeSight system is in
use can be set in 3 stages (“Max ”,“Mid ”
and “Min”).
! Lead Vehicle Acquisition Sound
When adaptive cruise control is used, the
buzzer that sounds under any of the
following conditions can be activated or
deactivated.
. A vehicle is detected in front
. Detection is not possible
Select “On”to activate the buzzer. Select
“Off ”to deactivate the buzzer.
! Lead Vehicle Moving Monitor
Function
When the lead vehicle moving monitor
function is operated, the buzzer that
sounds if a vehicle in front has started
can be activated or deactivated. Select
“On ”to activate the buzzer. Select “Off”to
deactivate the buzzer.
!Vehicle Icon
The vehicle icon indication can be acti-
vated or deactivated. Select “On ”to
activate. Select “Off”to deactivate.
3-44
Page 237 of 610
Instruments and controls/Tilt/telescopic steering wheel
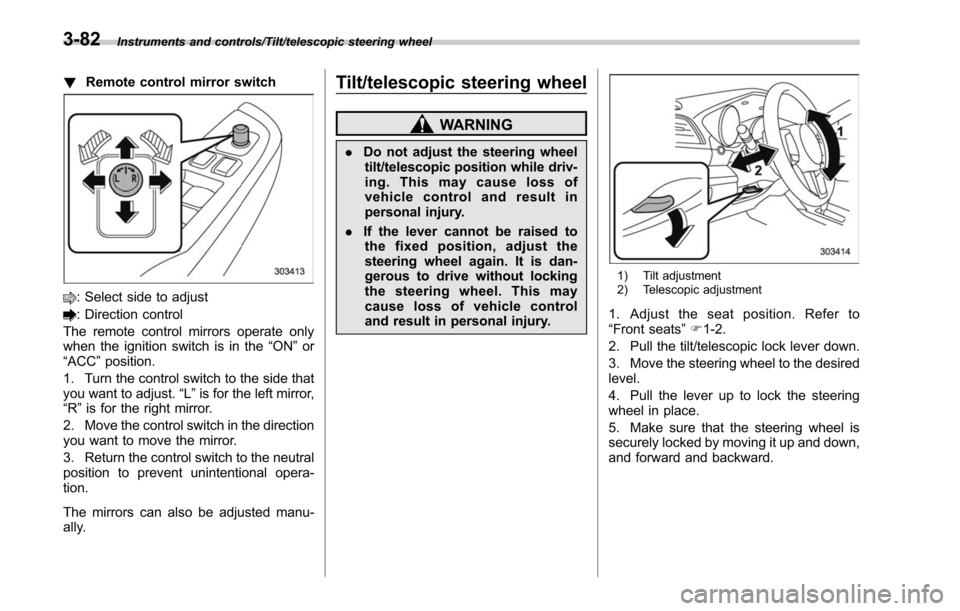
!Remote control mirror switch
: Select side to adjust
: Direction control
The remote control mirrors operate only
when the ignition switch is in the “ON”or
“ACC ”position.
1. Turn the control switch to the side that
you want to adjust. “L”is for the left mirror,
“R ”is for the right mirror.
2. Move the control switch in the direction
you want to move the mirror.
3. Return the control switch to the neutral
position to prevent unintentional opera-
tion.
The mirrors can also be adjusted manu-
ally.
Tilt/telescopic steering wheel
WARNING
. Do not adjust the steering wheel
tilt/telescopic position while driv-
ing. This may cause loss of
vehicle control and result in
personal injury.
. If the lever cannot be raised to
the fixed position, adjust the
steering wheel again. It is dan-
gerous to drive without locking
the steering wheel. This may
cause loss of vehicle control
and result in personal injury.
1) Tilt adjustment
2) Telescopic adjustment
1. Adjust the seat position. Refer to
“Front seats ”F 1-2.
2. Pull the tilt/telescopic lock lever down.
3. Move the steering wheel to the desired
level.
4. Pull the lever up to lock the steering
wheel in place.
5. Make sure that the steering wheel is
securely locked by moving it up and down,
and forward and backward.
3-82